Introduction
- This room focuses on
post-exploitationenumeration. - In other words, we assume that we have successfully gained some form of access to a system.
- Moreover, we may have carried out privilege escalation; in other words, we might have administrator or root privileges on the target system.
Some of the techniques and tools discussed in this room would still provide helpful output even with an unprivileged account, (i.e., not root or administrator).
- Our purpose is to collect more information that will aid us in gaining more access to the target network.
Example: Finding the login credentials to grant access to another system.
- We focus on tools commonly available on standard systems to collect more information about the target. (Living off the land)
- Being part of the system, such tools look innocuous and cause the least amount of “
noise”. - We assume you have access to a command-line interface on the target, such as
bashon a Linux system orcmd.exeon an MS Windows system. - Starting with one type of shell on a Linux system, it is usually easy to switch to another one.
- Similarly, starting from
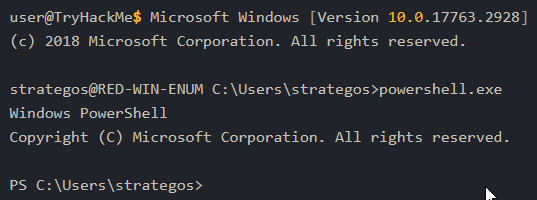
cmd.exe, you can switch toPowerShellif available. - We just issued the command
powershell.exeto start thePowerShellinteractive command line in the terminal below.
Flow of this room:
- Purpose of enumeration
- Linux enumeration with commonly-installed tools: Systems, users networking and running services.
- MS Windows enumeration with built-in tools: System, users, networking and running services.
- Example of additional tools:
Seatbelt
Purpose
- When you gain a
"shell"on the target system, you usually have very basic knowledge of the system. - If it is a server, you already know which service you have exploited; however, you don’t necessarily know other details, such as usernames or network shares.
- Consequently, the shell will look like a “
dark room” where you have an incomplete and vague knowledge of what’s around you. In this sense, enumeration helps you build a more complete and accurate picture.
- The purpose behind post-exploitation enumeration is to gather as much information about the system and its network.
- The exploited system might be a company desktop/laptop or a server.
- We aim to collect the information that would allow us to pivot to other systems on the network or to loot the current system.
Information we are interested in enumerating;
1
2
3
4
5
6
7
8
9
10

- Users and Groups
- Hostnames
- Routing Tables
- Network Shares
- Network Services
- Apps and Banners
- Firewall Configurations
- Service settings and audit configurations
- SNMP and DNS details
- Hunting for credentials (saved on web browsers or client apps)
- There is no way to list everything we might stumble upon.
- For instance, we might find SSH keys that might grant us access to other systems.
- In SSH key-based authentication, we generate an SSH key-pair(public and private keys); the public key is installed on a server.
- Consequently, the server would trust any system that can prove knowledge of the related private key.
Linux Enumeration
- This task focuses on enumerating a Linux machine after accessing a shell, such as
bash. -
Although some commands provide information on more than one area, we tried to group the commands into four categories depending on the information we expect to acquire:
1
2
3
4

  - System
  - Users
  - Networking
  - Running Services
System
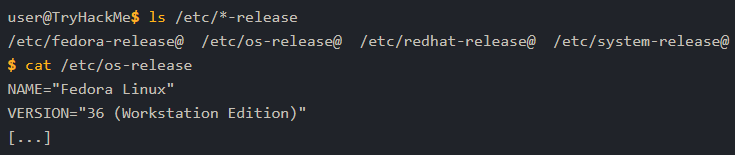
Checking Linux distro and release version
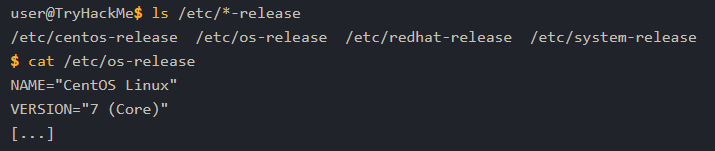
- On a Linux system, we can get more info about the Linux distro and release version by searching for files or links that end with “
-release” in “/etc”. - Running “
ls /etc/*-release” helps us find such files. - What it looks like on a
CentOSlinux:

- What it looks like on a Fedora system:
$ ls /etc/*-release $ cat /etc/os-release
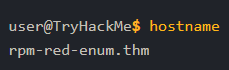
Finding the system’s name:
$ hostname

- Various files on a system can provide plenty of useful info.
Checking users, group and password information on a Linux system:
$ cat /etc/passwd $ cat /etc/group $ cat /etc/shadow
1
2
3
4
5
6
7
8
9
10
11
12
13
14
15
16
17
18

$ cat /etc/passwd
root:x:0:0:root:/root:/bin/bash
[...]
michael:x:1001:1001::/home/michael:/bin/bash
peter:x:1002:1002::/home/peter:/bin/bash
jane:x:1003:1003::/home/jane:/bin/bash
randa:x:1004:1004::/home/randa:/bin/bash
$ cat /etc/group
root:x:0:
[...]
michael:x:1001:
peter:x:1002:
jane:x:1003:
randa:x:1004:
$ sudo cat /etc/shadow
root:$6$pZlRFi09$qqgNBS.00qtcUF9x0yHetjJbXsw0PAwQabpCilmAB47ye3OzmmJVfV6DxBYyUoWBHtTXPU0kQEVUQfPtZPO3C.:19131:0:99999:7:::
[...]
michael:$6$GADCGz6m$g.ROJGcSX/910DEipiPjU6clo6Z6/uBZ9Fvg3IaqsVnMA.UZtebTgGHpRU4NZFXTffjKPvOAgPKbtb2nQrVU70:19130:0:99999:7::: peter:$6$RN4fdNxf$wvgzdlrIVYBJjKe3s2eqlIQhvMrtwAWBsjuxL5xMVaIw4nL9pCshJlrMu2iyj/NAryBmItFbhYAVznqRcFWIz1:19130:0:99999:7::: jane:$6$Ees6f7QM$TL8D8yFXVXtIOY9sKjMqJ7BoHK1EHEeqM5dojTaqO52V6CPiGq2W6XjljOGx/08rSo4QXsBtLUC3PmewpeZ/Q0:19130:0:99999:7::: randa:$6$dYsVoPyy$WR43vaETwoWooZvR03AZGPPKxjrGQ4jTb0uAHDy2GqGEOZyXvrQNH10tGlLIHac7EZGV8hSIfuXP0SnwVmnZn0:19130:0:99999:7:::
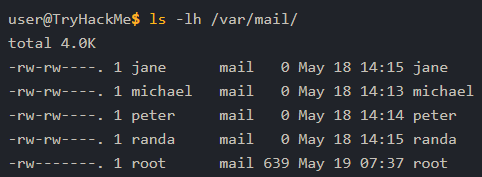
- Similarly, various directories can reveal information about users and might contain sensitive files; one is the mail directories found at
/var/mail:
Checking mail information in Linux system:
$ ls -lh /var/mail
Finding installed applications (in general)
$ ls -lh /usr/bin $ ls -lh /sbin/
Getting the list of installed packages on an RBP-based Linux
$ rpm -qa
- ”
-qa” means we want to query ALL packages.
Getting the list of installed packages on a Debian-based Linux system
$ dpkg -l
1
2
3
4
5
6
7
8
9
10
11
12
13

$ dpkg -l
Desired=Unknown/Install/Remove/Purge/Hold
| Status=Not/Inst/Conf-files/Unpacked/halF-conf/Half-inst/trig-aWait/Trig-pend
|/ Err?=(none)/Reinst-required (Status,Err: uppercase=bad)
||/ Name                                  Version                            Architecture Description
+++-=====================================-==================================-============-===============================================================================
ii  accountsservice                       0.6.55-0ubuntu12~20.04.5           amd64        query and manipulate user account information
ii  adduser                               3.118ubuntu2                       all          add and remove users and groups
ii  alsa-topology-conf                    1.2.2-1                            all          ALSA topology configuration files
ii  alsa-ucm-conf                         1.2.2-1ubuntu0.13                  all          ALSA Use Case Manager configuration files
ii  amd64-microcode                       3.20191218.1ubuntu1                amd64        Processor microcode firmware for AMD CPUs
[...   ]
ii  zlib1g-dev:amd64                      1:1.2.11.dfsg-2ubuntu1.3           amd64        compression library - development
Users
- Files such as
/etc/passwdreveal the usernames; however, various commands can provide more information and insights about other users on the system and their whereabouts. - You can show who is logged in using
whocommand:
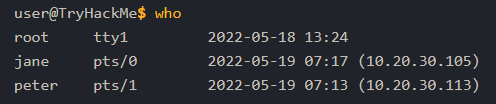
1

- We can see that the user `root` is logged in to the system directly, while the users `jane` and `peter` are connected over the network, and we can see their IP addresses.
Note that
whoshould be not confused withwhoamiwhich prints your effective UID. Basically, the current UID in which the current shell operates in.- To take things to the next level, you can use
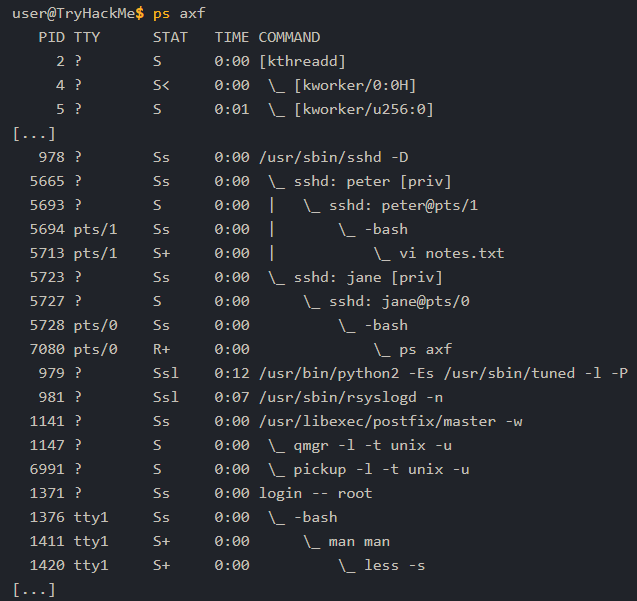
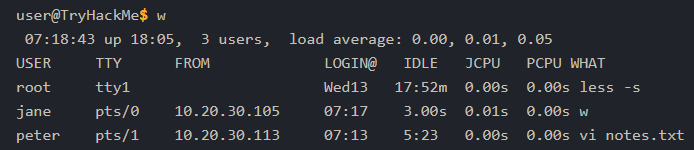
'w'which shows who is logged in and what they are doing. Based on the terminal output below,
peteris editingnotes.txtandjaneis the one runningwin this example.- To print the real and effective user and group IDs, you can issue the command
id:

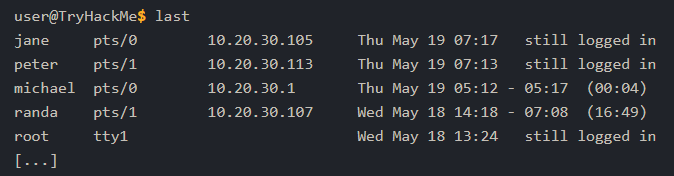
- Do you want to know who has been using the system recently?
-
lastdisplays a listing of the last logged-in users; moreover, we can see who logged out and how much they stayed connected. - In the output below, the user
randaremained logged in for almost17 hours, while the usermichaellogged out after four minutes.
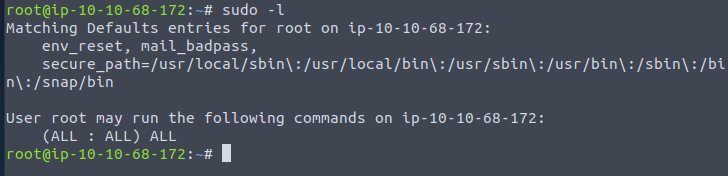
- Finally, it is worth mentioning that
sudo -llists the allowed command for the invoking user on the current system.
Networking
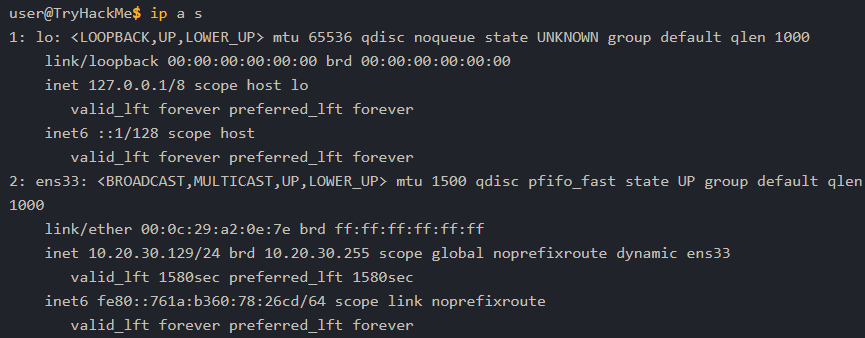
- The IP addresses can be shown using
ip address show(which can be shortened to “ip a s”) or with the older commandifconfig -a(its package is no longer maintained.) - The terminal output below shows the network interface
ens33with the IP address10.20.30.129and subnet mask255.255.255.0as it is24.

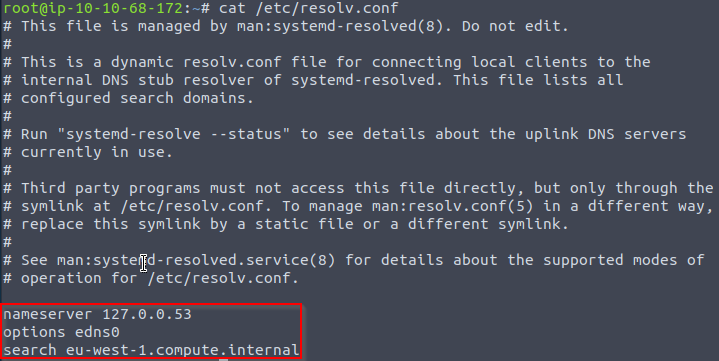
- The DNS servers can be found in the
/etc/resolve.conf. - Consider the following terminal output for a system that uses DHCP for its network configurations.
The DNS, i.e., nameserver, is set to
10.20.30.2.-
netstatis a useful command for learning about network connections, routing tables, and interface statistics. - We explain some of its many options in the table below:
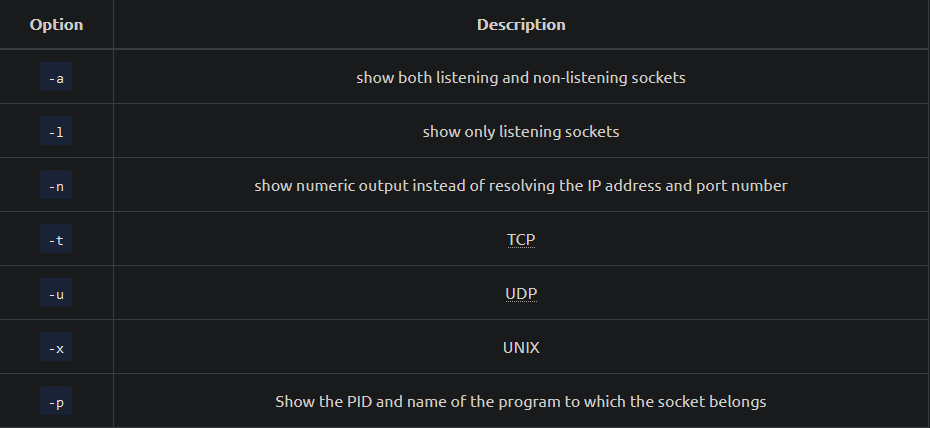
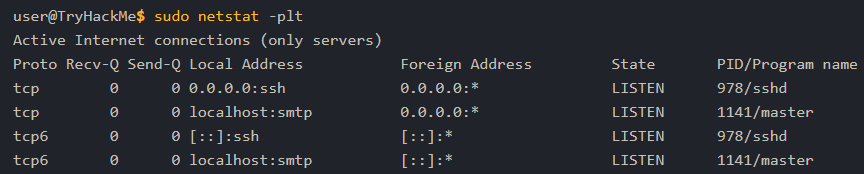
- You can use any combination that suits your needs,
- For instance,
netstat -pltwill return Programs Listening on TCP sockets.
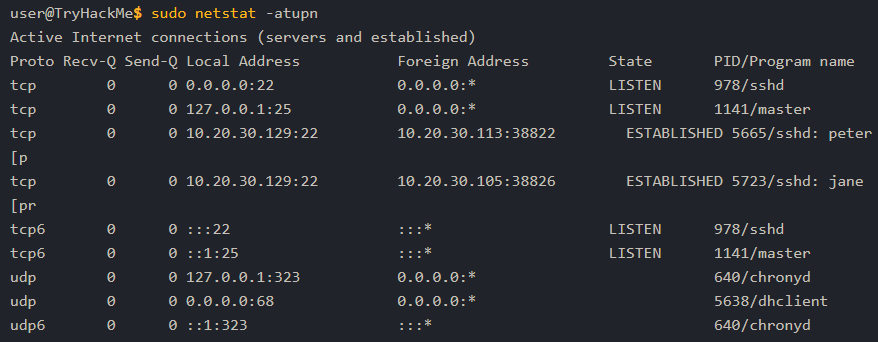
-
netstat -atupnwill show ALL TCP and UDP listening and established connections and the program names with addresses and ports in numeric format.
- One might think that using
nmapbefore gaining access to the target machine would have provided a comparable result. - However, this is NOT entirely true. Nmap needs to generate a relatively large number of packets to check for open ports, which can trigger IDS/IPS.
Furthermore, firewalls across the route can drop certain packets and hinder the scan, resulting in incomplete NMAP results.
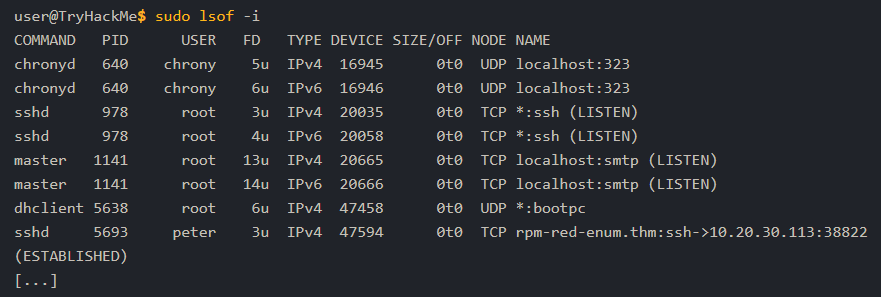
-
lsofstands for “List Open Files”. - If we want to display only Internet and network connections, we can use
lsof -i. - The terminal output below shows IPv4 and IPv6 listening services and ongoing connections.
- The user
peteris connected to the serverrpm-red-enum.thmon thesshport. - Note that to get the complete list of matching programs, you need to run
lsofas root or usesudo lsof.
- Because the list can get quite lengthy, you can further filter the output by specifying the ports you are interested in, such as
SMTPport 25. - By running
lsof -i :25, we limit the output to those related to port 25, as shown in the terminal output below. - The server is listening on port 25 on both IPv4 and IPv6 addresses.
Running Services
- Getting a snapshot of the running processes can provide many insights.
-
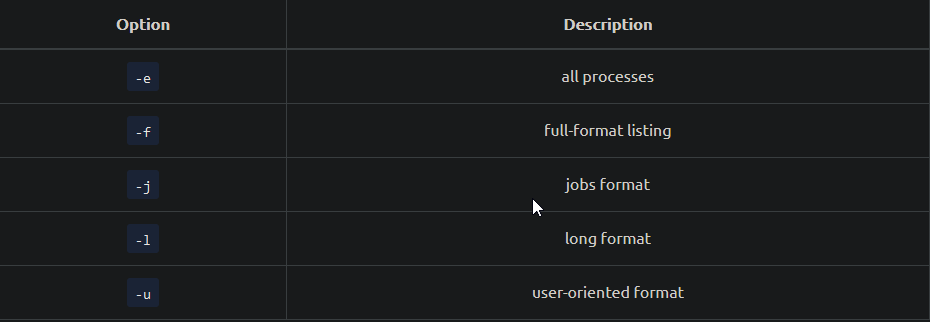
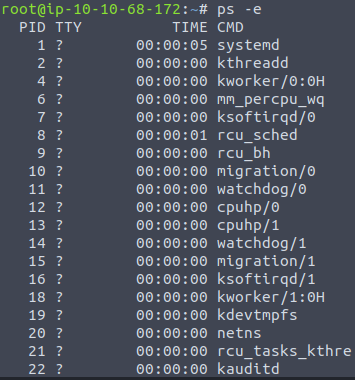
pslets you discover the running processes and plenty of information about them. - You can list every process on the system using
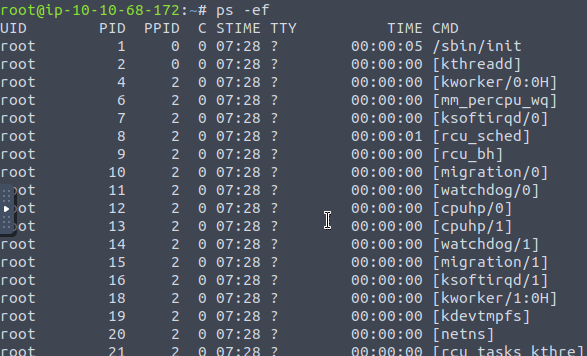
ps -e, where-eselects ALL processes. - For more information about the process, you can add
-ffor full-format and-lfor long format. - Experiment with
ps -e,ps -ef, andps -el. - You can get comparable output and see all the processes using BSD syntax:
1
2

$ ps ax
$ ps aux
- Note that
aandxare necessary when using BSD syntax as they lift the “only yourself” and “must have a tty” restrictions; In other words, it becomes possible to display all processes. - The
uis for details about the user that has the process.
- For more “visual” output, you can issue
ps axjfto print a process tree.
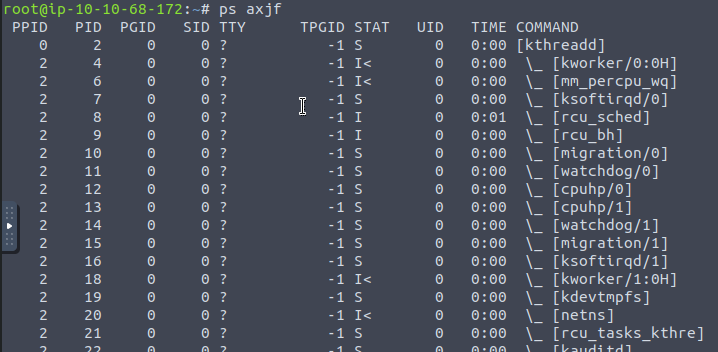
1

- "f" stands for "forest" and it creates an ASCII art process hierarchy as shown in the terminal output below.
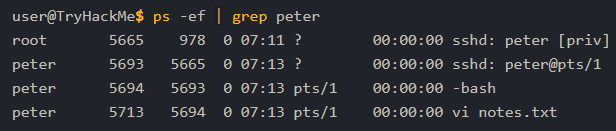
- To summarize, remember to use
ps -eforps auxto get a list of all the running processes. - Consider piping the output via
grepto display output lines with certain words. - The terminal output below shows the lines with
peterin them:
Linux Enum Cheatsheet
1. Checking Linux distro and release version
> ls /etc/*-release > cat /etc/os-release
2. Finding the system’s name:
$ hostname
3. Checking users, group and password information on a Linux system:
$ cat /etc/passwd $ cat /etc/group $ cat /etc/shadow
4. Checking mail information in Linux system:
$ ls -lh /var/mail
5. Finding installed applications (in general)
$ ls -lh /usr/bin $ ls -lh /sbin/
6. Getting the list of installed packages on an RBP-based Linux
$ rpm -qa
- ”
-qa” means we want to query ALL packages.
7. Getting the list of installed packages on a Debian-based Linux system
$ dpkg -l
1
2
3
4
5
6
7
8
9
10
11
12
13

$ dpkg -l
Desired=Unknown/Install/Remove/Purge/Hold
| Status=Not/Inst/Conf-files/Unpacked/halF-conf/Half-inst/trig-aWait/Trig-pend
|/ Err?=(none)/Reinst-required (Status,Err: uppercase=bad)
||/ Name                                  Version                            Architecture Description
+++-=====================================-==================================-============-===============================================================================
ii  accountsservice                       0.6.55-0ubuntu12~20.04.5           amd64        query and manipulate user account information
ii  adduser                               3.118ubuntu2                       all          add and remove users and groups
ii  alsa-topology-conf                    1.2.2-1                            all          ALSA topology configuration files
ii  alsa-ucm-conf                         1.2.2-1ubuntu0.13                  all          ALSA Use Case Manager configuration files
ii  amd64-microcode                       3.20191218.1ubuntu1                amd64        Processor microcode firmware for AMD CPUs
[...   ]
ii  zlib1g-dev:amd64                      1:1.2.11.dfsg-2ubuntu1.3           amd64        compression library - development
8. Checking who’s logged in currently:
$ who
9. Checking the user of the shell instance that you currently have:
$ whoami
10. Checking what each user is currently doing in:
$ w
11. To print the real and effective user and group IDs, you can issue the command id:
12. Checking who logged-in last and for how long:
$ last
13. Checking what commands are allowed for the current user:
$ sudo -l
14. Checking the ip address, network interface and subnet masks:
$ ip address show OR $ ifconfig -a
15. Checking the DNS servers
$ cat /etc/resolv.conf
16. netstat is a useful command for learning about network connections, routing tables, and interface statistics.
17. Showing connections on Programs Listening on TCP sockets:
$ netstat -plt

18.netstat -atupn will show ALL TCP and UDP listening and established connections and the program names with addresses and ports in numeric format.
19. Getting the network connections via list of opened files:
$ lsof -i

1

- We need sudo privileges to see ALL open files.
20. Specifying which is opened file for connection through port 25:
$ lsof -i :25

21. You can list every process on the system using ps -e, where -e selects ALL processes.
22. For more information about the process, you can add -f for full-format and -l for long format.


23. Experiment with ps -e, ps -ef, and ps -el.
24. You can get comparable output and see all the processes using BSD syntax:
$ ps ax $ ps aux
Windows Enumeration
- In this task, we assume you have access to
cmdon a Microsoft Windows host. - You might have gained this access by exploiting a vulnerability and getting a shell or a reverse shell.
- You may also have installed a backdoor to set up an SSH server on a system you exploited.
In all cases, the commands below require
cmdto run.- In this task, we focus on enumerating an MS Windows host.
System
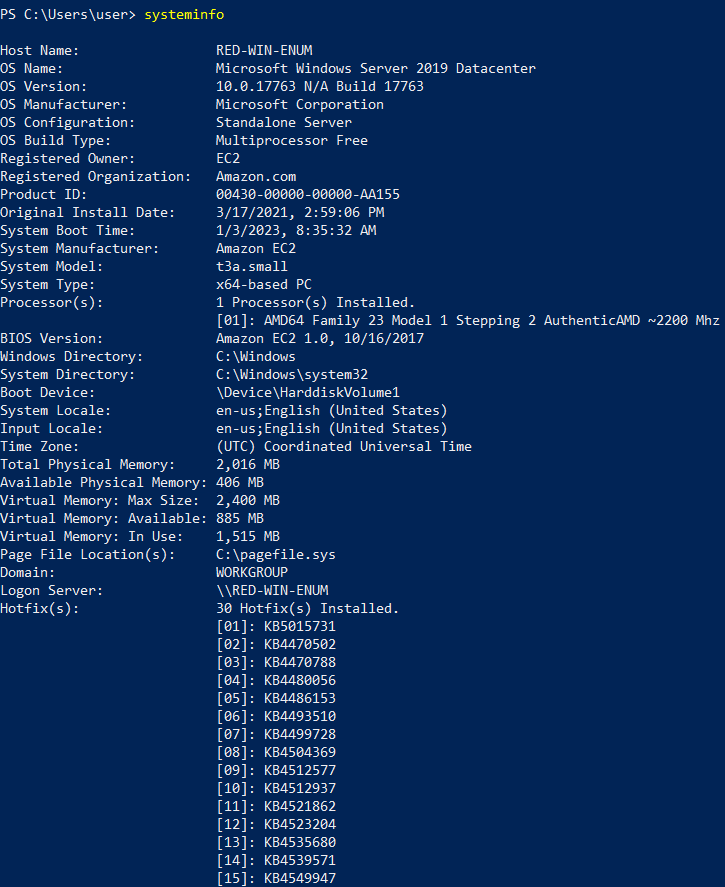
- One command that can give us detailed information about the system, such as its build number and installed patches, would be
systeminfo. - In the example below, we can see which hotfixes have been installed:
> system info

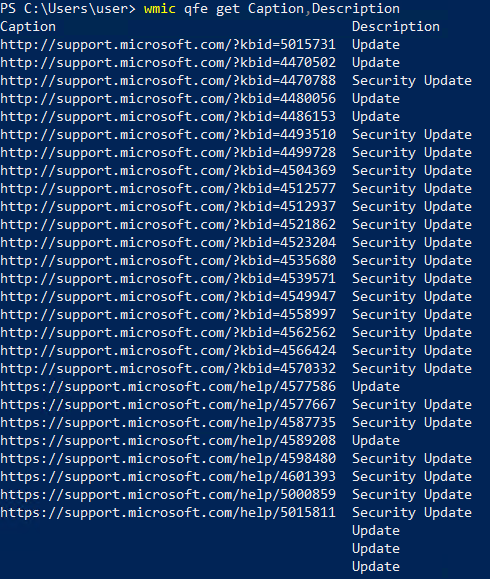
- You can check installed updates using
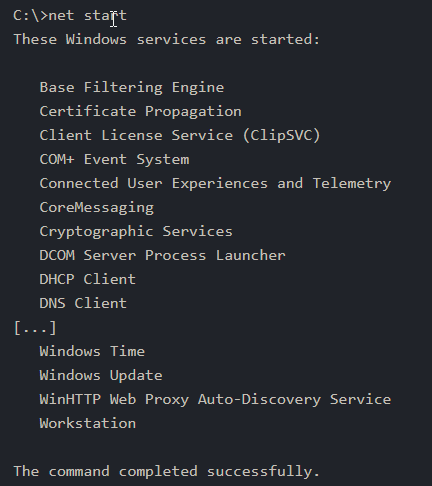
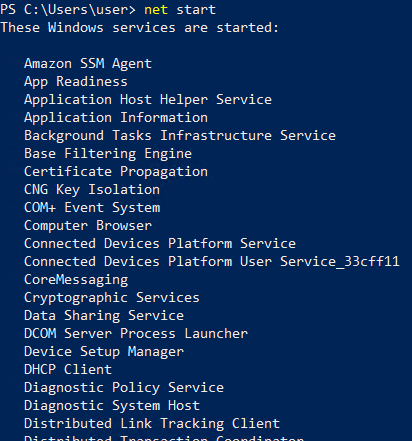
wmic qfe get Caption, Description. This information will give you an idea of how quickly systems are being patched and updated. - You can check the installed and started Windows services using
net start. Expect to get a long list; the output below has been snipped:
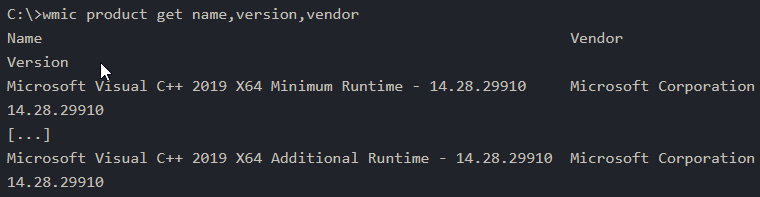
- If you are only interested in installed apps, you can issue
wmic product get name,version, vendor. If you run this command on the attached VM, you will get something similar to the following output:
Users
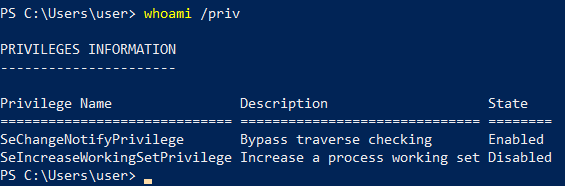
- To know who you are, you can run
whoami; moreover, to know what you are capable of, i.e., your privileges, you can use> whoami /priv. - Output:

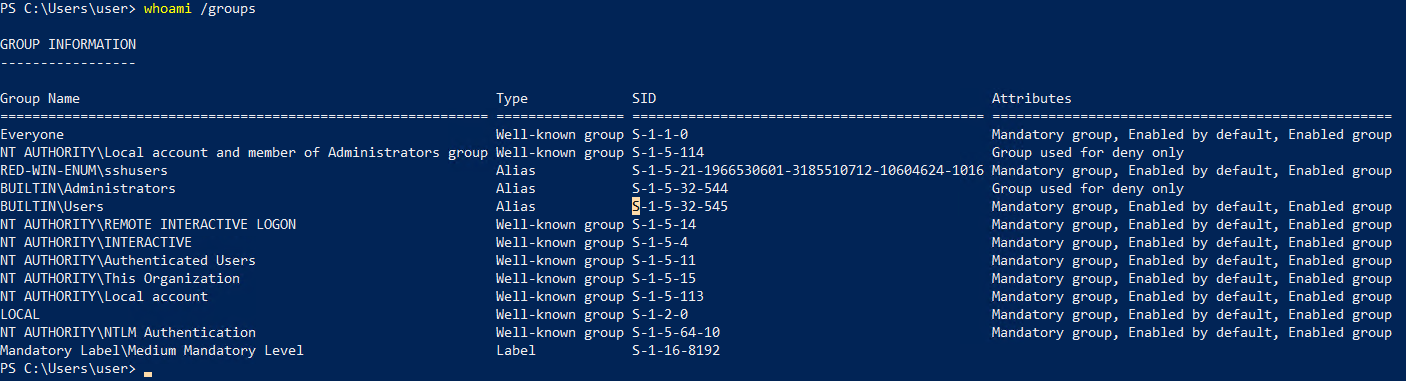
- Moreover, you can use
whoami /groupsto know which groups you belong to. - The terminal output below shows that this user belongs to the
NT AUTHORITY/Local account and member of Administrator groupamong other groups.
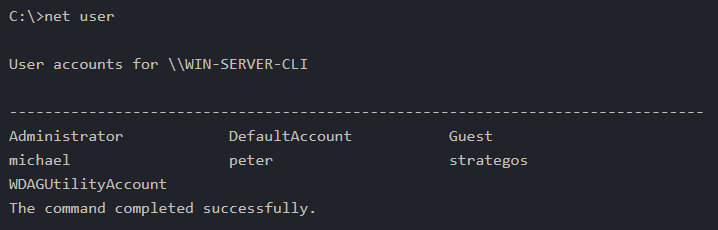
- You can view users by running
net user.
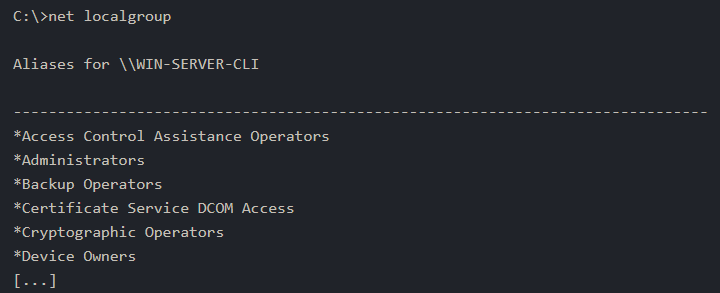
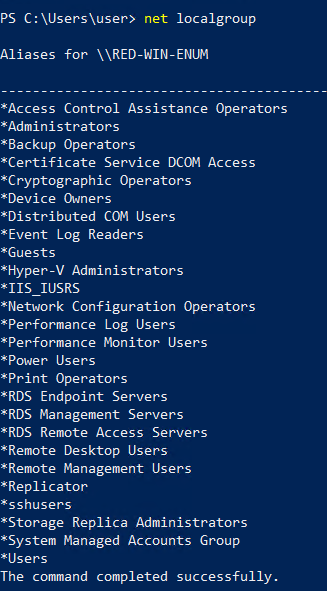
- You can discover the available groups using
net groupif the system is a Windows Domain Controller ornet localgroupotherwise, as shown in the terminal below:
> net localgroup
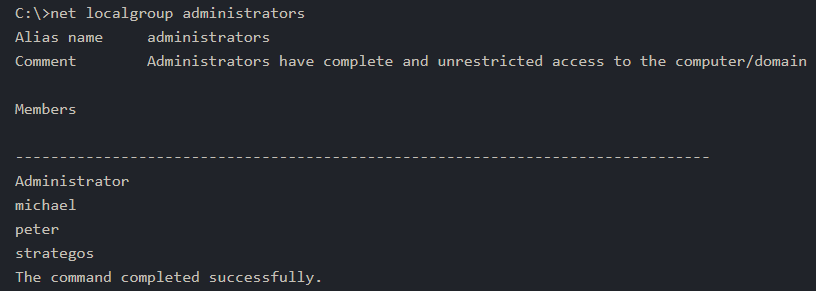
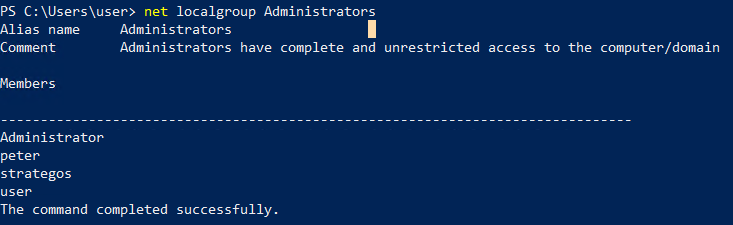
- You can list the users that belong to the local admin’s group using command
net localgroup Administrators:
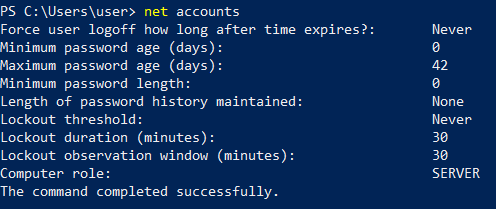
- Use
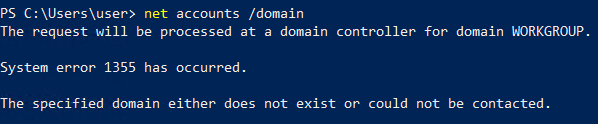
net accountsto see the local settings on a machine; moreover, you can usenet accounts /domainif the machine belongs to a domain. - This command helps learn about password policy, such as minimum password length, max password age and lockout duration.
> net accounts
Networking
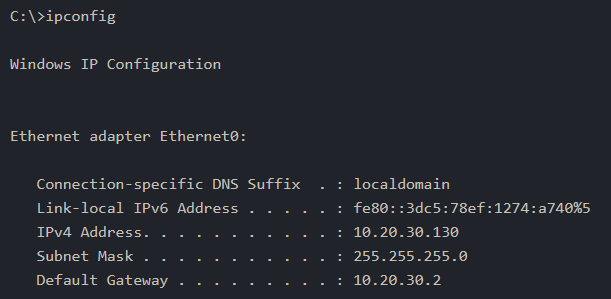
- You can use the
ipconfigcommand to learn about your system network configuration. - If you want to know all network-related settings, you can ue
ipconfig /all. - The terminala output below shows the output when using
ipconfig. - For instance, we could have used
ipconfig /allif we wanted to learn the DNS servers.
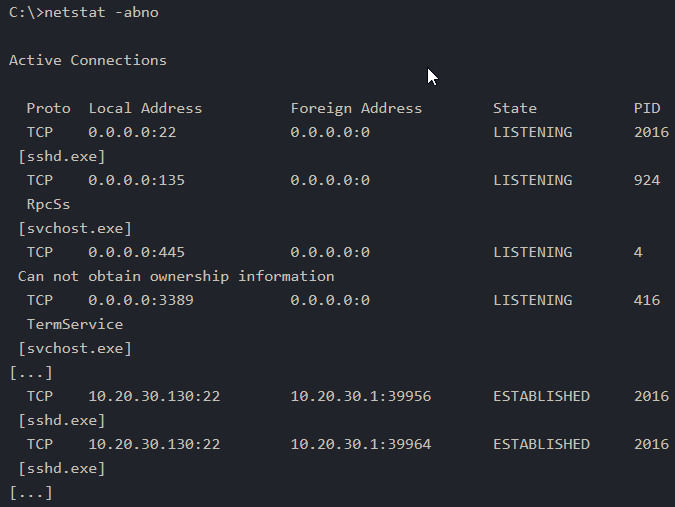
- On MS Windows, we can use
netstatto get various information, such as which ports the system is listening on, which connections are active, and who is using them. - In this example, we use the options “
-a” to display all listening ports and active connections. - The “
-b” lets us find the binary involved in the connection, while “-n” is used to avoid resolving IP addresses and port numbers. Finally, “
-o” display the process ID(PID).-
In the partial output shown below, we can see that
netstat -abnoshowed that the server is listening on TCP ports1 2 3 4
- 22 : sshd.exe - 135 : RpcSs - 445 : Termservice - 3389 : Termservice
- Moreover, we can see two established connections to the SSH server as indicated by the state
ESTABLISHED.
1

- Note: using the "-b" flag requires elevated privilege.
- You might think that you can get an identical result by port scanning the target system; however, this is inaccurate for two reasons.
- A firewall might be blocking the scanning host from reaching specific networks ports.
Moreover, port scanning a system generates a considerable amount of traffic, unlike
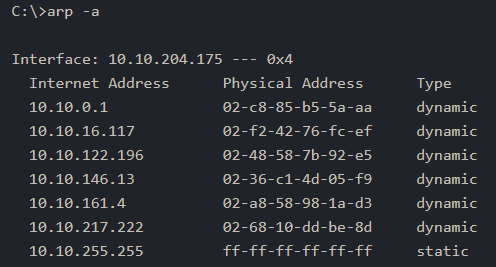
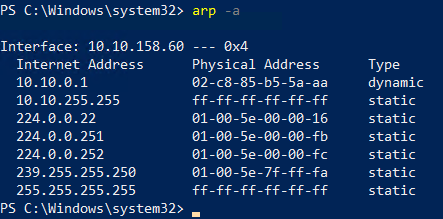
netstat, which makes zero noise.- Finally, it is worth mentioning that using
arp -ahelps you discover other systems on the same LAN that recently communicated with your system. - ARP stands for
Address Resolution Protocol;arp -ashows the current ARP entries, i.e., the physical addresses of the systems on the same LAN that communicated with your system. - An example output is shown below. This indicates that these IP addresses have communicated somehow with our system; the communication can be an attempt to connect or even a simple ping.
- Note that
10.10.255.255does NOT represent a system as it is the subnet broadcasT system.
> arp -a
Cheatsheet
1. Getting basic system information: (hotfixes)
> system info
2. Checking installed updates:
> wmic qfe get Caption,Description
1
2

- 'qfe' are the hotfixes.
- These are ALL hotfixes.
3. Check the installed and started Windows services using net start
4. Checking the current user and its capabilities:
> whoami /priv
5. Moreover, you can use whoami /groups to know which groups you belong to.
> whoami /groups
6. Check current user:
> net user 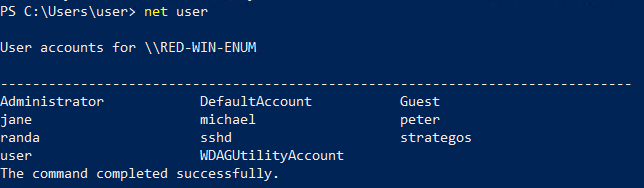
7. You can discover the available groups using net group if the system is a Windows Domain Controller or net localgroup otherwise
> net localgroup
8. Getting the members of a certain group:
> net localgroup Administrators
9. Use net accounts to see the local settings on a machine
> net accounts
10. Use net accounts /domain if the machine belongs to a domain.
> net accounts /domain
1

- Seems like in the lab, the machine doesn't belong to a domain?
11. Checking network connections using netstat:
> netstat -abno
1
2
3
4

	- "-b" : lets us find the binary involved in the connection. This requires elevated privilege.
	- "-n" : avoid resolving IP addresses and port number
	- "-a" : displays all listening ports`
	- "-o" : displays the PID.
12. Checking the ARP table:
> arp -a
DNS, SMB and SNMP
DNS
-
We are all familiar with Domain Name System (DNS) queries where we can look up:
1
2
3
4
5

  - A
  - AAAA
  - CNAME
  - TXT records
  - etc.
- If we can get a “copy” of all the records that a DNS server is responsible for answering, we might discover hosts we didn’t know existed.
- One easy way to try DNS zone transfer is via the
digcommand: - Depending on the DNS server config, DNS zone transfer might be restricted.
-
If it is not restricted, it should be achievable using:
dig -t AXFR <DOMAIN_NAME> @<DNS_SERVER>1 2
- ' -t AXFR' : indicates that we are requesting zone transfer - '@' : precedes the DNS_SERVER that we want to query regarding the records related to the specified `DOMAIN_NAME`.
SMB
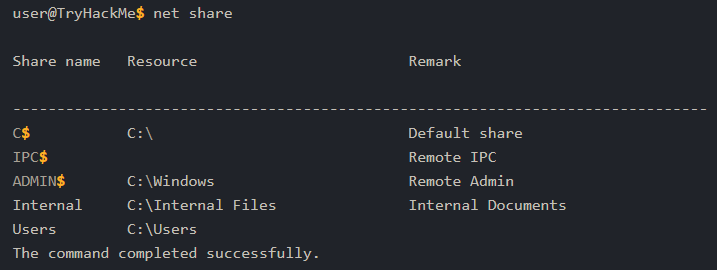
- Server Message Block(SMB) is a communication protocol that provides shared access to files and printers.
- We can check shared folders using
net share. - Here is an example of the output. We can see that
C:\Internal Filesis shared under the nameInternal:
SNMP
- Simple Network Management Protocol(SNMP) was designed to help collect information about different devices on the network.
- It lets you know about various network events, from a server with a faulty disk to a printer out of ink.
- Consequently, SNMP can hold a trove of information for the attacker.
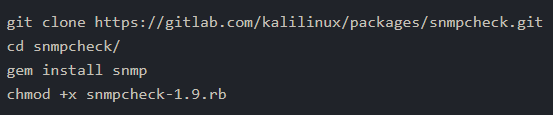
- One simple tool to query servers related to SNMP is
snmpcheck:$ /opt/snpmcheck/snmpcheck.rb <machine-ip> -c COMMUNITY_STRING
Installation:
1
2
3
4

git clone https://gitlab.com/kalilinux/packages/snmpcheck.git
cd snmpcheck/
gem install snmp
chmod +x snmpcheck-1.9.rb
Cheatsheet
1. DNS request zone transfer
$ dig -t AXFR <DOMAIN_NAME> @<DNS_SERVER>
2. Checking Windows Shares:
> net share
3. Querying servers related to SNMP:
$ /opt/snpmcheck/snmpcheck.rb <machine-ip> -c COMMUNITY_STRING
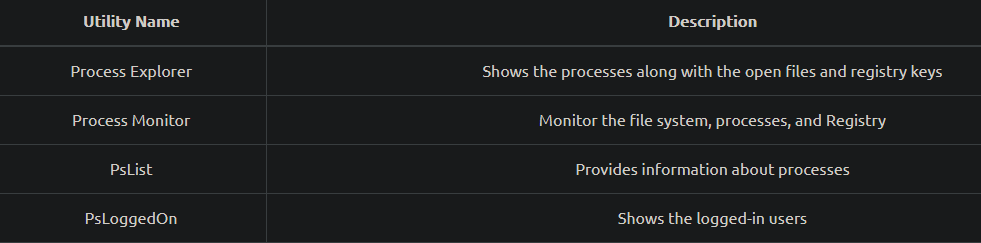
More Tools for Windows
- Sysinternals Suite
- Process Hacker
- GhostPack Seatbelt
Sysinternals Suite