
Revisiting Windows Forensics
In the Windows Forensics 1 and Windows Forensics 2 rooms, we learned about the different artifacts which store information about a user’s activity on a system. We also learned where those artifacts are located and how they can be accessed and interpreted. However, we did all that manually. In many cases, a forensic investigator doesn’t have the luxury to perform manual analysis, which can be time-consuming. In such scenarios, it is helpful to have some tools help in automating the evidence collection, sanitization, and processing part. Learning Objectives: In this room, we will:
1
2
3
4
- Learn about KAPE
- How KAPE works
- The different targets and modules used by KAPE
- Collection and analysis of forensic data using KAPE
Intro to KAPE (theory)
Kroll Artifact Parser and Extractor (KAPE) parses and extracts Windows forensics artifacts. It is a tool that can significantly reduce the time needed to respond to an incident by providing forensic artifacts from a live system or a storage device much earlier than the imaging process completes. KAPE serves two primary purposes:
1
2
1) collect files and
2) process the collected files as per the provided options.
For achieving these purposes, KAPE uses the concept of targets and modules.
1
2
- 'Targets' : can be defined as the forensic artifacts that need to be collected.
- 'Modules' : are programs that process the collected artifacts and extract information from them.
How it works
KAPE is extensible and highly configurable. In essence, the KAPE binary collects files and processes them as per the provided configuration. The collection of files (targets) KAPE adds the files to a queue and copies them in two passes. In the first pass, it copies the files that it can. This works for files that the OS has not locked. The rest of the files are passed to a secondary queue. The secondary queue is processed using a different technique that uses raw disk reads to bypass the OS locks and copy the files. The copied files are saved with original timestamps and metadata and stored in a similar directory structure. Once the data is collected, KAPE can process it using modules.
The modules can be independent binaries that run on the collected data and process them to extract information. For example, KAPE will collect and copy the Prefetch file to our target destination during the target collection. Running a Prefetch Parser (PECmd) module on this target will extract the prefetch file and save it in a CSV file.

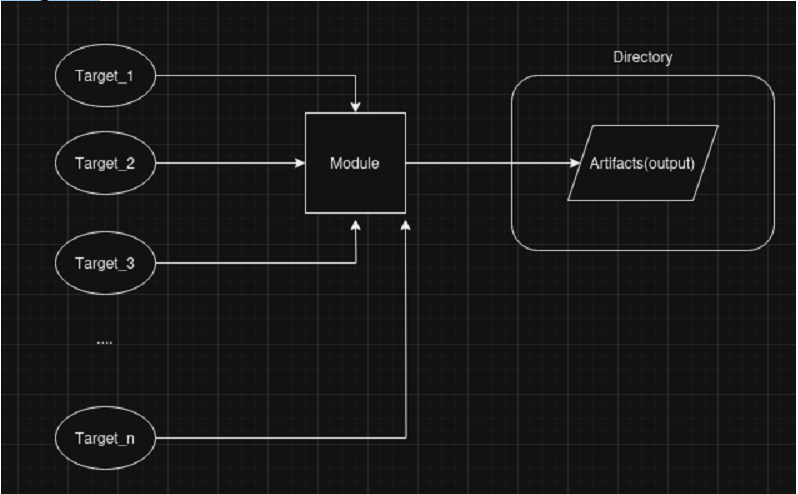
As the above image shows, KAPE can extract targets from a Live system, a mounted image, or the F-response utility. KAPE does not need to be installed. It is portable and can be used from network locations or USB drives.
- Source of F-response: https://www.f-response.com/
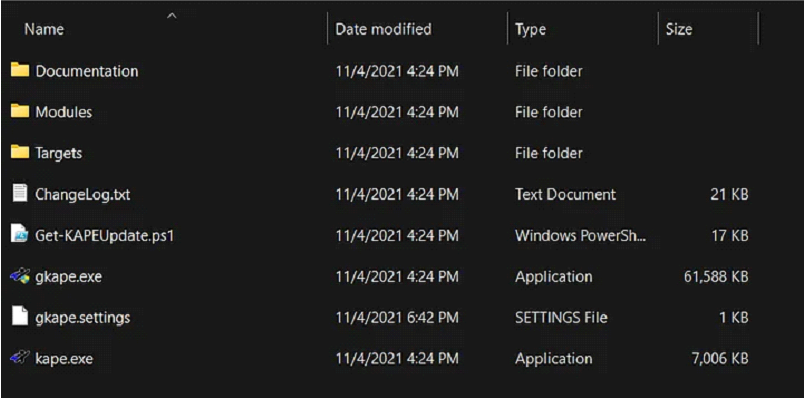
You can see two binaries in this directory, kape.exe and gkape.exe. The first is the CLI version of KAPE, and the second is a GUI version (symbolized by the ‘g’ prefix). gkape.settings stores the default settings of the GUI version. Get-KAPEUpdate.ps1, as the name suggests, is a Powershell script that checks and downloads updates. ChangeLog.txt and Documentation are self-explanatory. We will explore Targets and Modules in the following tasks.
Target Options
In KAPE’s lexicon, Targets are the artifacts that need to be collected from a system or image and copied to our provided destination. For example:
- As we learned in the last room, Windows Prefetch is a forensic artifact for evidence of execution so that we can create a Target for it. Similarly, we can also create Targets for the registry hives. In short, Targets copy files from one place to another.
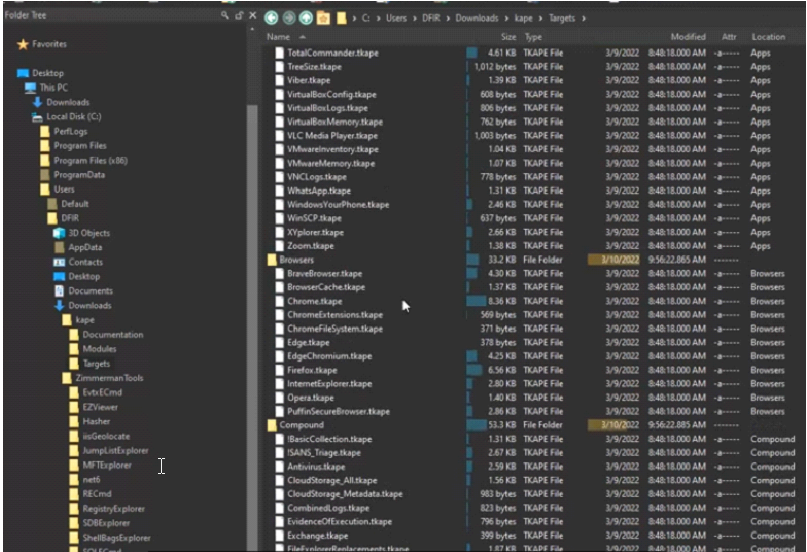
When we open the Targets directory of KAPE, this is what we will see:
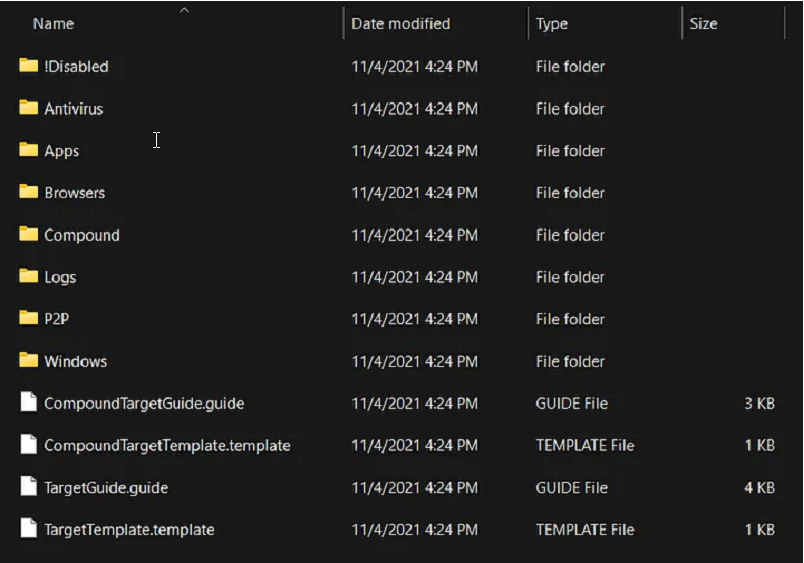
The last four files at the bottom are guides and templates to create Targets and Compound Targets of our own. We will discuss Compound Targets later in this task. As you can see, the targets are grouped into different directories.
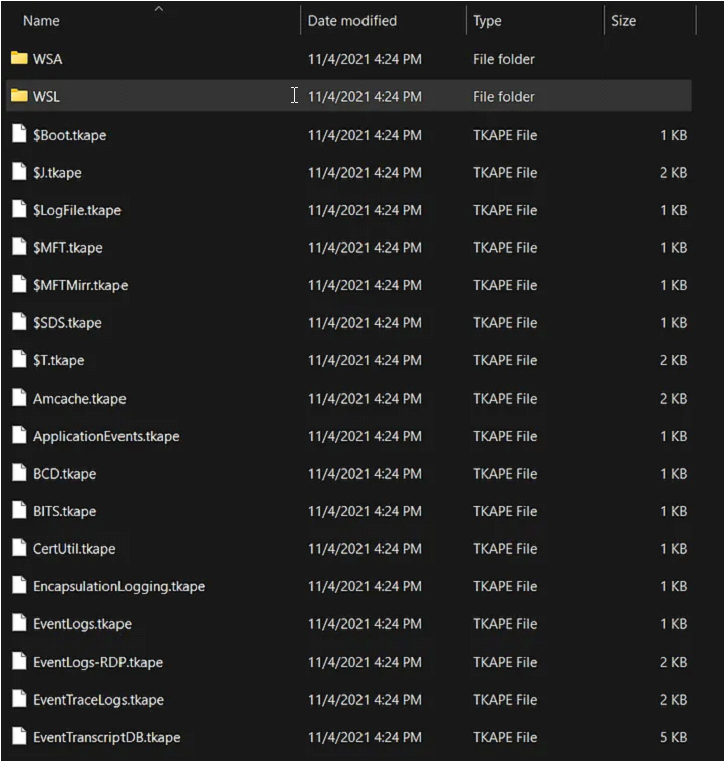
Let’s check out the Windows directory to see what we have:
1
- We can see different .tkape extension files. This is how a Target is defined for KAPE.
A TKAPE file(metadata of the file we want to extract) contains information about the artifact that we want to collect, such as the path, category, and file masks to collect.
1
  -> As an example, below is how the Prefetch Target is defined.
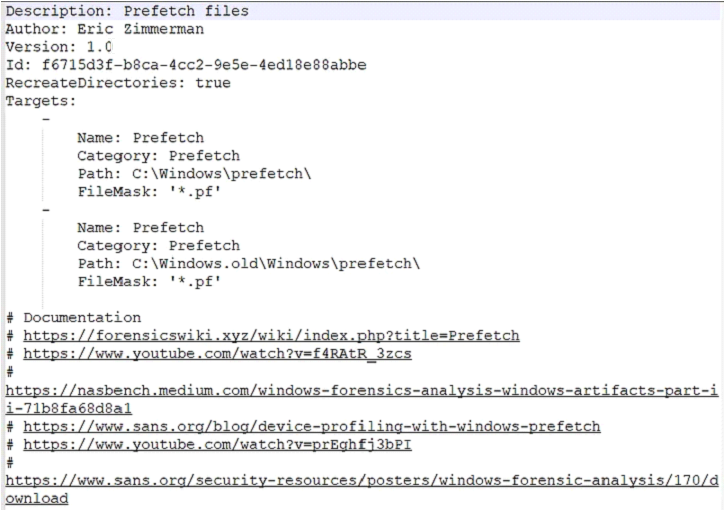
This TKAPE file tells KAPE to collect files with the file mask *.pf from the path C:\Windows\prefetch and C:\Windows.old\prefetch.
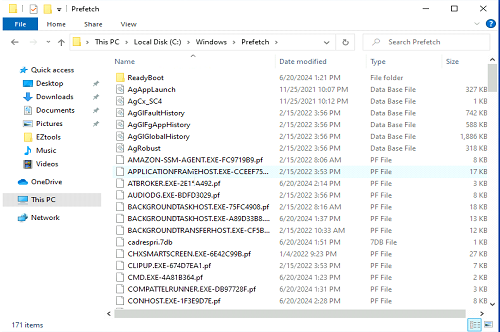
Notice that we have the C:\Windows.old path listed here as well. This path contains files retained after Windows has updated to a new version. For forensic analysis, we can also find interesting historical artifacts from this directory.
Compound Targets:
- KAPE also supports Compound Targets. These are Targets that are compounds of multiple other targets. As mentioned in the previous tasks, KAPE is often used for quick triage collection and analysis. The purpose of KAPE will not be fulfilled if we have to collect each artifact individually.
Therefore, Compound Targets help us collect multiple targets by giving a single command. Examples of Compound Targets include:
1
2
3
- !BasicCollection
- !SANS_triage
- KAPEtriage
We can view the Compound Targets on the path KAPE\Targets\Compound. The following image shows what a Compound Target for evidence of execution looks like:
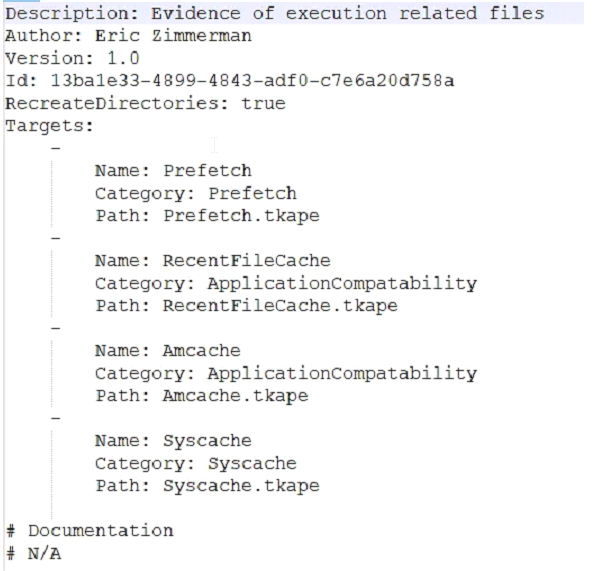
Gathered four artefacts
The above Compound Target will collect evidence of execution from:
1
2
3
4
- Prefetch,
- RecentFileCache,
- AmCache, and
- Syscache Targets.
!Disabled
This directory contains Targets that you want to keep in the KAPE instance, but you don’t want them to appear in the active Targets list. (doesn’t extract these artifacts then)
!Local
If you have created some Targets that you don’t want to sync with the KAPE Github repository, you can place them in this directory. These can be Targets that are specific to your environment. Similarly, anything not present in the Github repository when we update KAPE will be moved to the !Local directory.
Questions:
- What is the file extension for KAPE Targets?
1
-> .tkape
- What type of Target will we use if we want to collect multiple artifacts with a single command?
1
-> Compound Targets
Module Options
Modules, in KAPE’s lexicon, run specific tools against the provided set of files. Their goal is not to copy files from one place to another but rather run some command and store the output. Generally, the output is in the form of CSV or TXT files.
This is what the Modules directory looks like in KAPE:
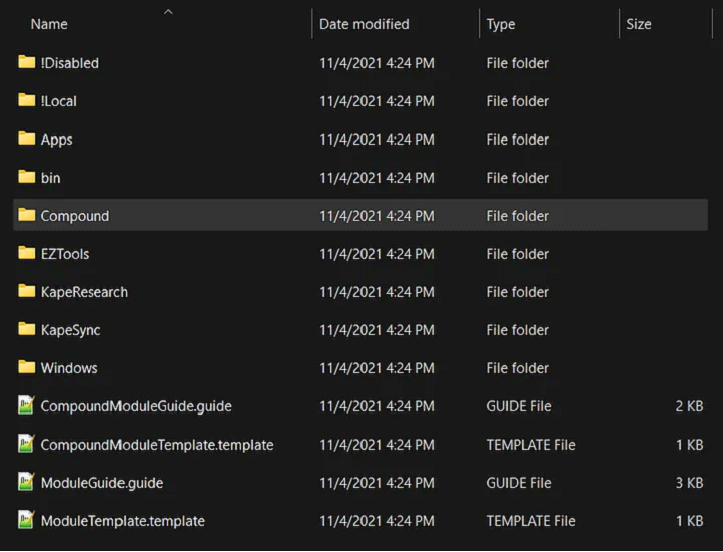
Similar to the previous task, we see guides and templates for creating Modules and Compound Modules. We also see the !Disabled, !Local and Compound directories, which are similar to what we saw in the previous task. We will not discuss these again, as we discussed them in the last task. We see that most of the Modules are grouped together in different directories. One thing we find different is the bin directory. We will discuss that in a bit. For now, let’s open the Windows directory and see what we have there:
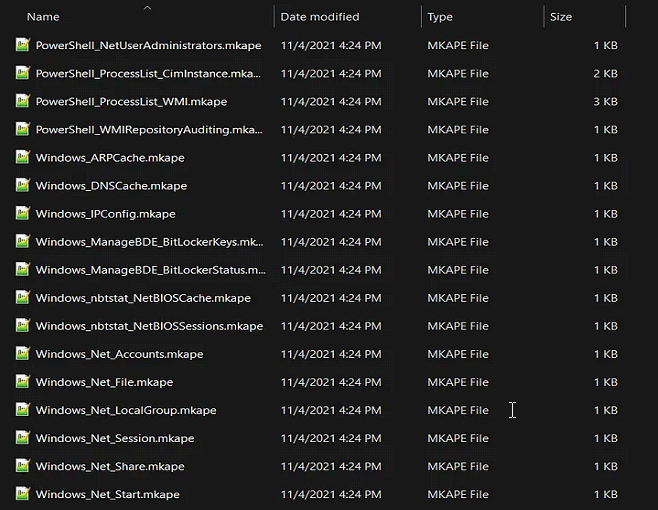
1
- Here we see files with the .mkape extension. These are understood as Modules by KAPE.
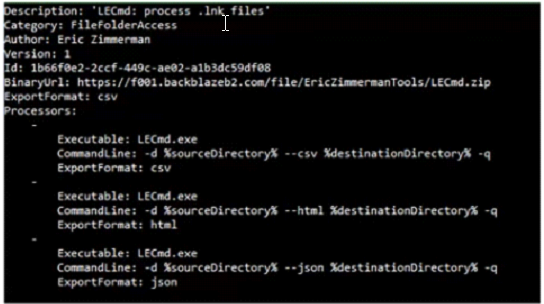
Let’s open an MKAPE file and see how it is structured. The following image shows the Windows_IPConfig MKAPE file:
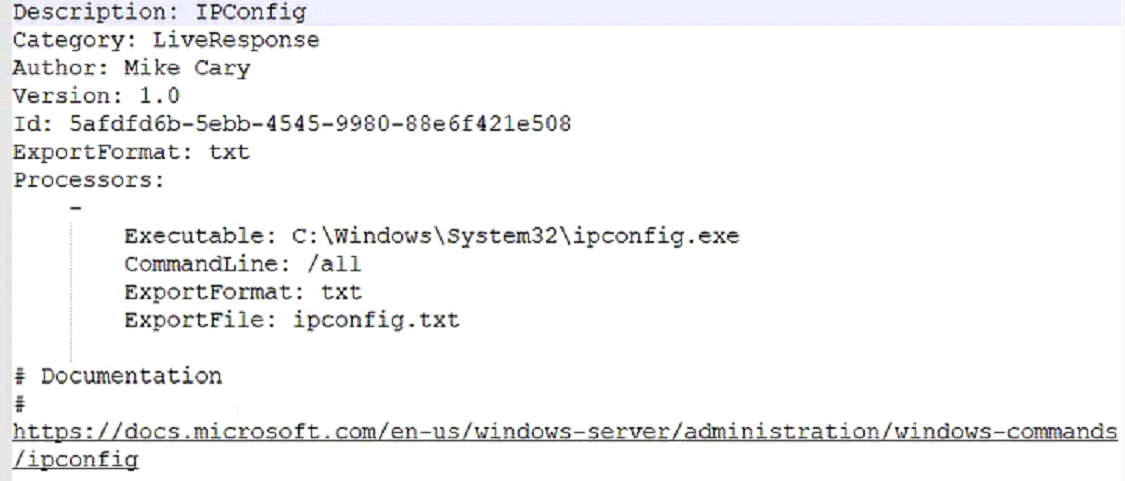
Notice that the MKAPE file tells KAPE about the executable that has to be run, the command line parameters of the executable file, the output export format, and the filename to export to.
Question: But what if the executable that we want to run is not present on the system? This brings us to the bin directory.
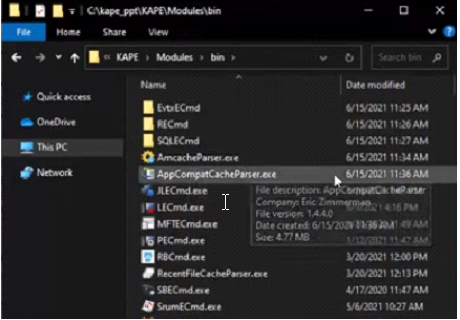
The bin directory:
The bin directory contains executables that we want to run on the system but are not natively present on most systems. KAPE will run executables either from the bin directory or the complete path. An example of files to be kept in the bin directory are Eric Zimmerman’s tools, which are generally not present on a Windows system. We used them extensively in the Windows Forensics rooms:

Question:
- What is the file extension of the Modules files?
1
-> .mkape
- What is the name of the directory where binary files are stored, which may not be present on a typical system, but are required for a particular KAPE Module?
1
-> bin
KAPE Additional Notes
Workflow:
1
2
3
4
5
-> Use targets:
	- Acquires data from target source
-> Use modules:(function)
	- Processes data from target source
-> Use Targets and Modules together
- Acquires and then processes data from target source
Diagram:
KAPE GUI
Now that we have learned about the different components of KAPE let’s take it for a test drive. In the attached VM, double-click to open the gkape.exe file. You will see the following Window:
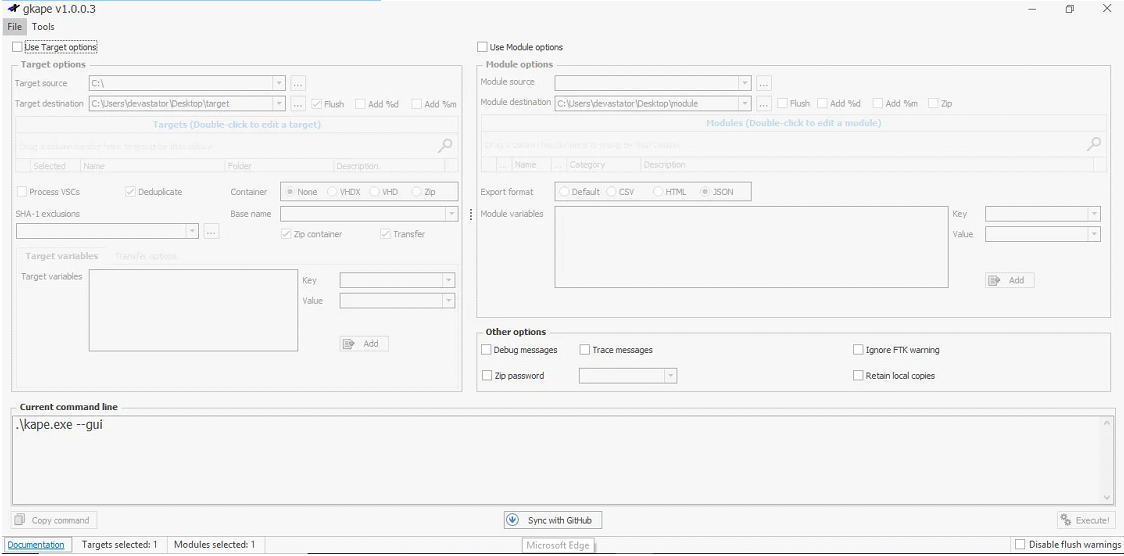
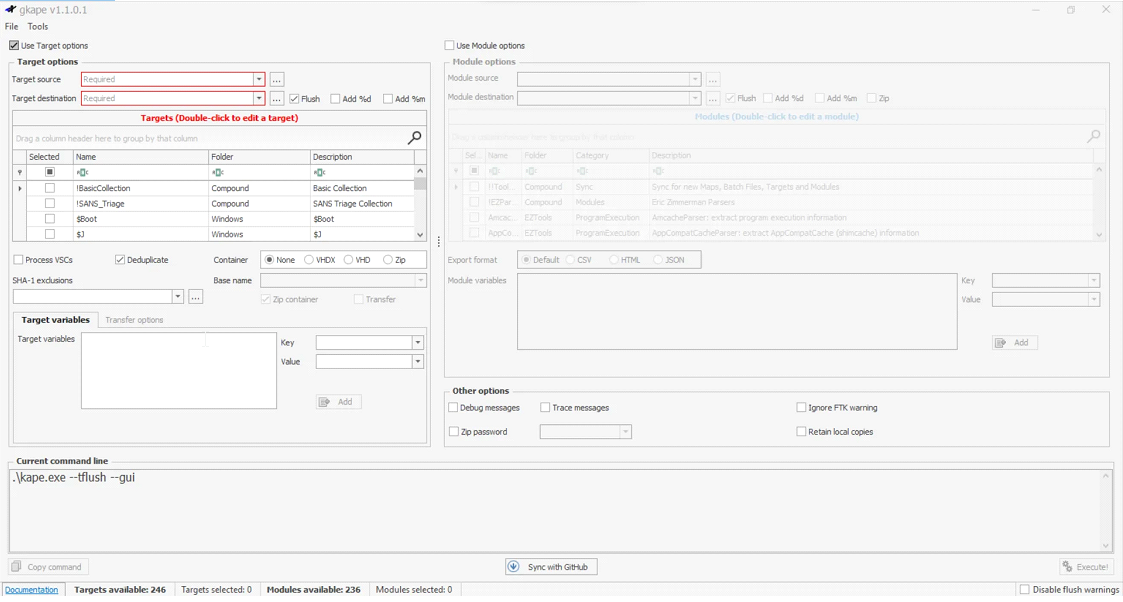
Here you can see that there are different options, but most are disabled. To collect Targets We will go ahead by enabling the Use Target Options checkbox. This will enable the options present in the left half of the Window:
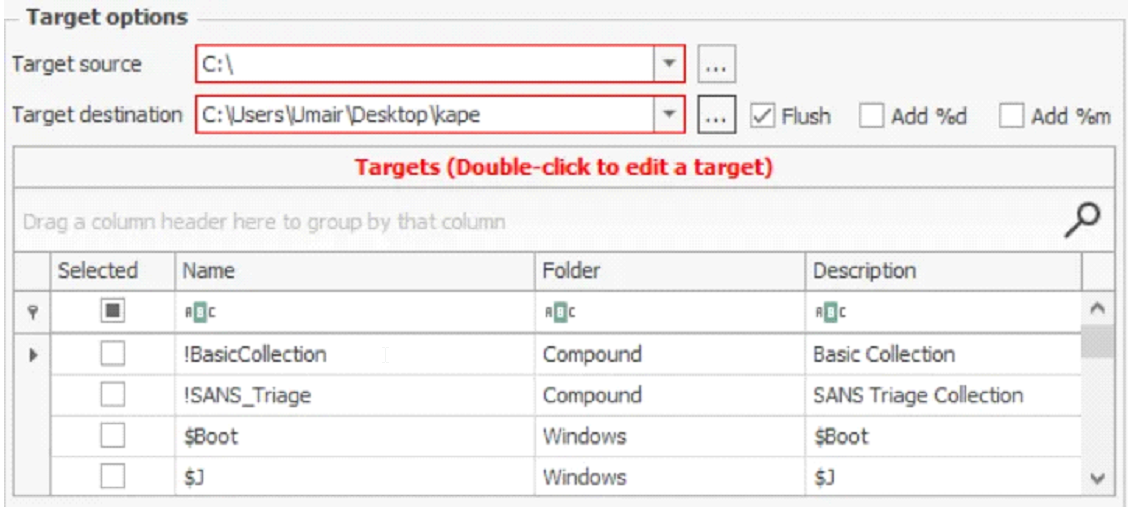
If we want to perform forensics on the same machine on which KAPE is running, we will provide C:\ for the Target source. We can select the target destination of our choice. All the triage files will be copied to the Target destination that we provide.
1
2
3
4
	- Here, the Flush checkbox will delete all the contents of the Target destination where you will store the extracted data from the source, so we have to be careful when using that.
	- We have disabled the Flush checkbox so that it does not delete data already present in the directories.
	- Add %d(need) will append date info to the directory name where the collected data is saved.
	- Similarly, Add %m(need) will append machine info to the Target destination directory.
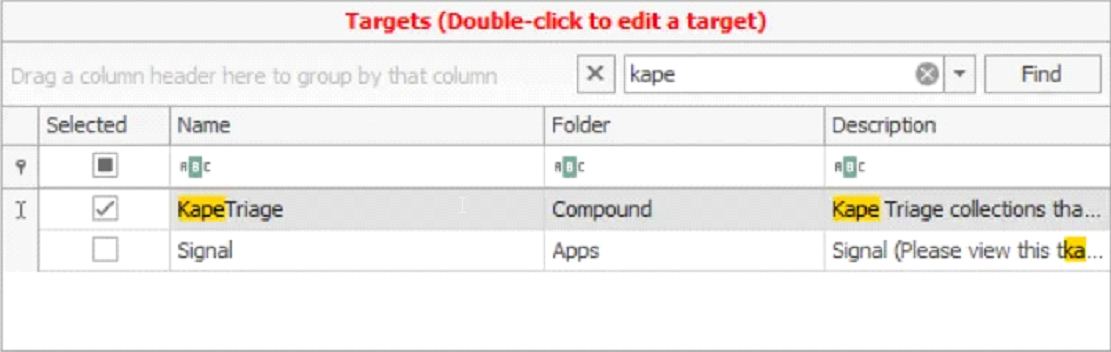
We can select our desired Target from the list shown above. The Search bar helps us search for the names of the desired Targets quickly.
We can select if we want to process Volume Shadow Copies by enabling Process VSCs. We can select the transfer checkbox if we want to transfer the collected artifacts through an SFTP server or an S3 bucket.
For transfer, the files must be enclosed in a container, which can be Zip, VHD, or VHDX. Similarly, we can provide exclusions based on SHA-1, and KAPE will not copy the excluded files. When enclosing in a container, we will need to give a Base name that will be used for all the created files. It is not required if we are not transferring files or enclosing them in a container.

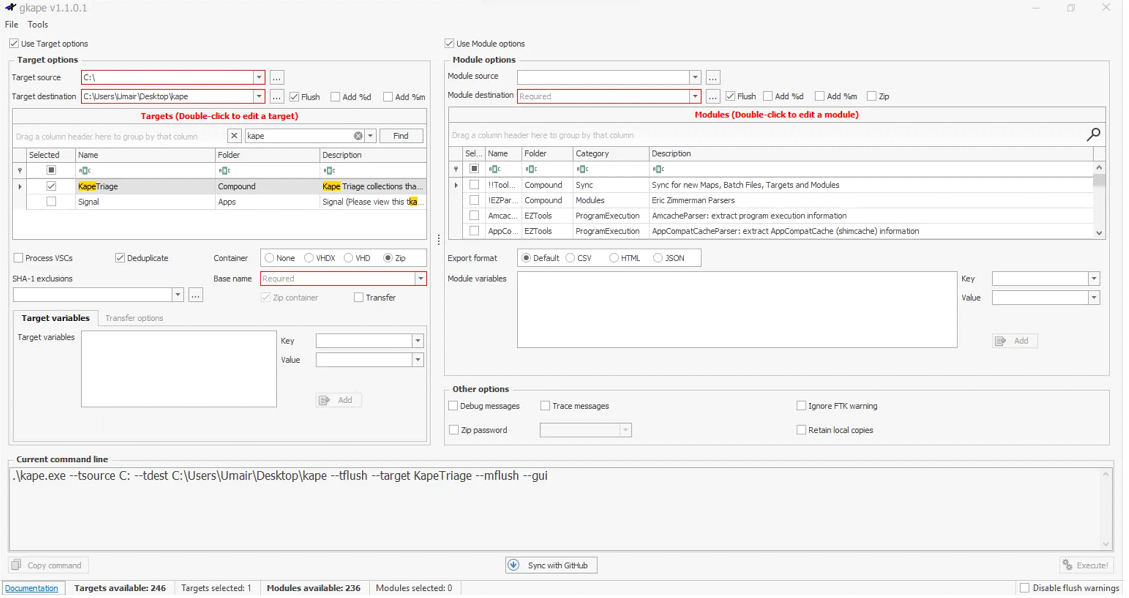
In the Current command line tab, we can see the command line options being added or removed while configuring the UI. This Window will show more options in the command line as we add options. Please note that the destination path in your case will be different from the one shown in the image. Notice the --tflush flag here. It means that when this command line was created, the Flush checkbox was still checked:

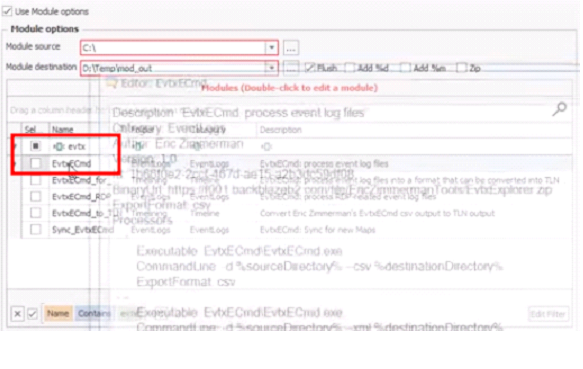
By checking the Use Module Options checkbox (middle checkbox), the right side of the KAPE Window will also be enabled:
When using both Target and Module Options, providing Module Source is not required. The selected Modules will use the Target destination as the source.

The rest of the options for Modules are similar to the ones for Targets, so we won’t go into details for them.
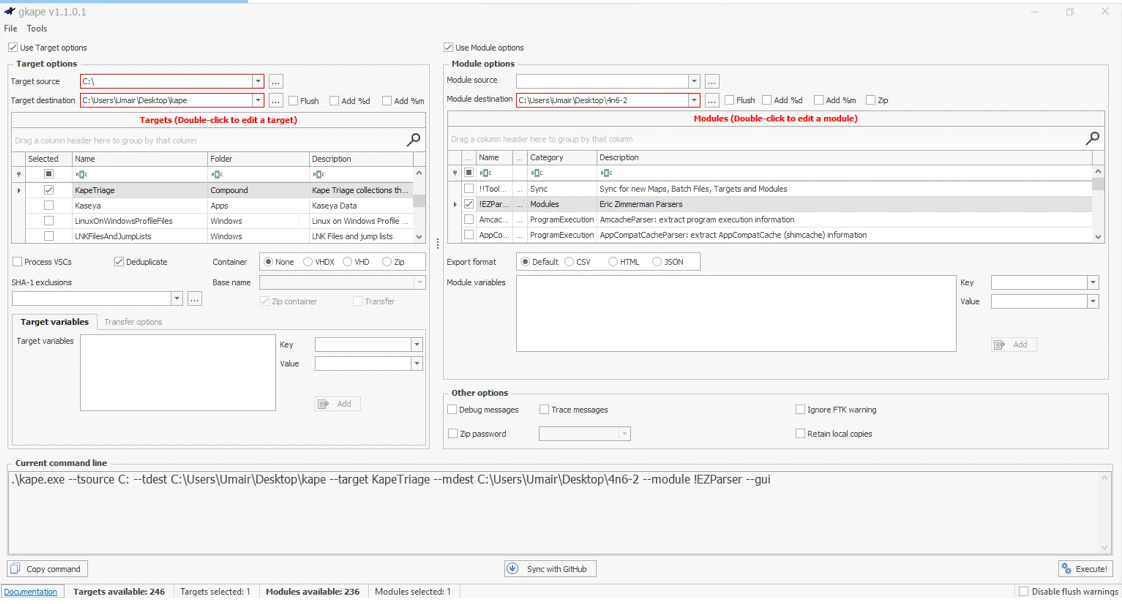
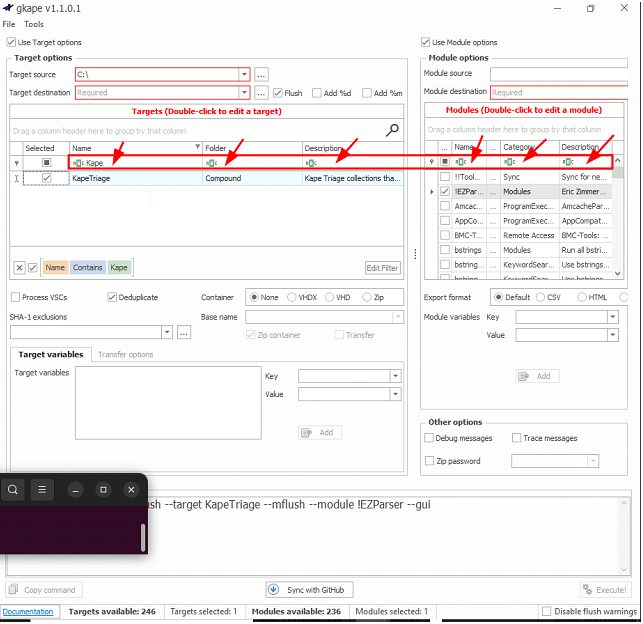
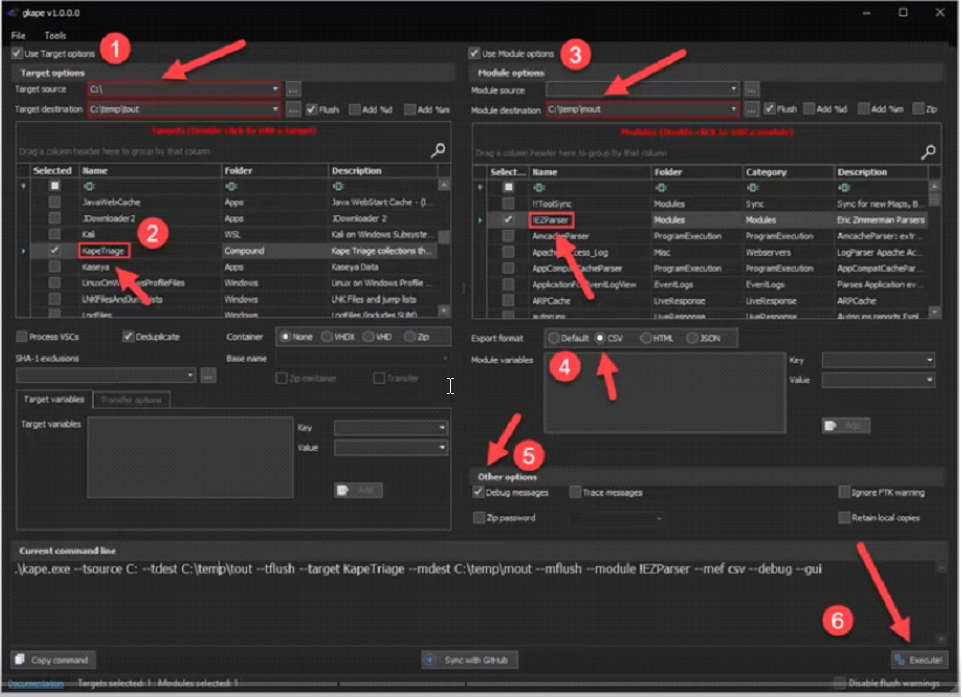
Below you will see what the configuration looks like when we have KAPE all set up for collecting Targets and processing them using Modules:
1
2
3
4
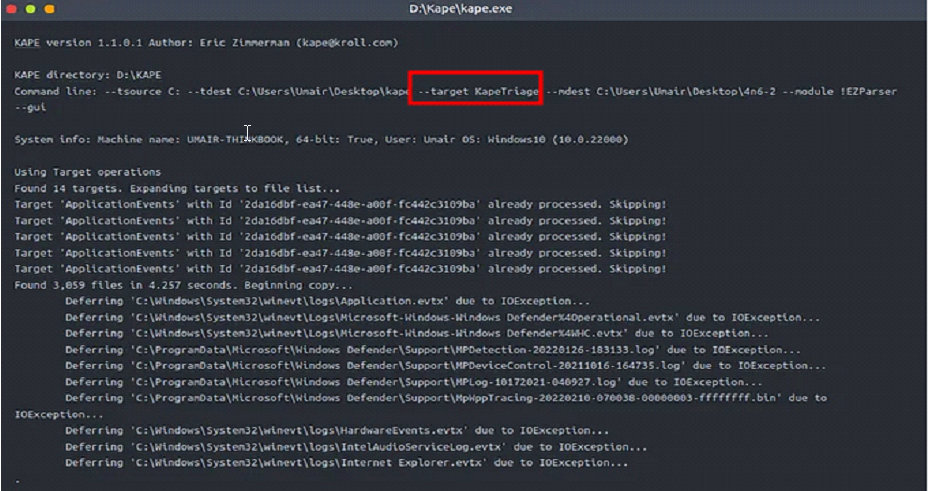
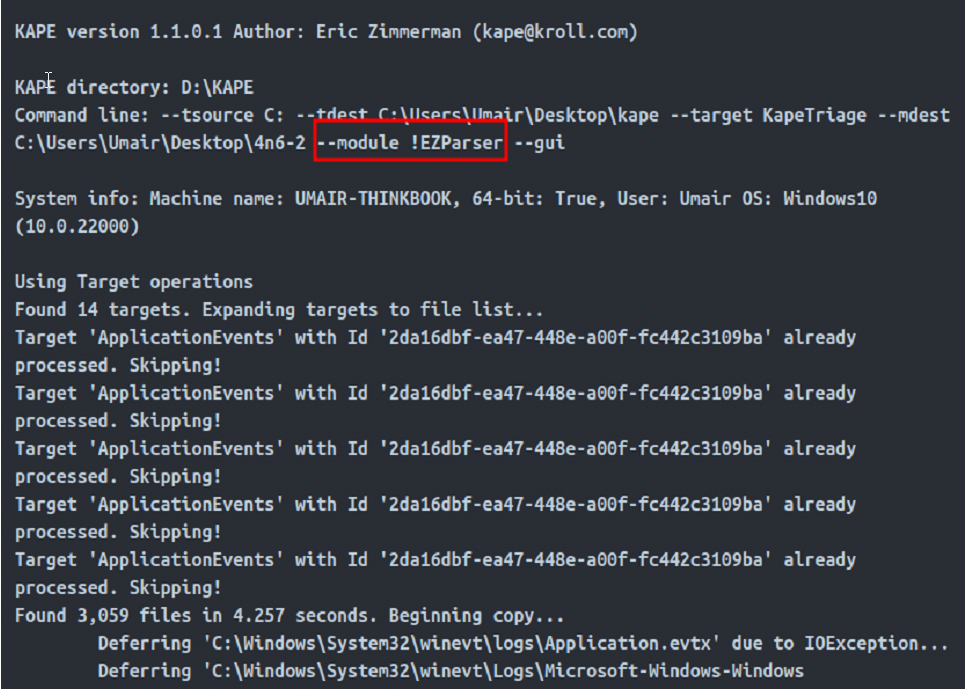
- We have selected the KapeTriage compound Target and !EZParser Compound Module.
- The command line below shows the CLI command that will be run. The Execute! button in the bottom right corner will execute the command.
- The Disable flush warnings checkbox underneath it will not warn us when we are using the Flush flags.
- Where is the base name?
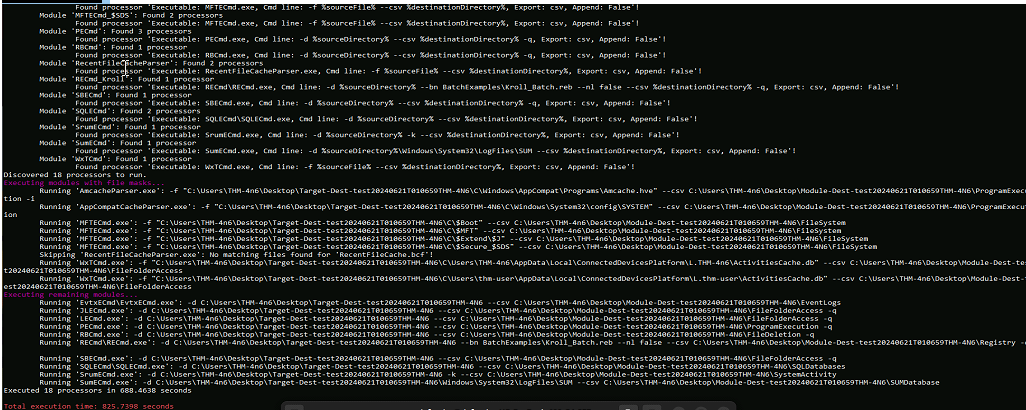
When we press Execute! We will see a command line window open and show us the logs as KAPE performs its tasks. It will take a few minutes to execute since it will be collecting all the data and then running the module processes on it. Once it completes, it will show us the total execution time, and we can press any key to terminate the command window.
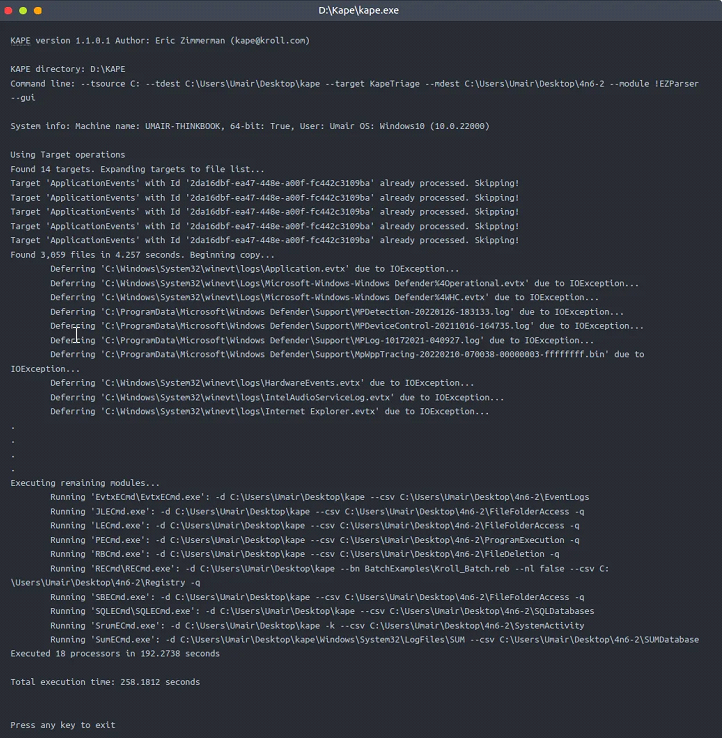
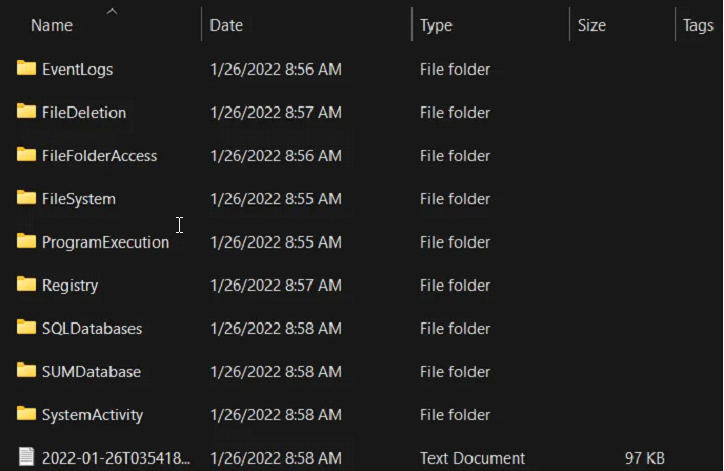
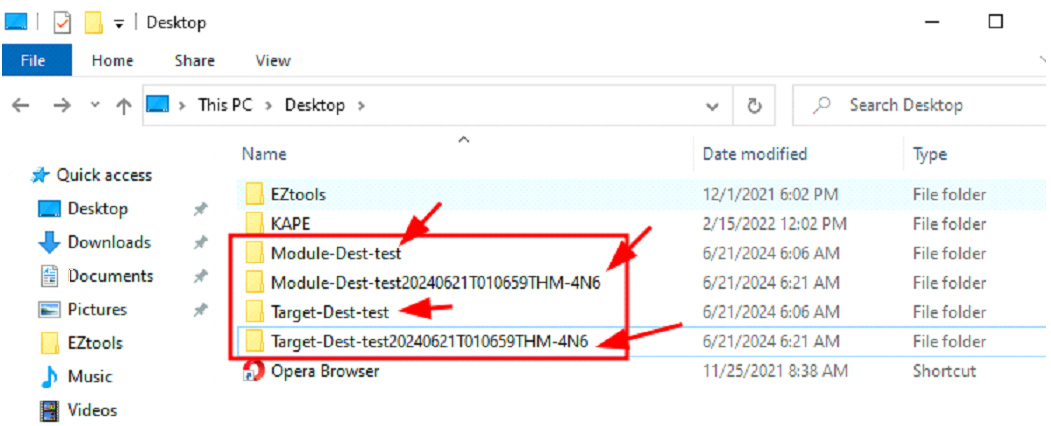
Notice that at the backend, KAPE is running the kape.exe in a command line. We can check out the files created by KAPE once it completes processing them. The below snapshot shows our Module destination. Notice how KAPE has processed the files according to different categories: (Module destination is the directory where Kape will save the extracted artifacts contained in directories based on category)
Let’s collect triage data using the KAPETriage package, process it using !EZParser module, and answer the questions below. Then we can proceed to learn about the KAPE CLI in the next task.
1
- Basically, KAPE is used for automated artefact extraction.
Questions:
- In the second to last screenshot above, what target have we selected for collection?
- In the second to last screenshot above, what module have we selected for processing?
- What option has to be checked to append date and time information to triage folder name?
1
-> %d
- What option needs to be checked to add machine information to the triage folder name?
1
-> %m
1
- Enclosed with the red triangle and pointed by the arrows are the search box
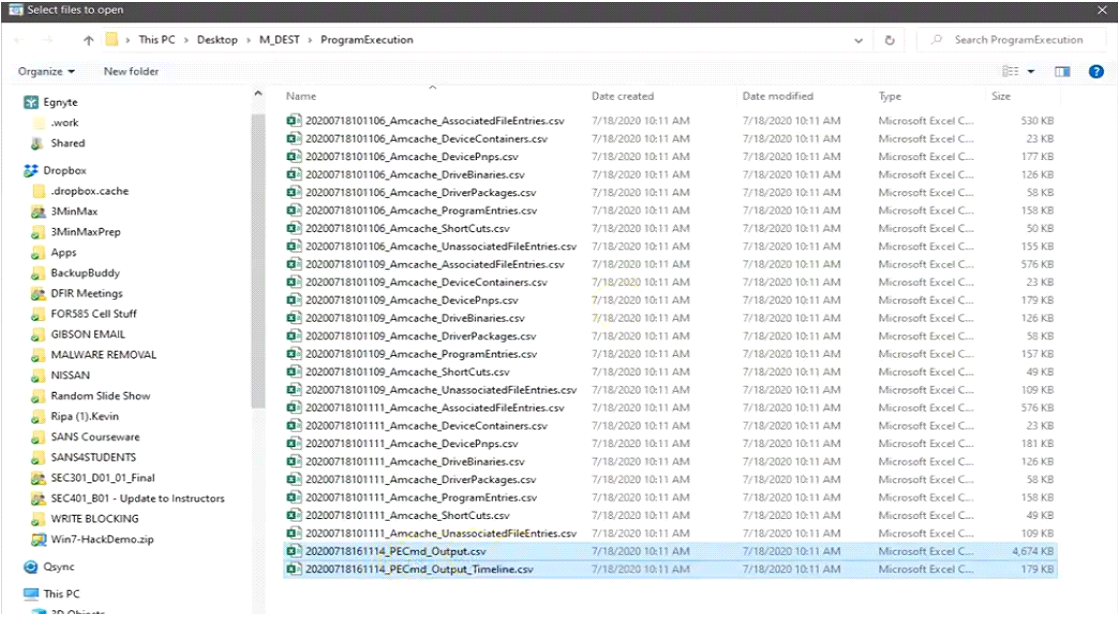
Output:
Output directories:
Artefacts collected from different modules:
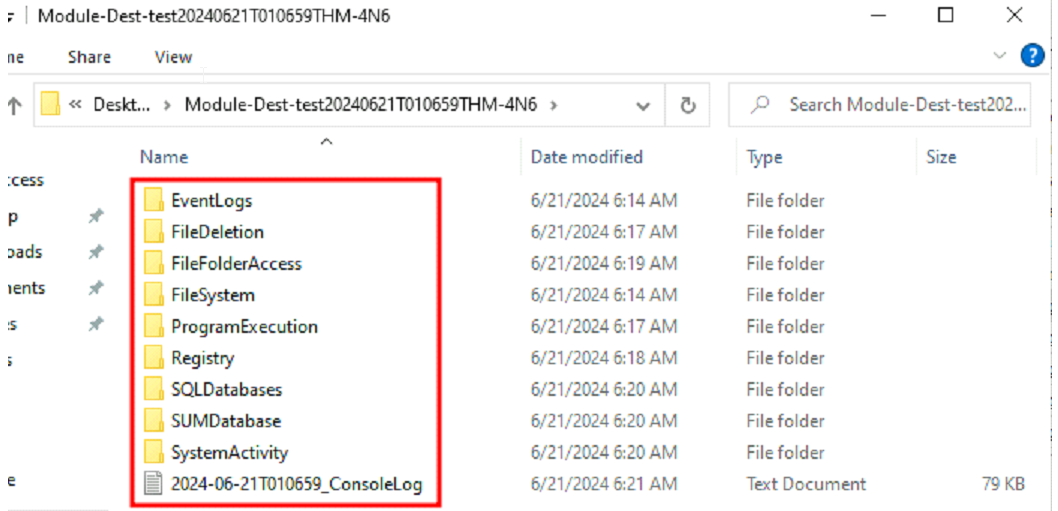
Image of the target source collected: (in this case, the system was live)
KAPE Workflow:
KAPE Setup
Accessing evidence:
1
2
1. Live systems
2. Mounting images using some opensource software (in this case, use whatever inside SIFT workstation)
Most common workflow:
1
2
3
- KapeTriage target
- !EZParser Module
- Can be customized (need more practice on this)
Understanding Targets and Modules
KAPE Targets:
1
2
3
4
5
6
7
- Collection of relevant files and directories
- Predefined and customizable
- Able to target files locked by the OS (e.g. Registry Hives)
- KAPE has functions to bypass interaction with ‘locked files’ despite the OS restrictions.
- Copied as-is during the time of data extraction.
- Preserves original timestamps and metadata
- Any tampering could possibly happens after the data extraction or during the attack.
Accessing Targets: (any target in Gkape.exe will not show up from the extracted artifacts)
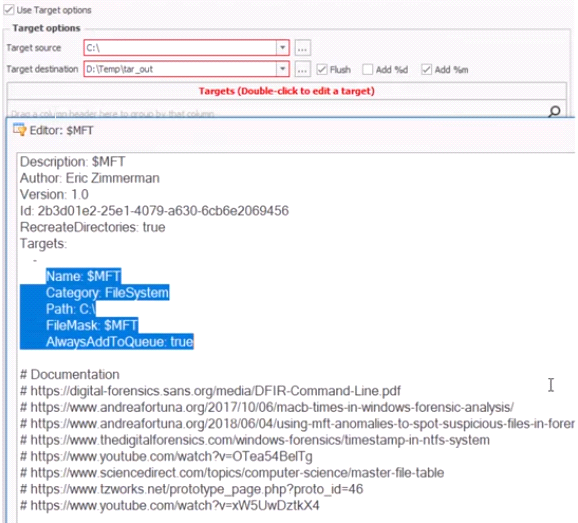
- Example metadata for the target
$MFT:
Checking all of the artifacts ‘KapeTriage’ will extract: (double-click)
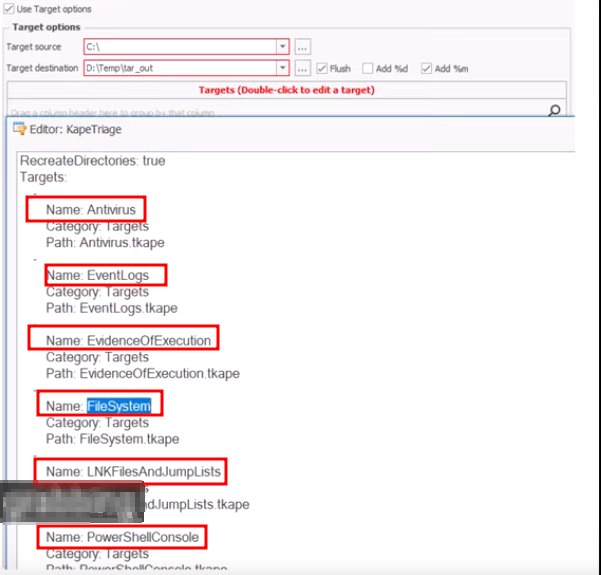
Filesystem target:
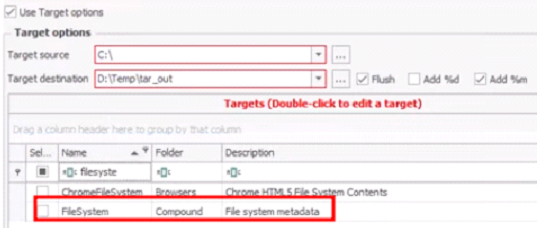
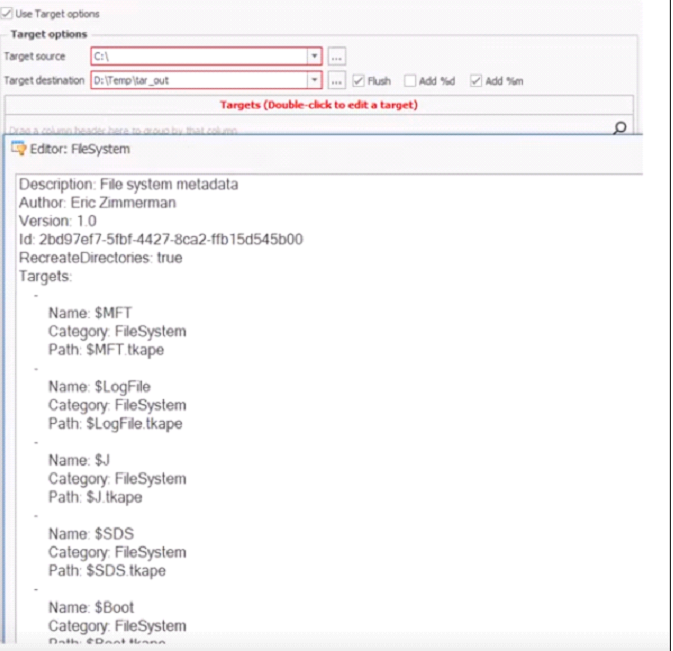
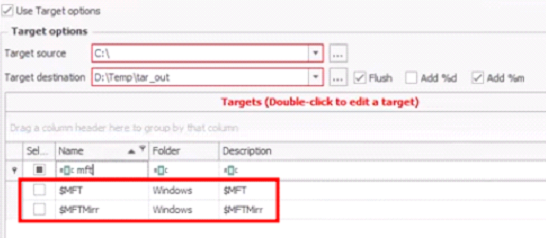
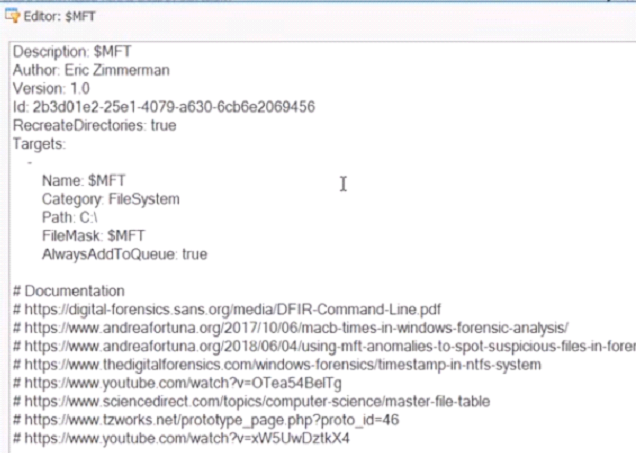
Checking the $MFT target:
Shows up the metadata for $MFT:
Drilling down on a particular target to extract forensic data from:
1
KapeTriage → FileSystem (within KapeTriage) → $MFT (within Filesystem)
1
- Use the search bar and double-click the entry.
KAPE Modules:
1
2
3
4
- Mechanism/function to run programs on collected files : how are those targeted files digested
- Predefined and customizable
- Ability to run programs on a system from a live response perspective
- Use automation of a command line tool such as JLECmd.exe using KapeModule. I guess if you want a very specific way to extract data, just feed it into the KAPE module like any other open-source tools by Eric Zimmerman then get the extracted data.
Different output formats:
Digging into !EZParser module (and its sub-modules):
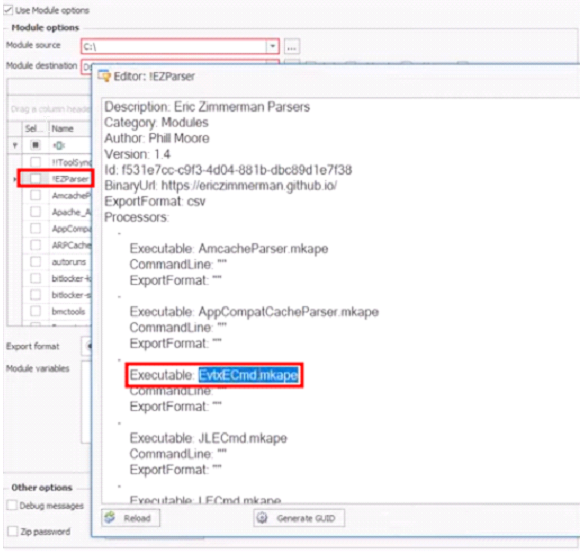
- Going in
EvtxECmd.mkape:
Note: the binary that represents these modules are contained in KAPE\Modules\bin
1
- Use case: adding a specific module(3rd party) on the KAPE module, you have to add the binary inside this directory along with the command to use given on the screenshot above.
Case Study 1: Intellectual Property Theft
Scenario: A senior engineer recently left the company and created his own business with a competing product offering.Task: You are requested to determine if the evidence exists that the engineer took data leading up to their departure.
Artifact of Interest:
1
2
3
- USB Devices
- File/Folder Access
- Program Execution
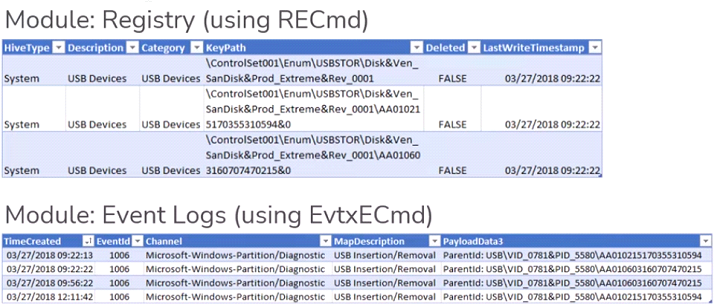
Registry and Event logs output:
File and Folder Access: (Shellbag Parser):
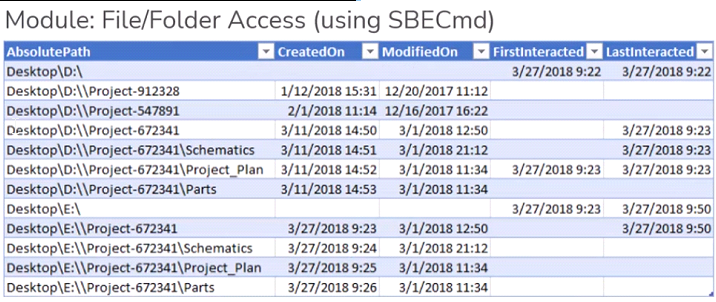
1
- Uses the last interaction with this files and directories by the user.
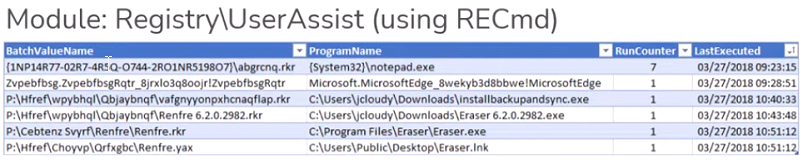
Program Execution: (extracting “User Assist” artifacts)
Updating KAPE
UPDATE KAPE BEFORE EACH USE
- Use the PowerShell script to ensure you’re using the most up-to-date version of KAPE, the tools it depends on, and other dependencies.
- Search up
EZToolsAncillaryUpdateon Github.

Advanced KAPE – Under the Hood
- Alternative to File Explorer that might help (Windows Directory Opus: allows you to see what’s underneath directories of interest)
1
- This is on a “flat-view” from the opus
NOTE: KAPE is only available on windows but there’s GRR Rapid Response for *nix OSes.
KAPE CLI
Though we used the GUI in the previous task, KAPE is a command-line tool. Therefore, it is pertinent to know how to use KAPE through the command line to make full use of it.
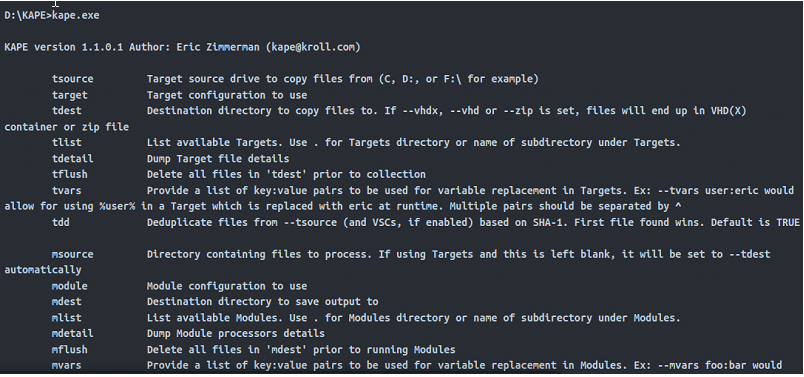
For a list of all the different switches that can be used with KAPE, open an elevated PowerShell (Run As Administrator), go to the path where the KAPE binary is located, and type kape.exe. You will see something like this as an output.
Switches meaning in the context of KAPE:
1
"These switches allow you to specify various options for collecting, processing, and exporting forensic artifacts".
...
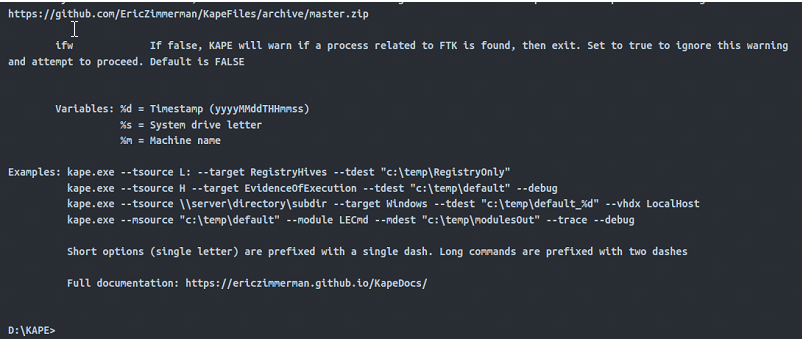
We can see from the above screenshot that while collecting Targets, the switches tsource, target and tdest are required. Similarly, when processing files using Modules, module and mdest are required switches. The other switches are optional as per the requirements of the collection.
0) With this information, let’s build a command to perform the same task we performed in the previous task. i.e., collect triage data using the KapeTriage Compound Target and process it using the !EZParser Compound Module. Since we are not using the GUI version, we will start with typing:
1
Command: kape.exe
1) To add a Target source, let’s append –tsource and that Target path:
1
Command: kape.exe --tsource C:
1
2
- The --target flag will be used for selecting the Target
- The --tdest flag for the Target destination
2) For the sake of simplicity, we will set the Target destination to a directory named target on the Desktop. KAPE will create a new directory if it doesn’t already exist. Our command line now looks like this:
1
Command: kape.exe --tsource C: --target KapeTriage --tdest C:\Users\thm-4n6\Desktop\target
1
- Running the above command will collect triage data defined in the KapeTriage Target and save it to the provided destination. However, it will not process it or perform any other activity on the data.
3) If we want to flush the Target destination, we can add --tflush to do that. For now, let’s move on to adding the Module options. If we were using a Module source, we would have used a --msource flag in a similar manner to the --tsource flag. But in this case, let’s use the Target destination as the Module source. By doing this, we will not need to add it explicitly, and we can move on to adding the Module destination using the –mdest flag:
1
Command: kape.exe --tsource C: --target KapeTriage --tdest C:\Users\thm-4n6\Desktop\Target --mdest C:\Users\thm-4n6\Desktop\module
1
- We have just used a directory named module for the Module destination.
4) To Process the Target destination using a Module, we need to provide the Module name using the --module flag. To process it using the !EZParser Module, we will append –module
- !EZParser, making our command look like this:
1
Command: kape.exe --tsource C: --target KapeTriage --tdest C:\Users\thm-4n6\Desktop\Target --mdest C:\Users\thm-4n6\Desktop\module --module !EZParser
Please note that we will need to run this command in an elevated shell (with Administrator privileges) for KAPE to collect the data. We can modify the command as per our needs and the switches provided by KAPE. When we run this command, we will see a similar window as in the previous task. You can check out the files collected by KAPE Targets and Modules once it completes.
Batch Mode:
KAPE can also be run in batch mode. What this means is that we can provide a list of commands for KAPE to run in a file named kape.cli.
Then we keep this file in the directory containing the KAPE binary. When kape.exe is executed as an administrator, it checks if there is kape.cli file present in the directory. If so, it executes the commands mentioned in the cli file. This mode can be used if you need someone to run KAPE for you, you will keep all the commands in a single line, and all you need is for the person to right-click and run kape.exe as administrator. For example, if we have to perform the same task as we did earlier in this task using batch mode, we will have to create a kape.cli file with the following content:
1
Command: --tsource C: --target KapeTriage --tdest C:\Users\thm-4n6\Desktop\Target --mdest C:\Users\thm-4n6\Desktop\module --module !EZParser
1
- When we run kape.exe, it will perform the same tasks as when we ran it through CLI above.
Questions:
- Run the command kape.exe in an elevated shell. Take a look at the different switches and variables. What variable adds the collection timestamp to the target destination?
1
-> %d
- What variable adds the machine information to the target destination?
1
-> %m
- Which switch can be used to show debug information during processing?
1
-> debug
- Which switch is used to list all targets available?
1
-> tlist
- Which flag, when used with batch mode, will delete the _kape.cli, targets and modules files after the execution is complete?
1
-> cu
Hands-on Challenge
So, now that we have learned how to use KAPE let’s put it into practice. For this task, you will need to utilize your skills gained in this room and the previous Windows Forensics 1 and Windows Forensics 2 rooms.
Scenario: Organization X has an Acceptable Use Policy for their Portable Devices, including Laptops. This policy forbids users from:
1
2
3
- Connecting removable or Network drives,
- Installing software from unknown locations, and
- Connecting to unknown networks.
It looks like one of the users has violated this policy. Can you help Organization X find out if the user violated the Acceptable Use Policy on their device? The user’s machine is attached to the room as a VM. Navigate to the KAPE directory placed on the Desktop in the attached VM. Run KAPE with your desired Target and Module options, and answer the following questions.
Hint: You can use EZviewer placed in the EZtools folder on Desktop to open CSV files.
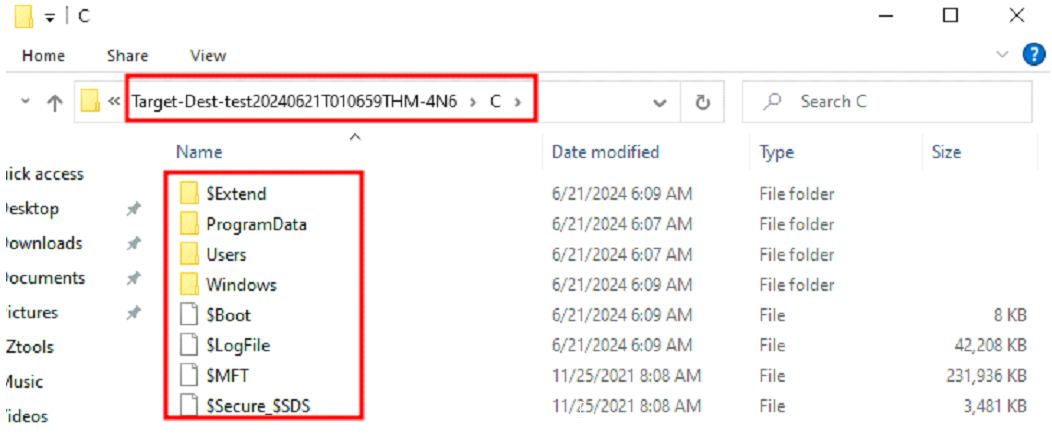
Getting the artifacts and image of the C:\ drive:

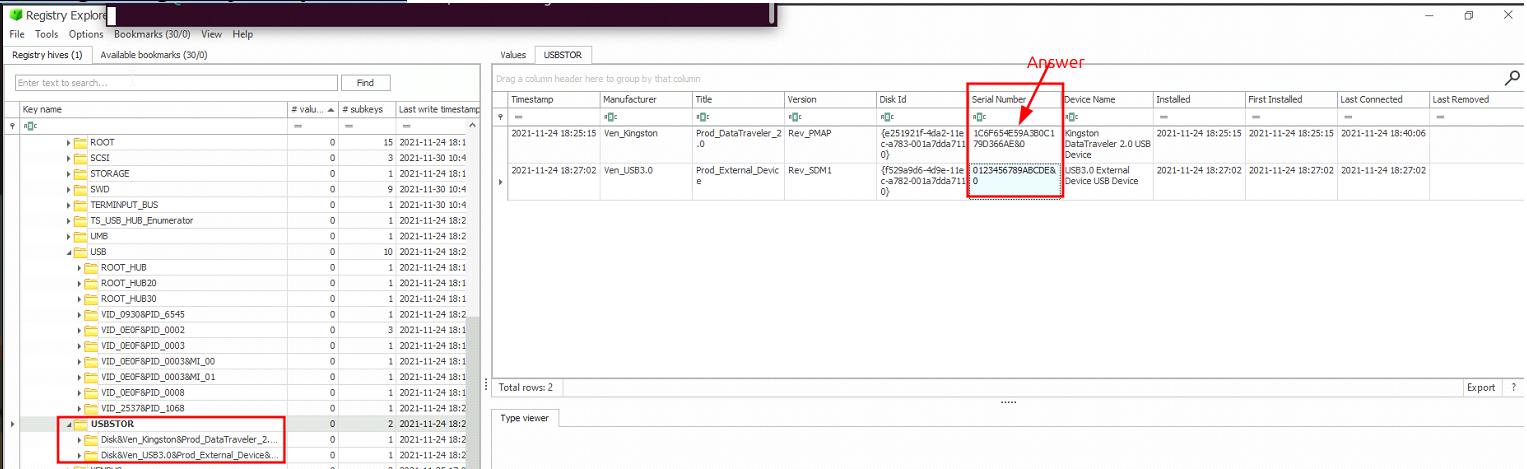
Two USB Mass Storage devices were attached to this Virtual Machine. One had a Serial Number 0123456789ABCDE. What is the Serial Number of the other USB Device?
(a)Connecting removable or Network drives:[/]1
C:\Windows\System32\SYSTEM (hive) → Registry → → External Devices / USB device forensics (Windows Forensics II notes)
More information about USB metadata:
1
2
3
- External Devices/USB device forensics
- SYSTEM\CurrentControlSet\Enum\USBSTOR
- SYSTEM\CurrentControlSet\Enum\USB
First and last connection times:
1
2
3
4
- SYSTEM\CurrentControlSet\Enum\USBSTOR\Ven_Prod_Version\USBSerial#\Properties\{83da6326-97a6-4088-9453-a19231573b29}\####
- 0064 : First Connection time
- 0066 : Last Connection time
- 0067 : Last removal time
USB device Volume Name:
SOFTWARE\Microsoft\Windows Portable Devices\Devices
Using Registry Explorer:
- Using KAPE – specifically,
RECmd.exemodule:

(b) Installing software from unknown locations: [/]
More information about Software metadata:
1
2
3
- Computer Name: SYSTEM\CurrentControlSet\Control\ComputerName\ComputerName
- Services:
- SYSTEM\CurrentControlSet\Services
List of opened files for each user:
1
- NTUSER.DAT\Software\Microsoft\Windows\CurrentVersion\Explorer\RecentDocs
Last used pdf(or any) file:
1
- NTUSER.DAT\Software\Microsoft\Windows\CurrentVersion\Explorer\RecentDocs\.pdf
Recently opened documents (NTUSER hive):
1
- NTUSER.DAT\Software\Microsoft\Office\VERSION
Recent Files:
1
- NTUSER.DAT\Software\Microsoft\Windows\CurrentVersion\Explorer\RecentDocs
Windows Explorer Address/Search Bars:
1
2
- NTUSER.DAT\Software\Microsoft\Windows\CurrentVersion\Explorer\TypedPaths
- NTUSER.DAT\Software\Microsoft\Windows\CurrentVersion\Explorer\WordWheelQuery
UserAssist:
1
- NTUSER.DAT\Software\Microsoft\Windows\Currentversion\Explorer\UserAssist\{GUID}\Count
ShimCache:
1
2
- SYSTEM\CurrentControlSet\Control\Session Manager\AppCompatCache
	-> Command: AppCompatCacheParser.exe --csv <path to save output> -f <path to SYSTEM hive for data parsing> -c <control set to parse>
AmCache:
1
2
3
4
5
- Hive location → C:\Windows\appcompat\Programs\Amcache.hve
- Registry location → Amcache.hve\Root\File\{Volume GUID}\
- BAM/DAM:
- SYSTEM\CurrentControlSet\Services\bam\UserSettings\{SID}
- SYSTEM\CurrentControlSet\Services\dam\UserSettings\{SID}
(c) Connecting to unknown networks: [/]
More information about network interfaces past interactions:
1
- Network Info: SYSTEM\CurrentControlSet\Services\Tcpip\Parameters\Interfaces
Past networks a machine was connected:
1
2
- SOFTWARE\Microsoft\Windows NT\CurrentVersion\NetworkList\Signatures\Unmanaged
- SOFTWARE\Microsoft\Windows NT\CurrentVersion\NetworkList\Signatures\Managed
Tools to use:
1
2
3
- Registry Explorer (manual)
- KAPE (automated)
- Timeline Explorer
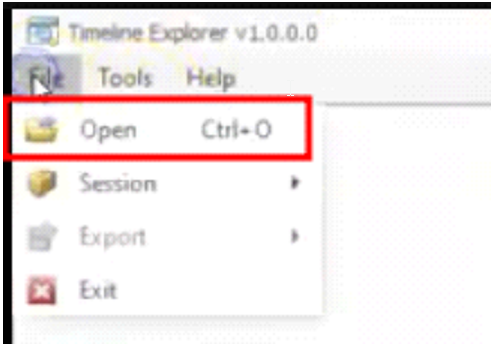
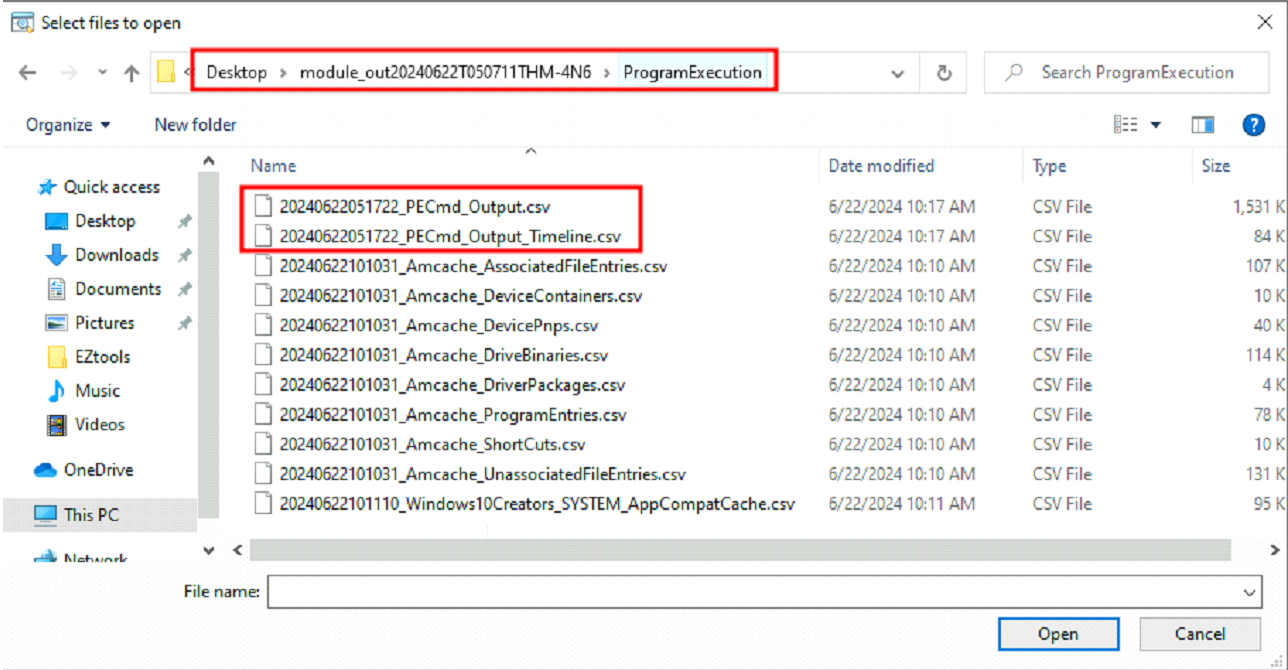
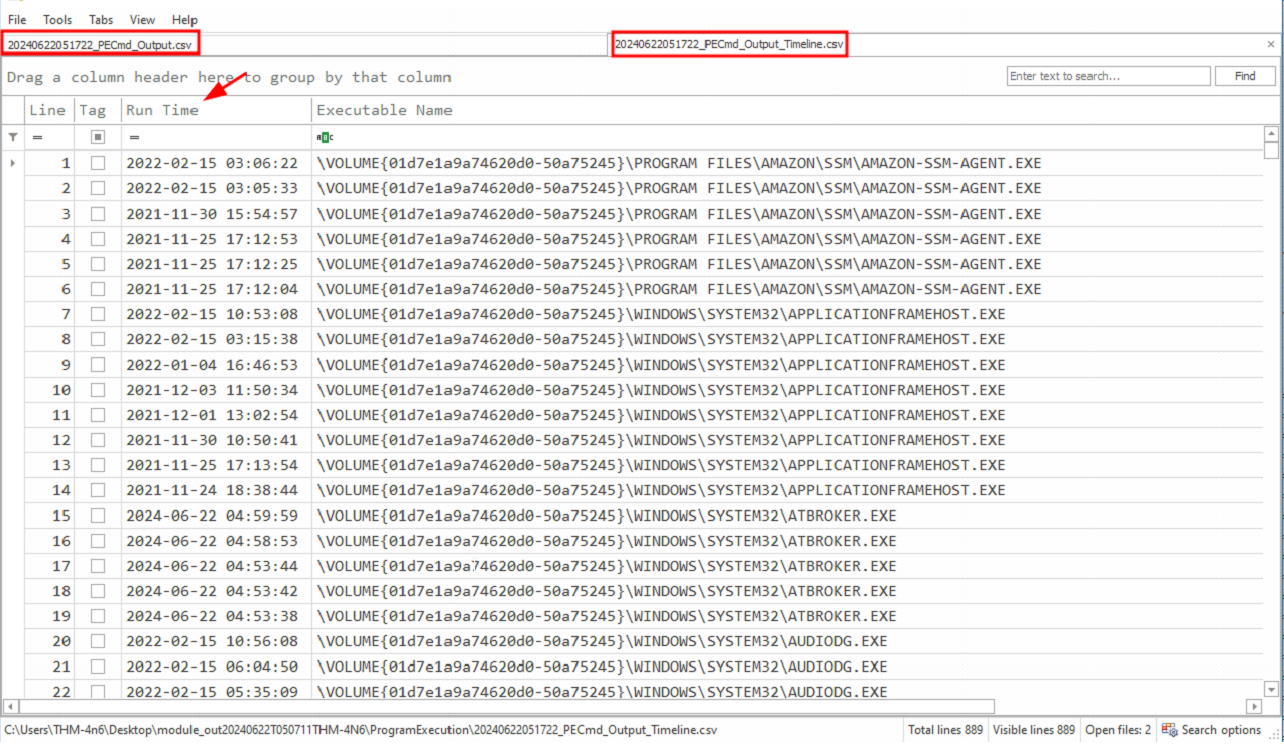
Quick detour to Timeline Explorer: After extracting forensics data using KAPE modules, you can import these “.csv” (or whatever data format you extracted it with) on Timeline Explorer and see the creation of each of these artifacts sequentially:
1
- For this example, the mentor inputs the “Evidence of Execution” through PECmd.exe module.
From here, you can then sort it by “Run Time”:
Answer: 1C6F654E59A3B0C179D366AE&0
7zip, Google Chrome and Mozilla Firefox were installed from a Network drive location on the Virtual Machine. What was the drive letter and path of the directory from where these software were installed?
Found from UserAssist artifacts (modules): (Recap → “Windows keeps track of applications launched by the user using Windows Explorer for statistical purposes in the User Assist registry keys. These keys contain information about the programs launched, the time of their launch, and the number of times they were executed.”)
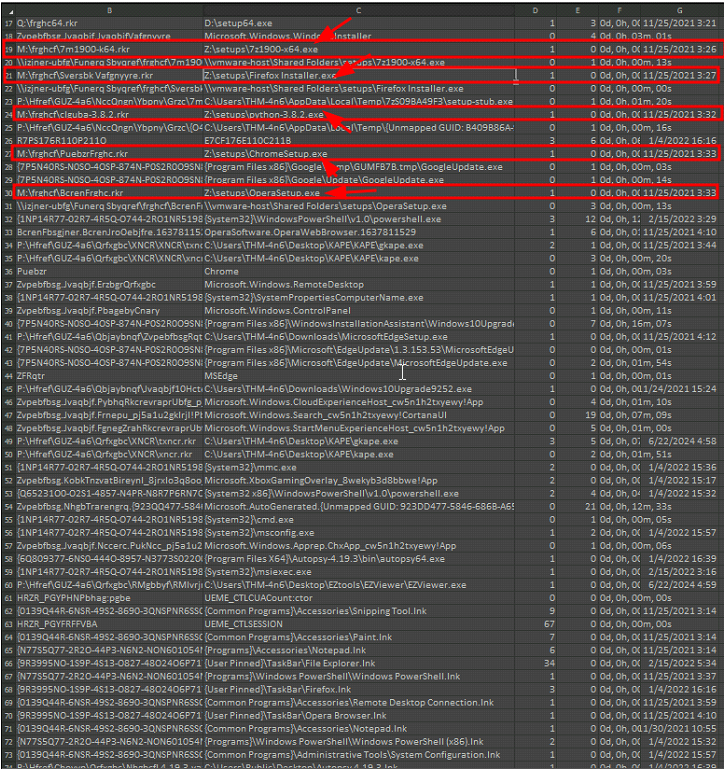
1
2
- Though it gives us an idea of the drive where the installer came from, are there other information from artifact that was extracted that could give us more context?
- Given the presumption that we don’t have that much knowledge about the scenario such as these programs was downloaded from a Network Drive, how can we create meaning on a filename such as Z:\setups\ChromeSetup.exe? If there wasn’t an information that this is a network drive, this could be presumed to be the user’s computer hard drive.
They are also visible from “Recent Apps”:
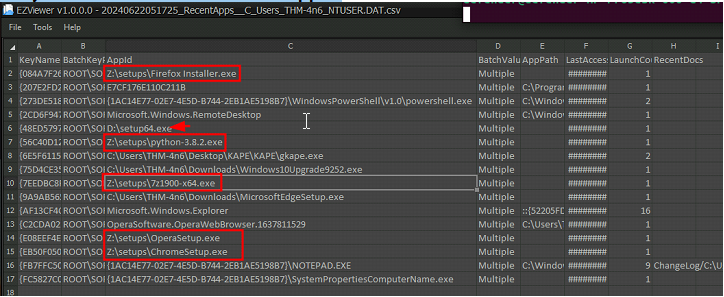
1
- Whats the D:\ drive though?
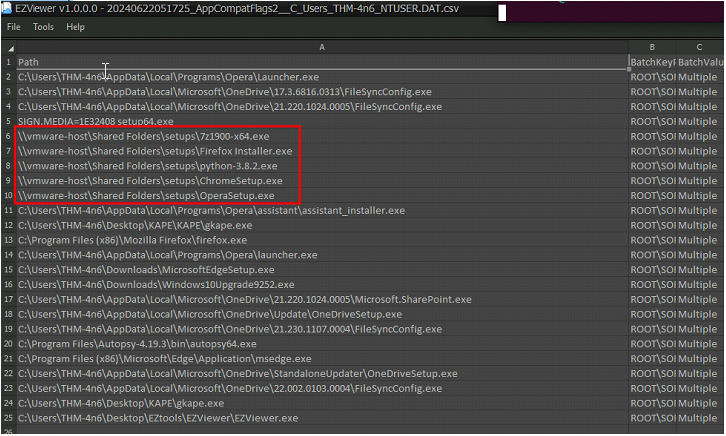
From “AppCompatFlags2”, it shows that the machine to install these is a VM and used a Shared Folder acting as a Network drive: (Z:\ == \\vmware-host\Shared Folders)
Another one from RECmd output:
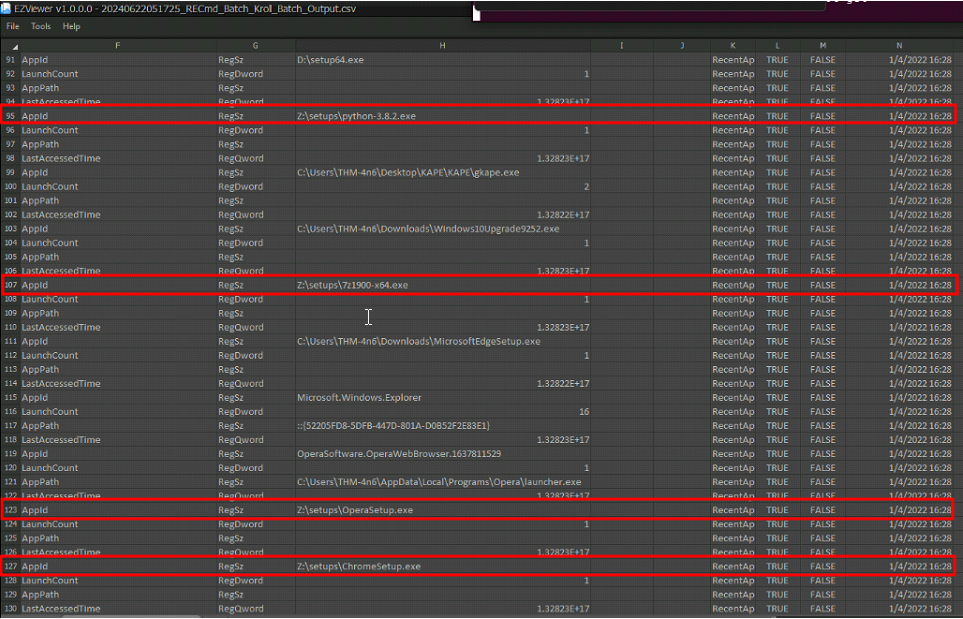
1
- Found from the full output of RECmd.exe module
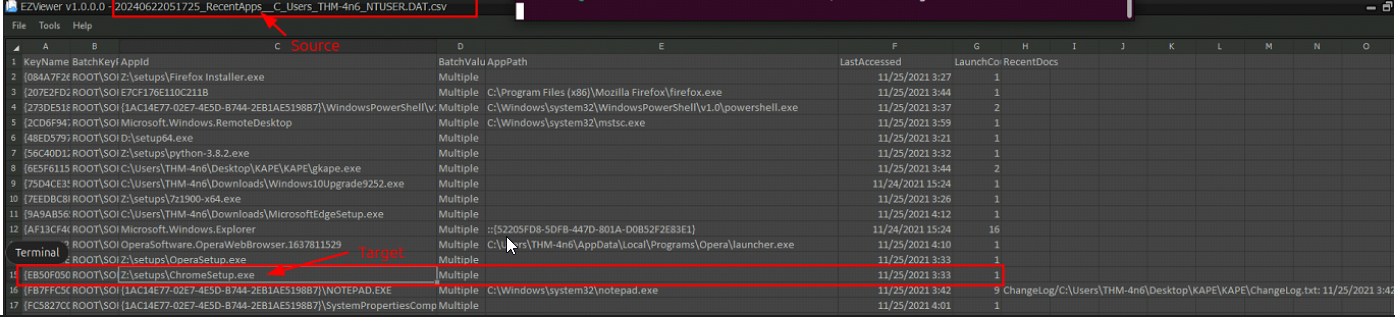
What is the execution date and time of CHROMESETUP.EXE in MM/DD/YYYY HH:MM?
What search query was run on the system?
An object that could help here is:
-> Windows Explorer Address/Search Bars
1
2
- NTUSER.DAT\Software\Microsoft\Windows\CurrentVersion\Explorer\TypedPaths
- NTUSER.DAT\Software\Microsoft\Windows\CurrentVersion\Explorer\WordWheelQuery
Using Registry Explorer:
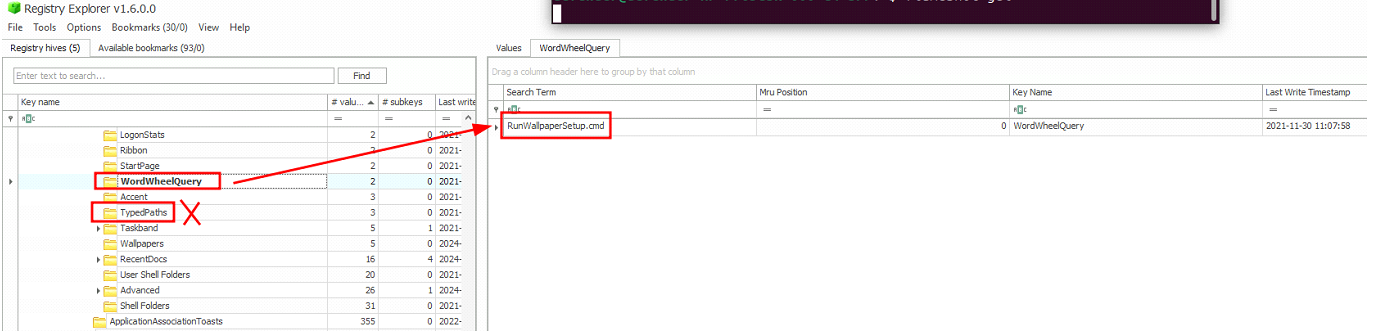
From KAPE:

1
- Don’t know why I can’t find TypedPaths in there...
- When was the network named Network 3 First connected to?

Answer: 11/30/2021 15:44
- KAPE was copied from a removable drive. Can you find out what was the drive letter of the drive where KAPE was copied from? Answer:
E:\→ How would I know though if the action related to this is ‘copy’?

1
- From ‘AutomaticDestinations’ category, we see that the drive E:\ is a not exactly the main drive in the user’s machine along with Z:\ drive.